

 ChatGPT
 Perplexity
 Gemini
 Claude
 Grok
Grok
Being a video editor or creator, you have always aspired to create stunning and visually appealing videos for your audience. But while you go to resize or reframe your video for different channels, sometimes you break the engagement or focus point from the video. Don't worry, it happens to all editors while doing it manually. Here, the Auto Reframe Premiere Pro feature helps creators bring an appealing touch to their videos.

This feature automatically detects the focus point and reframes it. Somehow, Premier Pro is for professional editors. It takes a lot of practice to understand the complex interface and advanced features. Beginners or casual editors should start with user-friendly video editors like Wondershare Filmora. Anyhow, here you will get to learn about how to use auto reframe in Premiere Pro and also know about the good alternative.
In this article
Part 1. What is Auto Reframe in Premiere Pro?
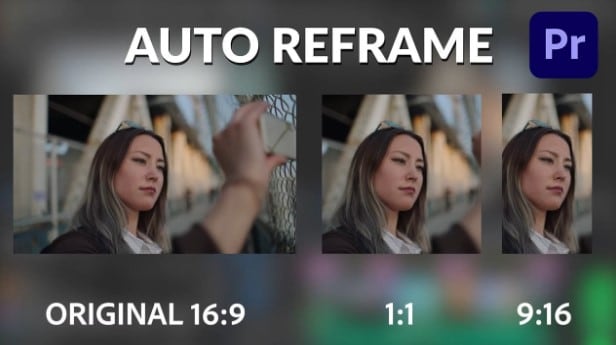
The Premiere Pro is an advanced video editing tool that is mostly used by professionals. However, the "Auto Reframe" feature of Premiere Pro is very useful for creators. It allows you to quickly reframe the video in various ratios while maintaining an accurate focal point. Moreover, it is an AI-powered feature that automatically converts existing sequences or video clips to different aspect ratios.
It also provides many powerful features, such as transitions, to create a smooth video at any time.
The "Auto Reframe" feature is extremely useful for creating visually appealing videos for social media platforms like Instagram, Facebook, and TikTok. Premiere Pro auto reframe allows users to reframe video clips either individually or in sequence. Take a look at how auto-reframing benefits creators.

Benefits of Using Auto Reframe in Video Editing
- Save Time & Efforts
Editors spend a significant amount of time and effort manually reframing videos. With Auto Reframe, editors can quickly automate the process of converting videos into aspect ratios.
- Speed Up the Process
The user doesn't need to struggle with manual adjustment to catch the focal point of the video. The elimination of the need for manual adjustment improves workflow and streamlines the editor task.
- Improve Visual Flow
While using the auto reframe feature, the editor gets more improved visual flow. It minimizes the faults and errors that could happen during manual adjustments.

Wondershare Filmora - Auto Resize Video
Part 2. How to Use Auto Reframe in Premiere Pro?
Now, let's help you learn how to use auto reframe in Premiere Pro. Before diving into auto-reframing, it's important to check whether your system meets the Adobe Premiere system requirements for optimal performance. After you have finished editing your video project, reframe it automatically to fit different aspect ratios. In Premiere Pro, you can use auto reframe to create square, vertical, and cinematic frames without sacrificing video quality. Here, we have discussed the two methods for incorporating the auto-reframe effect into the clip and the entire sequence.
Method 1. How to Add the Auto Reframe Effect to a Clip
Step 1: Upload the video into Premiere Pro. Now go to video effect >> Transform >> Auto reframe feature, and drag it into the video.
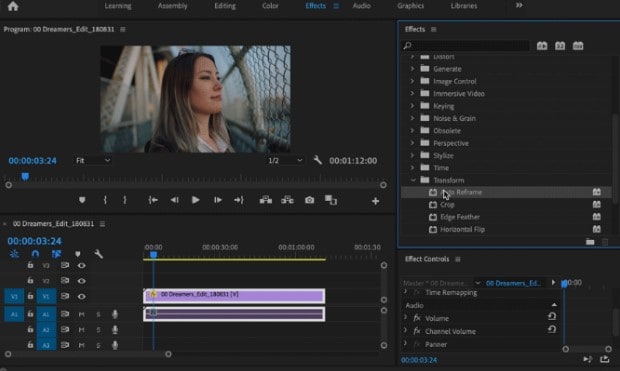
Step 2: To fine-tune the auto-reframe effect, select the motion tracking option from the effect controls.
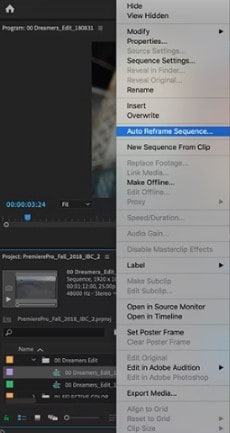
Method 2. Auto Reframe an Entire Sequence
Now if you want to add auto reframe in the entire sequence, then follow the below steps:
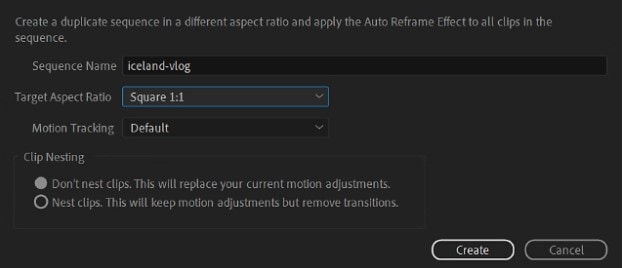
Step 1: Go to the Sequence >> Auto Reframe Sequence.
Step 2: A new dialogue box will appear. Choose the target aspect ratio accordingly. Similarly, you can fine-tune effects on auto-reframe videos by selecting the desired effects.
As you can see, using Premier Pro's auto-reframe feature is not difficult if you are a little techy. However, for super-quality results, you must be aware of tips or best practices to use auto-reframe. Let's uncover those as well!
Related article: Learn to apply morphing transitions in Premiere Pro.
Part 3. Best Alternative to Premiere Pro Using Auto Reframe - Wondershare Filmora
However, Premiere Pro offers the most advanced AI editing features to users, but due to the complex interface and expensive cost, beginners avoid using it.
If you also find it expensive and need alternatives, then try Wondershare Filmora! It is a reliable and complete video editor for both professional and personal use. It is powered by advanced AI features that smooth every task of the editor. The best part about Filmora is that it preserves video quality and makes it easy to reframe videos for different channels.
Now, let's see how simple it is to perform an auto-reframe in Filmora.
Step 1: First, Download and install Wondershare Filmora.

 secure download

Step 2: Now launch Wondershare Filmora on your system. Then click on "New Project."

Step 3: Next, click "Import" to upload the video.

Step 4: Now do right-click on the video, and you will get the Auto Reframe feature.

secure download
Step 5: After clicking the Auto Reframe feature, you will be redirected to a new window. Here you need to select the Aspect ratio and then click on "Analyze."

Step 6: Now, the video is automatically reframed using autofocus points. Click on "Export" to get the reframed video on your PC.

That's It! Look how easy it is to reframe the video in Wondershare Filmora.
The Wondershare Filmora offers a variety of features and an easy-to-use interface that allows beginners to get started with video editing. As well, the advanced AI features and effects also help to enhance the editor's creativity. So if you are looking for a user-friendly and rich feature video editor at an affordable price, Wondersahre Filmora is one of the best options for you.
secure download
Part 4. Tips and Techniques for Effective Auto Reframing
Auto reframing is very useful, particularly in today's social media, where you want to fit different scenes into different formats with different aspect ratios. Let us look for some professional tips and techniques to help you achieve the best results.

- Select the Right Frame Size
Each of the social networks has its preferred aspect ratio. Such a 16:9 ratio is standard on YouTube, and 9:16 is famous in Instagram stories. So before engaging in auto reframing, decide which sectors of social media you want to consider so that you may align the framing to these sectors.
- Select the Right Focal Point
The auto-reframing application typically detects the main object and frames this object. Thus, it is always advisable to set the focal manually or anyhow if required while using this gadget. With this, if it's not where the algorithm guides you, you can guarantee that the most crucial parts of your video do not get lost.
- Focus on Movements
Generally, auto-reframing works best when the camera movement is slow and predictable. The software may be inconvenienced if the subject's movement is fast or unpredictable in some way. In such situations, you may want to place a limit on the speed at which the footage is run or the cut points so that the audience can properly follow the events.
- Preview Reframed Video
It is always important to preview the reframed videos before you export them. Look for awkward crops, a lack of focal points, or any shifts within the frames. This allows you to make some changes in case there are, which should have been done earlier on.
- Fine-tune with Other Tools
Overall, do not rely alone on auto reframing. Further refine this by using the cropping, pan, and zoom functions of the camera. In this way, you stay in command of the aesthetic presentation of your video at all times.
By applying these tips, it is possible to achieve the best outcomes of auto reframing with no compromise to the results.
🤩 Post You Might Be Interested In:
Conclusion
At last, you surely understood how beneficial the auto reframe feature is in video editing. No doubt, the Premiere Pro is a fantastic video editor, but due to its high price and a little complex interface, it is not a good option for beginners. With that said, Wondershare Filmora can be the best fit. It is also an AI-powered video editor that simplifies all editing tasks and makes your auto reframing process automatic. So, give Wondershare Filmora a try and see how convenient it is for you.
secure download
