- Premiere Tutorial
How to Create Freeze Frames in Adobe Premiere Pro: 4 Pro Methods

Nov 06, 2025• Proven solutions
 TL;DR:
You can generate static freeze frames in Adobe Premiere Pro using precise methods like Frame Hold and Time Remapping, or opt for Wondershare Filmora if you require a simpler, cross-platform alternative.
● The "Insert Frame Hold Segment" option automatically generates an adjustable 2-second freeze in the middle of a clip, whereas "Add Frame Hold" freezes all remaining footage from the playhead onward, making it ideal for ending sequences.
● When utilizing the Export Frame shortcut (Shift+E) to extract a still image, you must explicitly check the "Import to project" box so the resulting JPEG or PNG file is directly added to your project bin for timeline placement.
● Wondershare Filmora is best suited for users who find Premiere Pro too complicated, allowing editors to apply freeze frames via a basic right-click "Speed" menu while maintaining a synchronized workflow across desktop and mobile devices.
Ask AI for a summary
 ChatGPT
 Perplexity
 Gemini
 Claude
 Grok
Grok
When we talk about Freeze Frame effect then it means generating a static shot somewhere in between a floating video clip. This is a unique technique in the world of videography that simply causes repetition of single frame on screen for desired duration. Although, it is possible to capture still images using advanced filming devices or camcorders but if you don't have such tools then it is good to simply use the Freeze Frame effect on your desired scene. With this effect you can easily grab few stills from a large video and develop a new interesting story. Adobe Premiere Pro provides several ways to freeze frame in video. The article below contains details about most 4 useful methods for freezing a frame in video with Adobe Premiere Pro.
- Method 1: Insert Frame Hold Segment in Clip
- Method 2: Freeze frame in video with Add Frame Hold options
- Method 3: Export Still Frame and Import
- Method 4: Freeze Frames with Time Remapping feature
- FAQs on Frame Hold not working in Premiere Pro
How to Create Freeze Frames in Premiere Pro
There are so many techniques to execute Freeze Frame effect in Adobe Premiere Pro platform. Below we are going to discuss three most commonly used and user friendly methods to perform freeze framing:
Method 1: Insert Frame Hold Segment in Clip
- First of all you have to position your frame head at desired frame that you wish to capture from whole video.
- Now right click on your selected clip and from drop down menu select “Insert Frame Hold Segment” option.

This method will clip your frame right from the position where you have kept playhead and it will automatically insert a two second freeze frame at that location. In case if you want to insert a freeze frame having duration more than 2 seconds then you can use drag the edge of the freeze frame to adjust duration of freeze frame as per need.

Method 2: Freeze frame in video with Add Frame Hold options
Further, if you need the rest of video clip to act like a freeze frame or do not want to insert segment into it then it is good to proceed with “Add Frame Hold” option. Do as follows:
- First of all you need to position the playhead at desired location in the clip so that stop motion can be added at this particular location.
- Now right click on this clip and from drop down menu select “Add frame hold” option.
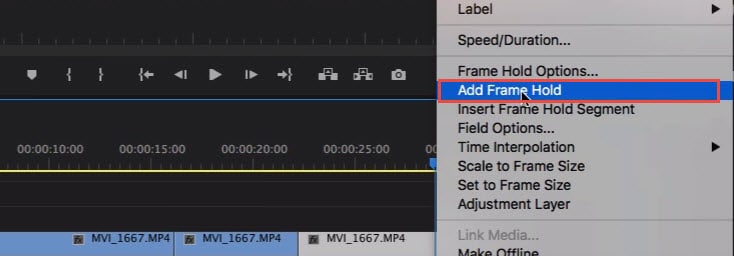
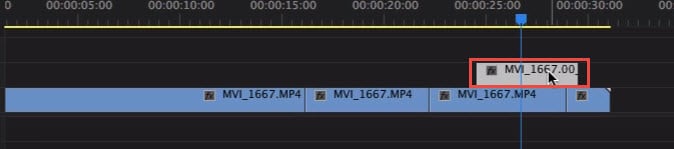
- It will immediately cut that particular point from whole clip and freeze frame effect will get added to the rest of the video clip. Such types of effects are useful at ending position of a video clip in case that you don’t want to insert any segment.
Method 3: Export Still Frame and Import
Users can create a freeze frame or still image from movie clip by simply using the Export Frame button. This button can be found on Source Monitor and with the help of Program Monitor you can immediately export your desired frame out of video even without using Adobe Media Encoder. Below are the steps of exporting still frames:

- First of all you have to position your playhead at particular frame location that you wish to export out of the video frame sequence.
- Now hit the Export frame button, or you can use the shortcut Shift+E. It will immediately open an export frame dialogue box on screen where you can change name of the still frame and save it in JPEG or PNG format. This image will also contain the time code of original video.
- Premiere Pro develops a still image and saves it on your computer. You can also change the save path by clicking the Browse to select. Remember to select Import to project option so the still image will be added to project bin directly. Now, add this still frame to the target position in the timeline to create freeze frame effect.
Note: These exported still images will appear with Lavender shade on timeline so that users can easily distinguish them from original clip.
Method 4: Freeze Frames with Time Remapping feature
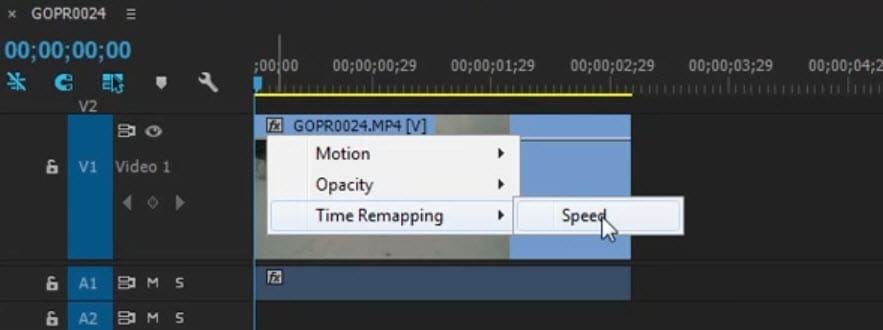
With time remapping tool you can freeze a particular section of frame by changing the selected clip speed as:
- Go to timeline and locate your video clip that you want to freeze. Now move to clip effect menu and select Remapping option, finally hit speed option from available drop down menu.
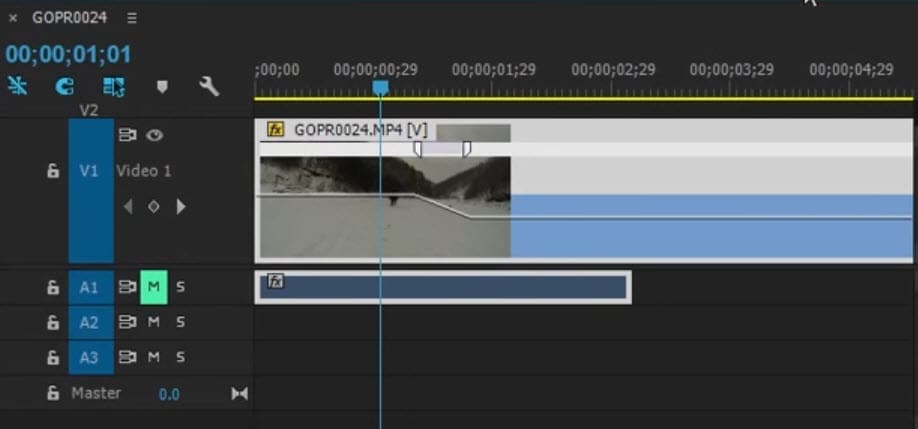
- A rubber band will appear in yellow colour that you need to command click in order to generate speed keyframe.
- Keep on holding this Option-Command and then try to drag the outer keyframe up to the duration that you wish to frame.
- The lower rectangular section appearing on your screen reflects the freeze frame.
You may also like:How to Change Frame Size in Premiere Pro >>
Alternative Tool: Freeze Frames With Wondershare Filmora
While following tutorials for Premiere Pro can be a great way to learn video editing, the tool is primarily made for professional-level editing. If you find it complicated to use, it may be time to try a more user-friendly alternative without sacrificing powerful features: Wondershare Filmora. Of course, this tool also has an easy-to-use freeze frame function, similar to Premiere Pro.

 secure download

However, Filmora gives you some features that can be more beneficial in other areas:
- AI Tools. Enjoy how Filmora improves your editing experience with AI-powered tools like text-to-video, objects remover, or portrait cutout that can make your freeze frames much more compelling.
- Auto Reframe. Filmora also offers a way to easily transfer between different aspect ratios depending on which platform your videos will be uploaded to.
- Creative Assets. Enjoy over 1 million assets, including filters, stickers, transitions, music, sound effects, etc. You can even find 10,000+ stock templates to use.
- Cross-Platform. Enjoy seamless workflow from a Windows or Mac computer and mobile devices on Android or iOS.
As you can see, Filmora is more than just freezing frames or making simple edits. It can make it easier for you to perform many video editing tasks with its powerful toolkit.
How To Freeze Frames With Filmora Desktop
Check out the steps below on freezing frames with Filmora Desktop to see how powerful Wondershare Filmora can be:
Step 1: Download, install, and launch Wondershare Filmora on your Windows or Mac desktop. Then, under Create Project, make a new video project.
secure download

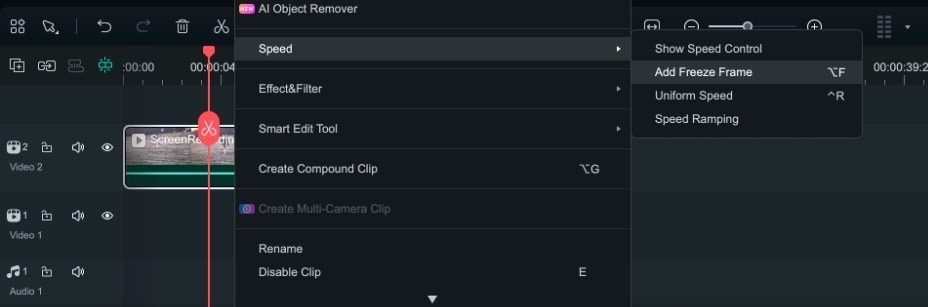
Step 2: Import your video and drag it to the timeline. Then, right-click on the video from the timeline and go to Speed > Add Freeze Frame.
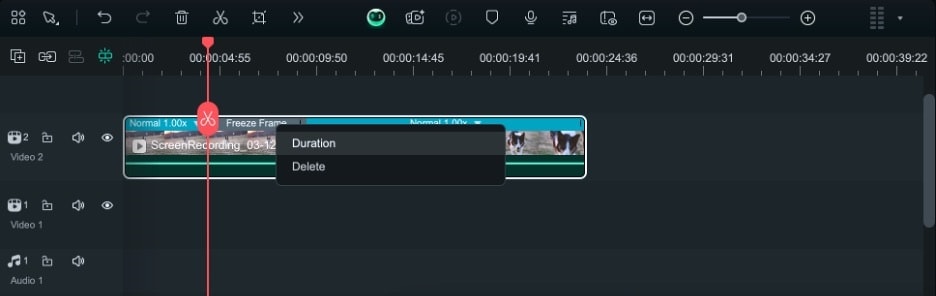
Step 3: Click Freeze Frame > Duration from the top of the video and adjust the length accordingly.
How To Freeze Frames With Filmora Mobile
There’s also an easy way to create freeze frames from Filmora’s mobile version. As mentioned earlier, Filmora is a cross-platform tool that allows you to start your project on one device and pick it up from another. This is very convenient, especially for video editors who are always on the go.
Here are the steps you should follow when looking to freeze frames in Filmora mobile:
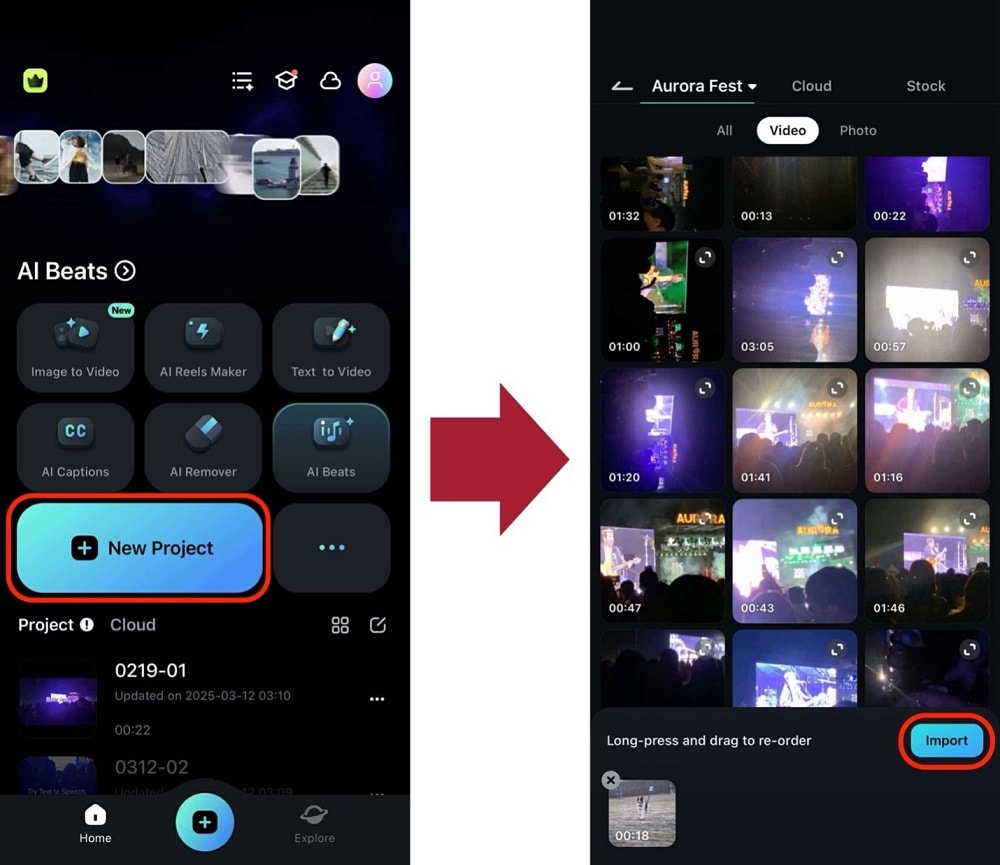
Step 1: Go to New Project and Import the same video.
secure download
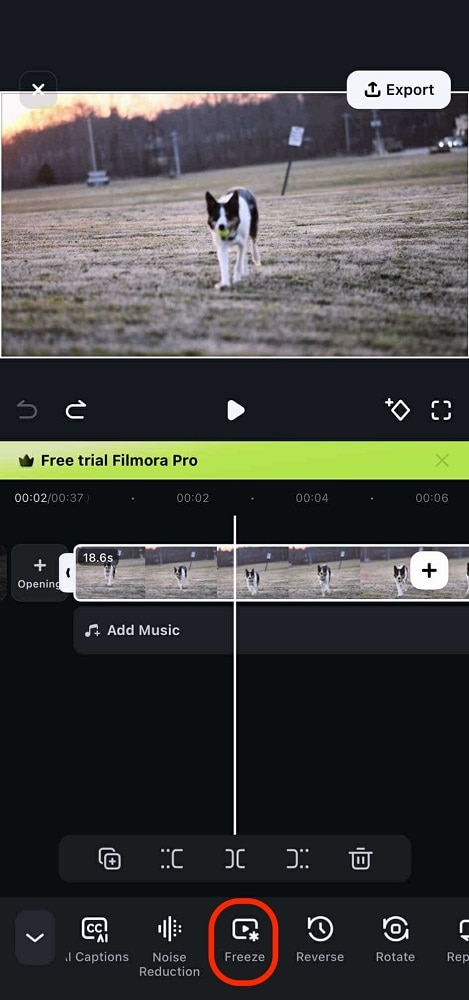
Step 2: Select the frame you want to freeze with the playhead. Once satisfied, tap Freeze from the bottom toolbar.
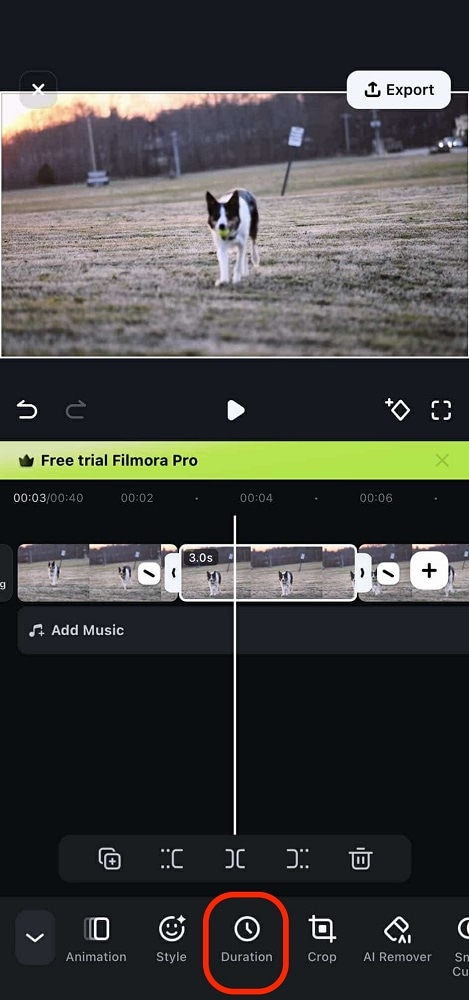
Step 3: Adjust the duration by selecting the freeze frame from the timeline and going to Duration from the bottom toolbar.
With that, you should now be able to use the freeze frame functions within the tool easily. It’s much easier to create these effects with Wondershare Filmora, so try it out as an alternative to Premiere Pro!
Filmora vs. Premiere Pro: Freeze Frame Features Comparison
| Feature | Filmora | Premiere Pro |
| Ease of Use | Much easier, intuitive functions. | Complicated, professional-level editing. |
| Core Method | Right-click "Add Freeze Frame." | Insert Frame Hold, Add Frame Hold. |
| Advanced Methods | AI tools, Auto Reframe, Creative Assets. | Export Still, Time Remapping. |
| Platform Support | Cross-platform (desktop/mobile). | / |
Conclusion
Mastering freeze frame effects in your videos, whether for dramatic impact or to highlight a key moment, is a valuable skill. We've explored comprehensive methods for creating these still shots in Adobe Premiere Pro, offering professional control and precision. For those seeking a more intuitive and streamlined approach, Wondershare Filmora provides an excellent alternative with its user-friendly tools. Now, let's address some common questions you might have about implementing freeze frames, including potential issues.
FAQs on How to Create Freeze Frames in Premiere Pro
-
Why is my Frame Hold not working in Premiere Pro?
Frame Hold issues in Premiere Pro can stem from several common culprits. Ensure you have the correct clip or track selected when applying the effect. Sometimes, corrupted media files, an outdated Premiere Pro version, or insufficient system resources can cause unexpected behavior. Check if your sequence settings match your clip properties, clear your media cache, or try restarting Premiere Pro. If problems persist, consider updating your graphics drivers or reinstalling Premiere Pro. -
What is a Freeze Frame effect and why should I use it?
A Freeze Frame effect involves generating a static shot somewhere in between a floating video clip, causing a single frame to repeat on screen for a desired duration. This unique technique adds a professional touch by allowing you to grab stills from a larger video, helping to develop a new interesting story, or simply highlighting a specific moment. -
What are the primary methods for creating a Freeze Frame in Adobe Premiere Pro?
Adobe Premiere Pro offers several useful methods for freezing a frame. These include inserting a Frame Hold Segment directly into a clip, utilizing the Add Frame Hold option to freeze the rest of a clip, exporting a still frame and re-importing it, and using the Time Remapping feature for precise control over speed and holds.
Do you want to better your video with Premiere Pro? Try transitions. This article will give you 10 best Premiere Pro transitions and let you know how to add transitions in Premiere. Check it out!
by Benjamin Arango Jan 06, 2026 11:36 AM
Benjamin Arango
staff Editor
