- Premiere Tutorial
How to Use Proxy in Premiere Pro to Edit Video Easily

Jan 06, 2026• Proven solutions
 TL;DR:
To smoothly edit high-frame-rate or 4K videos without lag in Premiere Pro, configure a proxy workflow by generating lower-resolution proxy files during the ingest phase and activating the Toggle Proxy button in the Program window.
● Generate standard proxies before importing files by clicking the Media Browser Ingest button and selecting Create Proxies from the wrench tool icon, utilizing 1/4 scale resolutions like 960x540 for UHD or 480x270 for FHD.
● If default presets fail to match your full resolution, build a custom ingest preset with reduced frame sizes, save it as an .epr extension, and render the proxies through Adobe Media Encoder.
● Should playback lag persist after enabling proxies, manually reduce the sequence playback resolution to 1/2, 1/4, 1/8, or 1/16 via the dropdown menu beneath the Program window.
Ask AI for a summary
 ChatGPT
 Perplexity
 Gemini
 Claude
 Grok
Grok
Editing a video smoothly in Premiere Pro is a dream for everyone and when it comes to high frame rate footage. While editing higher frames like 4k videos, there is a requirement to use Premiere Pro proxy to avoid lag. If you also wish to speed up on your projects and desire learning Premiere Pro proxy workflow, this article is just for you. We will let you know how you can use proxy in Premiere Pro.
How to Make Use of Premiere Pro Proxy
Step 1: Import Video
To start with, you need to choose a high-frame-rate footage that you want to encode. Right click on it then. Now, choose “Modify” and click on Interpret Footage. Next, you are required to select the “Assume this frame rate” button which is located under the Frame Rate tab in the dialog box. Now, enter the favorable frame rate and hit on “OK”.
If you can't import video to Premiere Pro, here are 4 solutions to fix it.
Step 2: Ingest Proxy
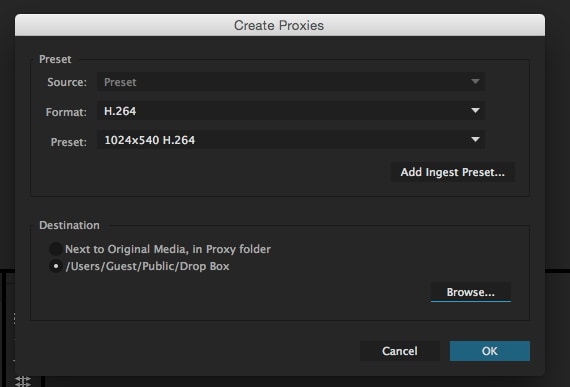
If you want to create proxies, you need to do it just before importing the file in Premiere Pro. With the help of Media Browser, launch the folder having the file resolution clips on which you are about to use proxies. Followed by this, press the “Ingest” button and hit on the wrench tool icon just beside the Ingest button. This will open up the Ingest settings. Just beside the Ingest, click on “Create Proxies” located in the drop-down. It’s time for picking out a proxy resolution preset.
Before making decision, you can take reference of the following common resolutions. Read out the recommended proxy resolutions and then make up a decision on the best proxy format for Premiere.
UHD(4K) 3480x2160 – The recommended proxy resolution for this is 960x540 i.e. ¼ of the complete resolution. Or you can take 1280x720 i.e. 1/3 of complete resolution.
“Cinema” 4K 4096x2160 – The recommended resolution for proxy would be 1024x540 which is ¼ of full resolution.
FHD (Full HD) 1920x1080 – The recommended proxy resolution is 480x270 implying as ¼ of the full resolution.
Step 3: Make Proxy Preset
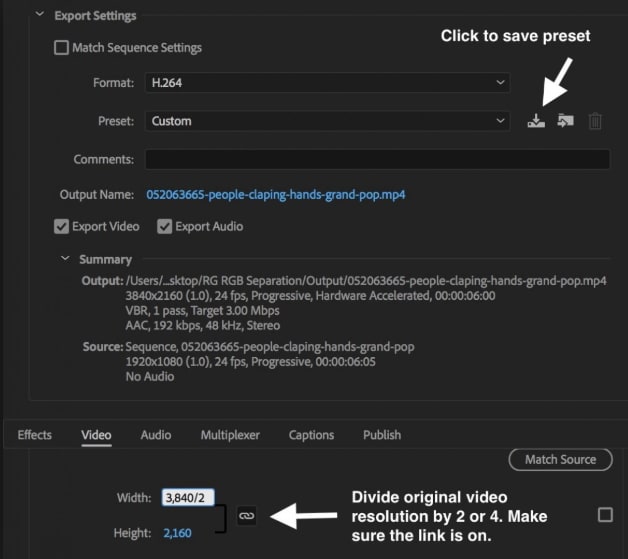
As the next step in Premiere Pro proxy process, you need to make Proxy preset. In case the presets don’t go with the common full resolutions, you have to create one yourself. This will be done by creating a custom proxy ingest preset with Premiere Pro’s export dialogue.
Simply import your file in a sequence. Head to “File” then and click “Export”. Go to “Media and make a new export preset with format. Now, lessen the resolution frame size with the parameters from “Video” tab. You can now proceed with saving the preset using the “Save Preset” option given beside preset drop-down. Provide a name to the preset and you will see it getting saved with “.epr” extension. Further with closing the media export window and get back to the wrench icon. This step will import your proxy ingest preset with the new extension.
Next, select the locations for the proxies you’ve worked with. While you will be importing your footage in the Project Panel, you will notice the launching of Adobe Media Encoder. The proxies will start encoding for each file. When all the proxies are rendered, you can then use them for editing in the Project Panel as they will appear in the panel.
Step 4: Edit Proxies
Once the proxy is made, the question arises about editing. How can you edit with them. Here is the answer.
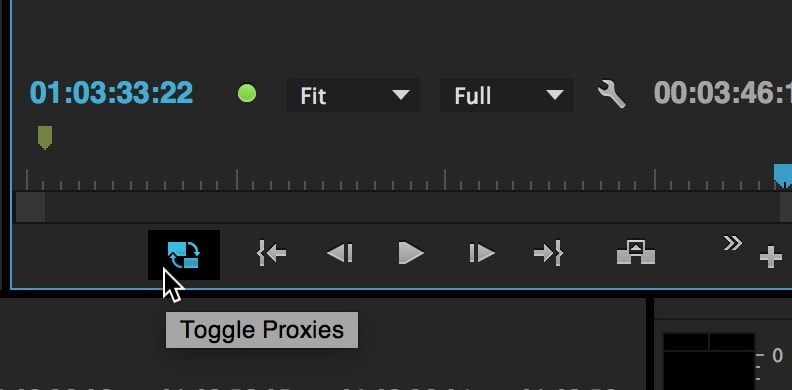
Start with editing as usual in the Premiere Pro. Make the sequence and begin to drag the clips in it. Hit on “Toggle Proxy” button which can be found from the “Program” window. This will activate proxies. The button will go blue once you enable it and will later exchange the clip with the proxy version clip to let you work with that. And this way you can edit with the Premiere Pro proxies.
In case, lag is still there, we suggest you to shrink the playback resolution. Make it to ½, ¼, 1/8 or 1/16th of the resolution. This can be done with the help of dropdown located at the bottom from Program window.
Conclusion
Well! This was all about how you can make best out of the Premiere Pro proxy. We hope you aren’t confused anymore and can work on it easily. Do let us know if there is any query. Also, for more interesting topics like this, stay tuned with us.
Do you know how to make cinematic look editing easily? In this article you will learn how to create cinematic video quickly.
by Benjamin Arango Jan 06, 2026 11:37 AM
Benjamin Arango
staff Editor
