- Premiere Tutorial
How to Rotate/Flip a Video in Adobe Premiere

Jan 06, 2026• Proven solutions
 TL;DR:
To rotate a video in Adobe Premiere Pro CC, select your clip on the timeline, navigate to the Effect Controls panel under the Motion tab, and enter the specific rotation degree.
● For a quick horizontal flip in Premiere Pro CC, apply the Transform effect from the Distort panel, uncheck the Uniform Scale box, and change the Scale Width to -100.
● Adobe Premiere Elements users must access the Applied Effects panel to use the Rotate Right or Rotate Left buttons, ensuring "Scale to Frame Size" is deselected in Video Options to retain the original scale.
● Wondershare Filmora provides a simpler visual alternative for beginners, but requires users to invert the Project Settings resolution to match the new orientation before rotating to prevent the software from cropping the video edges.
Ask AI for a summary
 ChatGPT
 Perplexity
 Gemini
 Claude
 Grok
Grok
I have been approached by a friend who had his daughter's recent wedding video filmed with the camera held 90 degrees off. The result is the whole thing being horizontal. How could I fix this for him in Premiere? - David
If you have the same problem with David, then you are on the right page. It is inevitable to shoot different videos with various angles. In this case, it is necessary to rotate videos. In this tutorial, we're going to tell you how to rotate a video in Adobe Premiere Elements and Pro.
- Part 1: How to rotate/flip a video in Adobe Premiere
- Part 2: Rotate/flip a video in Adobe Premiere Elements
You may also like: How to Crop Videos in Adobe Premiere Pro >>
Part 1: How to Rotate/Flip a Video in Adobe Premiere
Rotate/flip a video in Adobe Premiere Pro CC
Now a similar job to rotate/flip a video can be achieved by using the latest version of Premiere Pro which is Adobe Premiere Pro CC. The whole process may seem complex, but if you follow the steps below, you will find it is easier to flip a video.
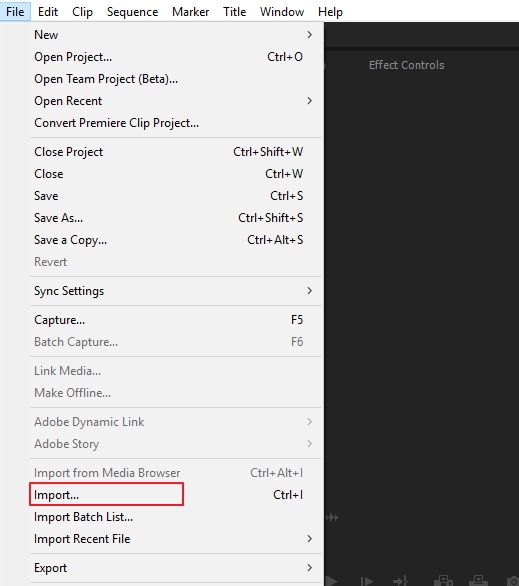
Step 1: import video
Start up the program. Click File and import to start flipping the video. After it is imported, drag it to the timeline.
Step 2: Highlight clip
Highlight the desired piece of video on the timeline panel.

Step 3: Go to effect controls
In the effect controls, you look for the "Motion" option. Click rotation. It is in the middle of the panel.

Step 4: Enter the degree to flip video
You can type 180 to rotate video upside and down. Enter 90 to make a clockwise rotation. You can also change the round table to rotate the video.

More information to accelerate your rotation process
If you want to do horizontal rotation, you can use the transform effect to make a quick 180 degree flip. It is easy to use for beginers. Check the steps below.
- Find the Transform on Distort effects panel. Then drag and drop onto the clip.
- You need first to uncheck the Uniform Scale box.
- Change scale Width to -100 for horizontal rotation.
Part 2: Rotate/Flip a Video in Adobe Premiere Elements
Premiere Elements provides the user with the option to rotate/flip a video using the software. The steps to do so are explained below:
- Start the program and open the video clip to be edited.
- Next, you adjust the position of the video clip. To do this, you open the clip in the Quick View and then drag it to the Monitor Panel and then adjust it.
- Next, you can click the "Applied Effects" button and scale the clip.
- If you require to use the original scale, then after importing your video file, choose the clip and go to "Video Options" and from there deselect "Scale to Frame Size".
- Now you can rotate the clip in the quick view or expert view timeline by first clicking the "Applied Effects" button.
- The Applied Effects panel will promptly open, from here you "Expand the Motion Effect" and click "Rotate Right" or "Rotate Left" to achieve a 90o rotation.
- Then you adjust the clip’s anchor points by dragging the anchor point sliders for the motion effect.
Check this video below to know more details.
An Easier Way to Rotate/Flip a Video in Filmora
Wondershare Filmora is one of the easiest video editing software you can use on your Windows or Mac. One of the amazing things about this program is that you can download it for free without missing any features.
And if you wish to remove the watermark, you can purchase Filmora and use it for your academic and professional projects.
It is reliable software with all the great tools, which are also simple to use.


So, if you want to know how to rotate or flip a video in Filmora, follow these steps to make it happen in a few minutes.
Step 1: Run Filmora on Your System
Considering you have already downloaded and installed Filmora on your operating system, open the software and click on the “File” button from the top menu to import your videos.
Or, you can also click the blue icon with a big “+” sign in the middle of the screen to import your video or any other file.

Step 2: Drag Your Video to the Timeline
After importing the video, take your mouse cursor on the video. Then, press and hold the left mouse button to drag the video to the timeline.

If done correctly, you will see the video in the “preview screen” on the left side.

You can see that the video is shot vertically. Therefore, even after importing and dragging it to the timeline, it stays similar on the preview screen. And, if you notice, there’s a grey area around both sides of the video, which should be black.
Why? It is because the grey area in Filmora’s preview screen defines that you or the viewer can only see that particular part of the video that stays between the grey sides.
So, in this case, if you will rotate or flip the video, it will cut any part of the video that underlaps the grey sides, like this.

That means you need to fix the resolution before rotating or flipping the video.
How to do it? See the next step.
Step 3: Change Project Settings
Go to the “File” option on the top menu and click on “Project Settings.”

You will see a new window with “Resolution” and “Frame Rate” options.
The video used in this tutorial has a resolution of 9:16 by default to make you understand well.

So, you will need to change it to the opposite numbers by clicking on the drop-down menu. For example, “16:9” and click the “OK” button.

Note: Whatever your video’s resolution is, if the grey area overlaps your video clip while rotating or flipping it on Filmora, you should always change the resolution by choosing the opposite number from the “Project Settings,” as shown in step 3 of this tutorial.
Here you can see that the grey has turned to black.

Step 4: Rotate or Flip Your Video
Double click on the video on the timeline to see the “Transform” settings.
Under the transform settings, you will see the “Rotate,” “Flip,” and “Scale” options.

Now, use sliders in front of each option to rotate or flip the video while viewing the preview screen results.


Contrarily, you can click on this blue dot/point on the preview screen to rotate the video with the help of your mouse.

Step 5: Scale Your Video
When you are satisfied with the rotation and flipping of your video, the next step is to adjust the resolution of the rotated video according to the resolution (16:9) you set in step 3.
To do that, you can use your mouse to grab the corner dots/points of the video to adjust it to the resolution.

Or, simply use the slider from the transform settings to perform the same task.

Step 6: Export Your Video
Click on the export button to save your rotated video to your computer.
Filmora allows you to rotate and flip any video without major obstacles. All you need is to follow the instructions correctly and enjoy your old videos with new changes and modifications.
Filmora vs. Premiere Pro: Video Rotation & Flipping Comparison
| Feature | Filmora | Premiere Pro |
| Ease of Use | Simple, without major obstacles. | Detailed steps, can seem complex. |
| Aspect Ratio Handling | Guided project settings adjustment. | / |
| Rotation Methods | Sliders, preview point, mouse drag. | Degree input, Transform effect. |
| Flipping Options | Flip option in Transform settings. | Transform effect for horizontal. |
Final thought
After reading this article, you know how to rotate video in Premiere. The level of complexity for performing this simple task is quite high, using the Adobe products. One might naturally resort to an easier and more efficient option as an alternative.
Do you want to learn premiere pro? In this article you will know 10 best Premiere Pro tutorials to learn basic and advanced video editing easily.
by Benjamin Arango Jan 06, 2026 11:37 AM
In this tutorial, we are going to show you how to combine videos clips as well as audio clips in Adobe Premiere Pro, you'll find the detailed steps below.
by Benjamin Arango Jan 06, 2026 11:35 AM
Benjamin Arango
staff Editor
