

 TL;DR:
To add motion blur in Premiere Pro, use the Transform effect for animated transitions, Time Remapping with Frame Blending for speed ramps, or third-party plugins like RSMB for realistic pixel-tracked blur on complex movements.
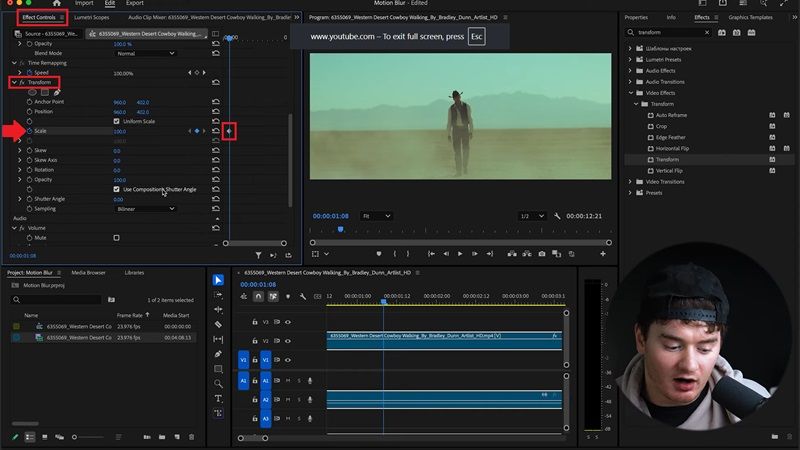
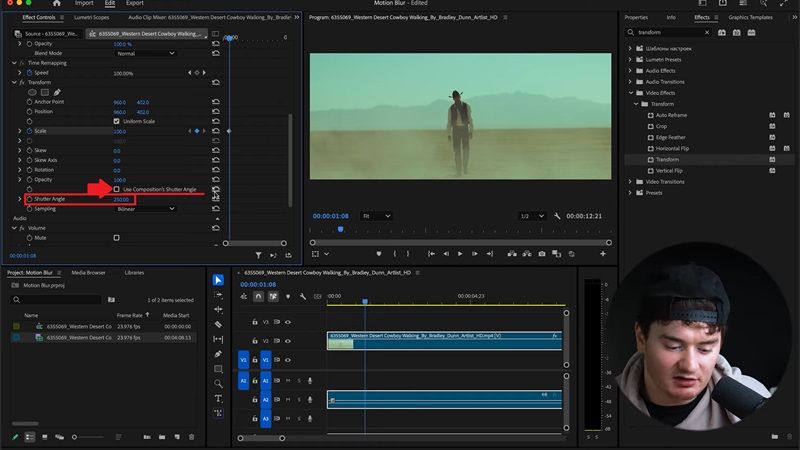
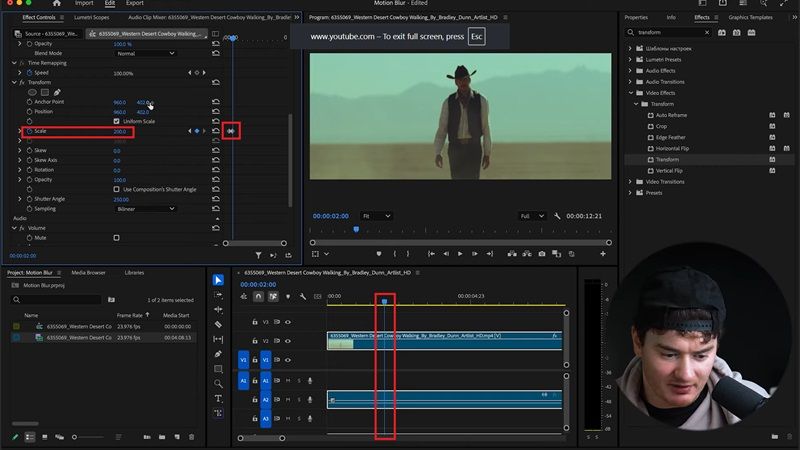
● Use the native Transform effect by disabling Use Composition's Shutter Angle and setting the value between 180-360 for basic zooms, or use Directional Blur for linear movements, though Directional Blur cannot track multi-directional camera movement and may cause edge distortion.
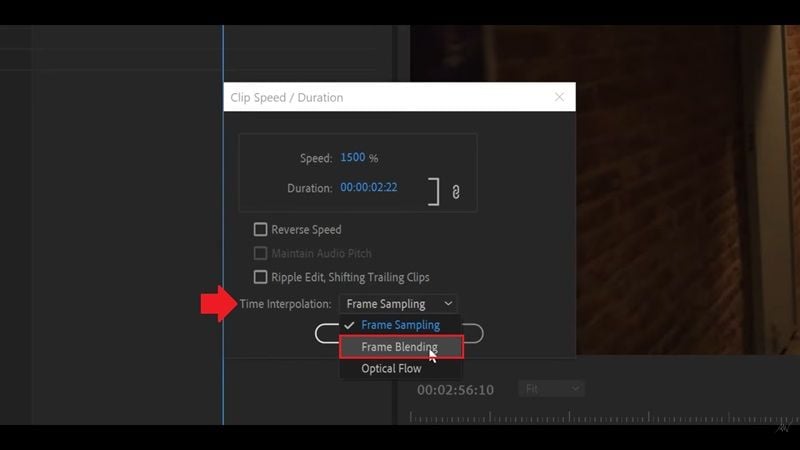
● Select Time Remapping and switch Time Interpolation to Frame Blending to smooth out fast-motion clips without manual keyframing, keeping in mind this blending method cannot be manually adjusted for blur direction and may produce visible ghosting trails.
● Install plugins like ReelSmart Motion Blur (RSMB) for professional projects that need real pixel motion tracking without repetitive keyframe setup, but expect increased playback lag, longer rendering times, and mandatory paid licenses.
Ask AI for a summary
 ChatGPT
 Perplexity
 Gemini
 Claude
 Grok
Grok
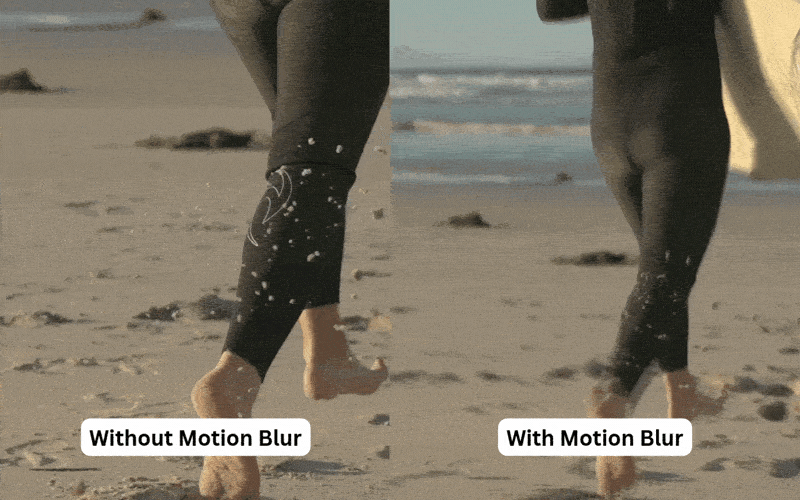
Motion blur in Premiere Pro is often used to smooth out movement that feels too stiff or overly sharp. Whether it's for transitions, action scenes, zoom effects, or speed ramps, motion blur can help make the final result look more natural and cinematic.
But the thing is, Premiere Pro is often called too complicated for total beginners. So, we'll break down how to add motion blur in Premiere Pro using several methods. This way, you can compare the results and decide which technique works best for your editing workflow.
Method 1: Add Motion Blur with the Transform Effect
If you search for how to add motion blur in Premiere Pro, the Transform effect is probably the method you'll see most often. It's one of the easiest and most popular ways to create motion blur in Adobe Premiere effects, especially for transitions, zooms, slides, and animated movement.
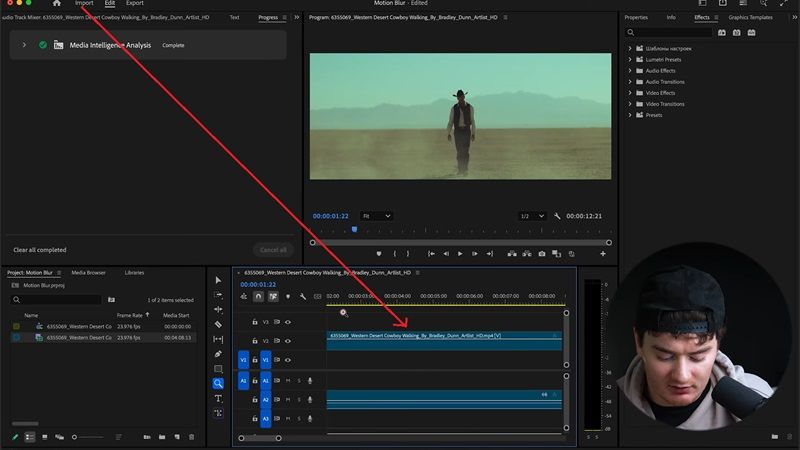
Step-by-Step: Using the Transform Effect
For this example, we'll follow a guided tutorial by Miracamp. Here, we'll break down how to create a cinematic zoom effect on a person standing in the middle of a desert using Premiere Pro motion blur.

Transform Effect for Motion Blur in Premiere Pro: Pros and Cons
The Transform effect is often used to create smooth zoom-in and zoom-out motion blur in Premiere Pro. It works well for basic animated movement. However, like any method, it has its own advantages and limitations depending on your workflow.
- Animate movement using keyframes.
- Create zoom-in or zoom-out effects.
- Make transitions between clips.
- Add movement to text or graphics.
- Create social media edits with fast motion.
- Fully Built-In Feature: Since it's already available inside Premiere Pro, you don't need to install any plugins or extra tools to use it.
- Adds a More Dynamic Feel to Footage: Even though it mainly looks like basic zoom animation, it can actually make your footage feel more engaging and help improve the overall visual flow, so the video doesn't feel flat or static.
- Manual Setup Required: You have to set keyframes for every movement, so it can feel repetitive if you're editing a lot of clips.
- Not Always Perfect for Complex Motion: For fast or complex movements, the result can sometimes look less natural compared to advanced plugins or AI-based tools.
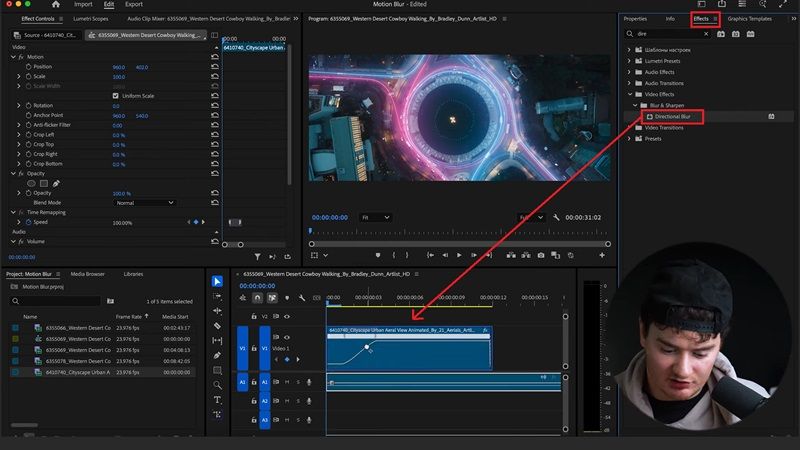
Method 2: Create Motion Blur with Directional Blur
Another way to create motion blur in Premiere Pro is by using the Directional Blur effect. Compared to Transform, this one is simpler because it focuses purely on adding blur direction instead of simulating realistic camera motion.
Step-by-Step: Using the Directional Blur Effect
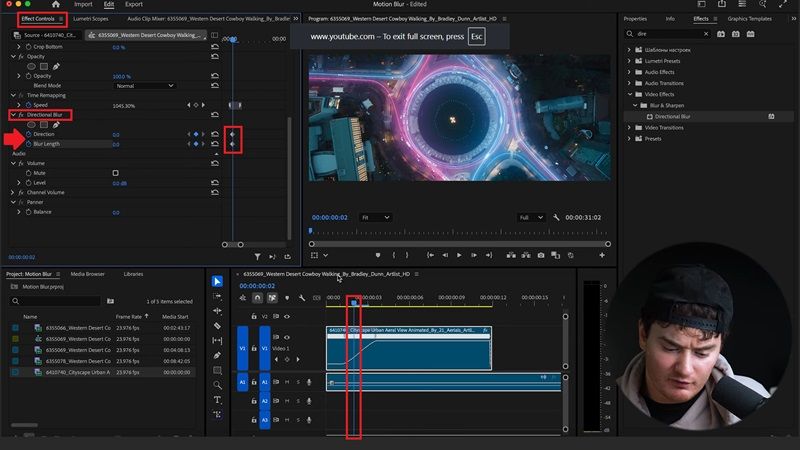
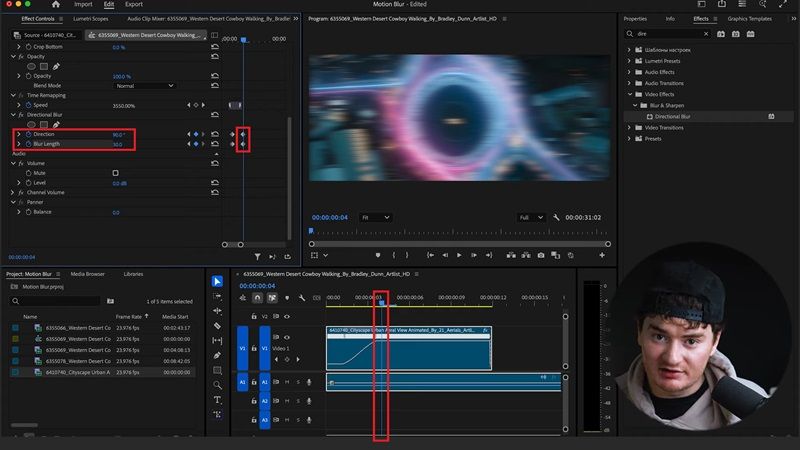
Directional Blur Effect for Motion Blur in Premiere Pro: Pros and Cons
You don't need any plugins to use Directional Blur as motion blur in Premiere Pro. It can help make simple horizontal or vertical movements feel more interesting. But before using it, it's worth looking at its pros and cons first.
- Transition effects between clips.
- Fast zoom or movement effects.
- Animated text and titles.
- Music video edits with lots of movement.
- TikTok, Shorts, and Reels content.
- Better than Natural Camera Blur: You can control how the blur looks by setting the exact direction and strength. This makes it easy to create a more dramatic or stylized motion effect that feels more intense than natural camera blur.
- Works Well for Fast Motion Sections (Speed Changes): When your footage switches between slow and fast movement, you can apply blur only in the fast parts to make the transition feel smoother.
- Fixed Blur Direction: The blur only follows one direction, so if your footage has multiple movements or camera rotations, the result can look unnatural or inconsistent.
- Edge Distortion: If you increase the blur too much, the edges of the video can start to look stretched or cut off, making the result less clean.
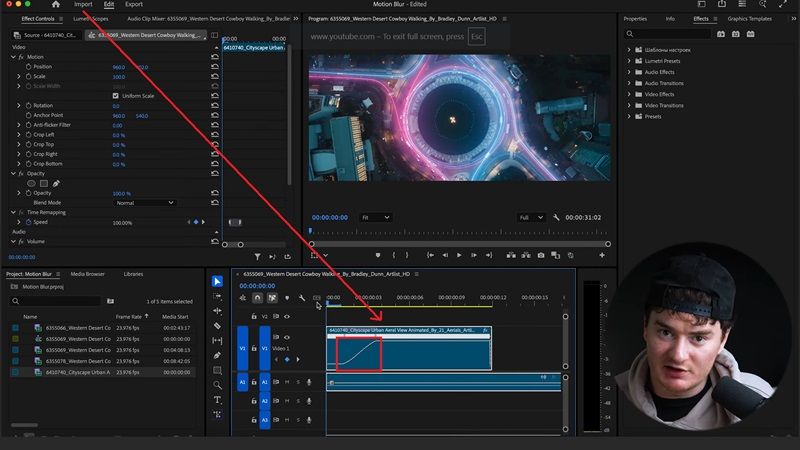
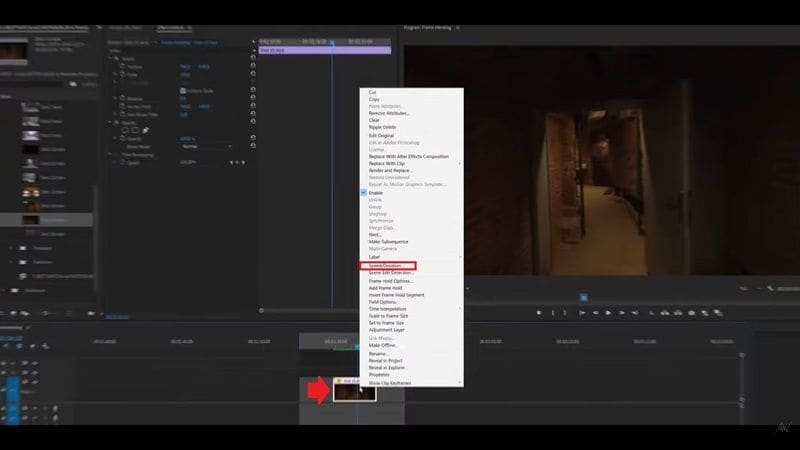
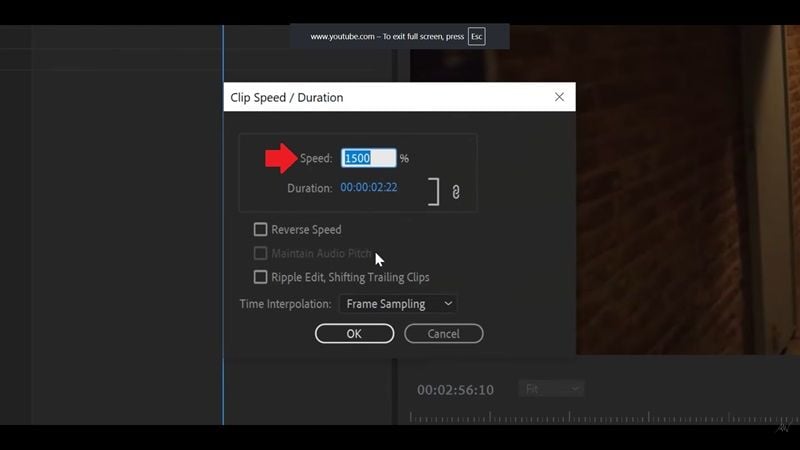
Method 3: Smooth Motion with Time Remapping and Frame Blending
If you want to create cinematic speed ramps, you can combine Time Remapping with Frame Blending to add motion blur in Premiere Pro. This technique does not create motion blur in the traditional sense, but it helps make speed changes and movement appear softer and more natural on screen.
Step-by-Step: Using Time Remapping + Frame Blending
For this demo, we'll follow a tutorial by Arthur Winer on YouTube. The tutorial shows how a simple tunnel clip can feel more cinematic and fluid by combining speed changes with frame blending.
Time Remapping and Frame Blending for Motion Blur: Pros and Cons
This method is often called a "fake" motion blur because it doesn't create real blur like traditional effects or plugins. Instead, it smooths movement by blending frames together. Even so, it's still useful for Premiere Pro motion blur methods when you want smoother motion without a complex setup.
- Speed changes between clips.
- Slow-motion clips.
- Cinematic edits and montages.
- Sports content.
- Travel videos with smooth movement.
- Action or chase scenes.
- Easy to Set Up: This is one of the easiest motion smoothing methods because you don't need to create many keyframes or do complex adjustments. You mainly just adjust speed and enable frame blending.
- Reduces Choppy Transitions: Instead of sudden jumps in speed, the effect helps the movement flow more smoothly between frames.
- Ghosting Effect: The overlap between frames may cause visible ghost-like trails, especially during fast movement.
- No Manual Blur Adjustment: You can't really adjust how strong or directional the blur looks since it fully depends on how the frames are blended.
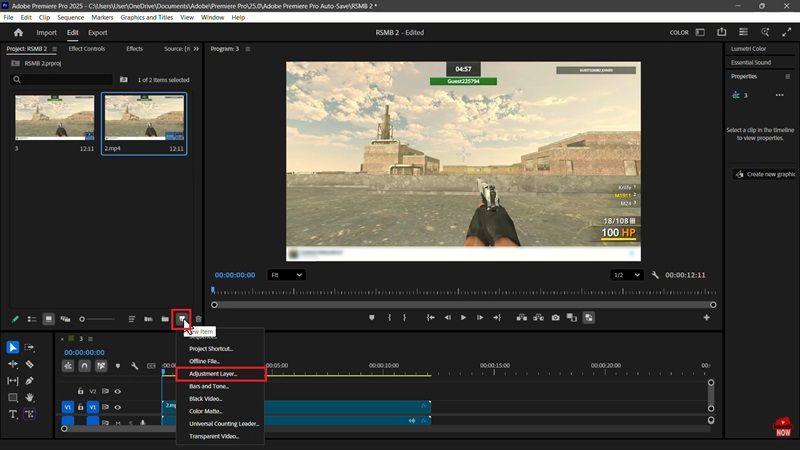
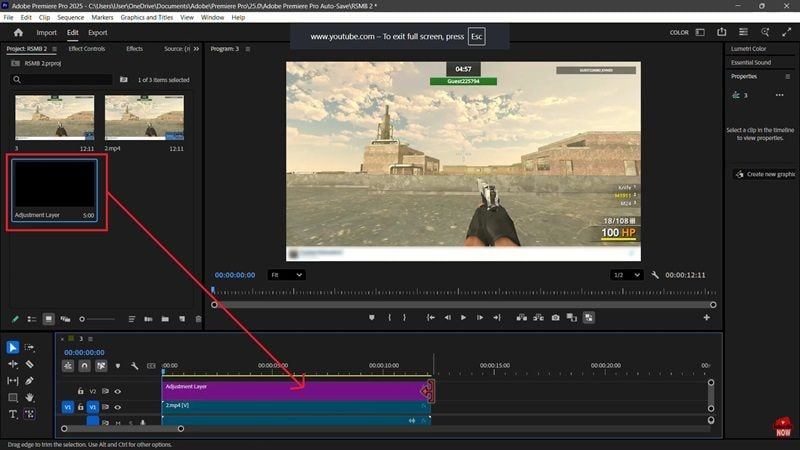
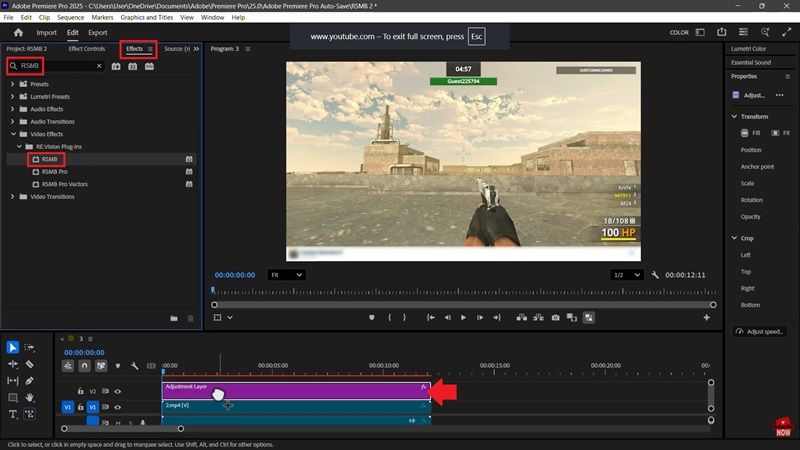
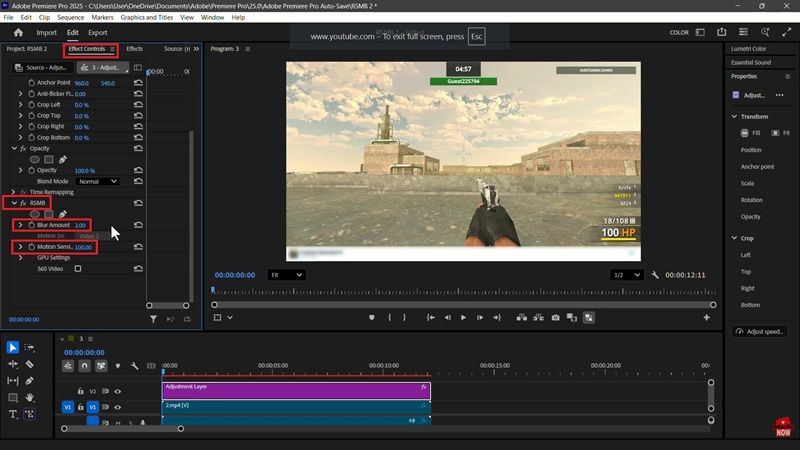
Method 4: Use Plugins for More Realistic Motion Blur
If you want professional-level Adobe Premiere Pro motion blur effects, plugins are usually the strongest option. Many professional editors use plugins because they can create more advanced and realistic blur compared to Premiere Pro's native tools.
Some of the most popular motion blur plugins include:
Step-by-Step: Using Third-Party Plugins
For this example, we'll follow a tutorial by the YouTube channel Learn with Limon. Here, we'll look at how to apply the RSMB plugin to a gaming clip. Before starting, make sure the plugin is already installed properly in Premiere Pro so the effect can appear inside the Effects panel.
Third-Party Plugins for Motion Blur in Premiere Pro: Pros and Cons
Third-party plugins are often the go-to choice if you want strong Premiere Pro motion blur results without spending too much time on manual setup. However, while they're powerful and convenient, they still come with strengths and drawbacks you should understand first.
- Professional editing projects.
- Commercial and advertisement videos.
- Cinematic edits and short films.
- Fast-moving scenes.
- VFX-heavy edits.
- Advanced transitions and animations.
- Simple to Use: This method is one of the easiest because you don't need to build multiple keyframes. You just apply the plugin, use the preset, and adjust a few settings based on how strong you want the effect.
- Real Motion Tracking: Unlike basic Premiere effects that only blur motion based on animation, plugins like RSMB actually detect how pixels move between frames, so the blur follows real movement in your footage more accurately.
- Requires Purchase or License: Most of the plugins are not free, so you need to purchase a license before you can use them.
- Heavy Rendering & Lag: Some plugins can be quite heavy on your system, which may slow down playback and increase rendering time.
Motion Blur Effect in Premiere Pro: Which One to Use?
Now that we've looked at different ways to create motion blur effects in Premiere Pro, the next question is: which method actually works best?
The answer to that question really depends on your editing style and workflow. For quick edits and social content, built-in tools are often enough. But for more cinematic or professional-level results, plugins usually provide stronger motion blur quality.
Here's a quick comparison between each Adobe Premiere Pro motion blur method:
| Method | Best For | Ease of Use | Result Quality |
| Transform | Zoom effects, transitions, social media edits | Takes some practice to fully understand keyframes and shutter angle settings | Can create smooth and cinematic movement when adjusted properly |
| Directional Blur | Swipe transitions, fast movement edits, animated text | Easier to apply, but still needs some tweaking to look natural | Great for creative and stylized blur effects |
| Time Remapping + Frame Blending | Speed ramps, slow motion clips, cinematic sequences | Easy to activate and adjust | Smooths frame movement effectively |
| Third-party Plugins | Professional projects, commercials, VFX edits | Easy once installed correctly | Produces more polished and realistic motion blur effects |
Bonus. Create Motion Blur Effects without Premiere Pro: Alternative Editor
There's no doubt that motion blur in Adobe Premiere Pro can produce smooth and cinematic movement. However, the setup process can become quite complicated, especially if you are still new to video editing. From keyframes to plugins, some workflows may take more time than expected just to create a single motion blur effect.
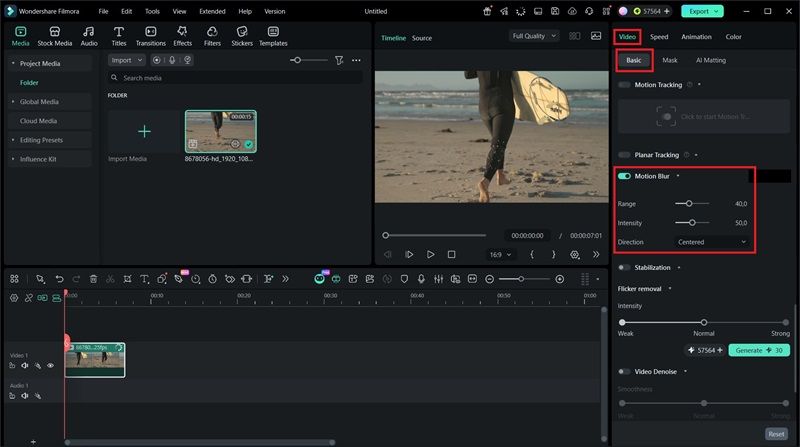
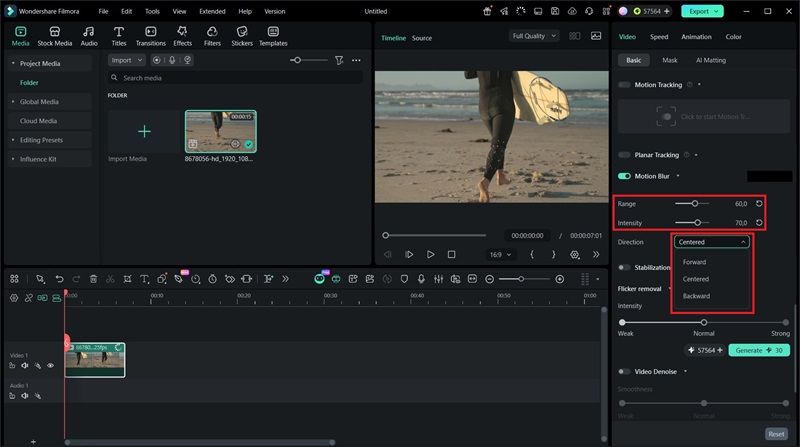
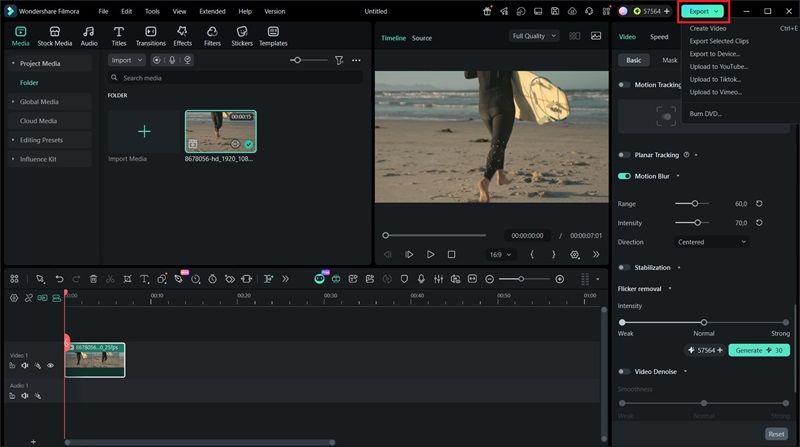
So, if you are looking for a simpler and more beginner-friendly option, Wondershare Filmora is worth considering. In one of its newer updates, Filmora introduced an Motion Blur feature that helps create smoother motion automatically. Instead of manually adjusting multiple settings, you can apply motion blur in Filmora with only a few clicks.
Why Filmora Motion Blur Is Worth Trying
- Simpler Workflow: Instead of manually stacking effects and adjusting multiple settings, Filmora lets you apply motion blur much faster directly from the editing panel.
- Easy Blur Adjustment: You can easily control how subtle or intense the blur effect looks using adjustable sliders.
- Adjustable Blur Direction: You can customize how the blur moves with Forward, Backward, and Center options, depending on the type of motion you want.
- Live Preview While Editing: The preview updates as you edit, so you can immediately check whether the motion blur already looks right.
How to Add Motion Blur in Filmora

Conclusion
Adobe Premiere Pro Motion Blur can make videos feel smoother, more dynamic, and visually polished. The software gives multiple ways to create the effect, whether through built-in tools or advanced third-party plugins. However, some methods may take more time to learn, especially for beginners who are not familiar with keyframes and motion settings.
For a faster and simpler workflow, Wondershare Filmora can be a practical alternative. Instead of manually tweaking multiple technical settings, Filmora lets you apply and adjust motion blur with only a button and sliders. This way, you can save time and still produce smooth, cinematic videos.
FAQs
-
1. Can I apply motion blur in Premiere Pro to every footage I have?
Yes, you can apply motion blur in Premiere Pro to almost any footage, but it doesn't always improve the result. It works best on clips with visible movement like zooms, pans, or speed changes. If the footage is already static, adding motion blur may not make much difference. -
2. Is motion blur necessary for every video?
No. Some videos already contain natural motion blur from the camera. Adding extra blur may sometimes make footage look too soft. -
3. Why does my motion blur look weird?
If your motion blur effect in Premiere Pro looks strange, it's often caused by extreme shutter angle values, poor footage quality, low frame rate, or incorrect blur direction settings. -
4. Can motion blur slow down Premiere Pro?
Yes, applying motion blur in Premiere Pro can slow down your workflow, especially when using heavy effects or plugins. It increases rendering time and can reduce playback performance on older devices.
