
 100% Security Verified | No Subscription Required | No Malware

In movies, voiceover is essential as it adds meaning to your content. A well-crafted voiceover enhances storytelling and adds emotional depth to ensure clarity in communication. Premiere Pro is a professional video editor that allows users to record instant audio. By recording voiceover Premiere Pro, you can polish it for a refined listening experience. To help you achieve all the benefits of voiceover, this article focuses on using this tool for audio recording.
In this article
Part 1. How to Record Voiceover with Adobe Premiere Pro CC
For studio-quality audio recording, you need high-end tools like Adobe Premiere Pro. This audio recording software lets you record multiple audio files and add them to the editing timeline. Once you have recorded your audio, you can execute many post-production tweaks to obtain a refined result. As you record voiceover Premiere Pro, you can use advanced sound effects to ensure that your dubbing sounds are professional.
Furthermore, users can automatically trim the silent parts from their audio post-recording. To learn how you can use Adobe Premiere Pro to record professional-level audio, follow the steps below:
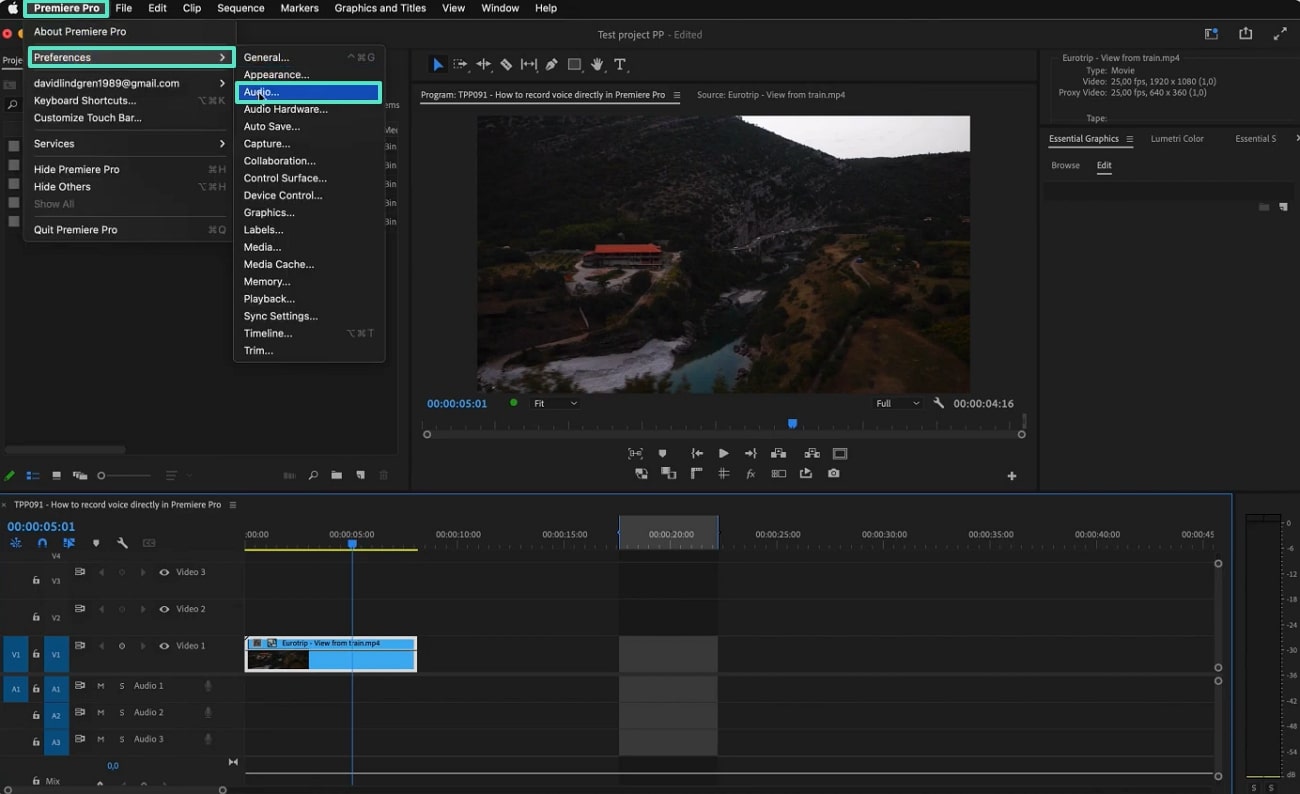
Step 1. To begin with, import a video to Adobe Premiere Pro and access the "Premiere Pro" tab at the top left. From the extended menu, hover your mouse over the "Preferences" option to select "Audio" using the next list of options.
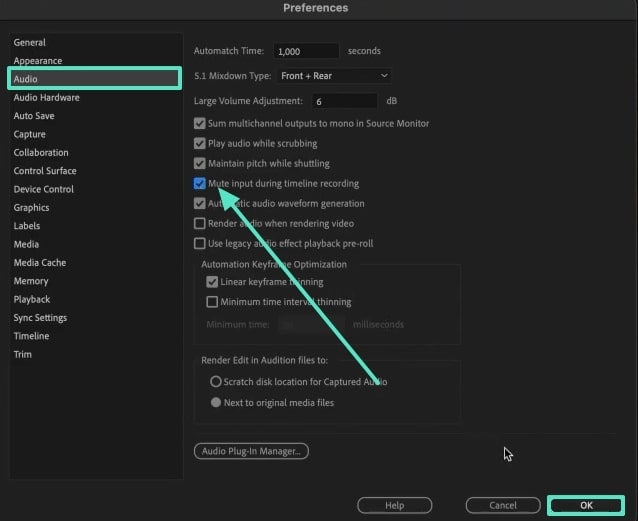
Step 2. When the "Preferences" window opens, enter the "Audio" tab on the left panel and check the "Mute input during timeline recording" box. Checking this box will eliminate the surrounding echo from your recording.
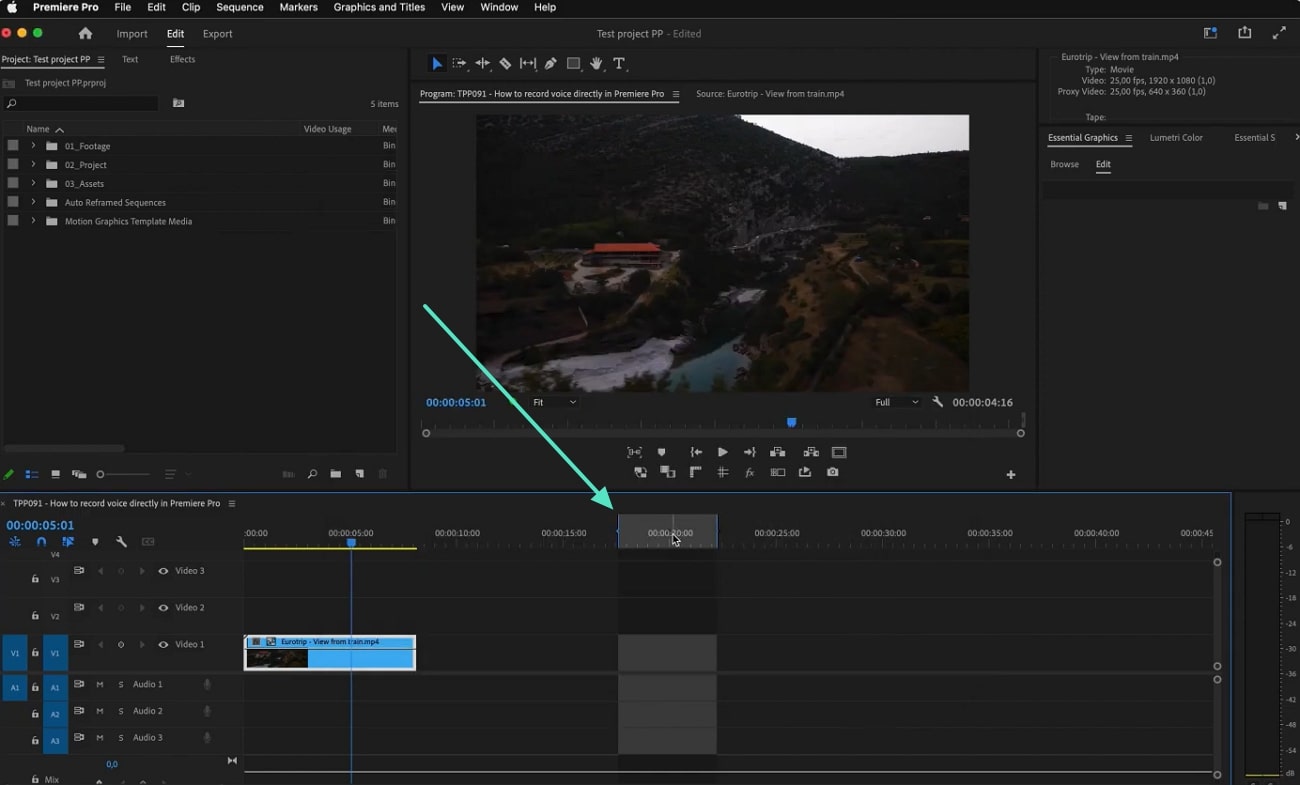
Step 3. To make sure that your recording begins from the playhead and not from the in-point, navigate to the timeline to deselect it. To do this, press the "Option + X" keys from Mac and "Alt + X" on a Windows device.
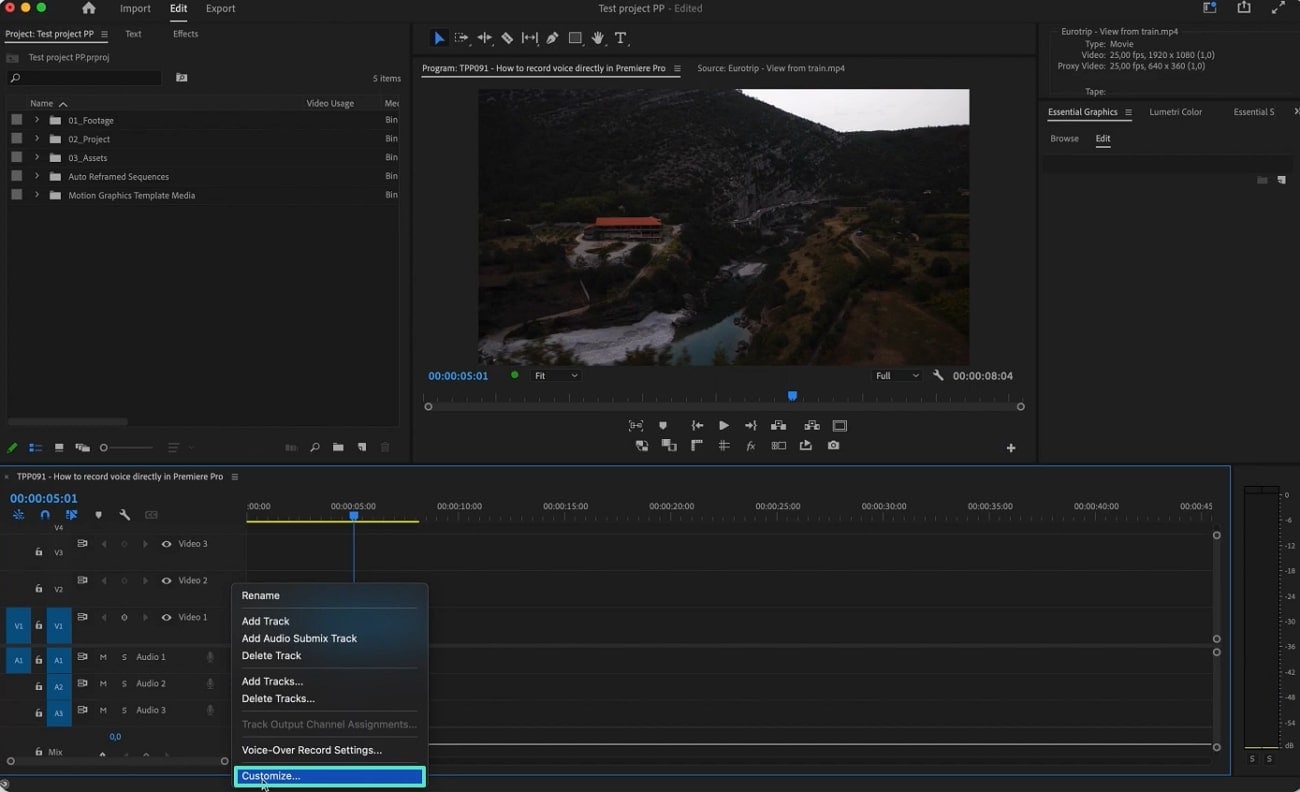
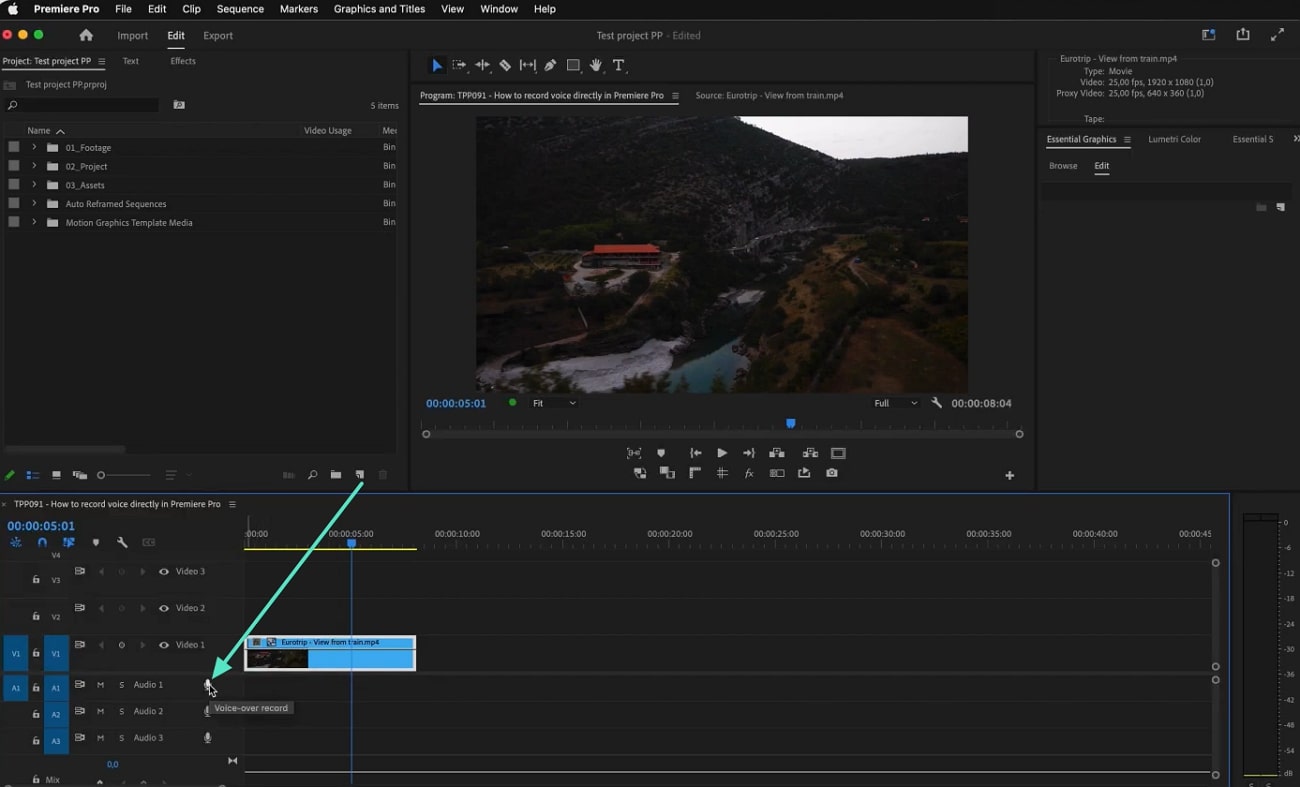
Step 4. You will see a microphone icon on the audio track, but if you don't, right-click on the track. From the pop-up menu, click the "Customize" option to access a new window.
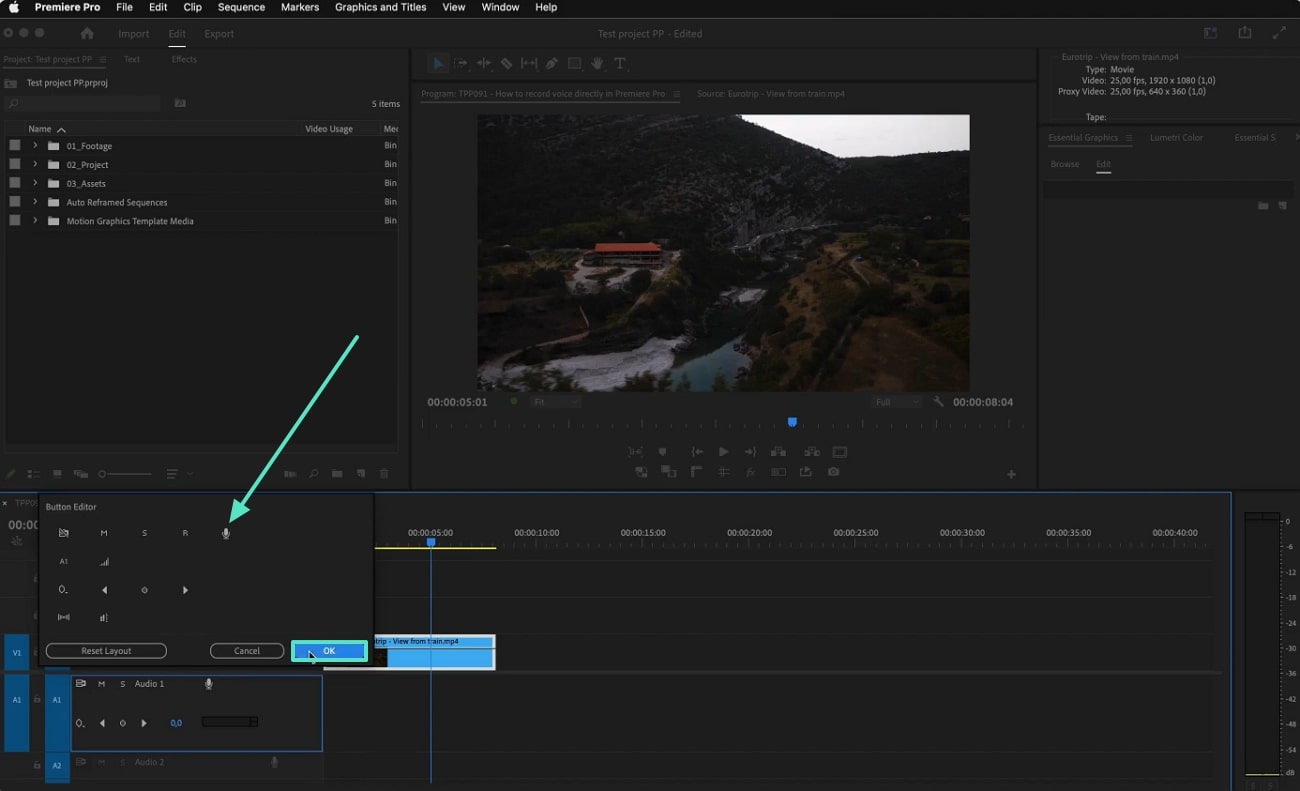
Step 5. Using the "Button Editor" dialogue box, drag the "Microphone" icon to the timeline and click "OK" to bring the audio-recording icon to the track.
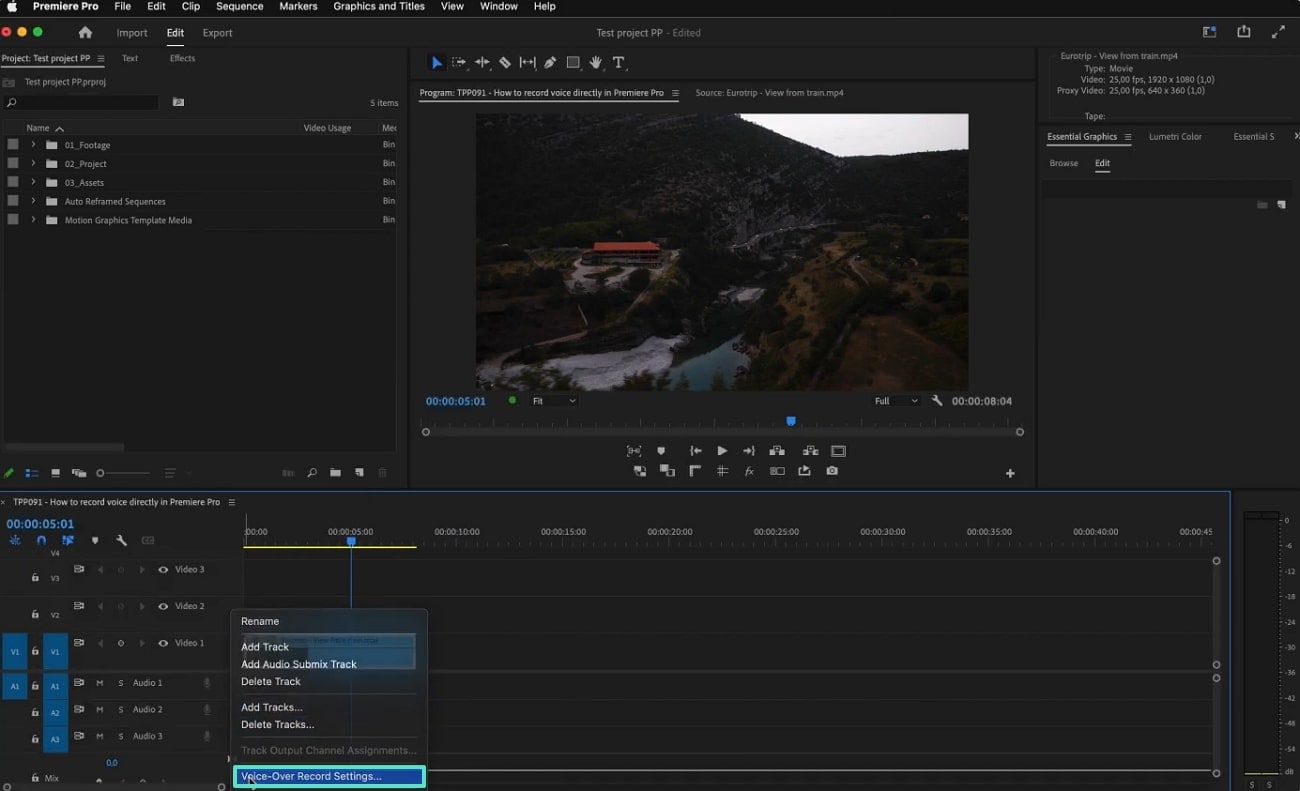
Step 6. Before recording audio, right-click on the track again and select the "Voiceover Record Settings" option to access a new panel at the left.
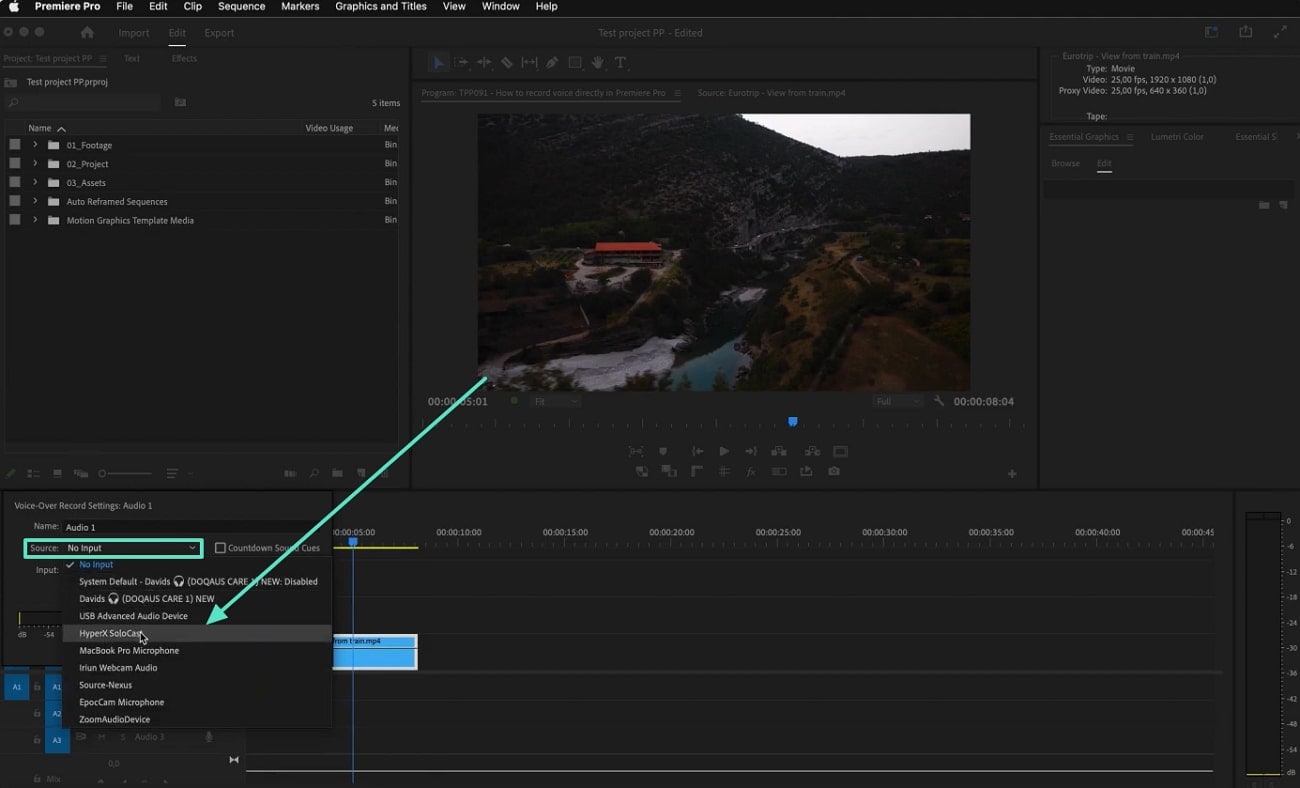
Step 7. Expand the "Source" menu from the left panel and select the desired microphone as the input device.
Step 8. After entering all the voiceover settings, select the "Microphone" button to start recording the audio. Once the audio has been recorded, select the same icon to abort the voiceover.
Part 2. Exploring a Better Voice Recording Alternative - Wondershare Filmora
After learning how to add voiceover in Premiere Pro, you must have noticed the complexity of the process. Therefore, you need a better alternative that requires minimal hardware and prior experience. Wondershare Filmora is a robust video editor that offers comprehensive audio recording features and post-processing in one.
To tailor the results according to your needs, you can select the recording device of your choice. Moreover, users can set a timer for the recording to prepare themselves before starting the voiceover. This tool also allows you to select the desired destination folder of the audio before you record.
 secure download

A Complete Tutorial on Using Wondershare Filmora to Record Voiceover
Now that we know the details about recording facilities in Filmora, we can understand its processing. The following instructions are a detailed guide on how to do voiceover on Premiere Pro alternative, Wondershare Filmora:
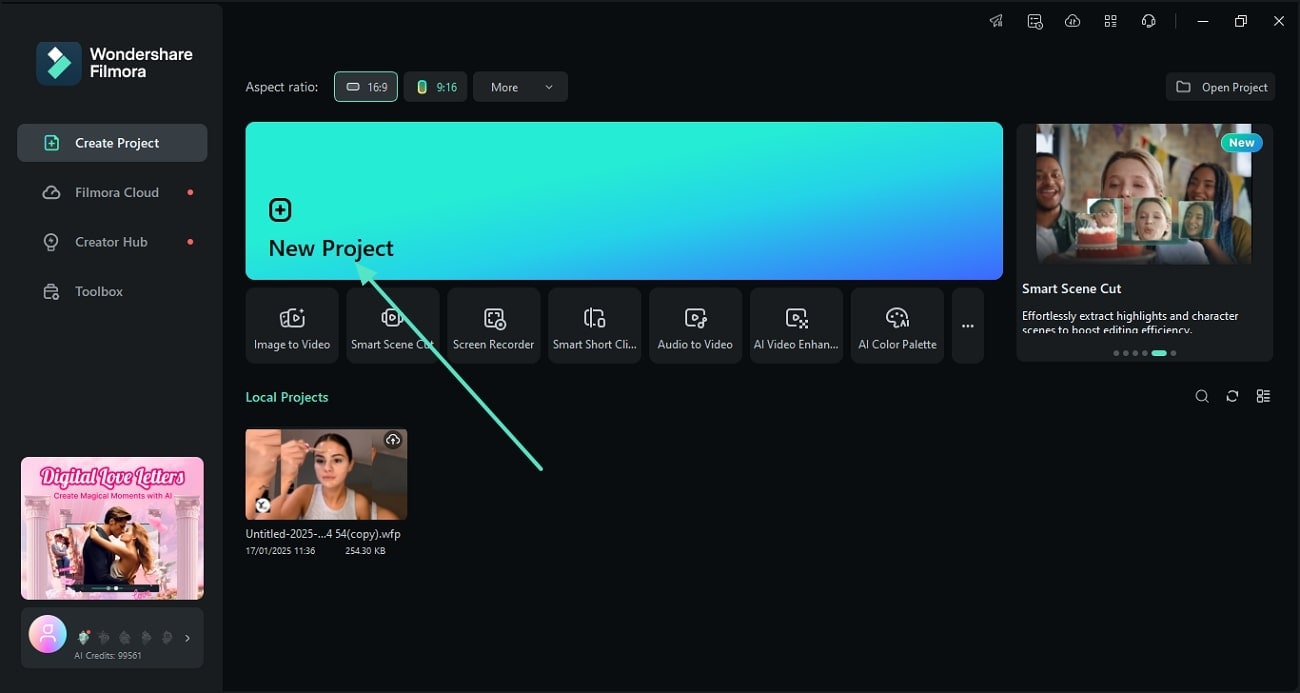
01of 05Start with the New Project to Record
Upon successfully acquiring Wondershare Filmora on the desktop, launch its main interface. From its homepage, select the "New Project" button to enter the main editing interface of the tool.
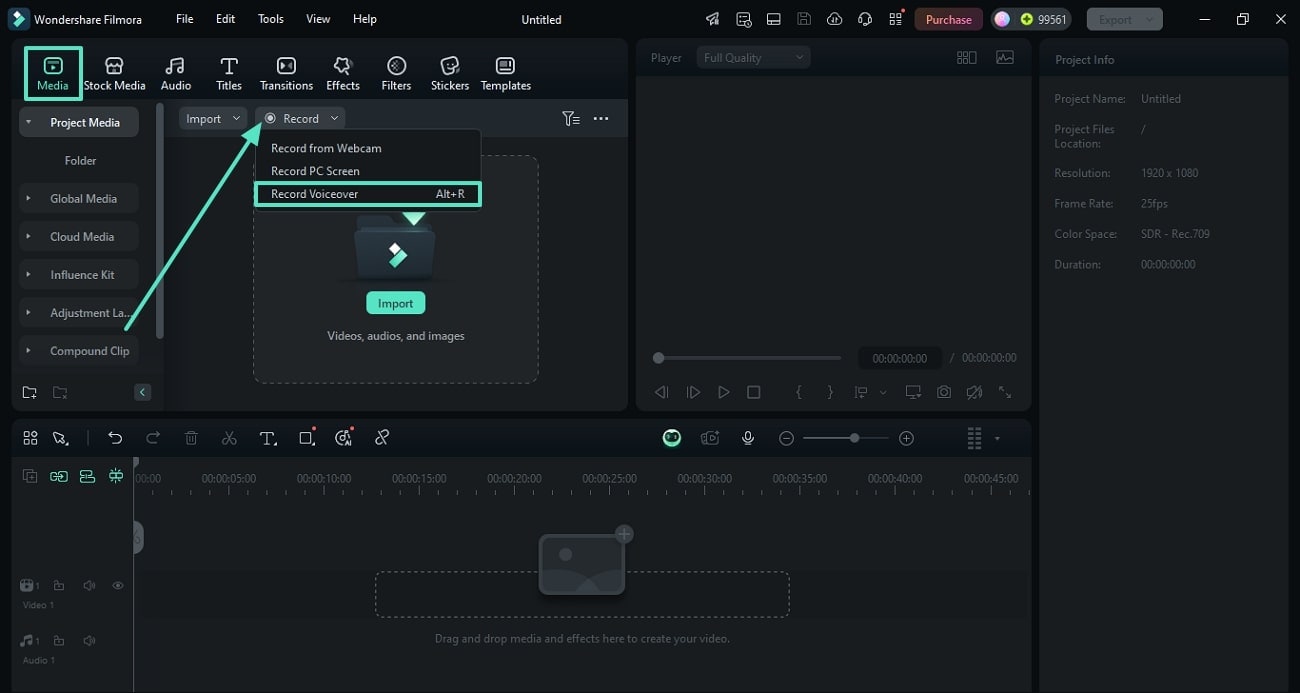
02of 05Prepare to Start a Voice Recording
From the editing interface, enter the "Media" section from the toolbar to unveil the "Record" menu. Using the extended menu, select the "Record Voiceover" option to start.
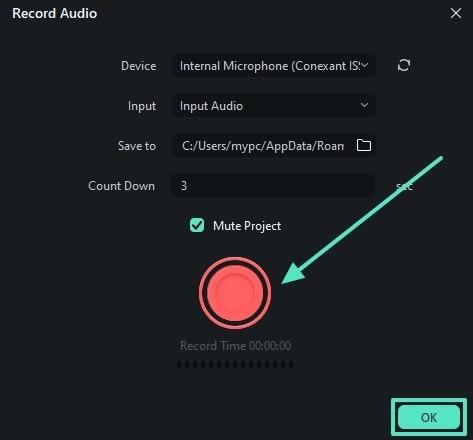
03of 05Record the Audio Using the Desired Microphone
When the "Record Audio" window appears, select the desired recording device and output folder. After setting a recording timer, press the "Record" icon to start recording the voiceover. Once you are done recording, use the same button to end the recording.
04of 05Drag the Audio to the Timeline to Edit and Export it
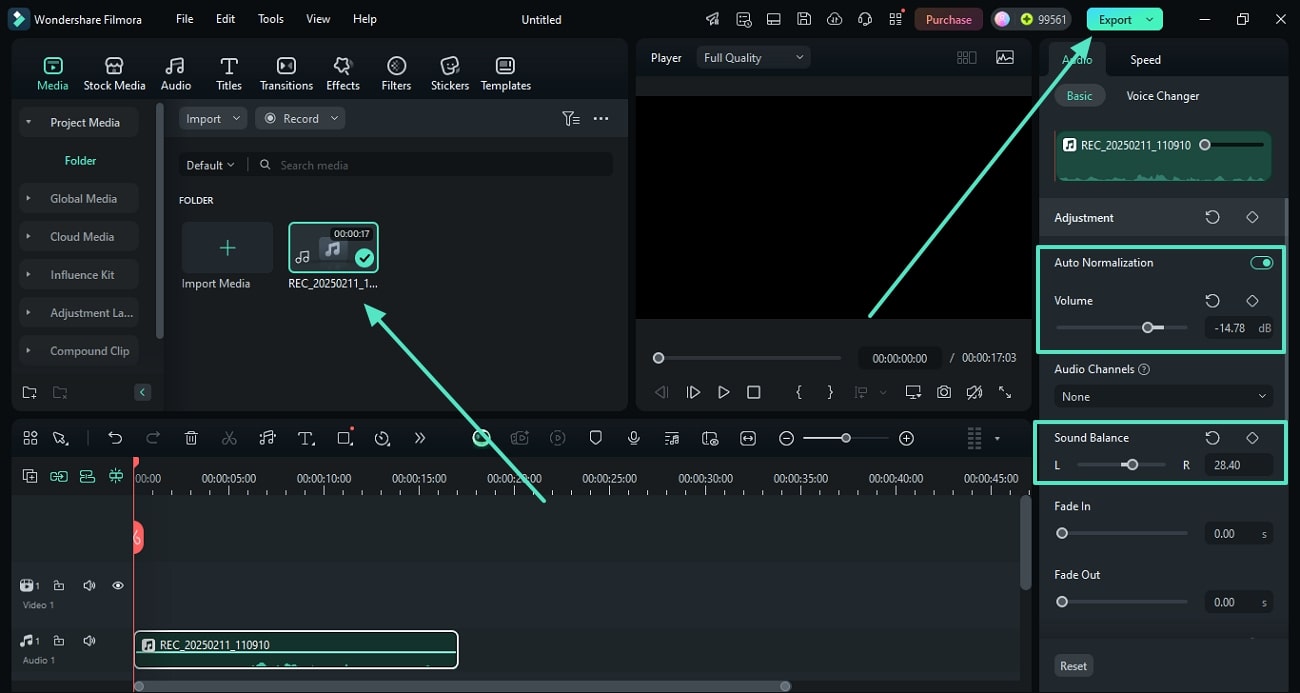
Once your audio automatically appears on the media window, drag it onto the timeline to unfold an audio editing panel on the right. While aligning it with the video, enable the "Auto Normalization" toggle and adjust the "Volume" by dragging the designated slider. After setting the "Sound Balance" level through the slider, navigate to the top right corner to select the "Export" button.
05of 05Export the Audio as an MP3 File
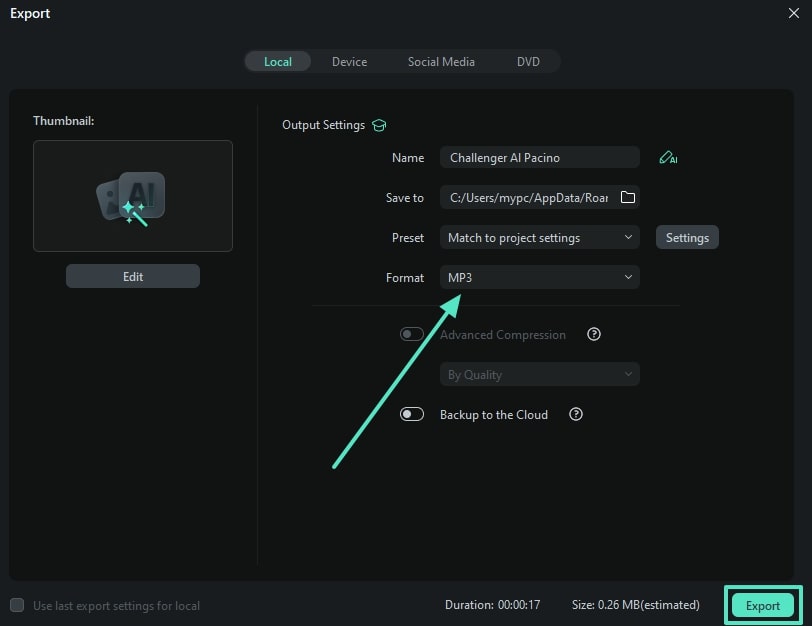
Using the "Export" window, expand the "Format" menu to select "MP3" as the export format if you wish to export the voiceover separately. Finally, click the "Export" button at the bottom right to save the recorded audio, which is better than Premiere Pro voiceover.
secure download
Other Features of Wondershare Filmora
- Audio Denoise: Helps you achieve studio-quality audio by reducing the hum, hiss, and audio background noise.
- Audio Ducking: Creates an audible audio file by creating a balance between background music and speech.
- AI Video Object Remover: Maintains the focus on the key video objects through this feature that removes unwanted objects.
- AI Speech-to-Text: Transcribe your recorded audio into customizable text to enhance the accessibility of your content.
- AI Sticker Generator: Generates stickers through a text prompt to add more meaning to your Premiere Pro record voice over videos.
secure download
Part 3. How to Record Audio Using a Mobile App? A Leap Into the Filmora App
As beneficial as desktop tools are, it is not possible for everyone to access them. Comparatively, mobile apps are a better option for users looking for their voiceover recording on the go. Therefore, the Filmora App is a video editor for iOS and Android that provides users with extensive tweak options. From audio recording to applying refining effects to it, this app has everything you might need and beyond.
With the volume adjustment tools, users can adjust the audibility of their audio and set the fade-in and out levels. Additionally, noise reduction can be applied to the audio to ensure that your voiceover has professional-level clarity.
Using the Filmora App to Record a Voiceover
It is only after learning about this app that you can enjoy its effective features. Follow the instructions below to learn how to record audio in the Premiere Pro alternative:
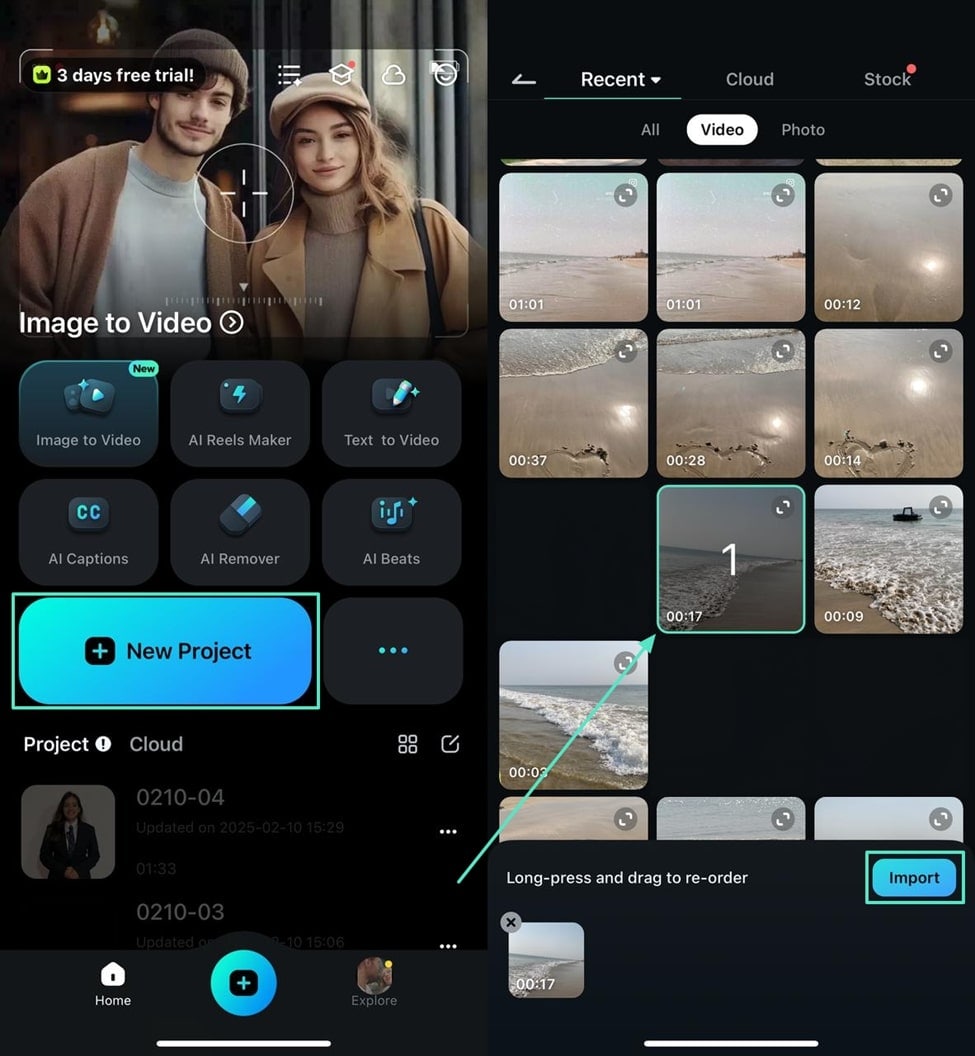
01of 05Initiate a New Project to Import a Video for Voiceover
To initiate the process, open the Filmora App on your phone and explore the homepage to tap the "New Project" button. As your media library unfolds, select the desired video from your device to generate a voiceover.
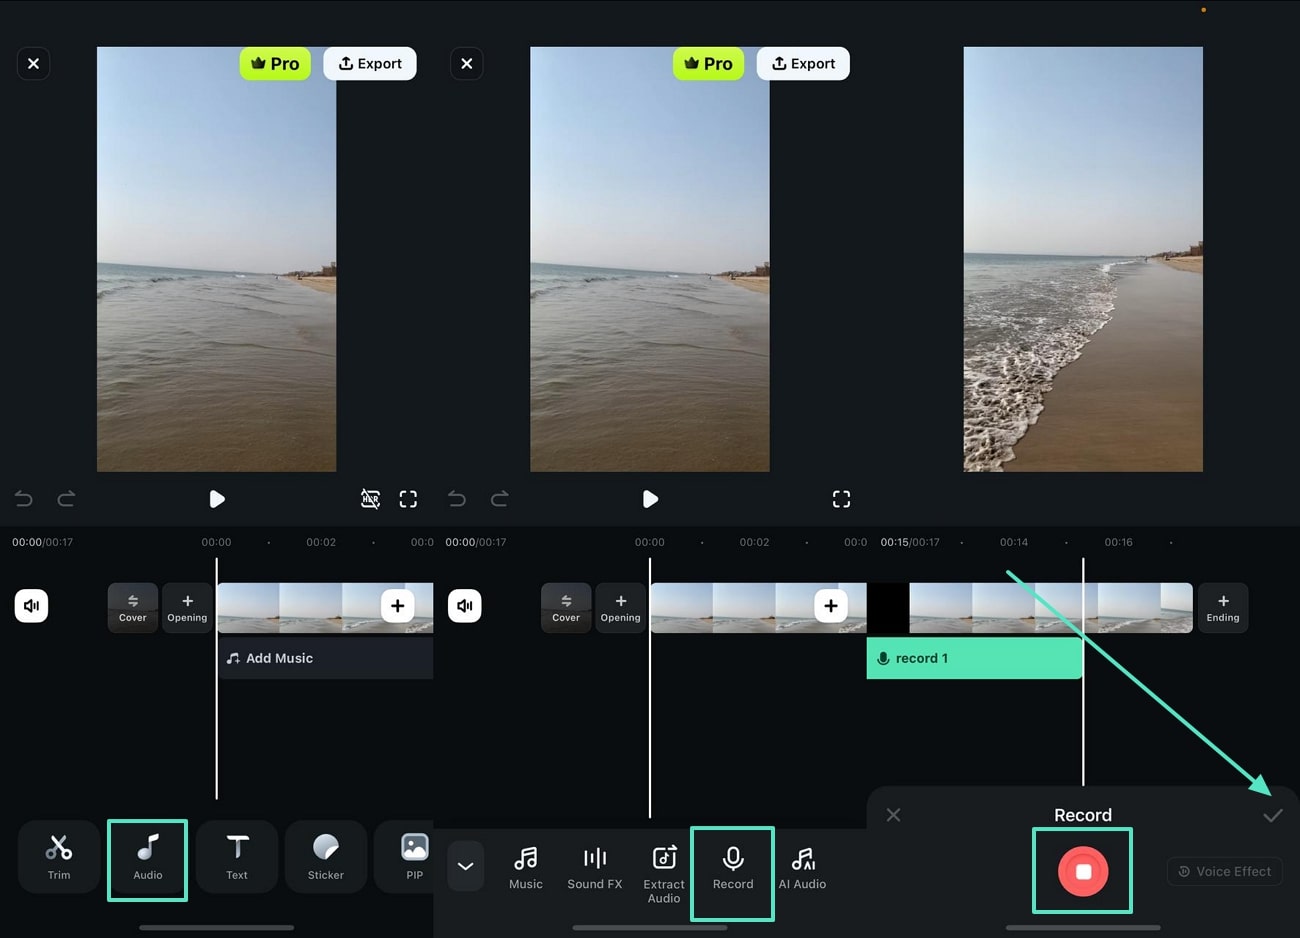
02of 05Record an Instant Audio for Your Video
After your video appears on the next screen, navigate to the bottom toolbar and enter the "Audio" tab. When audio-related features appear at the bottom, select the "Record" option to start recording in the next interface. Next, tap the "Record" icon to initiate the recording, and once you are done, tap the same button to end it. To add the recently recorded audio to the video, tap the "Tick" icon.
03of 05Enter Volume Settings to Get a Refined Audio
After recording the voiceover, tap the video track from the timeline to see the quick-access features. From the bottom, open the "Volume" tab and refer to the next interface for volume adjustment. Now, drag the "Volume" slider to adjust the volume levels and drag the "Fade in" and "Fade Out" sliders to set their levels. Once you are done entering the volume settings, press the "Tick" icon on the right.

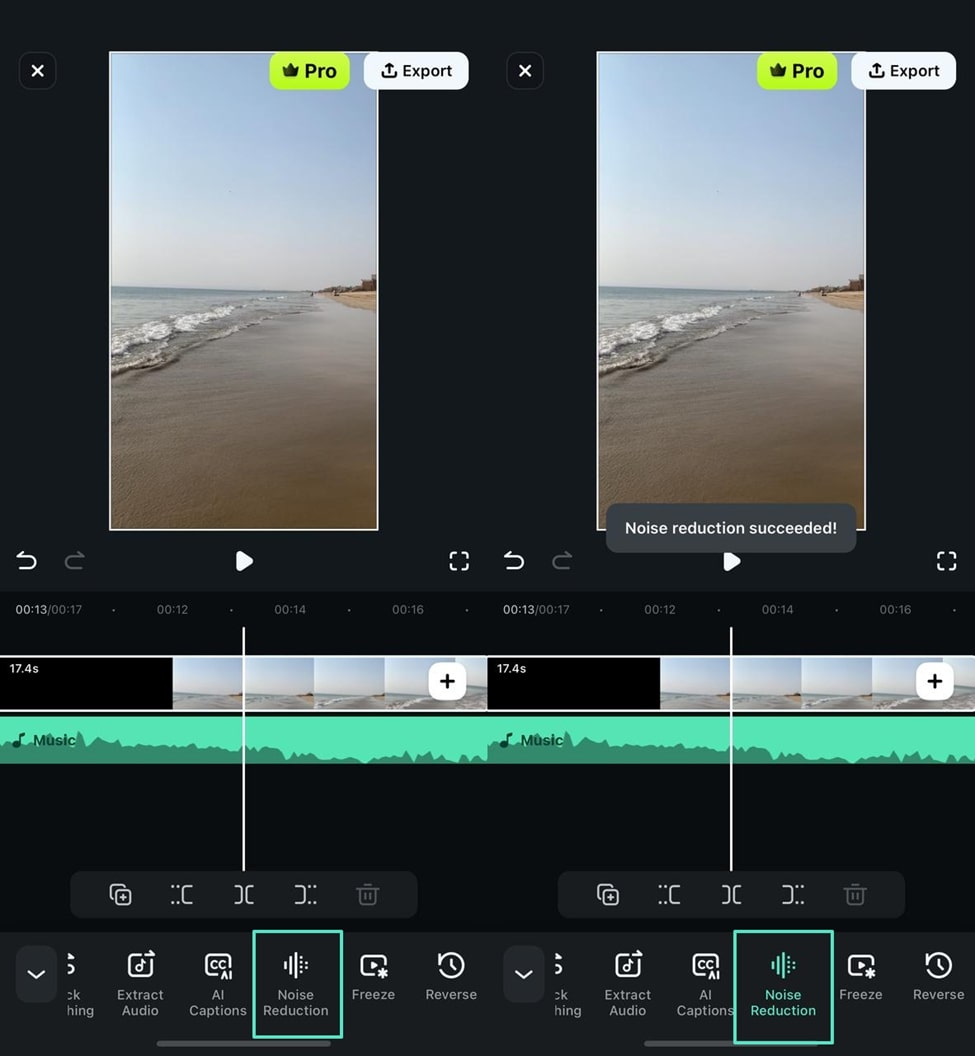
04of 05Apply the Denoiser to Add Clarity to the Audio
If your voiceover has intrusive background noise, use the bottom toolbar and select the "Noise Reduction" tab. Now, one-click noise reduction will be automatically applied to your audio.
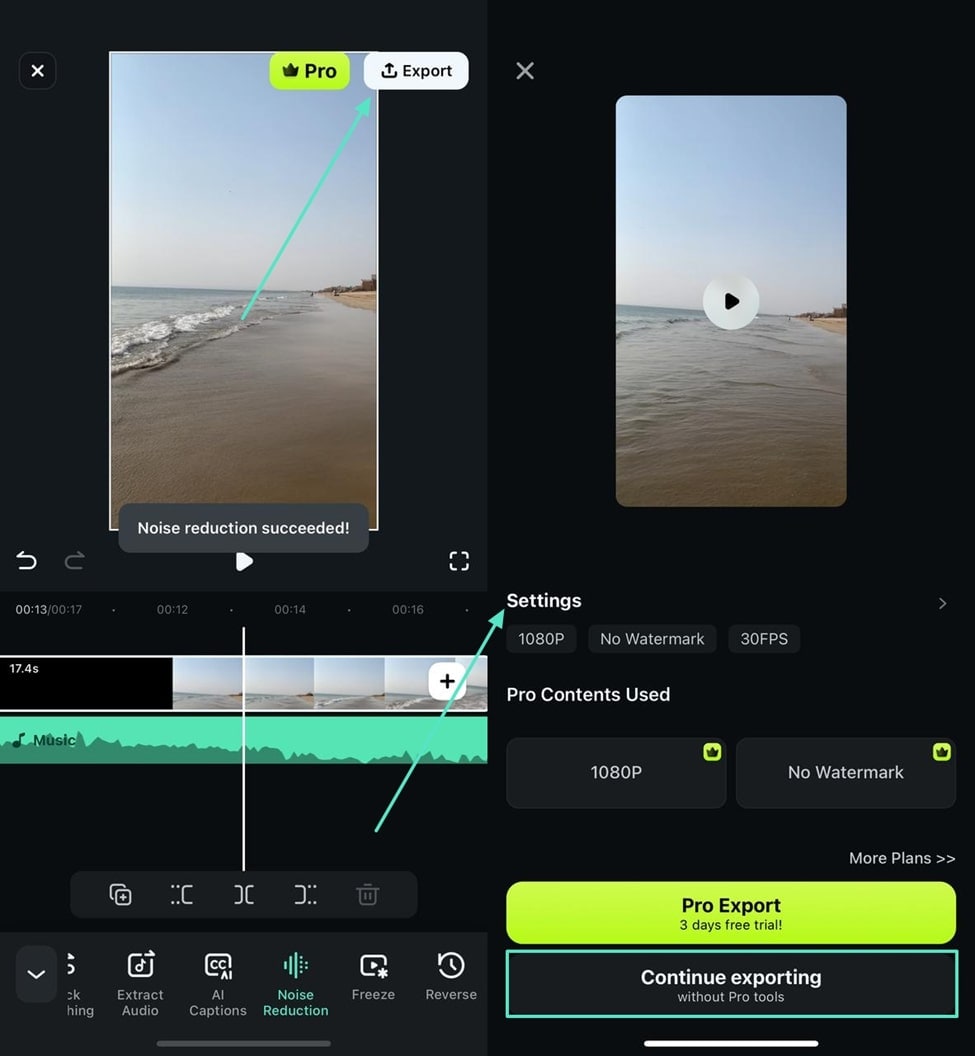
05of 05Export the Video in Your Desired Settings
After achieving the desired outcomes, go to the top right and tap the "Export" button to see the video export settings. Now, enter the desired export "Settings" and use the "Continue Exporting" button to save the video to your device.
Filmora for Mobile Filmora for Mobile Filmora for Mobile Filmora for Mobile Filmora for Mobile
Boost Your Video Editing for Viral Success
- • Powerful Brand New AI Features.
- • User-friendly video editing for beginners.
- • Full-featured video editing for professional.


Other Features of the Filmora App
- AI Music: Allows you to generate AI music with a text prompt to add uniqueness to your record voiceover Premiere Pro videos.
- AI Reels Maker: Transforms your ideas into a Reel by adding music and emojis tailored to your desires.
- Picture-in-Picture: Enables users to integrate two videos into a single frame for creating an explainer video.
- Video Backgrounds: Enhances video aesthetics by offering a diverse background collection that can be customized to your choice.
- Watermark: Maintains brand consistency throughout the video through this feature that lets you add a personal watermark to videos.
Conclusion
In summary, this article highlighted the benefits and detailed methods of recording voiceover Premiere Pro. After an in-depth analysis of this tool, we came across Wondershare Filmora as a better alternative. Users looking for a quick voiceover recording facility can rely on the designated Filmora App and have their video editing on the go.
