
 100% Security Verified | No Subscription Required | No Malware


 ChatGPT
 Perplexity
 Gemini
 Claude
 Grok
Grok
A video's frame rate significantly impacts its look and feel. Incorrect FPS can lead to unnatural motion or choppy playback. If you're wondering how to change the frame rate in Premiere Pro, whether it's for an entire sequence or specific clips, you're in the right place. This guide will walk you through the essential steps to adjust frames per second (FPS) in Premiere Pro, including common adjustments like converting 60fps to 24fps, ensuring your footage meets your creative vision or platform requirements. We'll cover how to check your current frame rate, reasons for making changes, and detailed methods for both sequence and individual clip adjustments.

In this article
- How To Check Video Frame Rate in Premiere Pro
- Reasons for Changing Frame Rate
- How To Change FPS in Premiere Pro
- How To Make 120 FPS Videos With Premiere Pro
- How To Change Video From 30 FPS to 60 FPS in Premiere Pro
- How to Change 60fps to 24fps in Premiere
- Frame Rate Conversion: Best Practices at a Glance
- [Bonus] Wondershare Filmora – Premiere Pro's Alternative
How to Check a Video's Current Frame Rate in Premiere Pro
Before we teach you how to change a video's frame rate in Premiere Pro, let's first make sure you know how to check. Maybe you don't need to modify the video because it is already in the correct setting.
So how do you do that in Premiere Pro?
- Import the video to Adobe Premiere Pro.
- Check the "Media" window. Next to the video file name is its frame rate. It is written in the format x.00 fps. FPS stands for "frames per second," which is used interchangeably with the term frame rate.

Why Change Video Frame Rate? (Impact on Smoothness & Style)
Suppose you have an action-packed video. It would not look great at 30 fps - it will look too choppy. That will give your audience a rotten viewing experience. By increasing the frames, you can make the motion more fluid and smoother.
Increasing the frames per second also results in better slow-motion videos. A 30 fps one would not look good with this effect because it does not show smooth motion. Thus, we recommend making the video at least 60 fps.
However, a higher frame rate does not always mean better videos. It can result in what they call the "soap opera effect." It means the video shows too many details. That makes the videos seem "unnatural" or less cinematic.
High frame rates make videos look more realistic since there is less stuttering and motion blur between frames. That's great. But for older audiences - the ones used to watching videos at 24 fps, it can be off-putting. So it's also important to consider your target audience when deciding the right frame rate for your video.
With these reasons in mind, you may want to change your video's frame rate.
How to Change Video FPS in Premiere Pro: Step-by-Step Guide
Let's dilly-dally no more. Here's a quick guide on how to change fps in Adobe Premiere Pro. This program gives you two different ways to change fps. One is changing the frame rate of a sequence; the other is changing the frame rate of the video clip. We will teach you how to do both.
Method 1. Change the Frame Rate of a Sequence
Suppose you want to keep the frame rate of most of the video the same. Only some parts need adjusting. You can change the frame rate of the sequences that need changing instead. Here are the steps to follow to achieve this:
- Open your project in Adobe Premiere Pro.
- In the Project panel, select the sequence whose frame rate you want to change. Right-click on that sequence.
- Choose "Sequence Settings" from the menu that appears.

- Click the drop-down menu for "Timebase."
- Select the frame rate you want the sequence to be in.

- Click "OK."
Method 2. Change the Frame Rate of a Video Clip
Here are the steps you should follow if you want to change the frame rate of an entire video clip.
- Import your video clip to Premiere Pro and drag it to the timeline.
- Go to the "Effects" tab. It's in the options at the bottom left of the screen.

- Select "Video Effects" > "Time" > "Posterize Time."

- Drag and drop the Posterize Time effect to the clip whose frame rate you want to change.
- Click "Effect Controls" at the top left of the screen.
- Select the small "arrow" button next to the "Frame Rate" text under "Posterize Time."
- Change the frame rate to your preferred setting. For example, type "60" to make the video 60 fps.

- Click "Sequence" > "Render Selection."
And that's it! That is how you change a video clip's frame rate in Adobe Premiere Pro.
How To Make 120 FPS Videos With Premiere Pro
Videos that are 120 fps are very popular now. If you are a gaming content creator on YouTube, you probably record videos at this frame rate. You'd want to edit that footage and export it at the same frame rate.
Adobe Premiere Pro allows you to do that. But it's a little bit of a hidden feature. When creating a sequence, you may notice that the highest the frame rate can go is 60 frames per second. That's obviously not the number that we want. Don't worry. There is a workaround. The best thing is that it's super easy.
Follow these steps to change your video to 120 fps:
- Import your 120 fps video to Adobe Premiere Pro.
- Select your footage. Drag it to your timeline or the tab where the text says, "Drop media here to create sequence."

- Select the timeline panel. Click "Sequence" > "Sequence Settings."
- Check the "Timebase" section. It should say "119.88 frames/second," 120 fps when rounded off.

- Edit the video as needed and render it. The output should stay at 120 fps.
How To Change Video From 30 FPS to 60 FPS in Premiere Pro
Do you have a video recorded at 30 frames per second, and do you want it at 60? Here's a simple solution to that. Follow these steps in Adobe Premiere Pro to double the video's frame rate.
- Open Adobe Premiere Pro. Click "File" > "New" > "Sequence."

- Click "AVCHD" > "1080p" > "AVCHD 1080p60" > "OK."

- Import your 30 fps video into Adobe Premiere Pro.
- Drag the video into the timeline.
- Click "Keep existing settings."

- Right-click the video in the timeline. Select "Time interpolation" > "Optical Flow."

- Press the "Enter" key. Wait for the processing to finish. This can take hours.
- Click "File" > "Export" > "Media."

- Select a preset.
- Scroll down to the "Effects" section to check if the frame rate is at 60 fps. If not, change it to 60 fps.

- Click "Export."
How to Convert 60fps to 24fps in Premiere Pro for a Cinematic Look
If you've shot your footage at a high frame rate like 60fps but want to achieve that classic, smoother "cinematic look" often associated with 24fps, Premiere Pro allows you to reinterpret your footage. This process is also useful when you need to match 60fps clips with a 24fps sequence timeline without speeding them up. Here's how to do it:
- Locate Your Clip: In the Project panel, find the 60fps video clip you want to convert.
- Modify Footage: Right-click on the clip and select "Modify" > "Interpret Footage...".
- Assume Frame Rate: In the "Interpret Footage" dialog box, select the "Assume this frame rate" radio button.
- Enter New Frame Rate: Type "24" (or your desired target frame rate, like 23.976 for precise film timing) into the box.
- Click OK: Premiere Pro will now treat your 60fps clip as if it were shot at 24fps. This means the clip's duration will increase (it will play back slower), effectively giving you a smooth slow-motion effect if the original motion was at normal speed. If you simply want to conform it to a 24fps timeline without slow motion, ensure your sequence settings are also 24fps and place the interpreted clip into the sequence.
Important Considerations:
- Playback Speed: Directly interpreting 60fps footage as 24fps will result in the clip playing back at 40% of its original speed (24/60 = 0.4). This is often desired for smooth slow motion.
- Conforming to a Timeline: If your goal is to fit the 60fps footage into a 24fps sequence without this inherent slow-motion effect (i.e., playing at normal speed but with fewer frames displayed per second), you would typically place the original 60fps clip into a 24fps sequence. Premiere Pro will then drop frames to match the sequence's frame rate. The "Interpret Footage" method is more about changing the fundamental timing of the clip.
- Audio Pitch: When footage is slowed down significantly by reinterpreting the frame rate, the audio pitch will also be lowered and slowed. You may need to detach and separately adjust or replace the audio.
- Motion Blur: Footage originally shot at 60fps will have less motion blur per frame than footage shot natively at 24fps (assuming similar shutter speeds relative to frame rate). When converted to 24fps, this can sometimes result in a slightly different, more "staccato" look to the motion compared to native 24fps footage, though this is often subtle.
By using the "Interpret Footage" command, you gain control over how Premiere Pro sees your clip's native frame rate, allowing for creative retiming and conforming workflows to achieve that sought-after cinematic feel.
Frame Rate Conversion: Best Practices at a Glance
| Conversion Scenario | Recommended Method | Why & Key Benefit | Potential Pitfalls |
|---|---|---|---|
| 60fps → 24fps | Interpret Footage | Creates smooth, cinematic slow-motion (40% speed). | Audio pitch changes; may require a separate fix. |
| 30fps → 60fps | Time Interpolation (Optical Flow) | Generates new frames for ultra-smooth results. | Can create visual artifacts; very render-intensive. |
| 120fps → 24fps | Interpret Footage | Ideal for extreme slow-motion (20% speed) in action shots. | Requires high shutter speed during filming to avoid blur. |
| Mixed FPS in Sequence | Set Sequence to your main delivery FPS. | Premiere conforms clips; use "Frame Blend" for smoothness. | Inconsistent motion feel if not managed carefully. |
Alternative: Easily Change Frame Rates with Wondershare Filmora
 secure download

What if you don't have Adobe Premiere Pro or don't like this tool? What's a good alternative? That would be Wondershare Filmora.

If you find Premiere Pro's interface complex for quick adjustments or are looking for a more streamlined alternative, Wondershare Filmora offers an intuitive way to change video frame rates easily. Filmora is designed with a user-friendly workflow, making tasks like adjusting FPS from 30fps to 60fps, or any other conversion, straightforward even for beginners. Its clear options for frame rate modification can save you time and effort.
How To Change the Frame Rate in Wondershare Filmora
Changing a video's frame rate in Wondershare Filmora is super easy. Even a child can do it due to how simple the steps are. Here, read this 5-step guide to change a video's frame rate using this amazing video editor.
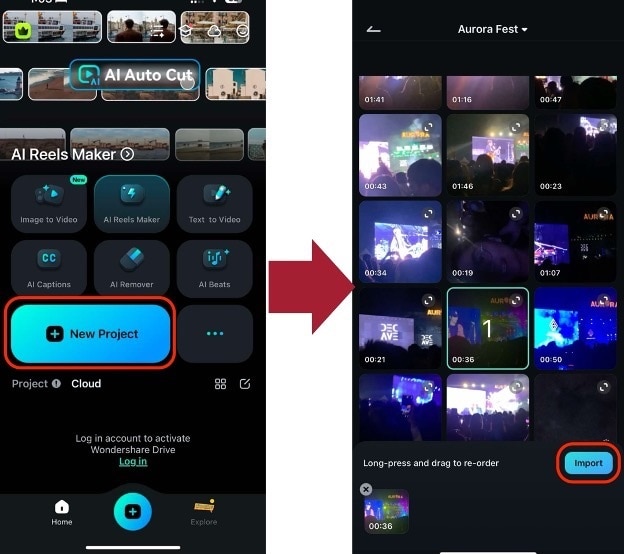
- Launch Wondershare Filmora and create a new project.

- Import the video whose frame rate you want to change.
- Drag the video into the timeline.
- Click "Export."
- Select the format you want the output file to be in. Find the "Frame Rate" in the options, click the drop-down menu, and select the frame rate that you want. Click "Export."

secure download
How To Change Frame Rate in Filmora Mobile
Next, you'll learn how to change fps or frame rate using your mobile phone. While these functions traditionally have only been available in more powerful devices like desktops, smartphones are strong enough to have them today. Thus, tools like Filmora bring amazing features to your phone. Now, you can adjust videos for different platforms or needs without a problem.
To change frame rates via Filmora mobile, follow the steps below:
Step 1: Install Filmora from the App Store or Play Store. Launch the app and click New Project > Import to open the video you want.
Step 2: Press Export.
Step 3: Go to Settings, then select the Frames per second value you need.
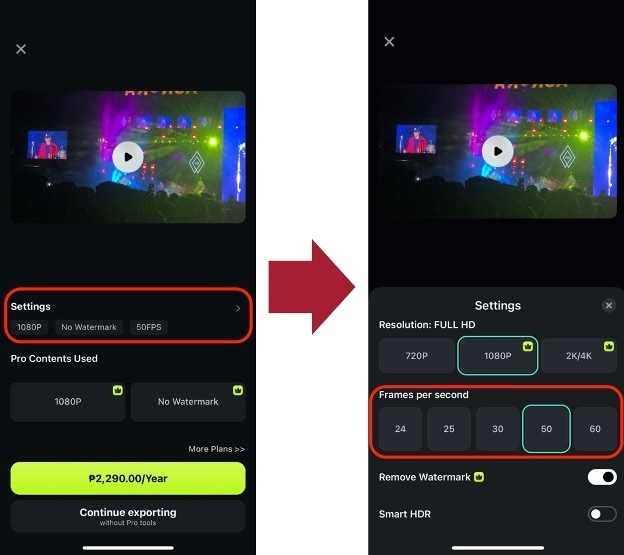
As you can see, the steps are similar to those in the desktop version. This will effectively change the frame rate according to your needs.
secure download
Conclusion
Getting the frame rate of a video right is important, so you should not neglect it. It greatly affects your audience's viewing experience. Thankfully, if you make mistakes, you can correct them with video editors like Premiere Pro. If it's not to your liking, you can use Wondershare Filmora instead - it's the best alternative.
Filmora lets you change a video's frame rate very easily. Also, it gives you a bunch of other features you might enjoy using. And here's some good news: this software app is affordable! You can also download the free trial to give it a shot.
FAQ About How to Change Frame Rate in Premiere Pro
-
Q1: What is the best frame rate for YouTube videos in Premiere Pro?
For YouTube, common frame rates like 24fps (for a cinematic look), 30fps (standard for many digital videos), and 60fps (ideal for gaming, sports, or smooth motion) all work well. Choose based on your content type and desired aesthetic. Premiere Pro can export to all these frame rates. Consistency within your video is key. -
Q2: Will changing frame rate in Premiere Pro affect video quality?
Yes, it can. Converting to a lower frame rate (e.g., 60fps to 24fps) involves discarding frames, which can make motion appear less smooth or slightly choppy if not handled carefully. Converting to a higher frame rate (e.g., 24fps to 60fps) requires Premiere Pro to create new frames (interpolation), which can sometimes introduce artifacts. Using features like Optical Flow can help, but results vary. -
Q3: How to fix choppy video after changing frame rate in Premiere Pro?
Choppy video can result from mismatched sequence settings, aggressive frame rate conversions, or how Premiere Pro handles dropped/interpolated frames. Try these:- Ensure your sequence frame rate matches your desired output frame rate.
- When conforming footage, try right-clicking the clip in the timeline and experimenting with "Frame Blend" or "Optical Flow" under "Time Interpolation."
- If you used "Interpret Footage," ensure the new rate makes sense for your source footage and desired outcome. Avoid extreme changes if possible.
- Re-evaluate if the original footage can be used without drastic frame rate changes.
-
Q4: Can I change the frame rate of multiple clips at once in Premiere Pro?
Yes, you can. In the Project panel, you can select multiple video clips, then right-click on any of them and choose "Modify" > "Interpret Footage...". Any changes you make to the frame rate settings here (like "Assume this frame rate") will apply to all selected clips.
