


 100% Security Verified | No Subscription Required | No Malware

 TL;DR:
To create a lock-on stabilization effect without losing video quality, you must shoot wide 4K footage and apply specific tracking tools like Filmora's Mocha plugin, FCPX Stabilizer 2.0, or Premiere Pro's Mask to Transform extension to keep a subject perfectly centered.
● Source footage must be recorded in at least 4K resolution and framed wider than a standard close-up to provide enough margin for zooming in, which is a mandatory step to hide the black edges created by the post-production re-framing.
● Wondershare Filmora accommodates different project sizes by offering a manual keyframing method using a temporary text marker for short clips, and an integrated Boris FX Mocha plugin using X-Spline layers for automated tracking on complex movements.
● Final Cut Pro X and Premiere Pro both require external plugins to achieve this effect, relying on FCPX Stabilizer 2.0 for direct tracking, or a Premiere Pro workaround that converts a dummy Gaussian blur mask into tracking data using the Mask to Transform extension.
Ask AI for a summary
 ChatGPT
 Perplexity
 Gemini
 Claude
 Grok
Grok
Excellent Video Editor - Wondershare Filmora
Smart video editor
Numerous effects to choose from
Detailed tutorials provided by the official channel
Shaky footage is a common issue that can undermine even great video content. While no one aims to shoot unstable clips, it often happens in real-world filming. That’s where the lock-on stabilization effect proves useful.
This effect keeps a specific point in the frame steady—making it look like the camera is locked onto the subject. It’s especially popular in workout or dance videos where motion needs to stay centered and clear.
With lock-on stabilization, you can turn shaky clips into smooth, professional-looking footage without losing quality.
In this article, we’ll highlight the top video editors that support lock-on stabilization. Let’s get started.
Part 1: How to Create Stabilization Effect with Filmora
Wondershare Filmora offers two powerful methods to achieve the lock-on effect. The first is a manual keyframing method perfect for short clips, while the second utilizes the professional-grade Mocha Filmora plugin for automated, precise tracking on more complex shots.
Solution A: The Manual Keyframing Method
This method gives you full manual control and is great for short, simple movements.
First, you'll want to slightly zoom into your clip to avoid black edges later. Double-click your clip, go to the Video > Transform tab, and increase the Scale. To create a reference point, drag a text effect to the track above, change the text to a '+' sign, and place it in the center of the frame. Lock this text track.
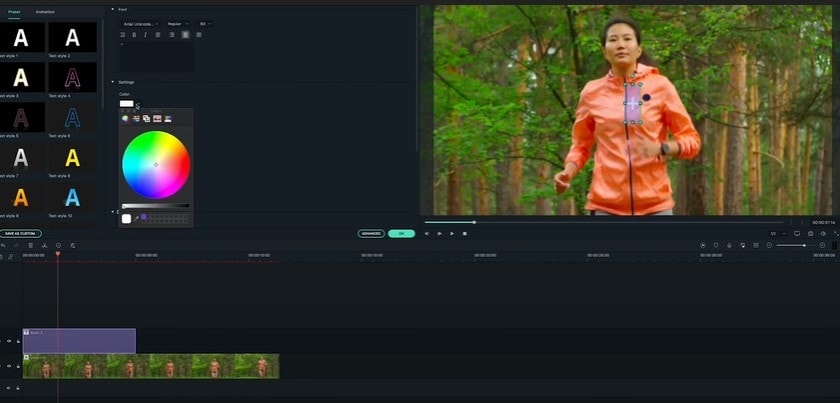
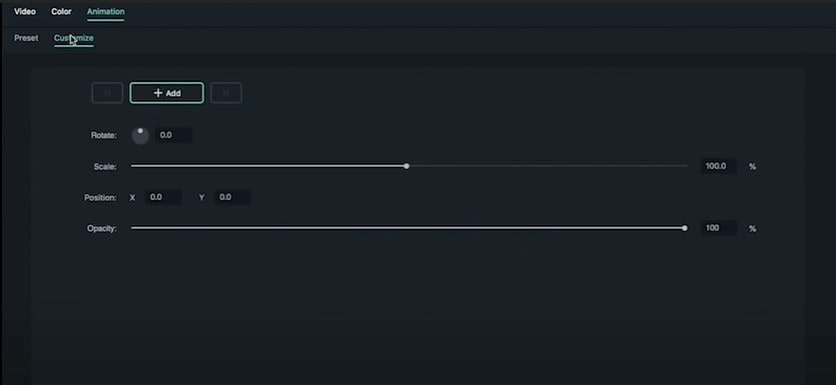
Now, double-click your video clip again and go to the Animation > Customize tab. Click 'Add' to create the first keyframe. Move the playhead forward a few frames, then drag your video in the preview window until the object you're tracking is back under the '+' marker. This creates a new keyframe.
Repeat this process for the duration of the effect. When finished, unlock and delete the text marker track. Your manually created lock-on shot is complete.
Wondershare Filmora
Get started easily with Filmora's powerful performance, intuitive interface, and countless effects!

Solution B: Automated Tracking with Mocha Filmora (The Pro Method)
For longer clips or more complex movements, manual keyframing is tedious. This is where Filmora's integrated Boris FX Mocha engine shines. It automates the tracking process, providing a result that is both faster and more precise than manual methods.
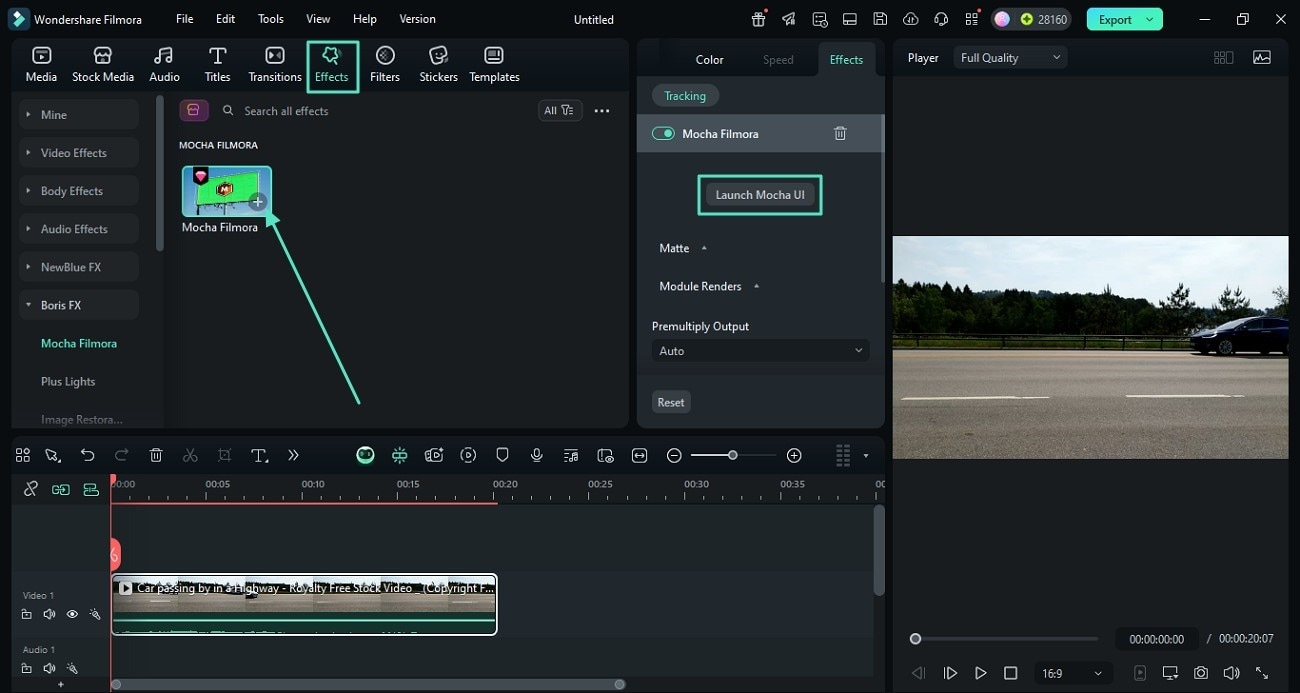
Step 1. Apply and Launch Mocha Filmora: Go to the Effects > Boris FX panel and drag the Mocha Filmora effect onto your video clip. In the effects settings on the right, click "Launch Mocha UI".
Step 2. Track the Object: Inside the Mocha interface, use the "Create X-Spline Layer" tool to draw a shape around the object you want to lock onto. It doesn't need to be perfect. Then, ensure the motion parameters (like Translation, Scale, Rotation) are selected in the "Track" module and click the "Track Forward" button. Mocha will automatically follow the object.
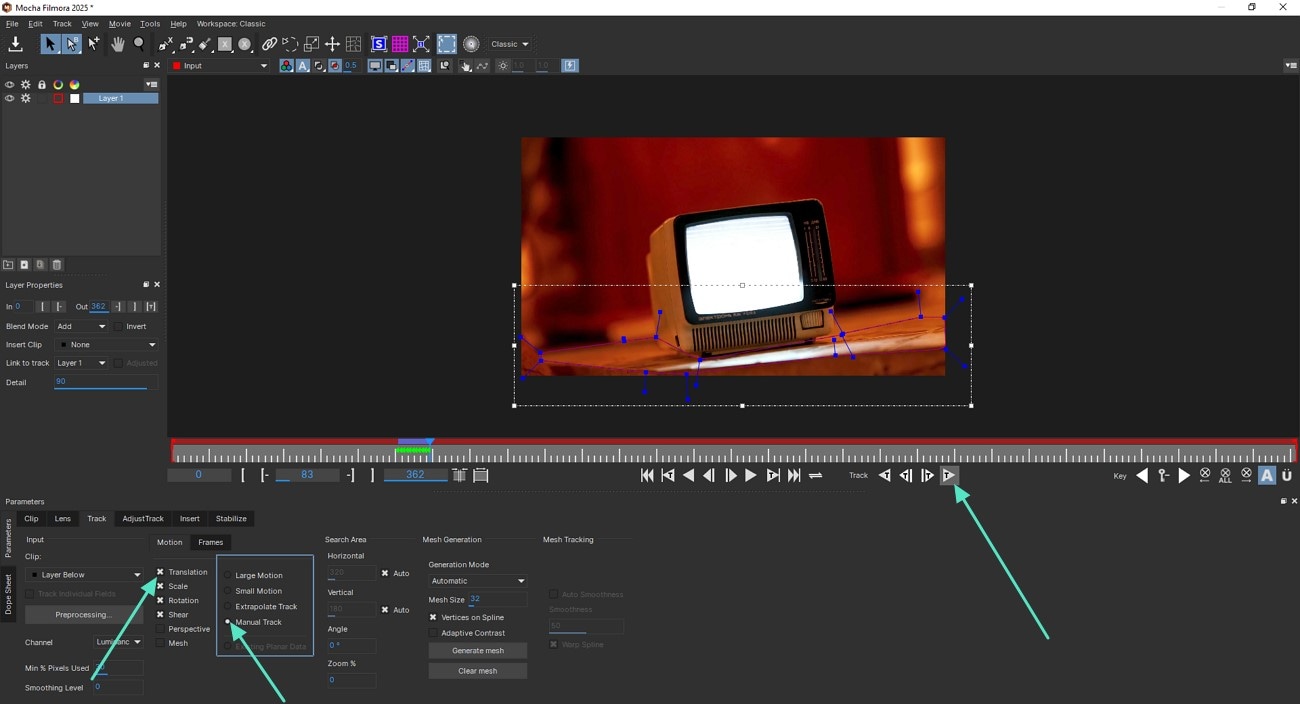
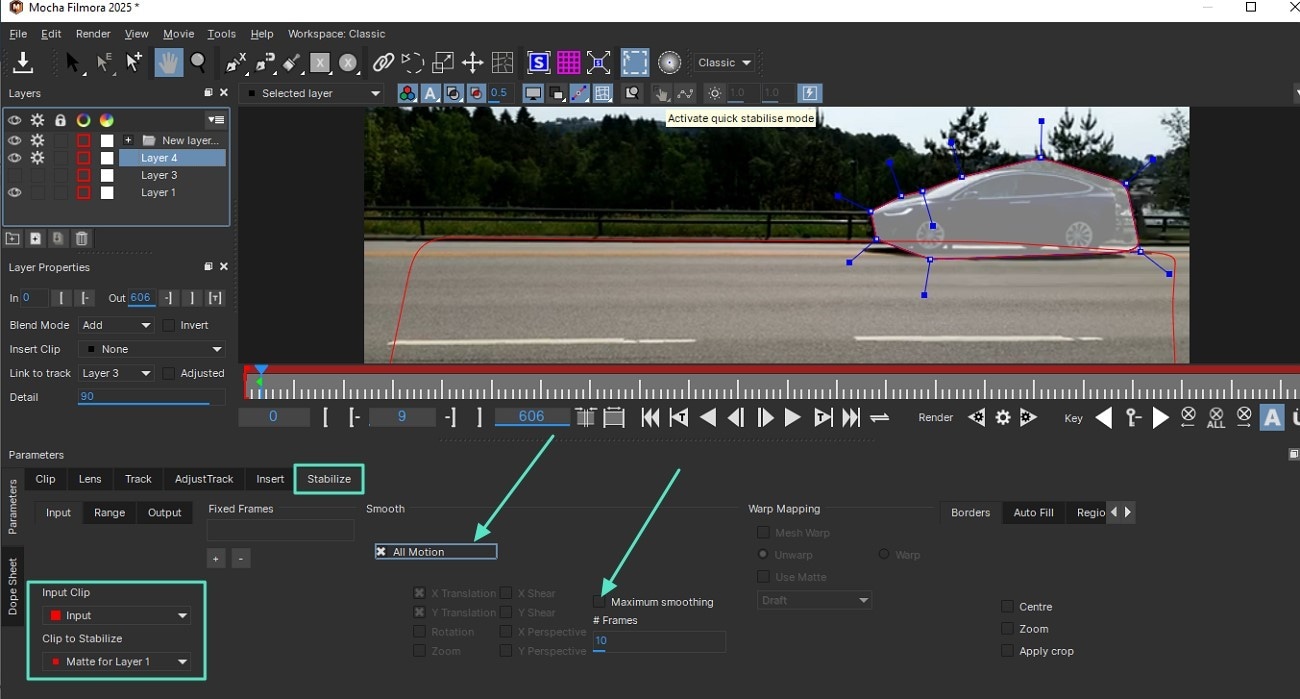
Step 3. Apply Stabilization Data: Once tracking is complete, go to the "Stabilize" module at the bottom. Here, you can adjust the smoothing and strength. The tracking data you just created will be used to move the video frame, keeping your tracked object perfectly centered. Simply save and close the Mocha UI.
Back in Filmora, your clip will now have a perfect, automated lock-on effect. You may need to scale the clip slightly (in Filmora's Transform settings) to hide any black edges created by the movement, just like with the other methods.
Part 2: How to Create Stabilization Effect with Final Cut Pro X
Creating a stabilization effect with just the camera is nearly impossible—that’s why it’s done in post-production. In this example, I’ve added a 2-second clip to the timeline in Final Cut Pro. Before filming, keep a few key tips in mind:
- Shoot in 4K for more flexibility in post
- Use a high shutter speed
- Maintain clean tracking
- Frame your subject properly
Once your footage is ready, bring in the FCPX Stabilizer 2.0 plugin and apply it to your clip. For this lock-on effect, uncheck the Rotation and Scale options—we won’t need them. Then, open the Track Editor, which launches a new window where you’ll track your footage and begin stabilization.

So over here, we've got a couple of shape options, but I'm perfectly okay just using the square. Now, these controls down here do not actually affect our footage. It just makes things a little bit easier to see when we're tracking. You've also got a hand here to move things around, and you can select it again to turn it off. Take the box and put it around the air pod, and then adjust the size accordingly.
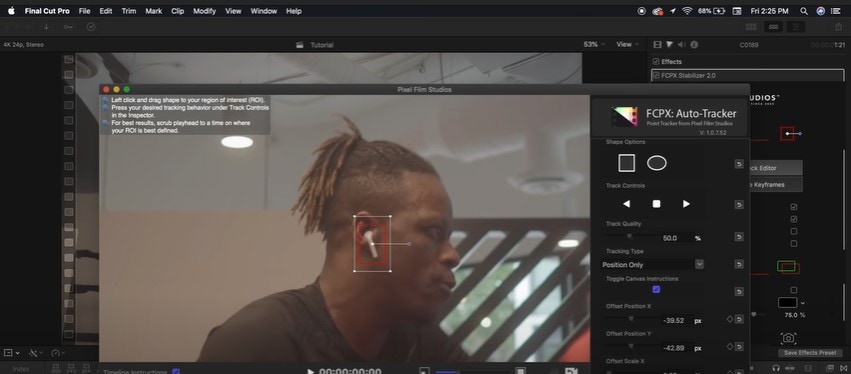
Make sure that that your playhead is set to the beginning of your timeline down here because that is where we're going to be starting our track. Push the track quality all the way up to 100%. Leave the tracking type on position only. Click the track forward button, and you can now see that the auto tracker has started tracking frame by frame without us actually having to go in and create keyframes individually on our own. And you can see that the auto tracker has actually done a perfect job tracking our AirPod. So once we're happy with that, we'll go ahead down here and click the export data button.
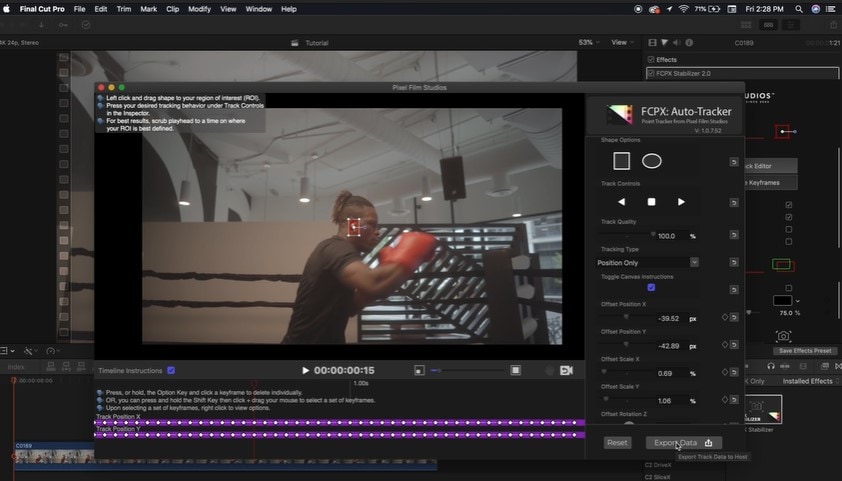
And just like that, you will have a perfectly tracked clip, and your object is in the center of the frame with Final Cut Pro.
Part 3: How to Create Stabilization Effect with Premiere Pro
To stabilize a shot with Premiere Pro, so the object stays exactly in the center, follow these steps:
Create a mask around the point that we want to track by using a Gaussian blur effect in the effects control. Click on the mask to create a mask around the object, and if you move it, you will be able to automatically track the movement of this mask, the position of this mask. We are not going to be using a Gaussian blur. The only reason why I added it is because we need some kind of mask that would not change our clip.

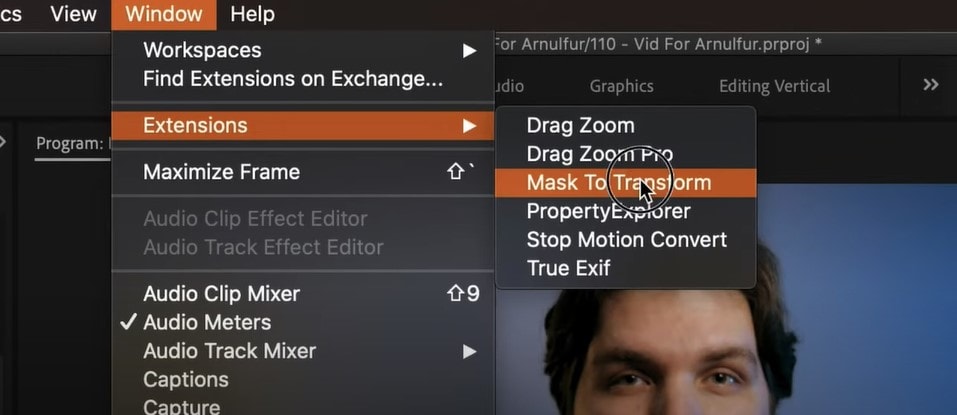
We could take the keyframes of this mask path and convert it into the keyframes of position. It is not normally possible inside Premiere Pro. So to achieve this, we are going to need a plugin. To open up the plugin, go to window extensions and click the plugin called mask to transform. Select the position, rotation, or scale. Click on position. Go to this Gaussian blur and click on the mask option. Right-click on it and copy, then go to the plugin and click get from the clipboard.
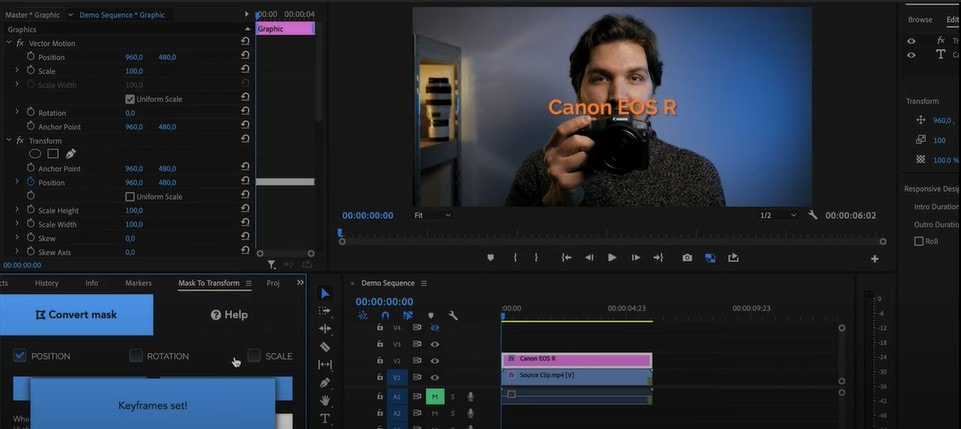
The plugin will tell you that how many keyframes you have read successfully. You can just apply those keyframes as a transform effect. For instance, I have the motion graphics layer right here if I prolong it, and if I use it as transform, as you can see, it is pasting those keyframes. When it is done, I can scrub through, and the text is perfectly following the object in the shot.
To stabilize the shot. Let's actually delete this text layer as we don't need it. Select the clip itself and paste those keyframes as transform. Transform effect will be added, and our position keyframes will be pasted if you want to move the clip to the left when the camera moves to the right and vice versa. Collapse this and add another transform effect. Go to the effects, click on transform and drag it below the transform that the plugin created for you. Scroll down and go to rotation and rotate it by 180 degrees.
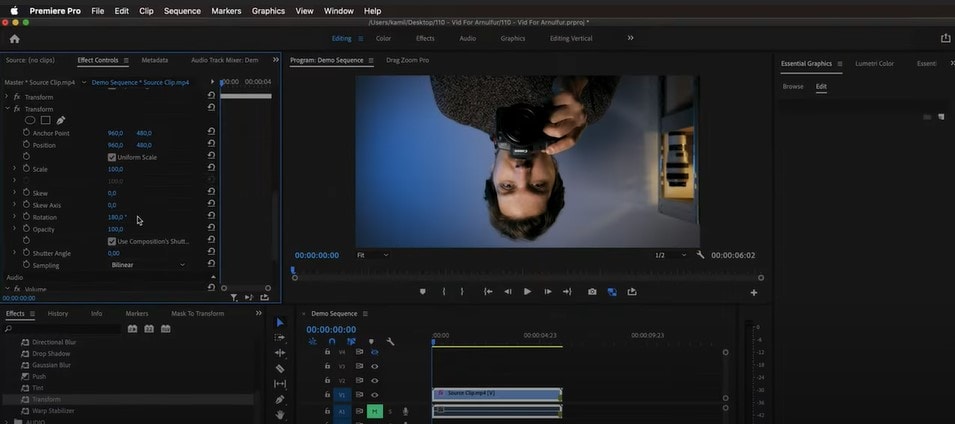
Now rotate it back 180 degrees again in order to fix the fact that we now have upside damn clips: right-click here and nest. When the clip is nested, go to the motion properties of this nest. Go to rotation and rotate it back to 180 degrees.
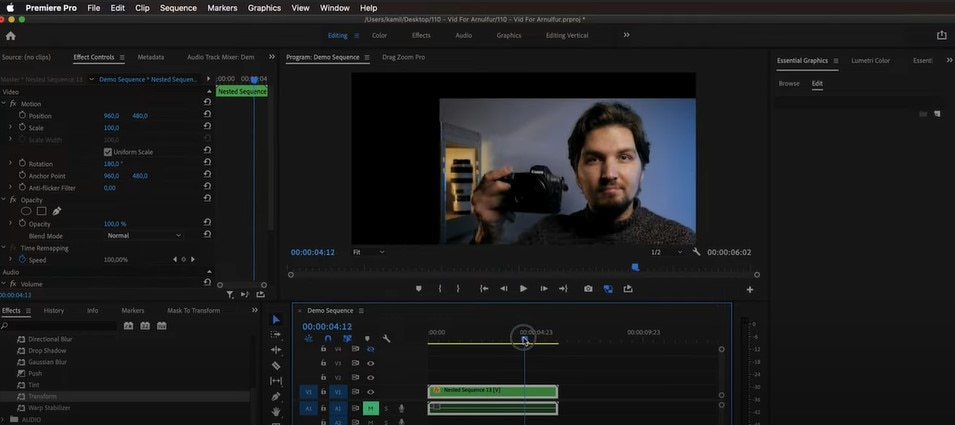
Just like that, you will have a perfectly stabilized shot in Premiere Pro. In the end, zoom into it a little bit to get rid of the black bars.
Part 4: FAQ - How to Shoot a Video that is Suitable for the Lock-on Stabilization Effect?
Shoot 4K video, so you don't lose resolution when zooming in
It's essential to realize that because to the re-framing, you'll need to scale in quite a bit, so the video you're utilizing should ideally be shot in 4K at the very least if you're downscaling to 1080p, or even higher if you're intending on delivering in 4K. You will need a high-resolution clip because you will have to blow up the image a bit to avoid black edges.
Shoot wider to avoid the black bar
Keep in mind that the shots should be a little broader than a standard close-up, giving you plenty of flexibility to alter the margins around your subject and avoid black bars.
