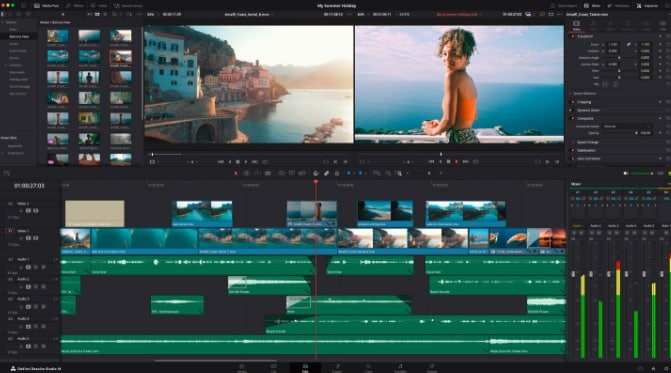
Does DaVinci Resolve support multicam editing? Yes! But if you're not new to this feature, it’s easy to feel lost among the numerous options and settings available.
The multicam editing feature is incredibly useful for film editors and anyone working on projects with multiple camera angles, like interviews live performances, or events. With this feature, you can easily switch between different camera views as you edit and make your workflow smoother.
But to effectively manage and edit multiple camera angles on DaVinci Resolve, you need to familiarize yourself with setting up multicam clips, syncing footage, and using the multicam viewer. We’ve prepared a comprehensive guide that breaks down each step of the process.
In this article
Part 1. Quick Overview of Multicam Editing in DaVinci Resolve
When working on footage with different angles, you may initially think of syncing the cameras and begin cutting them sequentially. However, since it consumes a significant amount of the editor’s time reviewing footage from each camera, it’s better to use the multicam editing feature that’s available on many video editing software like DaVinci Resolve.
Multicam editing in DaVinci Resolve is pretty similar to that in other video editing programs that support this feature. It involves setting up a multicam clip, which groups together various camera angles into a single, manageable clip. You can then switch between these angles in real time while editing.
Part 2. How to Create and Edit Multicam Clips in DaVinci Resolve
You already have a solid understanding of multicam editing, and now it's time to take the next step by learning how to do multicam editing in DaVinci Resolve. First, you need to create a multicam clip, and then you can edit either the entire clip or specific segments, depending on your project needs.
How to edit multicam in DaVinci Resolve
- Step 1: Create a New Project and Import Media
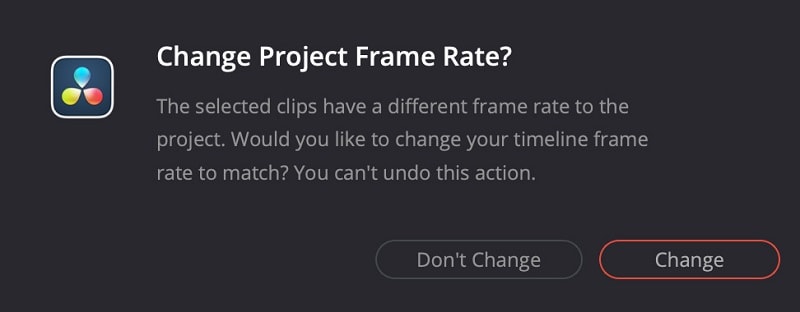
After creating a new project, import all of your footage. If the imported clips’ frame rates differ from the project’s default, a prompt will appear. You can adjust the project frame rate to match the clips by clicking “Change.”
- Step 2: Creating a Multicam Clip
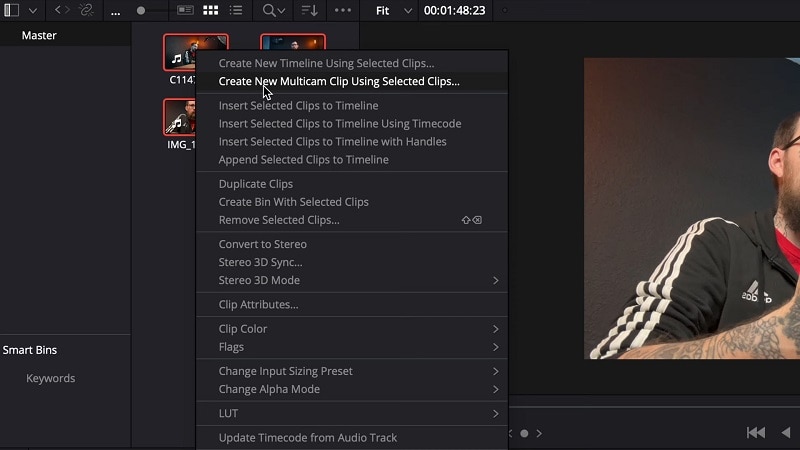
In the Media Pool, select all the clips you want to include in the multicam clip. Right-click on one of the selected clips and choose "Create Multicam Clip Using Selected Clips."
- Step 3: Set Up Multicam Clip
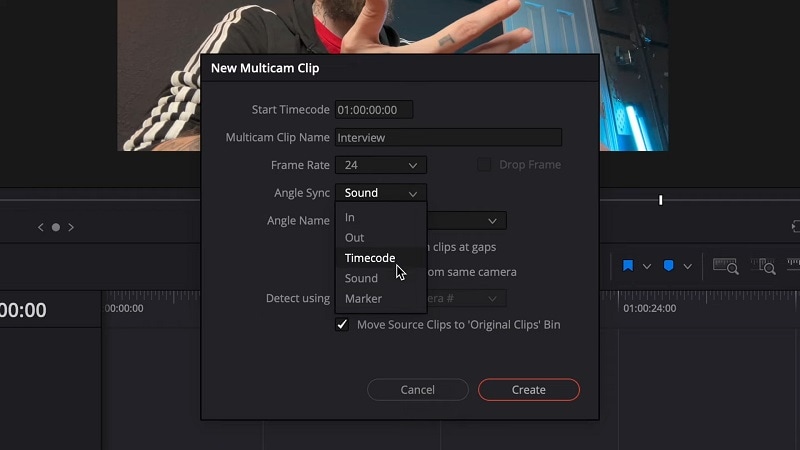
You can enter a name for the multicam clip for easier navigation. Then, make sure the frame rate matches the clips.
Choose how clips should be synced (In, Out, Timecode, Sound, or Markers). Syncing by audio is easiest if all clips have the same audio, but using markers might be easier if you use clapper slates. Click Create to proceed.
- Step 3: Adjusting the Multicam Clip
Select the multicam clip in the timeline and choose Clip > Open in Timeline from the menu bar. Or, you can use keyboard shortcuts to edit your multicam clip more quickly: Press Left/right arrows for single-frame adjustments or Shift + left/right arrows for five-frame adjustments.
Then, click the video icon in the track header to toggle visibility for tracks. You can add or delete tracks, rearrange, and rename tracks as needed.
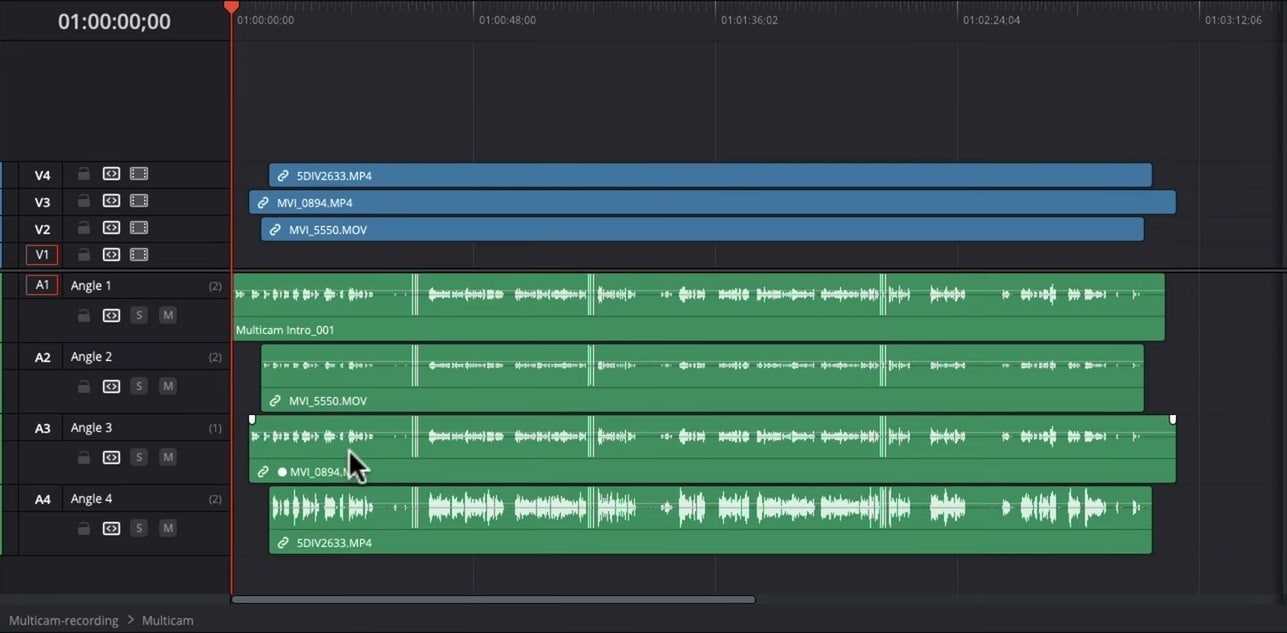
- Step 4: Editing the Multicam Clip
Next, switch to Multicam View. To view different angles, select "Multicam" from the menu in the lower-left corner of the screen. If you don’t see two monitors, switch to a dual monitor view by clicking the corresponding icon at the top right of the interface.
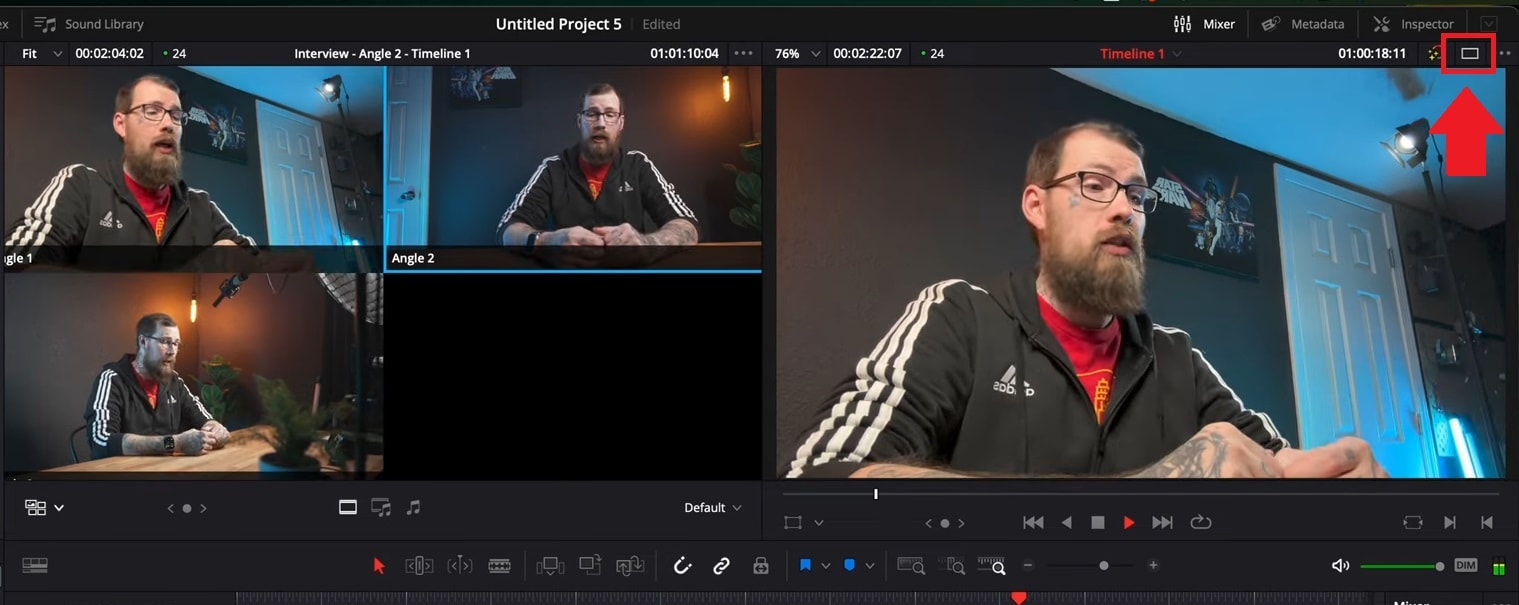
Then, position the playhead where you want to switch angles. To change angles, click on the desired angle in the Multicam Viewer or use shortcut numbers (1-9). You can also navigate to Clip > Multicam Cut and choose the angle.
Please note that you need to keep audio and video in sync. Don’t detach audio unless you intend to remove it.
- Step 5: Flattening the Multicam Clip
Once your edit is complete, right-click on the multicam clip in the timeline and select "Flatten Multicam Clip." It will merge all the camera angles into a single, consolidated clip, finalizing your edits and making the clip easier to manage in the timeline moving forward.
Part 3. Multicam Editing Software Alternative for Beginners: Wondershare Filmora
After learning the basics of how to do multicam editing in DaVinci Resolve, some people may find the steps quite complex, especially for beginners. DaVinci Resolve is packed with powerful features, but its advanced workflow and detailed customization options may not be suitable for those just starting out.
Thankfully, the multicam editing feature is not exclusive to DaVinci Resolve only. If you’re looking for a simpler, more beginner-friendly alternative, Wondershare Filmora offers a more intuitive approach to multicam editing while still providing the essential tools to create a professional video.
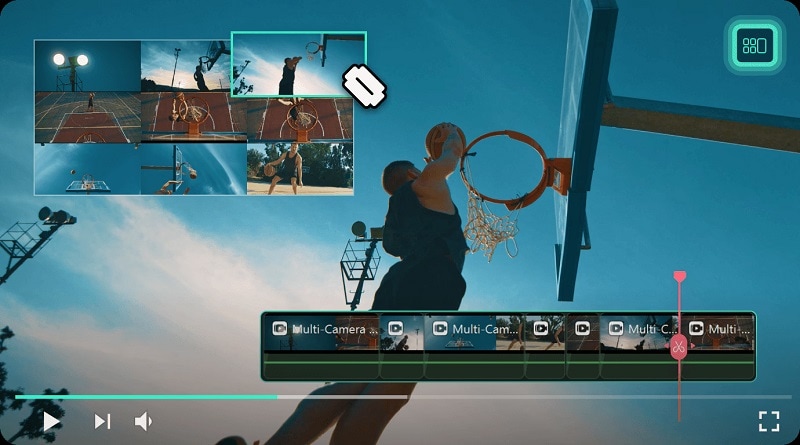
Editing multiple cameras with Filmora only takes a few steps. You can easily sync clips based on audio or first frame, and switch between different angles with just a click or two. Plus, with its built-in effects, transitions, and real-time preview, you can refine your multicam edits without sacrificing the quality.
How to Do Multicam Editing on Filmora
- Step 1: Download and Install Filmora
The multicam editing feature is introduced on Filmora 14. Make sure you have installed or updated the latest version of Filmora.
- Sync multiple cameras and allow quick angle switches
- Vast video/audio effects and creative assets.
- Powerful AI for effortless content creation.
- Intuitive, professional yet beginner-friendly.
- Works on Mac, Windows, iOS, and Android.

- Step 2: Create a new project and import your videos
Launch Filmora and create a new project. Then, import all the video clips you want to use in your multicam edit. You can do this by clicking on the Import button on the interface.
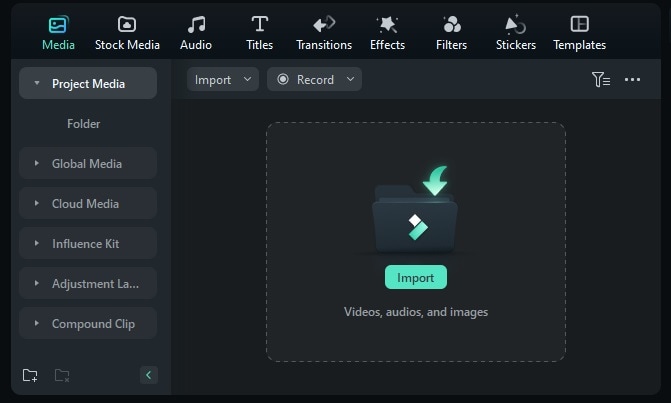
Note: Make sure all the clips have the same audio or start with the same scene for easier synchronization.
- Step 3: Sync the Video Clips
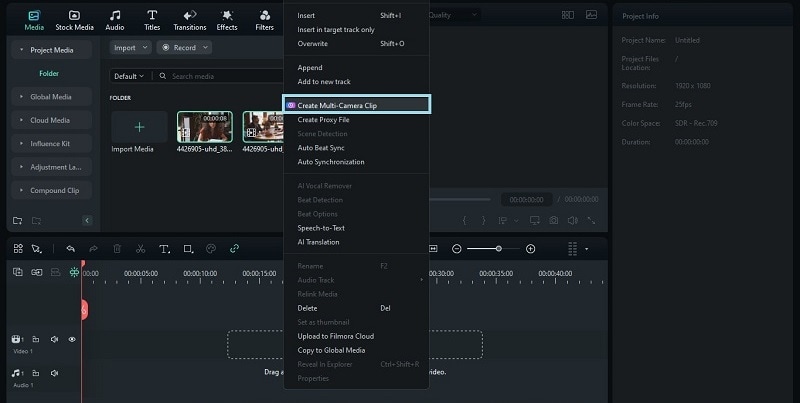
To sync your video clips, select all the clips you want to include in your multicam edit on the Media panel. Then, right-click and choose Create Multi-Camera Clip from the drop-down menu.
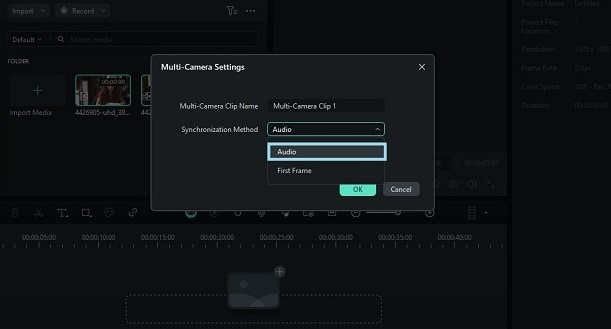
Filmora allows you to sync clips using audio or the first frame, with audio being the easiest method if all clips have the same sound.
- Step 4: Switch the Camera Angle
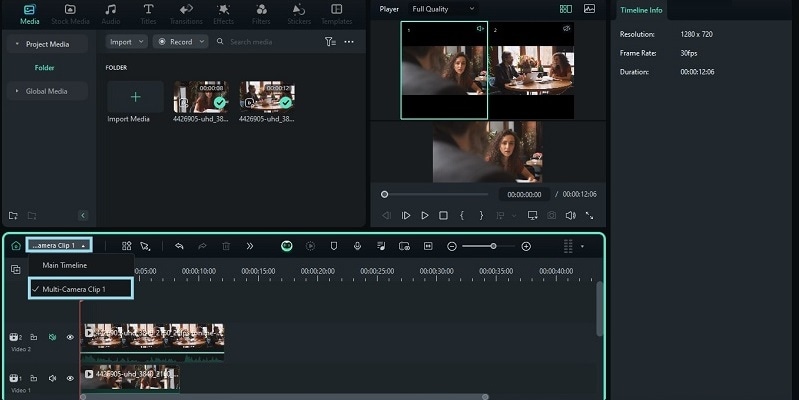
Now that your multi-camera clip is set up, you can start editing and switching between angles from your multicam video. To do this, switch to multi-camera view by clicking on the “Switch Multi-Camera View” button at the top of the preview window.
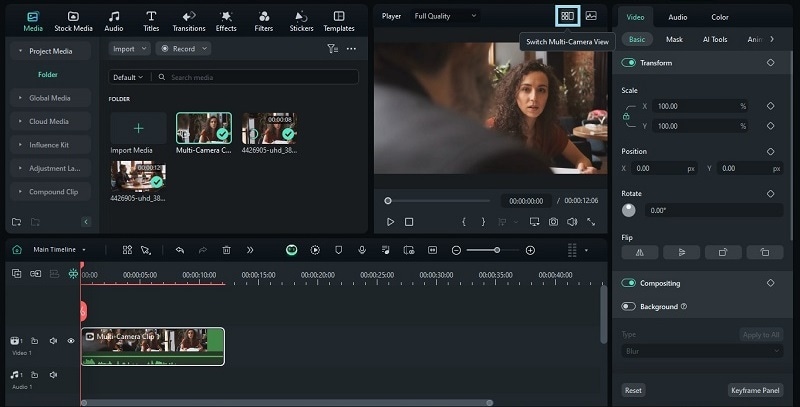
In this view, you can switch between different angles by simply clicking on the desired camera while the video plays. This is your "Main Timeline," where you can also adjust colors, add effects, and make other edits as needed to refine your final video. Any edits made here will apply to all the clips.
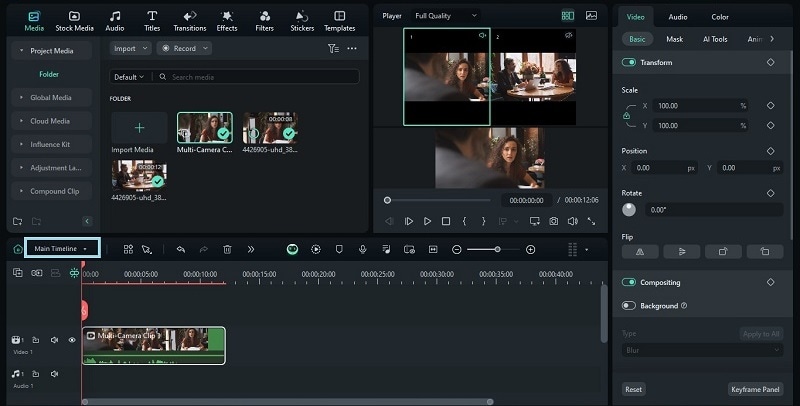
To make changes to individual clips, you need to switch from the "Main Timeline" to the specific multicam clip you’ve created. Here, you can perform adjustments like color correction or applying filters to that clip.
Part 4. DaVinci Resolve vs. Filmora Multicam Editing Feature
Now that you are presented with two multicam editing software, which one should you use? Check out the following comparison table below to help you with your decision.
| Wondershare Filmora | DaVinci Resolve | |
| Learning Curve | Beginner-friendly with a more intuitive interface | Steep learning curve due to its advanced features and detailed customization options |
| Affordability | Free version available. Offers multiple pricing models that cater to different needs and budgets. | Free version available. The Studio version offers additional features at a higher cost ($295). |
| Performance and Speed | Generally faster and less demanding on hardware | High performance, but requires powerful hardware for smooth operation |
| Syncing Options | Simplified syncing options mainly based on audio or the first frame, which is easy and quick for most multicam setups | Advanced syncing options including audio, timecode, markers, and more |
| Ideal for | Beginners and professionals who are looking for a quick edit | Users who are comfortable with complex software. |
In short, DaVinci Resolve is ideal for users who need precise control and are comfortable with a steep learning curve. But if you just want a straightforward solution that gets the job done efficiently, Filmora offers a more accessible and intuitive approach to multicam editing.
Conclusion
The multicam editing feature is the perfect solution to efficiently manage and edit footage from multiple camera angles. Among video editing software that supports this feature, DaVinci Resolve and Filmora are popular choices.
DaVinci Resolve multicam editing offers advanced, precise control ideal for experienced editors who need detailed customization. Meanwhile, Filmora provides a more intuitive and user-friendly approach suitable for beginners and those seeking a quicker, more straightforward editing process.


