Versatile Video Editor - Wondershare Filmora
An easy yet powerful editor
Numerous effects to choose from
Detailed tutorials provided by the official channel
In this guide, we’ll learn all about the voxel art—how it operates, the best free software you can use to create your own, and we even have some voxel freebies worth downloading!
Ready to dive in? Let’s begin!
A voxel art is generally a 3D pixel artwork. However, you can also call it a pixel with volume, where the term "voxel” originates. So it's a combination of the words “pixel” and “volume.” We’ll go more through its details as follows!
Part 1: What is Voxel Art?
Voxel art is a form where 3D models get wholly constructed out of 3D cubes known as voxels. These voxel models are created by artists using a particular type of software called a voxel editor or voxel art software. Once finished, these models can be helpful for various purposes, such as creating images shared to different networks such as Instagram or exported as 3D model files for 3D animations and games.
Making voxel art can be the perfect introduction to 3D modeling and allow for 3D materials experimentation. It can be as simple as creating with Legos. Even though you have simple models, you can still make some beautiful renders, aiming at factors like materials, lighting, and composition.
The simplicity of making a minimal amount of voxels and still displaying your idea becomes an art in itself.
However, not all voxel art is simplistic. A lot can be incredibly ornate, with hours and hours dived into minor details. Some artists even create complex voxel art at first glance; you might not even interpret it as voxel art.
Part 2: What are the Differences between Voxel Art and Pixel Art?
The difference is that a pixel is a square and a 2D image with a 2D grid position and a single color value. In contrast, a voxel art is a cube and a 3D model containing a single color value and a 3D grid.
Pixels are stored in image formats. PNG as well as. JPG. Voxels arts works are stored in their forms, such as.VOX for MagicaVoxel and.VOXELS for Mega Voxels Play. Because of the different kinds of files saved, you also need to use a specific editor to use them. For images, Photoshop is the most popular software available. For voxel models, MagicaVoxel is the most widely used.
However, both a voxel art and pixel get locked into a grid. Since both are the smallest unit in a model and an image, they must be a whole number value. That means that a pixel cannot have an "X" position of 2.5. It has to be either 2 or 3. A voxel is bound to the same rules. It cannot have a "Z" position of 4.75. It will either round to 5 or be minimized to 4.
The other thing is that voxel art and pixel art should be a single color value. They cannot contain multiple colors or gradients. They have to be a solid color since they are the smallest unit.
So, these are slight differences along with some similarities between voxel art and pixel art.
Part 3: 3 Best Voxel Art Makers for Beginners
As with any digital art style, you have the right tools for the job to curate the most out of your talent and time. Whether you are making voxel art for games or simply for fun, having a dedicated 3D pixel art maker to the job in hand can save you hours of frustration.
Luckily, quality voxel art software is abundant out there, both free and paid, whose selection is given below in our three best lists of voxel art makers.
1. MagicaVoxel
MagicaVoxel has been around for five-plus years now and has become the go-to voxel art maker out there.
With such simple tools enough for first-time users, you can dive in and begin creating simple 3D models. In contrast, more advanced users take full advantage of the MagicaVoxels toolset, which is ever-expanding and can make practically anything their imagination narrates.
MagicaVoxel is available on both macOS and Windows, completely free. In addition, with the included .obj exporter, voxel objects can get imported into most 3D applications supporting this format, such as Cinema 4D and Blender.
2. Qubicle
Qubicle is a powerful 3D pixel art maker developed by Minddesk for creating voxel models for games and images. Like MagicaVoxel, it is also compatible with tools for editing and creating voxel models. In addition, qubicle has features like an unlimited matrix size (size of the model) and a simple to use color editor. One huge advantage of this voxel art software is supporting export formats such as DAE, FBX, and OBJ.
Many hit games produced using Qubicle consist of Shooty Skies and Crossy Road. There is a free trial that comes with all the features downloadable from their website.
3. VoxEdit
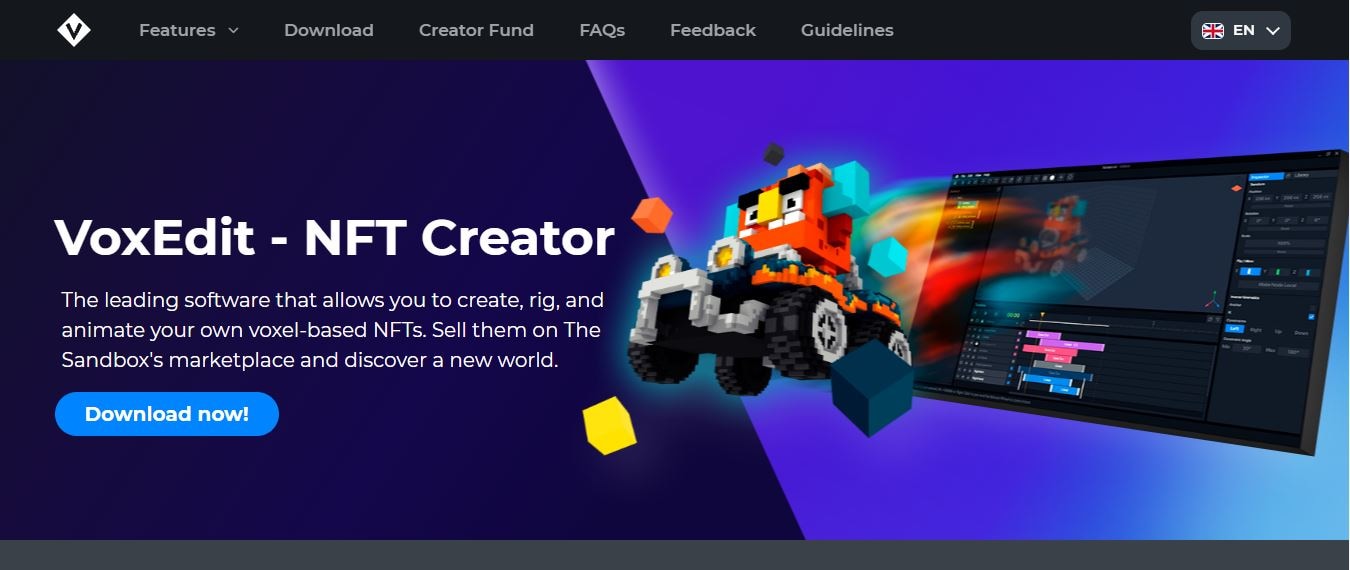
VoxEdit is our last best pick among the voxel art software designed for the Sandbox Game that runs on Windows, Linux, and macOS. Since the beginning, its primary purpose has been to give voxel artists a mobile voxel application without sacrificing the functionality expected in pro editors.
Nowadays, Voxel Max is in an open beta that can be accessed through test flight directly from their official site. But nowadays, it has added dozens of functions, making it a solid choice for creating your voxel art.
Part 4: How do you Make Voxel Art?
Voxel graphics are a speedy and super-easy way to create 3D content and have become highly famous for this reason. Of the various available tools, MagicaVoxel is one of the best, also from our choice given above. So, let’s have a look at this voxel art maker for creating one of my own!
This section will discuss the precise instructions to build your own Mr. Pig via voxel art. The artwork procedure is quite similar to how you'd dissect a poor little frog in Biology class — only in reverse. :]
Step 1: Create a New Model
Begin by creating a blank slate for yourself.
Choose the New tab under File Options to make a new model. Set the dimensions of the voxel model to 9 9 9, then hit the Zero tab under the Editor Options to clear the whole model.
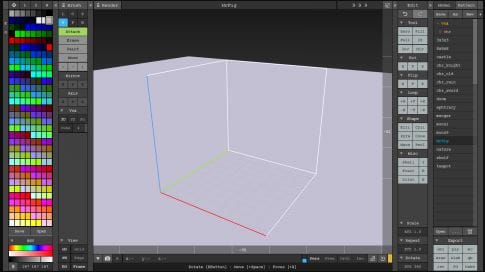
Source: koenig-media.raywenderlich.com
Name the model MrPig at the editor’s top panel and press Enter when you’re finished. Choose Save when prompted:
Note: Under the File options, your model will also now be available on the right-hand side.
Step 2: Create the Base
Now, begin by creating the base of Mr. Pig’s body.
Select a nice light piggy-pink shade from the color palette on the left.
Set the brush by hitting B to go into Box Mode, then hit the T tab to choose Attach option.
Slide to the position (x: 1, y: 7, z: -1). Left-click and long-press the mouse button while dragging to (x: 7, y: 7, z: -1). Release once you're there to create one voxel-high base.
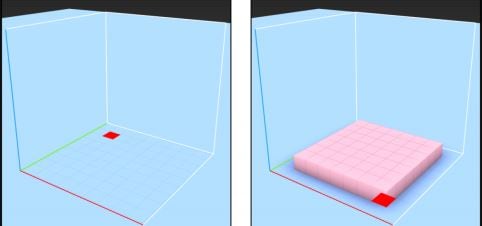
Source: koenig-media.raywenderlich.com
Step 3: Extrude the Base
Change the brush by hitting F to go into Face Mode, and ensure you select the Attach option.
Left-click the base layer's top panel to extrude it one voxel upwards. Repeat this until the base box is six voxels high:
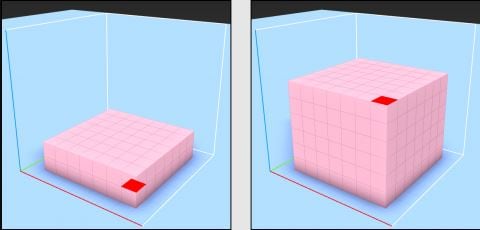
Under the View options, you can toggle Grid to help see the dimensions.
Step 4: Create the Head
To make the section that shelters the most critical Mr. Pig part — his brains! Of course, it's also essential to figure that the accuracy of the anatomy of a voxel pig is never to consider.
Transform the brush back to Box Mode by hitting B while ensuring again that Attach is chosen.
Begin from the position (x: 2, y: 6, z: 5). Left-click and hover among (x: 6, y: 4, z: 5):
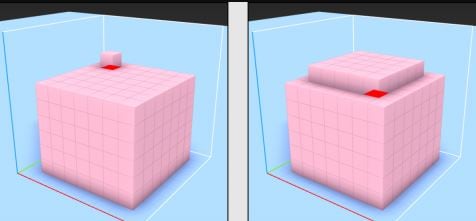
Step 5: Create the Snout
Now to construct the second most essential Mr. Pig part — his snout!
Choose a dark pink color from the color palette on the left.
Make a box from (x: 2, y: 1, z: 3) to (x: 6, y: 1, z: 1) using the same brush settings from the previous step.
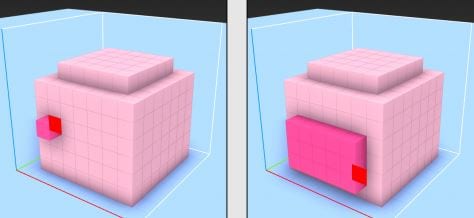
Step 6: Carve out Eyes and Nostrils
Change the brush to Voxel Mode by hitting the V tab. Then press R to choose Erase option.
Erase his two snout nostrils, using the below-mentioned image as a reference:
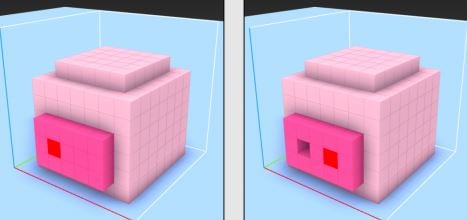
Separate his big eyes too along with.
Step 7: Create the Tail
Ensure that you still have the same dark pink color chosen as mentioned before.
Rotate the pig 180 degrees among the y-axis to expose the pig's hind side.
While still in Voxel Mode, hit the T tab to choose Attach and build a little spiral tail beginning at (x: 4, y: 7, z: 2) to represent the following image:
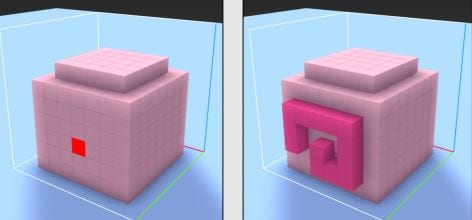
Once finished, rotate that pig 180 degrees around the y-axis again so that you can complete his front side.
Step 8: Add Ears
Use the same brush settings and dark pink color as before.
Press 1 tab to turn on mirroring along the x-axis. It will then turn on the mirror X button. What you do now on one side will automatically mirror on another side.
You must begin creating one ear, voxel by voxel, and you'll notice the other ear created simultaneously. Take a reference from the below-mentioned images to get a sense of where to begin and where to end:
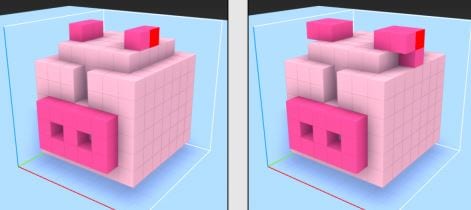
Step 9: Add Legs
Now, you can drag your model one voxel upwards or hold down the Command key or go into Move mode and drag one voxel upwards to get the same effect.
Rotate the pig upwards to expose his belly. With the same brush and color settings, ensure that the mirroring is still active along the x-axis. Begin creating the hind legs first, then the front legs. Again, use the following images as your reference:
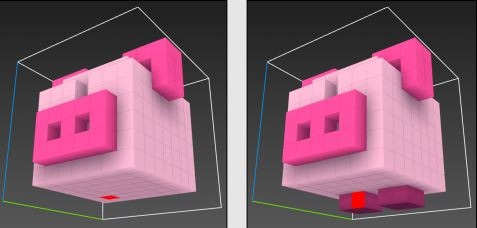
Step 10: Finishing Touches
It's almost over; all that's left is to color in the missing sections.
To do that, visit the Paint Mode by hitting the G tab.
Choose a white color from the left-hand side palette and tap on the voxels that create the white of Mr. Pig's eyes. Once you're over with this, choose black color and paint in the pupils:
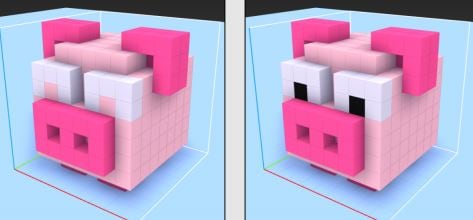
Next, angle the pig so that it directly faces you.
Strike a paint in his dark nostrils and dark ears like so:
Excellent! You’ve finished your first voxel model via the best voxel art maker or 3D pixel art maker. To top it off, you also saw quite certain helpful tips and tricks along the way.
Step 11: Export the Voxel Model
Now that you’ve made some amazing voxel art, you can easily use it through your game! Here, you can export your voxel model in the standard .obj format.
The .obj file format is an open-standard definition of geometry produced by Wavefront Technologies and supported by various 3D authoring tools.
Exporting MagicaVoxel's voxel model is as simple as falling off a hog.
Exporting a Voxel Model as a .obj
Mr. Pig requires a nemesis — enter Mr. Wolf!
Once you've loaded Mr. Wolf, you can take a look at the steps to export in a valuable format.
To export from MagicaVoxel as a .obj format, click obj under the Export section at the bottom right:
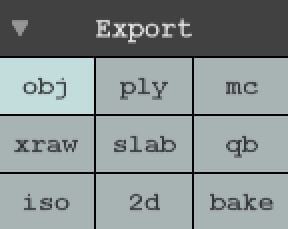
If you don't see the listed options, hit the Export tab to expand the menu.
Supply a destination and a file name for the export of files. Currently, leave everything at their default and click Save.
Conclusion
So if you made it here, you most likely have considered the significance of voxel art maker. Before you jump into any voxel art definition, we want to shed a little light on making voxel art. It's like working with blocks in reality while working with voxel models. Imagine you have a 3D cube-like a single lego piece or a dice. Like you would connect or stack blocks to create structures, voxels work precisely in a similar manner. The only difference is that you will be using the tools inside of the voxel art software to stack together all these pieces.


 100% Security Verified | No Subscription Required | No Malware

