How to Change a Video’s Playback Speed on Windows 10?
May 12, 2025• Proven solutions
Speeding up or slowing down a video’s playback speed is a simple task that doesn’t take more than a few moments of your time regardless of the version of the Windows OS you’re using. Besides the third-party video editing apps, you can also use Windows Media Player or the Photos App to change the playback speed on Windows 10. However, the actual steps you will need to take in order to adjust the speed at which your video is playing vary from one app to the other. So in this article, we are going to show you sever different ways of changing a video’s playback speed on Windows 10.
- Part 1: Change Video Speed with Windows Movie Maker
- Part 2: Change Speed in Windows 10 Photos App
- Part 3: Change Video Speed on Windows with Filmora
- Part 4: Change Video Speed on Windows with Media.io Online Speed Changer
Part 1: How to Change a Video’s Playback Speed with Windows Media Player?
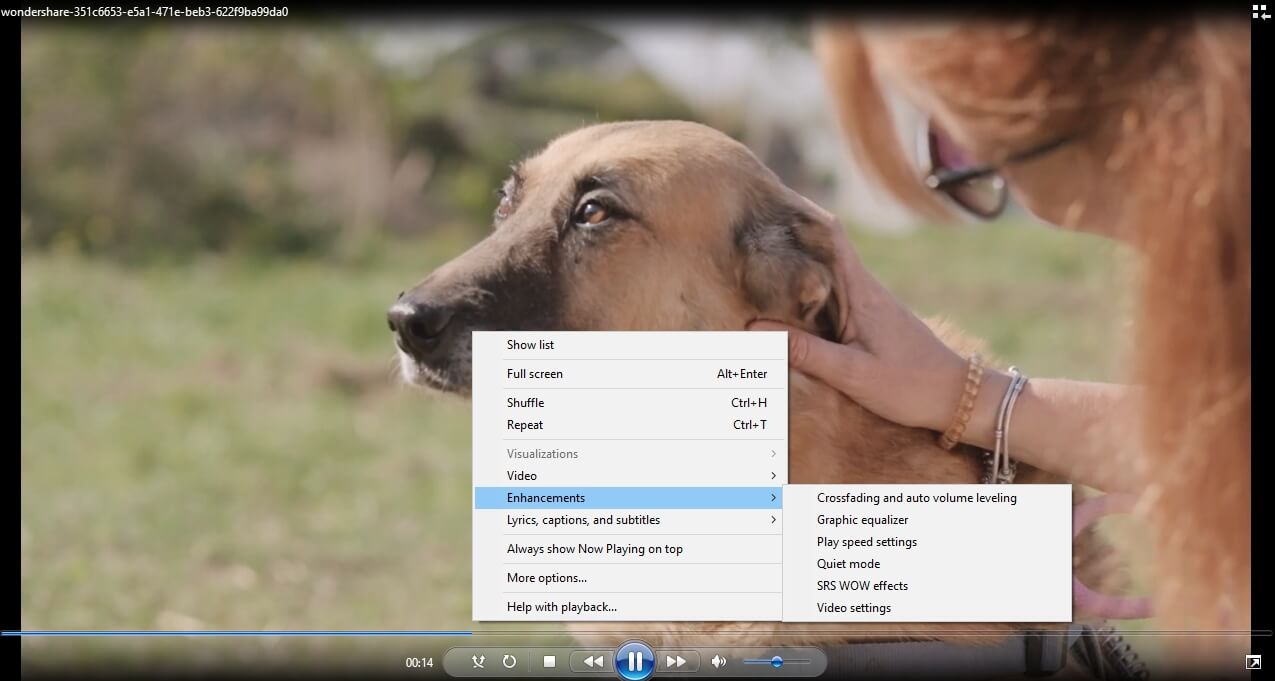
Windows Media Player is the default media player on Windows 10, that enables you to organize your video, audio and image files. All you have to do in order to alter a video’s playback speed is navigate to the file’s location in the Media Player’s library and open it in the Now Playing mode. Afterward, right-click anywhere within the newly opened window and select the Play Speed Settings option from the Enchantments menu.

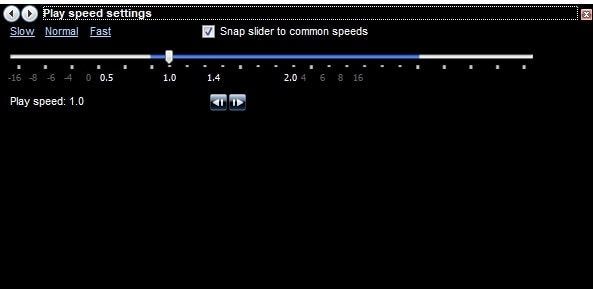
The Play Speed Settings window will appear on the screen and you can just drag the slider to the right if you want to speed up the video or to the left, if you would like to slow it down.

In case the Snap Slider to Common Speeds option is enabled, Windows Media Player will move the slider to one of the available speeds automatically after you position it between two common playback speed values. Moreover, you can choose between Slow, Normal and Fast options, if you want to use the default video playback values. Keep in mind that you cannot increase or decrease a video’s playback speed by more than 8 times its original speed and that all the changes you make to this setting are going to affect the speech of the characters in the video. These settings do not affect the original video files, but rather change the speed at which a video is played in Windows Media Player.
Part 2: Changing a Video’s Playback Speed with Windows 10 Photos App
Besides organizing a large number of photos and videos, you can also use the Photos App on Windows 10 to edit your videos. Despite the fact that Photos App offers only basic video editing tools you can still use it to change the playback speed of video files.
Click on the New Video button, after you launch the Photos app and then select the New Video Project option from the drop-down menu. You should then import the video file into the project you created and click on the Speed icon that is located in the toolbar above the storyboard.

Simply drag the slider to the left or to the right in order to alter a video’s playback speed and then click on the play button to preview the results. If you like the results, you should click on the Finish Video icon, choose the resolution of the output video file and click on the Export button. The changes you make to the video’s playback speed will affect the source file, so you must be sure you want to make these changes before exporting the video from the Photos App.
Part 3: Easier Solution to Customize Video’s Playback Speed on Windows
The Photos App or Windows Media Player offers only a limited range of options that allow you to adjust the playback speed of your video files. What’s more, changing the speed at which a video is played with either of these Windows 10 apps also affects the file’s audio track, since you can’t separate the video and audio tracks. That is why a video editing software like Filmora is a much better option for all PC owners who want to have control over the playback speed of their video files.
Step 1:Add video files to the Filmora video editor
Click Import on the media library and select the video files from your computer to add them into this program. Alternatively, you can simply drag and drop files to the User's Album. Wondershare Filmora supports almost all regular video formats, such as MP4, AVI, WMV, MOV, FLV, M4V, MPG, VOB, ASF, 3GP, 3G2, F4V, MPEG, TS, TRP, M2TS, MTS, TP, DAT, MKV, DV, MOD, NSV, TOD, EVO, etc.

Step 2:One-click to speed up or slow down
Next, drag videos from the User's Album to the video track on the Timeline, and then right-click on it to click Speed and Duration. A pop-up window will appear. Speed numbers will indicate how fast or slow the motion effects will be. Then adjust the speed you want. You can view the effects in the preview window to make videos faster or slower. If you think it is too much, 0.5 speed is a good choice.
- 0.5: half of the original speed (Slow Down, Half)
- 1: The original speed
- 2: Double the original speed (Speed Up, Double)
- Other speed available to choose: 0.1 times, 0.2 times, 0.25 times, 0.33 times, 0.5 times, 2 times, 3 times, 4 times,5 times, 10 times etc.
Note: You can simply change the video speed by dragging the speed slider. To speed up the video to make a fast motion effect, drag the slider to the right. To slow down the video to make a slow-motion effect, drag the speed slider to the left. You can always drag the slider to set to an optional video speed rate.

Step 3:Adjust Audio Sound [Optional]
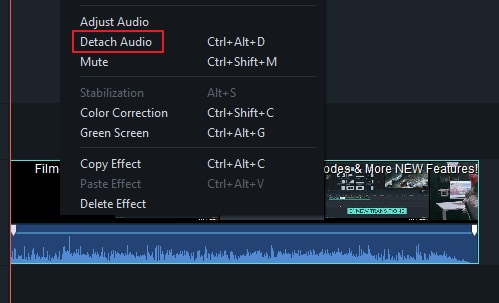
Whenever you speed up or slow down the video playback speed, the video audio speed will change accordingly. If you want to keep the original playback speed of the video audio, you can detach the audio from the video first and then do some editing to make a perfect pitch to the video. You just need to double click the audio clip to edit in the audio editing panel. You can edit fade in/out, remove background noise and more.

Besides, you can also add a new sound to the video to replace the original video audio, for the specific steps, check our guide about How to Replace Audio in Video.
Step 4:Export fast/slow-motion video
When you have finished adjusting the video speed, click Export. You can save the video in any popular formats by clicking Format. If you want to play your new video creation on your iPod, iPhone, iPad, click Device, and select the icon for your devices. You can also share your videos on YouTube and Vimeo directly or burn video to DVD disc.

You can also check the video tutorial below about how to change speed to add fast/slow motion video effects with Filmora.
Conclusion
Creating slow-motion or fast forward videos on Windows 10 is easy since even the Photos App allows its users to change the playback speed of their video files. The only downside is that changing the video’s speed with Windows Media Player or Photos App affects the video’s audio, which can make your videos unwatchable. Filmora enables you to separate the video and audio tracks so that you can only adjust the playback speed of the video file. That’s why you will achieve much better results if you choose to adjust the playback speed of your videos in Filmora. Which method of changing the video’s playback speed on Windows 10 do you like to use the most? Leave a comment and let us know.
Speeding up or slowing down the footage is a simple and yet effective video editing technique. In this article, we'll share with you about 10 best slow and fast motion video apps for iOS and Android d
by Max Wales Jun 19, 2025 17:14 PM
In this article, we are going to share with you everything you need to know about proxy video editing and show you how you can edit these proxy files to make videos in Filmora9.
by Max Wales May 12, 2025 10:50 AM
In short, if you’re looking for a way to edit audio to be slower or faster, higher or lower in Adobe Rush, you simply can’t. However, there is an alternative.
by Max Wales May 12, 2025 10:50 AM


