Ever wondered how to create a Snapchat that keeps the focus on you and not your surroundings? Adding a blurred background is the perfect trick! Plus, by blurring the background on Snapchat, you can instantly draw attention to your subject while giving your snaps a sleek, aesthetic vibe.
Thankfully, Snapchat offers plenty of creative tools to help you elevate your content and nail that perfect Snapchat blur background. So, we'll show you exactly how to blur the background in Snapchat in two different methods.
In this article
Part 1. Simple Guide to Blurring Backgrounds on Snapchat
Snapchat makes it super easy to blur your background with two simple methods: Portrait Mode for that classic blurred background look, and creative Snapchat filters that let you play around with unique effects. Learning how to use both methods not only gives you more creative freedom but also helps you make the most out of Snapchat's features.
So, let's break it down and show you exactly how to blur the background on Snapchat and make your snaps stand out!
Using Snapchat's Portrait Mode
Snapchat's Portrait Mode is designed to make your subject the star of the snap while adding a nice, soft blur to everything in the background. To learn how to apply this feature, follow this simple guide:
Step 1: Open Snapchat and head to the camera screen.
Step 2: Tap on the camera options and look for the "Portrait Mode" option.
Step 3: Position your subject in the camera frame.
Step 4: Capture the SnapOnce the background looks nicely blurred and your subject is in focus, hit the shutter button to take your snap.
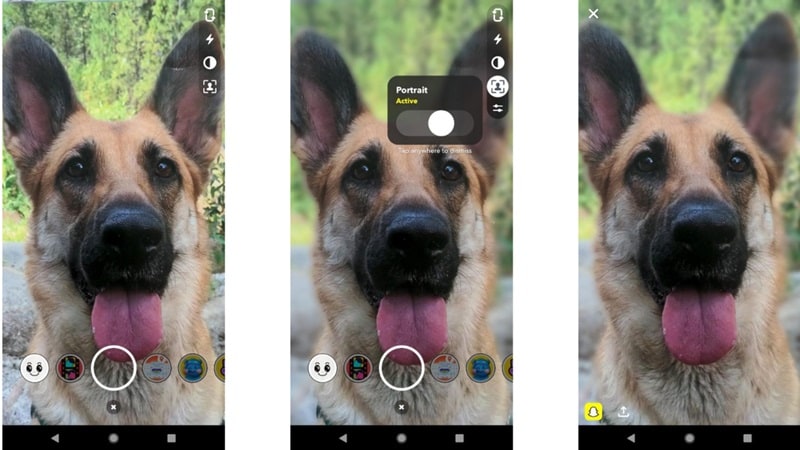
And there you have it! As you can see, Portrait Mode takes care of all the hard work for you, automatically blurring the background on Snapchat to make your subject shine. It's a super simple way to create professional-looking snaps that stand out, and it only takes a few seconds.
Using Snapchat Filters
Other than using Portrait Mode, there's also another fun way to achieve Snapchat blur background. Some Snapchat filters are designed specifically to add that dreamy blur effect, making your subject pop while the background fades into soft focus.
Here's how to use filters to blur the background on Snapchat:
Step 1: Open Snapchat and tap the search glass icon at the top-left corner.
Step 2: Type "Blur background" into the search bar and pick a filter you like.
Step 3: Adjust your framing so your subject is in focus and the blur enhances the background.
Step 4: When everything looks good, tap the shutter button to capture your snap with the filter applied.
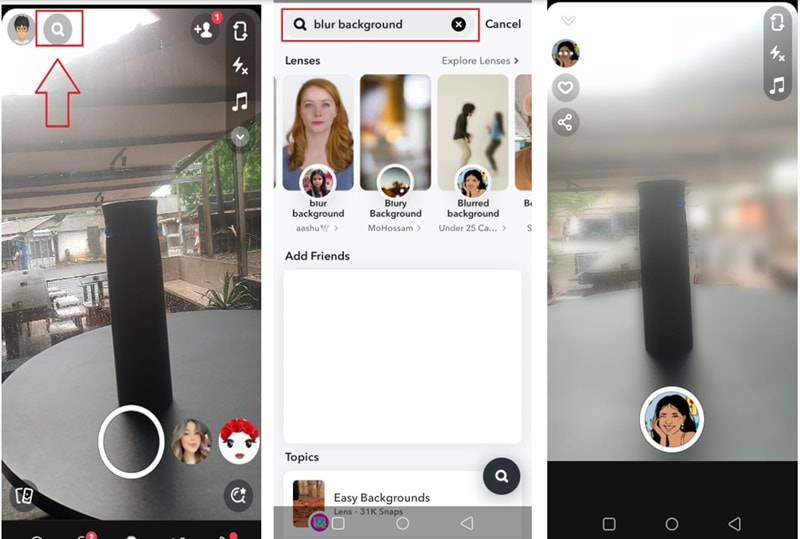
And that's it! As you can notice, Snapchat blur background filters are super easy to use and let you get creative with your snaps. If you don't find one you love right away, just keep exploring and experimenting—trying out new filters is half the fun!
Part 2. Common Problems and Limitations on Blurring Background
While the methods we've covered so far usually work like a charm, they're not always perfect. So, to prepare you for the worst, let's talk about some common hiccups you might run into when trying to blur backgrounds on Snapchat.
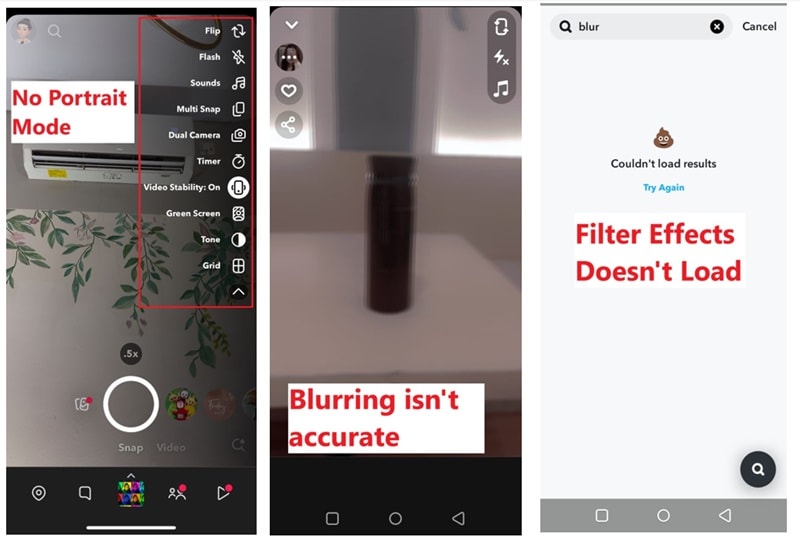
- Portrait Mode isn't available on all devices.
- Blurring isn't always accurate.
- Filters don't always work properly.
Unfortunately, not every phone supports Snapchat's Portrait Mode. We've even tried it ourselves using different phones. if you're using an iPhone, or older and lower-end device, you might not see the option at all.
Even with Portrait Mode, Snapchat can sometimes struggle with complex or busy backgrounds. The blur might overlap with your subject, or it might not create a clean separation.
When using filters to blur the background, you might run into glitches. Sometimes the effect doesn't load, or it might stop working altogether.
Part 3. Background Blur Made Easy with Powerful Video Editor
Due to the limitations of Snapchat's tools mentioned above, you might need something more powerful to get that perfect background blur. Luckily, you don't have to search far—Wondershare Filmora is here to handle the job with ease and flexibility.
Filmora is a powerful video editor that offers advanced tools to take your background blurring (and overall editing) to the next level. It's packed with features that let you customize every little detail of your snaps and videos, giving you way more creative freedom and control.
Here's why Filmora is worth trying for background blurring to upload on Snapchat:
- AI Tools for Face Blur: Just in case you want to blur a face too for privacy concerns or adding a professional touch, Filmora's AI Face Mosaic can detect and blur faces automatically.
- Precise Blur Control: Filmora lets you fine-tune the blur exactly where you want it, even after taking your snap.
- Sharpen Your Subject: Highlight your subjects by sharpening their features while keeping the background beautifully blurred.
- Creative Filters and Effects: Add more flair to your snaps with Filmora's library of creative filters and effects, giving your content a unique and aesthetic vibe.
- High-Quality Export: Export your videos in stunning resolutions without sacrificing quality, ensuring your snaps look their best when uploaded to Snapchat.
With all these features, Filmora makes it super easy to go beyond Snapchat's built-in tools and create snaps and videos that really stand out. Plus, it's super affordable! Filmora offers flexible pricing plans and even a free trial, so you can test it out before deciding to buy or subscribe.
So, why wait? Give Filmora a try to blur your video background and make your content Snapchat-ready. Follow this simple guide to get started!
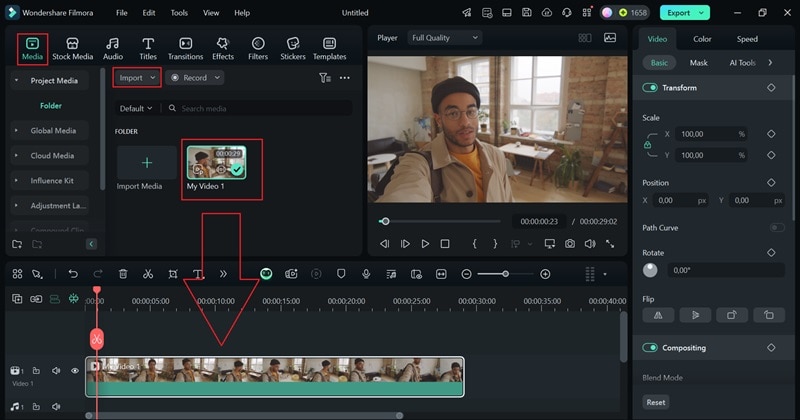
Step 1. Open Filmora and upload your video
If you haven't already, download the latest version of Filmora and install it on your device. Open the program and select "New Project" to begin editing. Once you're in the main editing timeline, go to the "Media" tab, import the video where you want to blur the background and drag it to the editing timeline below.
Step 2. Access background blur effects
Next, click on the "Effects" tab and type "background blur" into the search bar. Browse through the available effects, choose one you like, and drag it above your video clip the timeline to apply it.
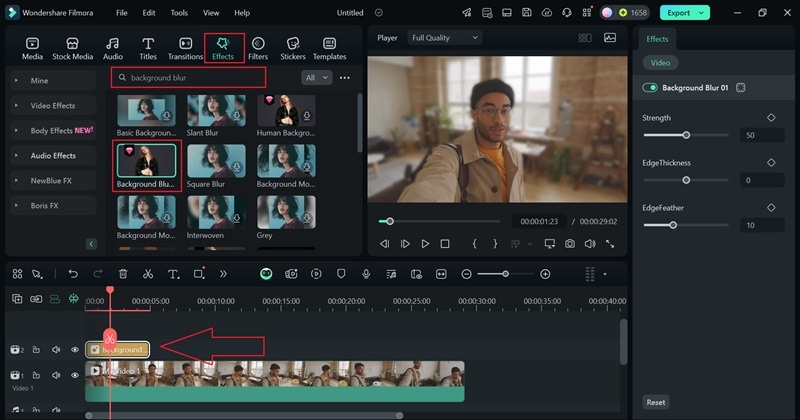
Step 3. Control blur effects
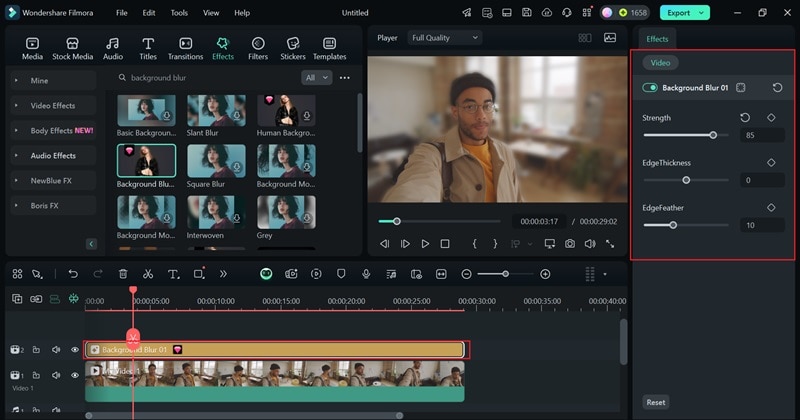
Adjust the duration of the effect to match your video's length so the blur is applied throughout the entire video. In the property panel on the right, use the slider to control the intensity of the blur effect to get the look you want.
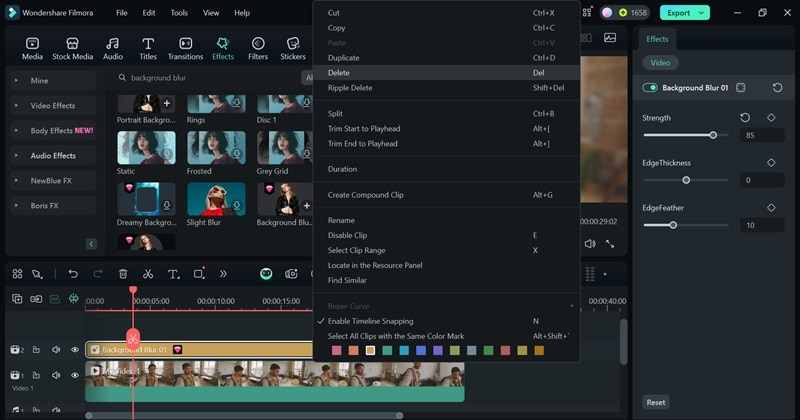
If you're not happy with the blur effect you selected, no problem! You can easily change it by right-clicking on the effect in the timeline and selecting "Delete".
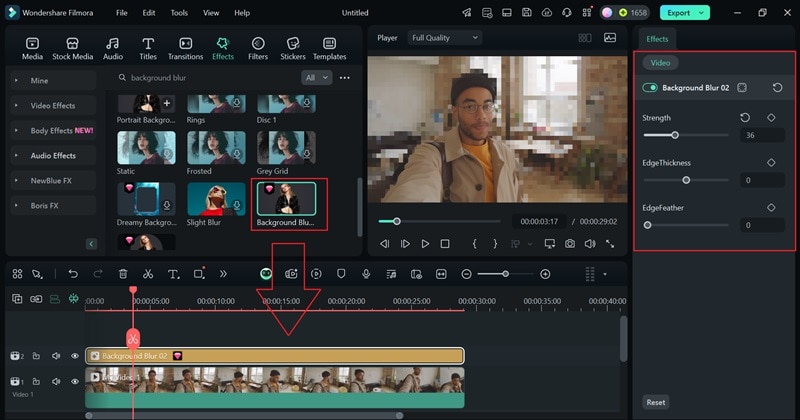
After that, simply choose a different effect, apply it to your video, and adjust the blur intensity in the property panel to get the perfect look.
Step 4. Enhanced your video (optional)
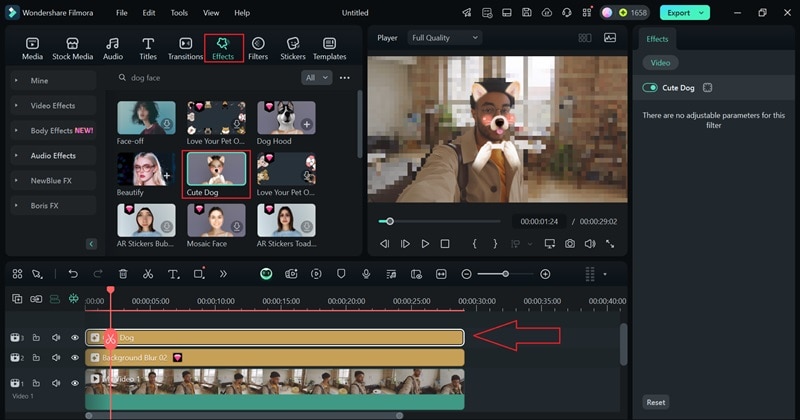
Before exporting your video, you can make it even more eye-catching by using some of Filmora's powerful tools. For example, you can add fun effects like the popular dog face filter from Snapchat. Just go to the "Effects" tab, search for the "Cute Dog" effect, and apply it to your video.
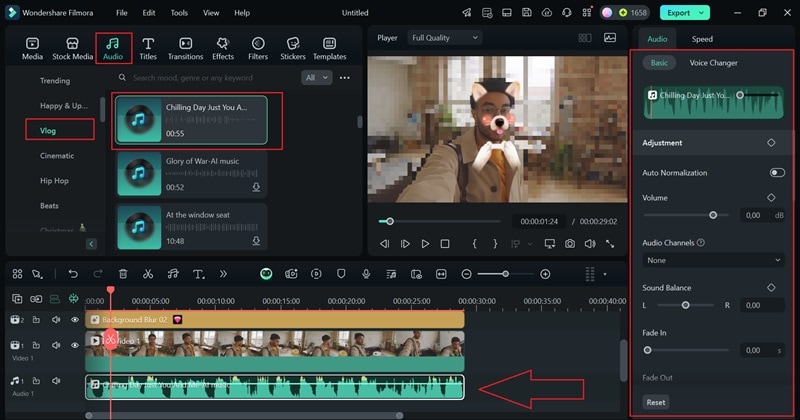
You can also make your video more engaging by adding music. To do this, go to the "Audio" tab and select the "Vlog" category. Browse through the available tracks, pick one you like, and drag it onto the timeline. Be sure to adjust the duration of the music to match your video and fine-tune the audio levels in the property panel for the perfect balance.
Step 5. Export your video
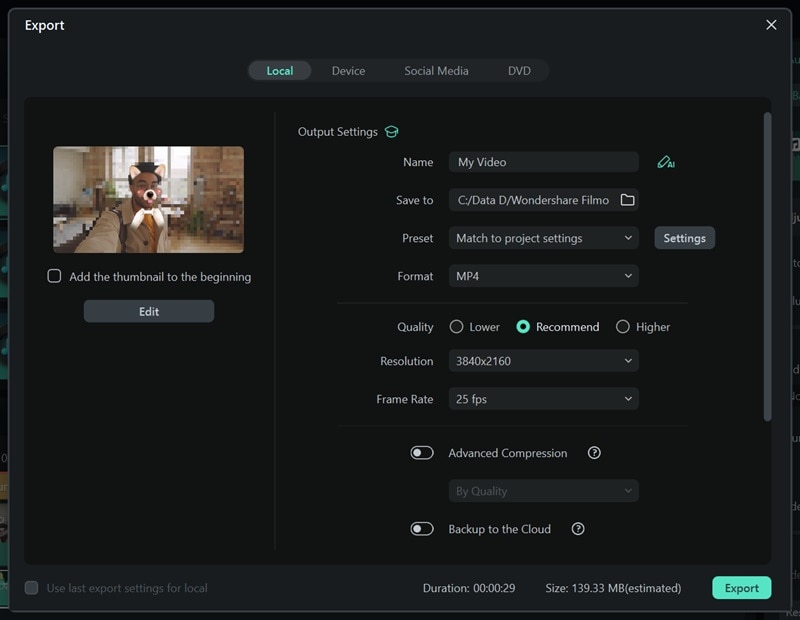
When you're satisfied with your video, click "Export" in the top-right corner. Select "Local" to save it directly to your device. Before saving, you can customize the title, description, format, and resolution to suit your preferences.
Conclusion
Blurring the background on Snapchat comes with a ton of benefits. That's why we've put together this guide to show you how to blur your background on Snapchat through different methods: using Portrait Mode and Snapchat filters. However, while Snapchat's tools usually get the job done, they're not always perfect.
If you want a more reliable and flexible option, Wondershare Filmora is the way to go. With Filmora, you can choose from a variety of background blur effects and have precise control over how much blur you apply—no inaccuracies like Snapchat sometimes has.
And it doesn't stop at just background blur! Filmora lets you enhance your video even further by adding creative filters, music, and so much more, making it perfectly polished and ready to post on Snapchat.


 100% Security Verified | No Subscription Required | No Malware

