For a successful Discord server, you need to create a welcome channel to make the new members feel at home. This channel serves as the first point of contact for new members and provides them with a detailed introduction to the community and rules. However, if you are a beginner, creating a welcome channel can be challenging since it involves too many setups.
Hence, in this guide, we have gathered essential details on how to make a welcome channel for Discord. From setting your automated messages to adding custom touches, you will thoroughly learn every process. Besides, we'll also guide you on how to create appealing and engaging GIFs or videos for your channel with an innovative solution.
In this article
Part 1.Detailed Guide on How To Make a Welcome Channel in Discord
As mentioned, creating a Discord welcome channel can be time-consuming, but setting it up correctly can make all the difference. Hence, to ensure you have a professional-looking welcome channel, we have mentioned the simple and easy steps on how to make a welcome channel on Discord:
Step 1. Create a New Welcome Channel on Discord
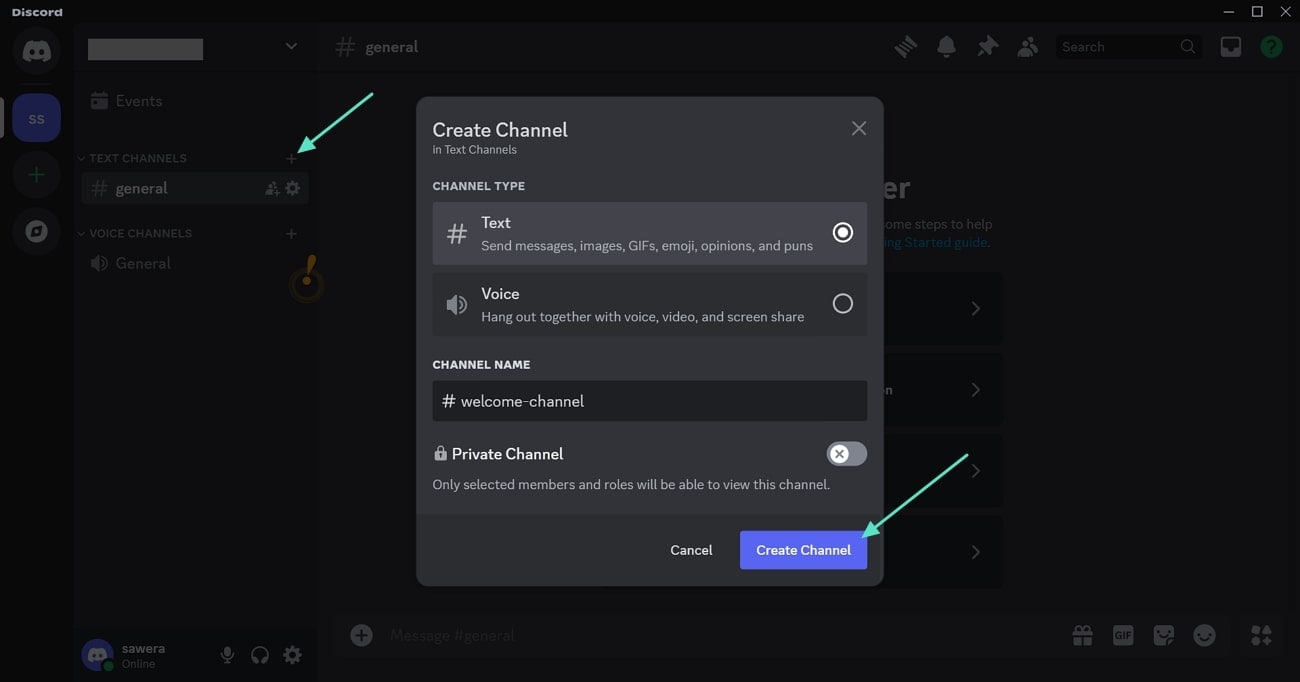
Start creating the welcome channel by pressing the "Plus" icon beside the text channel option. This will fetch a "Create Channel" pop-up window where you have to insert the channel details like the channel name. When it's done, press the "Create Channel" button to proceed with the channel creation process.
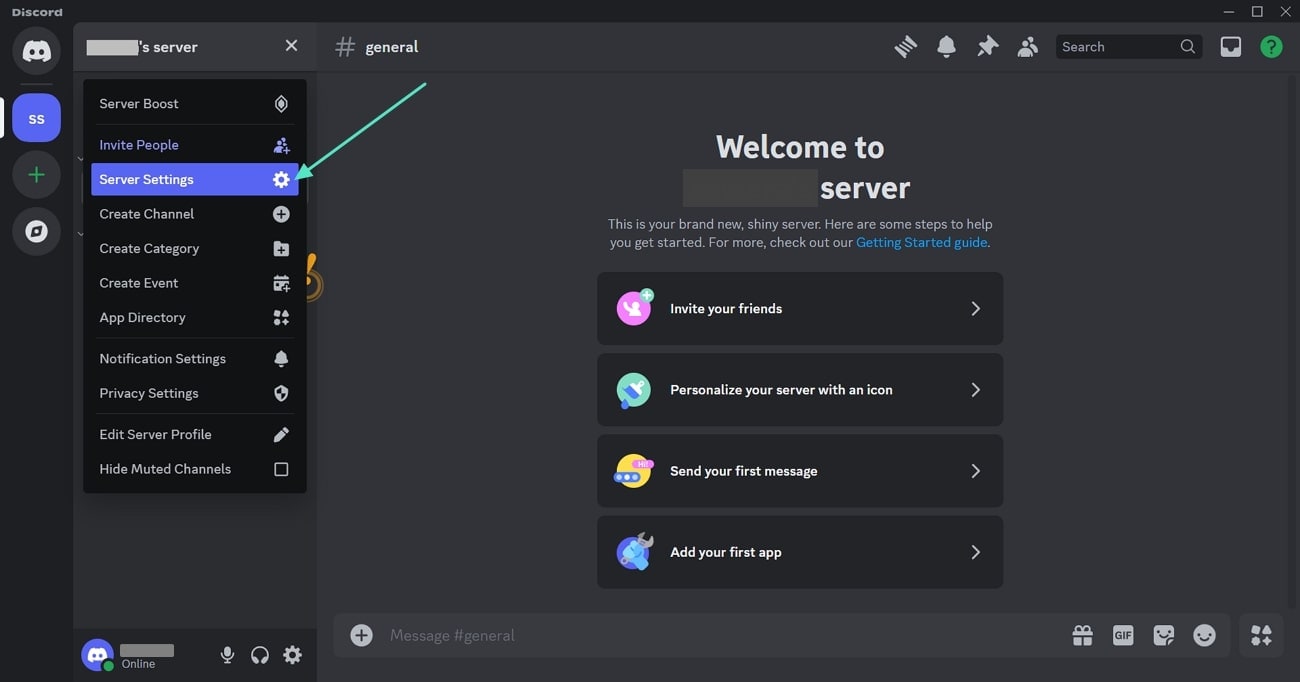
Now, access a new drop-down menu located next to your server's name and tap on "Server Settings" to continue with this task.
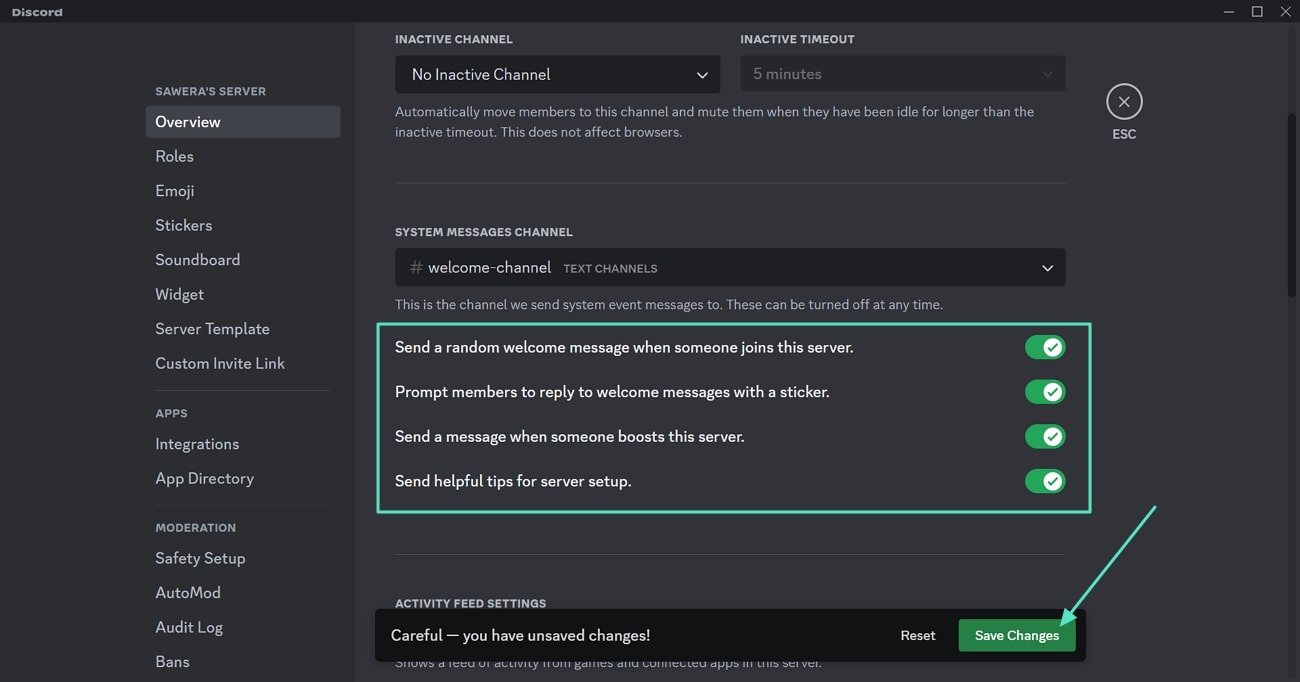
On the pop-up window that appears, toggle the settings you want to pick for users to send welcome messages. Tap the "Save Changes" option to ensure your updates are applied and your welcome channel settings are finalized.
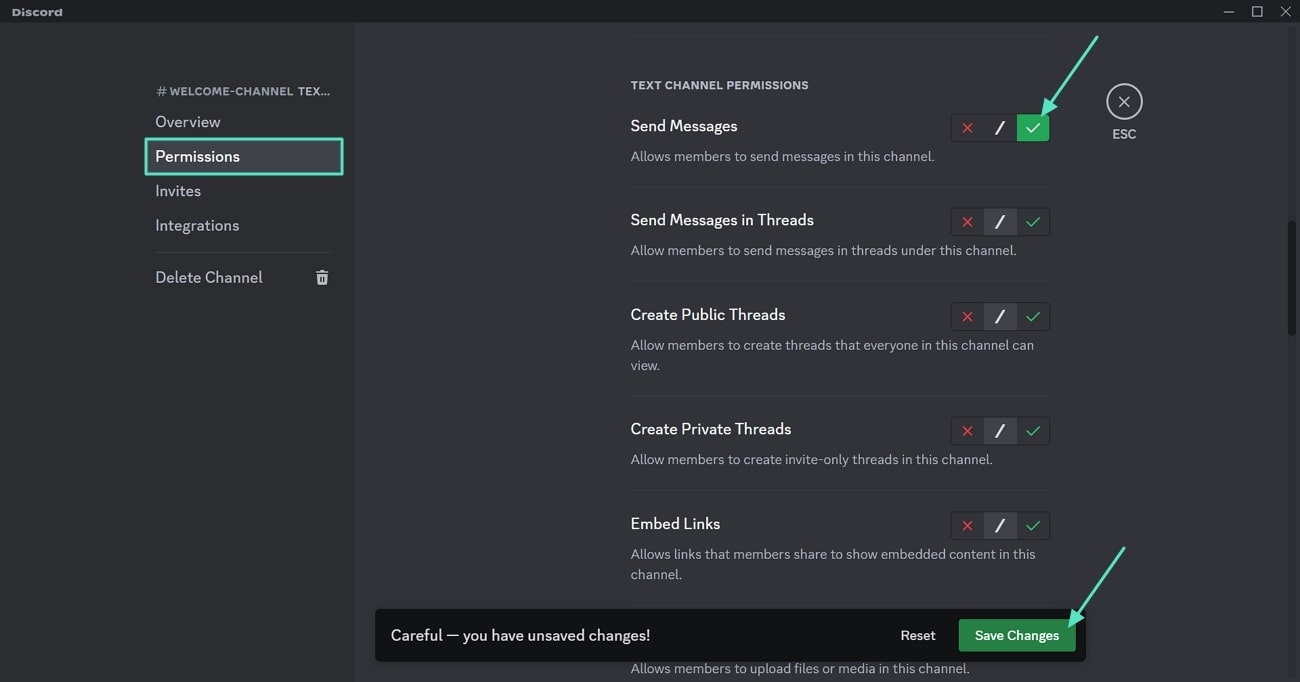
Moving on, while learning how to make a welcome channel on Discord, you can set the channel permissions by pressing the "Settings" icon beside the channel. On the new screen that appears, tap on "Permissions," and manage the desired settings. You can influence settings such as allowing members to reply to welcome messages and press the "Save Changes" option to apply the permission settings.
Step 2. Add a Bot to Send a Welcome Message
Upon finishing creating a new channel, go to the official page of MEE6 to add this bot to your Discord server. On this page, tap on the "Add to Discord" button to open a new window for bot authorization.

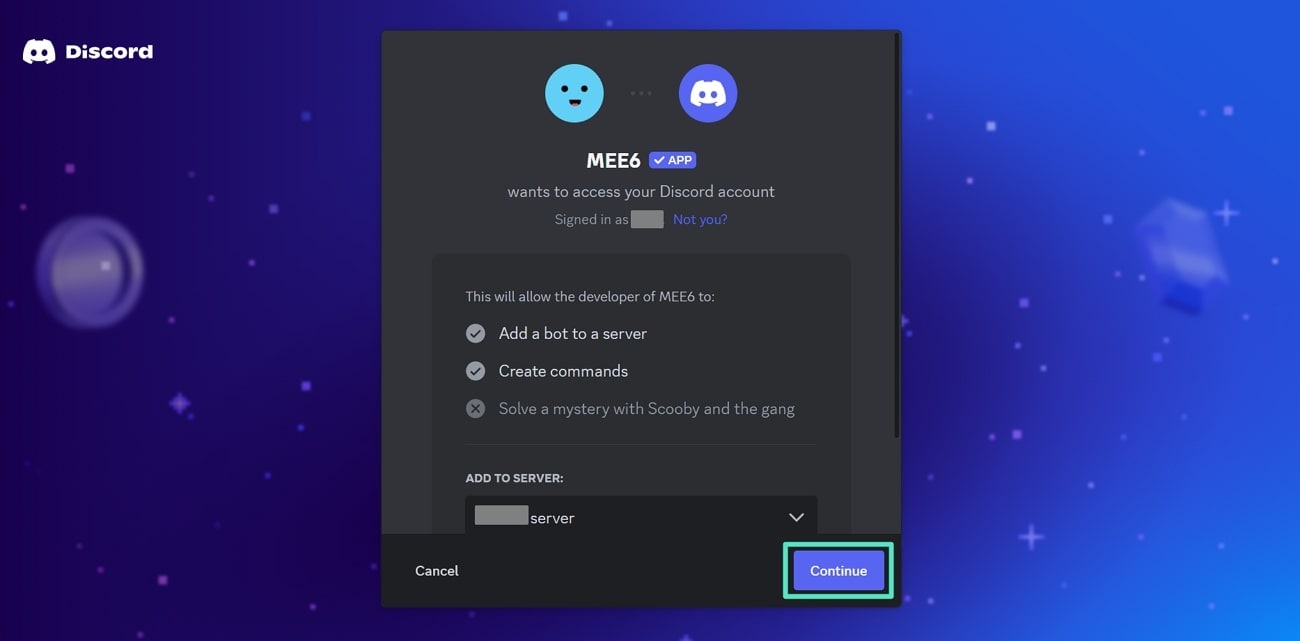
Proceeding with this task, tap the "Continue" option on the new screen. After that, it will ask you to manage the role to complete the authorization process.
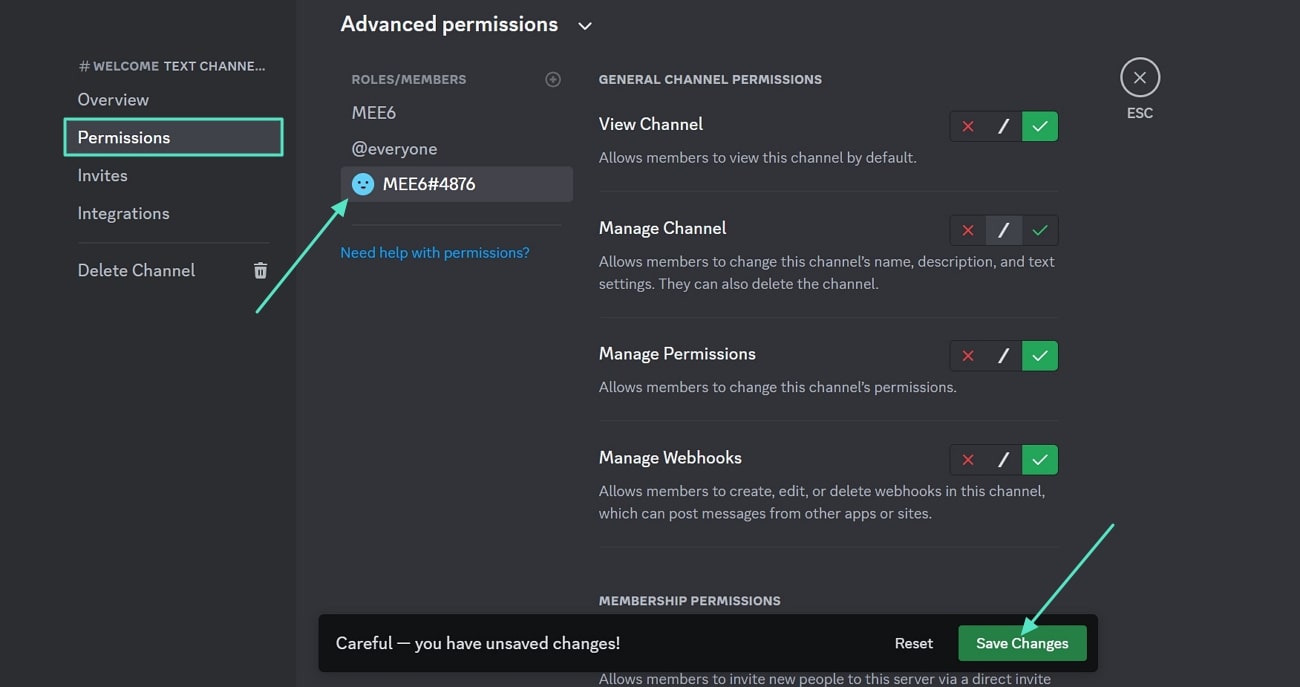
To manage the bot's relevant settings, go to "Server Settings" within your Discord account and choose the "Permission" tab on the left side of the screen. Pick the bot from the list and tick the desired permissions, like view channel or manage control, to let this bot handle your welcome channel. Once done, hit the "Save Changes" option to ensure it functions properly in your channel.
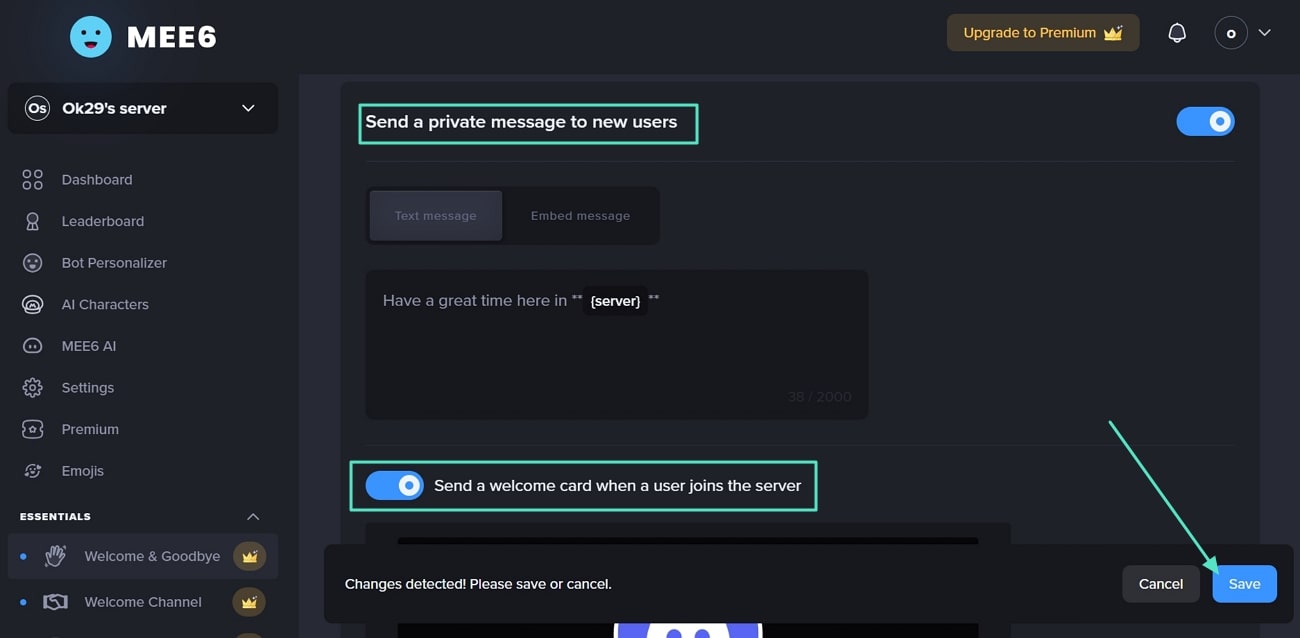
Now, go back to the MEE6 website and click on the "Welcome and Goodbye" tab to create a welcome message. On the new screen, toggle on "Send a Private Message to New Users," after which you will have to type the desired message. As it's done, toggle the "Send a Welcome Card When A User Joins the Server" option and press the "Save" option from the bottom of the screen.
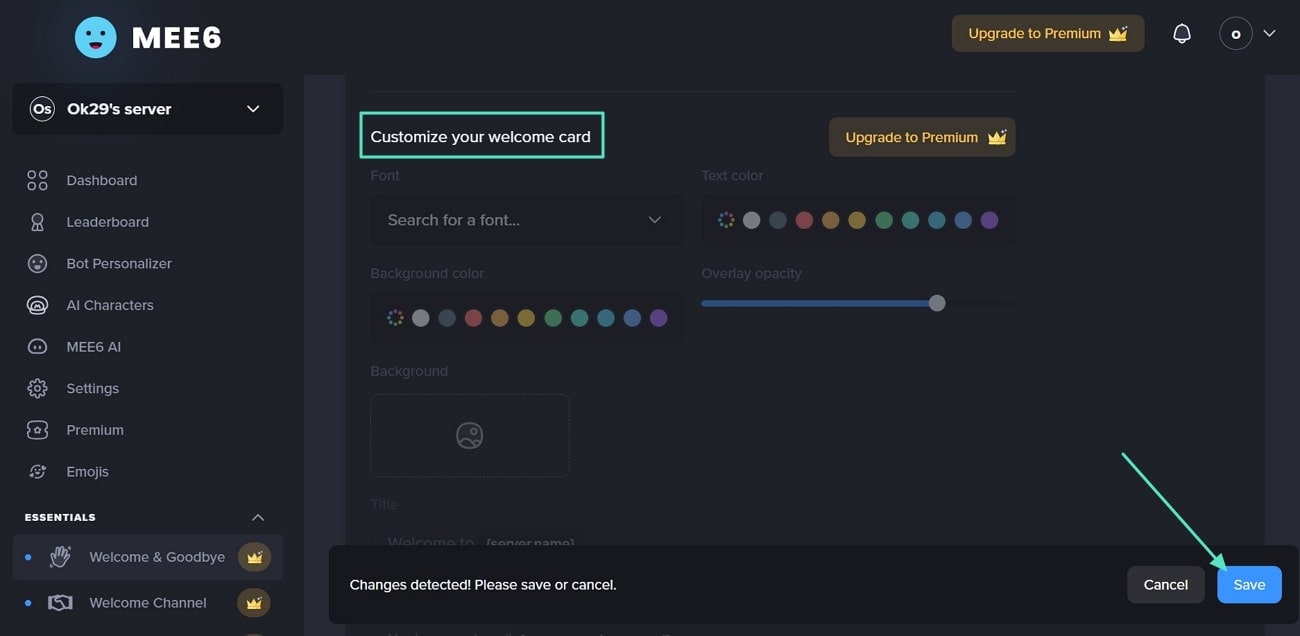
You can also customize your text message to enhance its appeal under the "Customize Your Welcome Card" section. There, choose the desired text color and image and then pick the "Save" option to finalize the appearance of your welcome channel text.
Step 3. Mange Safety Setup on Discord
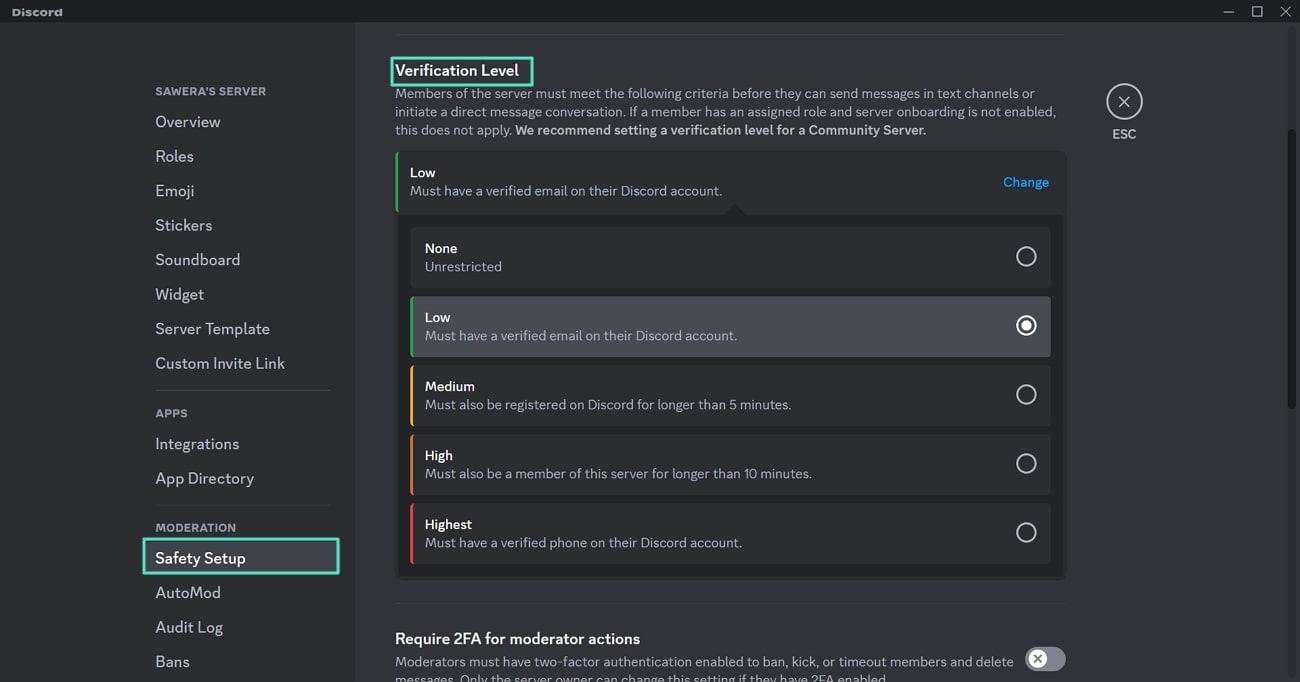
Now that you have created a welcome message using a bot, you can set rules before members reply or react to a particular text. To do so, go to the server settings and choose the "Safety Setup" settings from the left side of the screen. There, you can set the desired "Verification Level," such as low or medium, to ensure that only trusted users can interact.
Step 4. Enable AutoMod for Server Safety
While diving deep into how to set up a welcome channel on Discord discussion, you can also restrict users from posting inappropriate content with AutoMod settings. This setting automatically detects and blocks inappropriate messages or behavior based on rules.
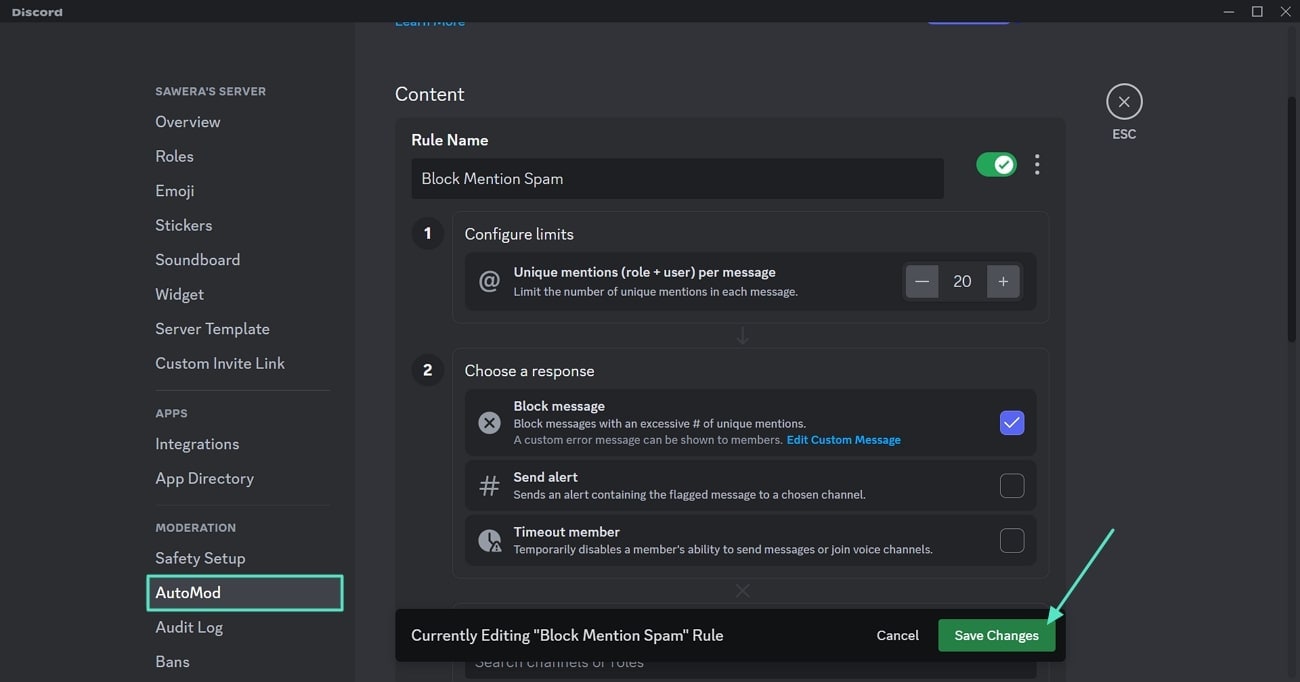
To enable that, locate the "AutoMod" from the server settings and choose the desired rule, such as blocking the mentioned spam. Then, press the "Setup" option beside it, optimize the settings, and hit the "Save Changes" option to set the rules.
Step 5. Set Age Restriction for Your Discord's Servers
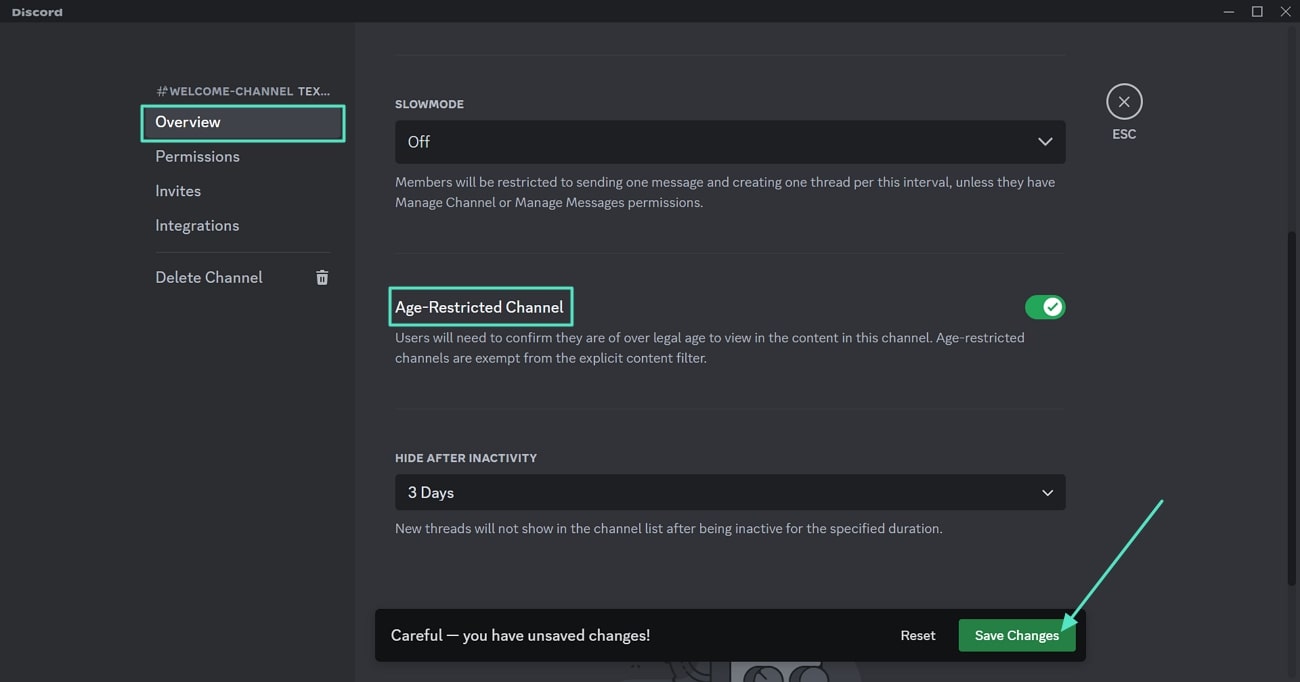
Besides setting rules, you can also enable age restrictions to ensure people under a certain age cannot join the channel. To impose such regulation on the channel's settings, pick the "Overview" tab from the left side of the screen. Scroll down and toggle on the "Age-Restricted Channel" option to activate the setting.
Part 2. Create Videos or GIFs To Add to the Welcome Channel in Discord
When learning how to make a welcome channel in Discord, many users seek to insert engaging media like GIFs to maintain user engagement. However, Discord itself doesn't offer a feature to let users create personalized videos or GIFs that let users locate alternate options. In this case, Wondershare Filmora allows you to create compelling media that can be further edited with its wide range of tools.
Key Characteristics To Note About Wondershare Filmora
- Extensive GIF Resources: Using this tool, you can insert stickers or GIFs into the video by searching for them from the tool.
- Variety of Transitions: Users can also choose from various transition effects, like dissolve or fade, to enhance the visual flow between scenes.
- Induce Diverse Effects: With its effects, you can also boost the video's visual appeal while making it more dynamic.
- Composite Video Exporting Ability: During exporting, one gets the facility to pick the video's desired quality, aspect ratio, and format to match Discord's requirements.
Detailed Guide on How To Create Videos or GIFs With Wondershare Filmora
Now that you have a detailed idea of its editing tools, here is the step-by-step guide to creating an engaging welcome video for your Discord channel:
Step 1. Access the Video Editing Utility on Your Device
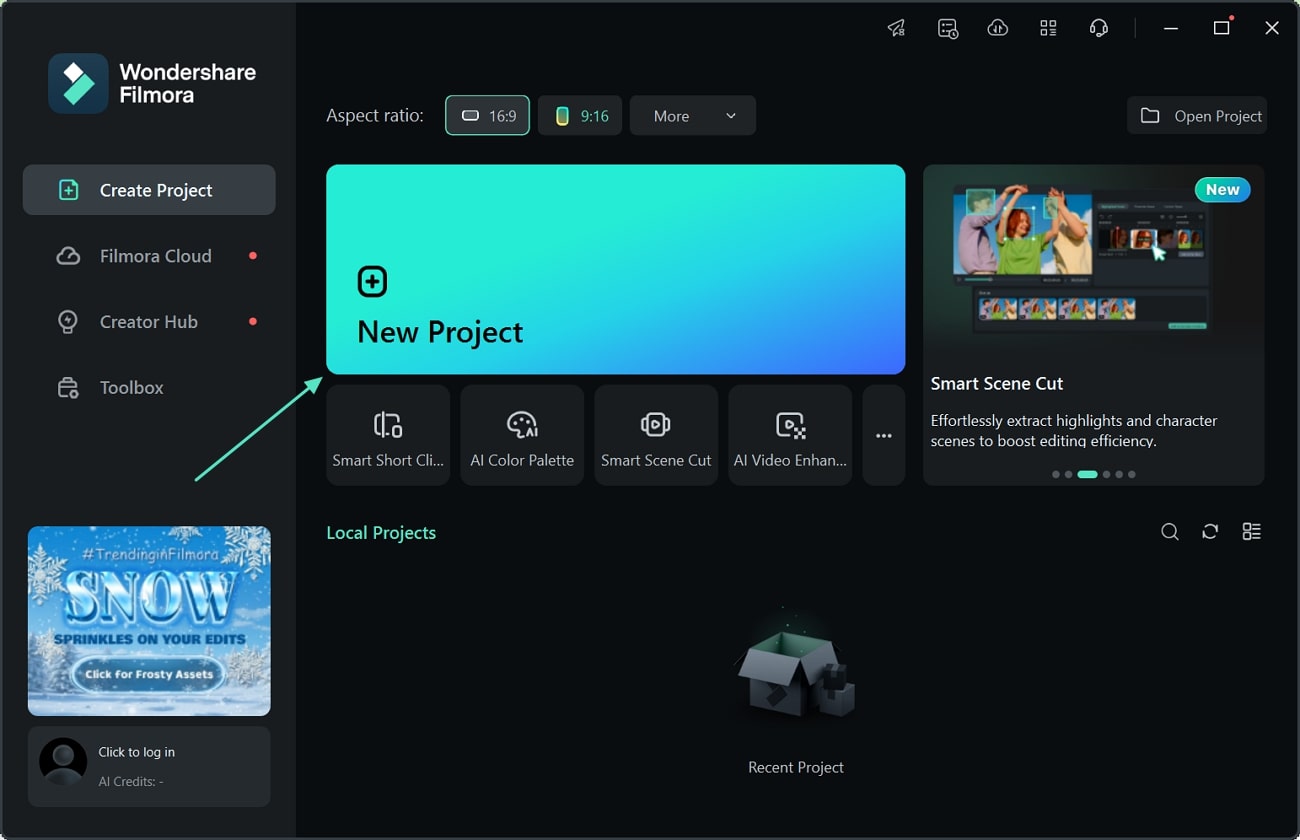
To begin with, download and install Wondershare Filmora on your device and tap on the "New Project" option from the main interface.
Step 2. Import the Reference Video on the Main Interface
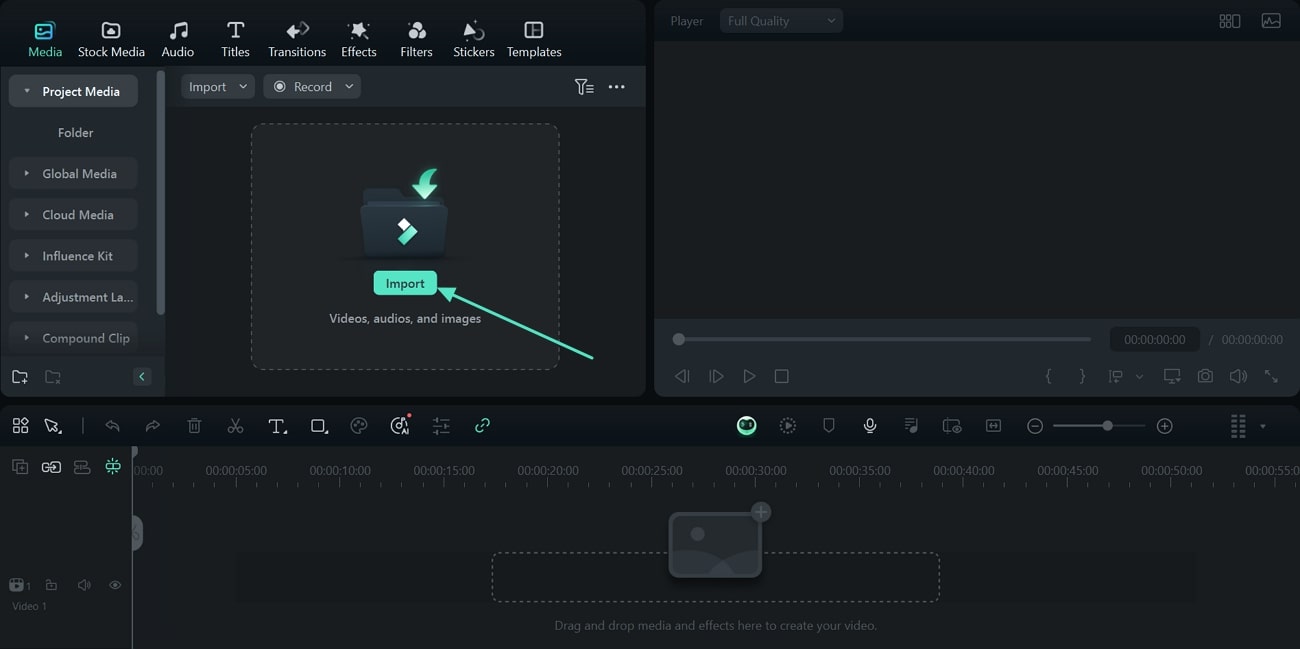
On the new screen, hit the "Import" option to fetch the reference video that you can edit. Afterward, simply drag the imported video to the editing timeline to start creating content for Discord.
Step 3. Enter the Text by Searching from the Toolbar
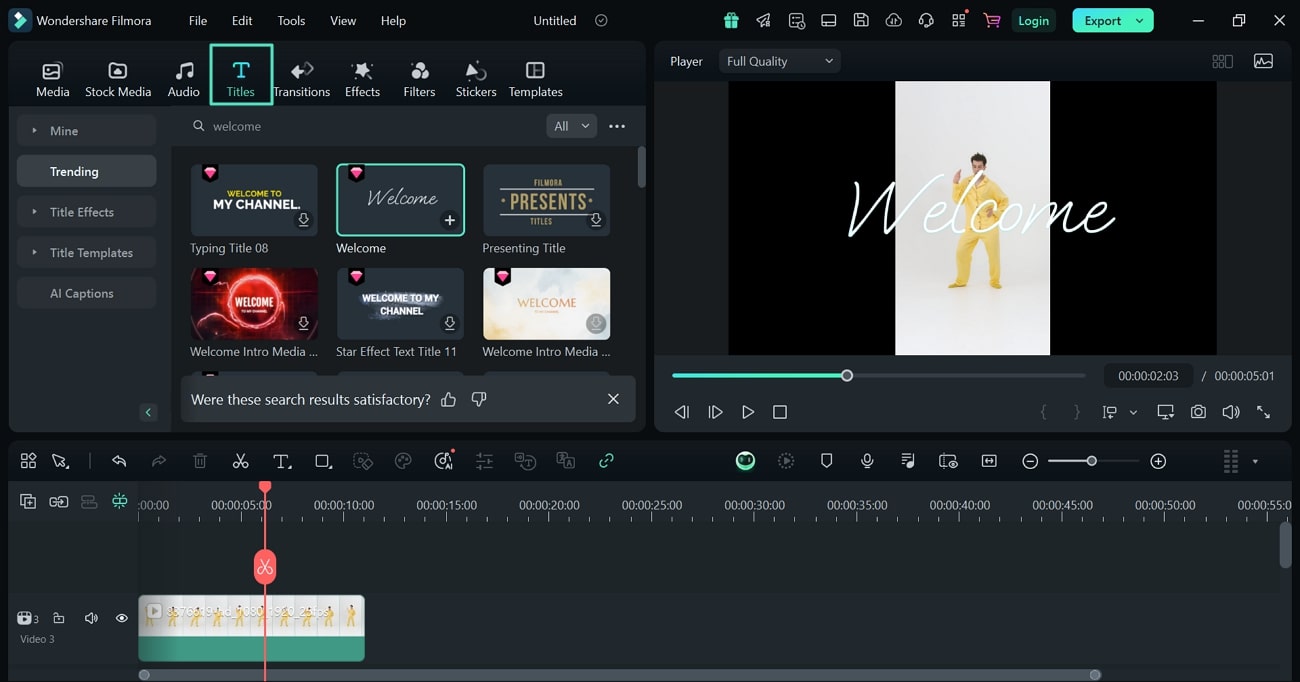
As the video is there, search for the welcome text by entering the "Titles" tab from the top toolbar. Search for the desired text and pick the preferred one to insert in the video.
Step 4. Insert Effects to Boost Appeal of Discord Welcome Video
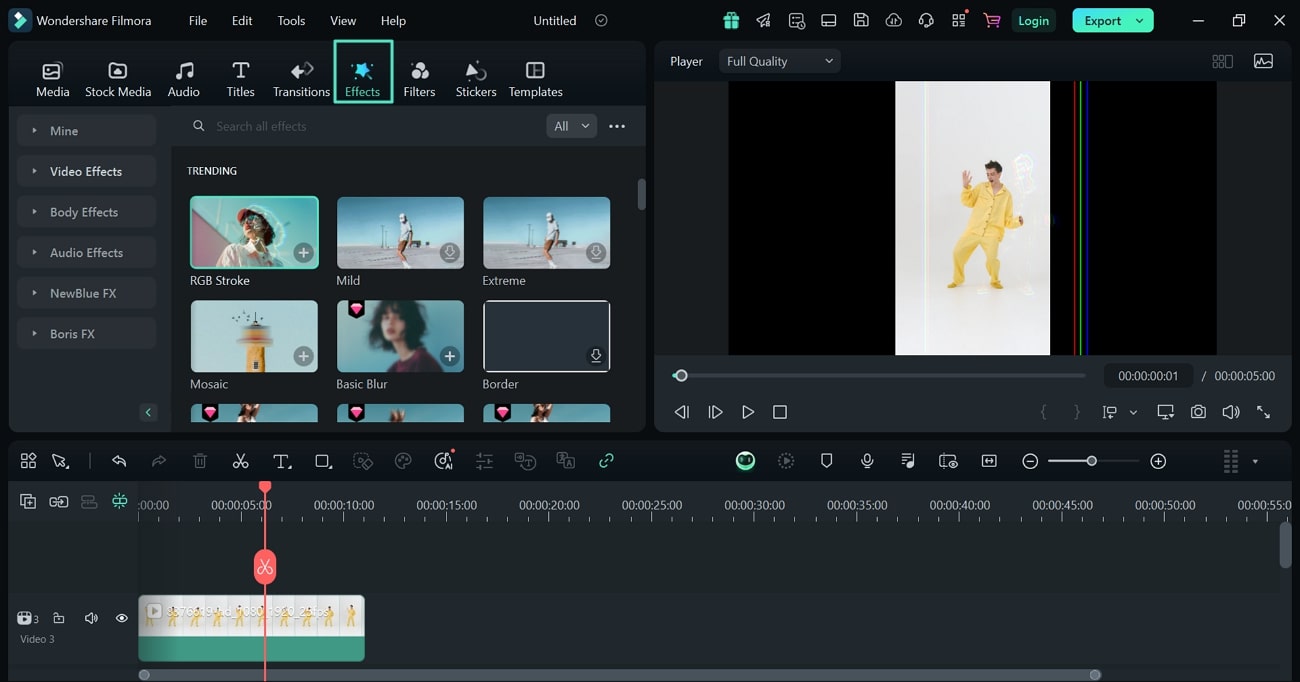
Moving on, pick the "Effects" option from the toolbar and search for the specific effect. Once you get the effect, drag it to the timeline to apply it to your video to enhance its appeal.
Step 5. Add Stickers for Fun and Personalized Touch
Besides effects, enter the "Stickers" tab from the top toolbar and search for the welcome-related sticker on the search bar. When you locate the suitable one, take it to the editing timeline to add it to your video for a fun touch.
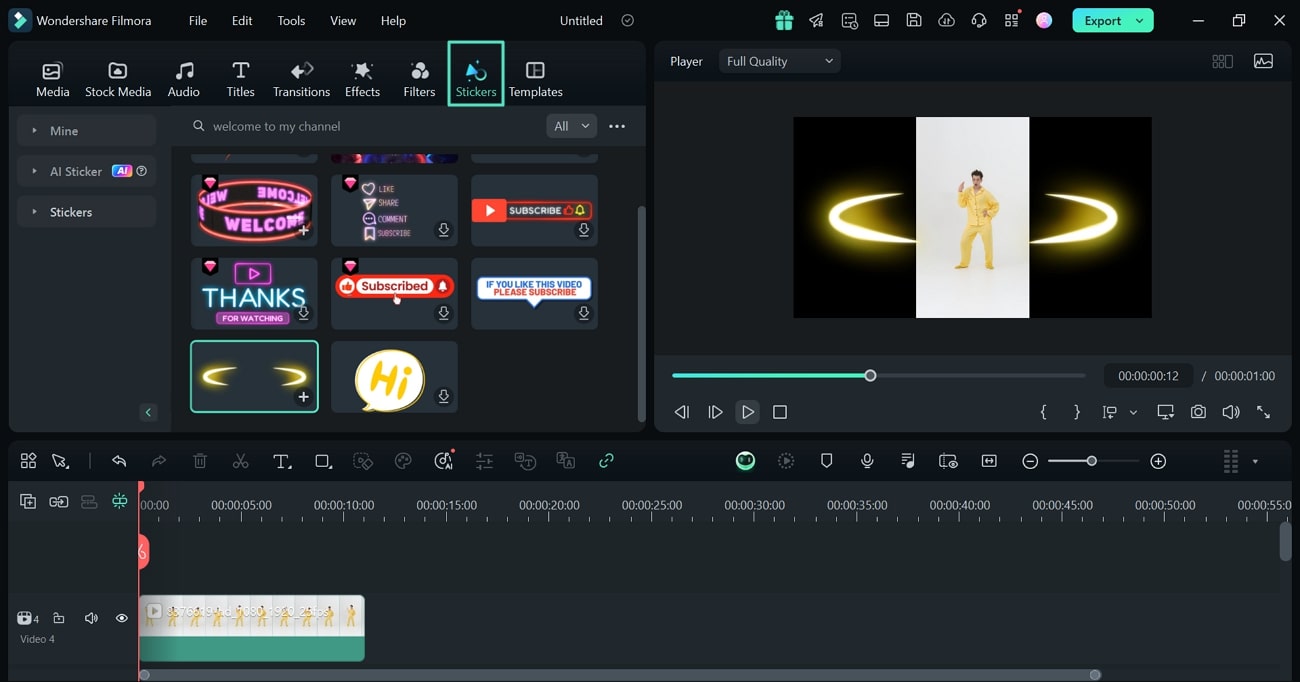
Pro Tip: If you are unable to find the sticker for your video, you can utilize the AI Sticker functionality in Filmora. Provide a dedicated idea and let the AI generate stunning stickers to add to your content. Check the video below to unlock more possibilities.
Step 6. Incorporate Audio for Enhanced Engagement
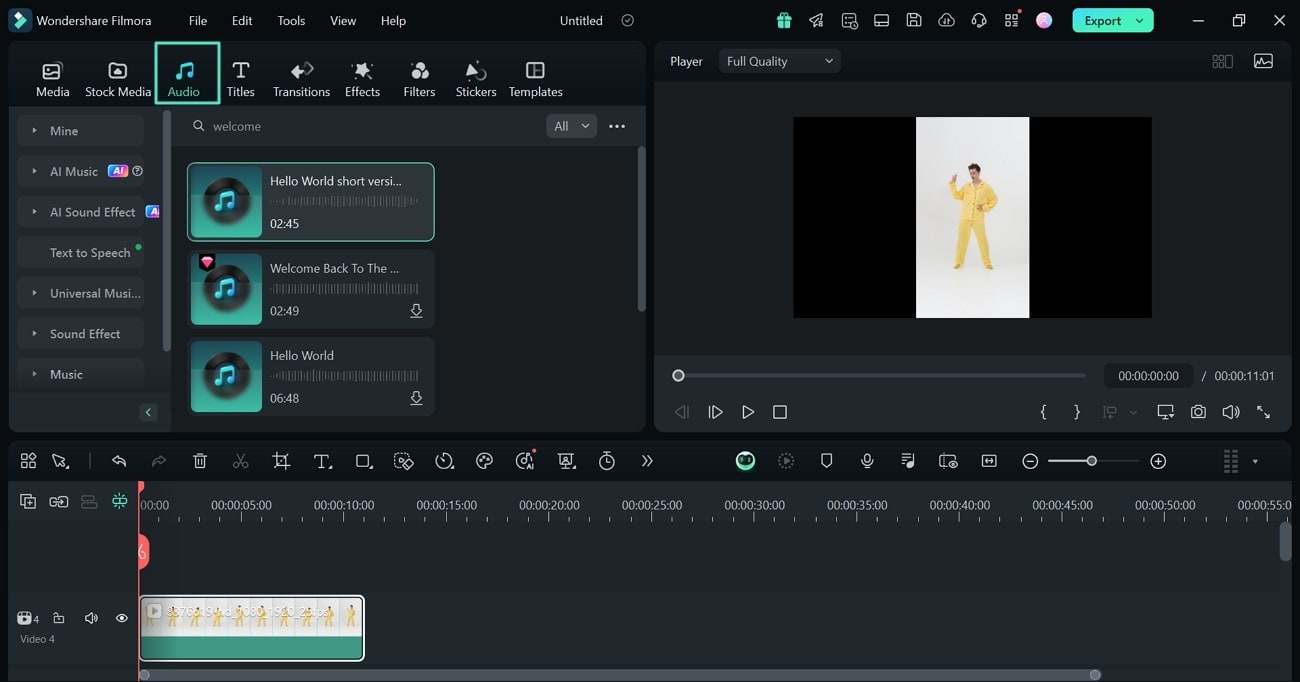
If you desire to create a video, insert a fun welcome song to make it more engaging by navigating to the "Audio" tab. As you choose the desired one, drag it to the timeline and pick the duration to fit it into the video.
Step 7. Export as Video or GIF for Discord
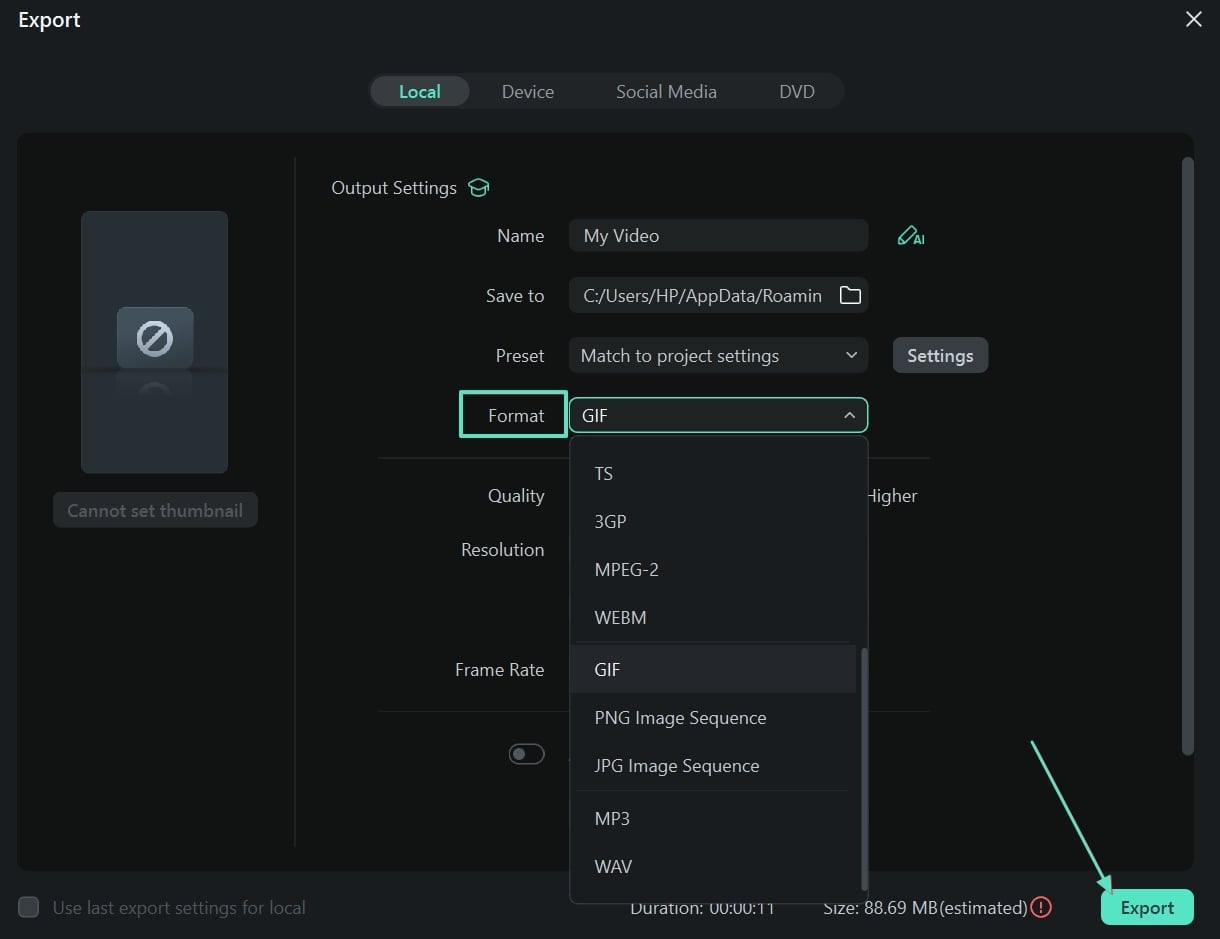
Now that you have made changes, preview them by playing them from the right side of the screen, and hit the "Export" options when you are satisfied. This will open a pop-up window where you can pick a GIF or any video format from the "Format" section. Once done, select the "Export" option again to save the video on your device.
Part 3. How To Add Videos and GIFs to Your Discord Welcome Channel?
Since you know how to set up a welcome channel on Discord and create a welcome message, you might wonder how to insert it into Discord. If so, here we have mentioned possible ways through which you can add welcome text to your channel seamlessly:
1.Uploading Videos Directly
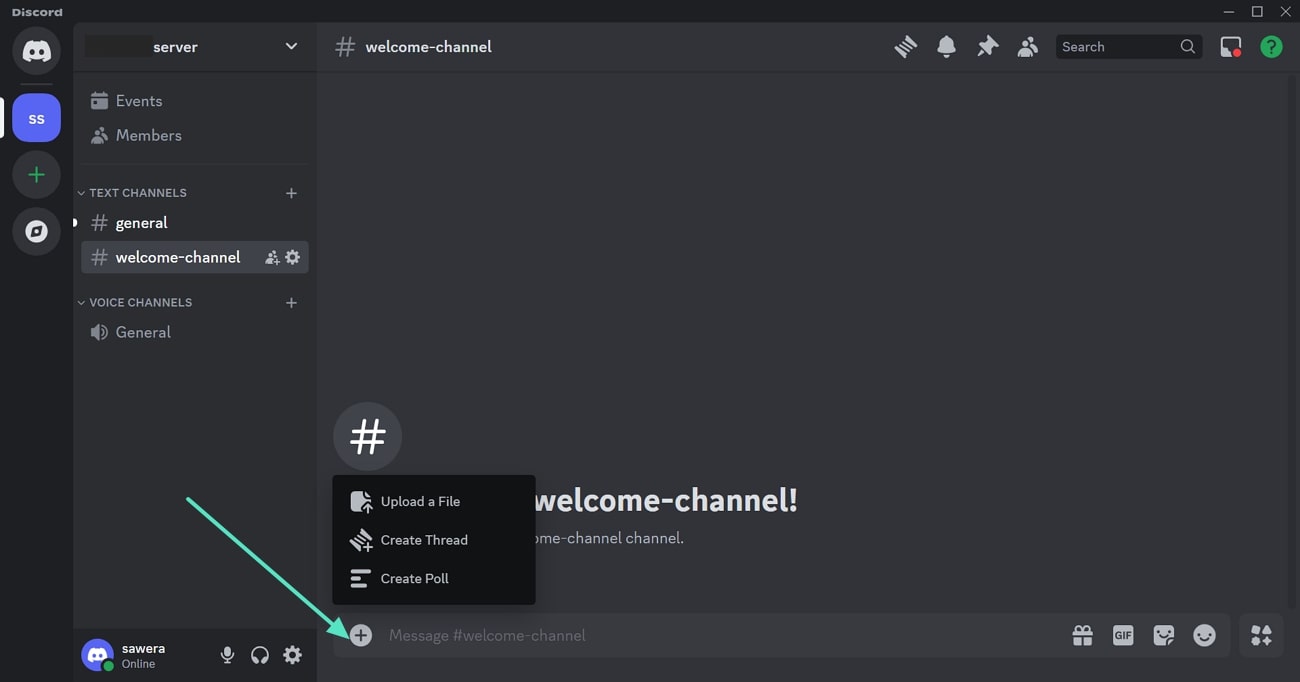
You can upload videos directly into your Discord welcome channel by clicking the "+" icon in the message bar. To do so, you just have to choose the video file from your device to share in the channel. Overall, this is a quick and easy method to add personalized welcome videos to your Discord channel.
However, keep in mind that Discord Nitro users can upload a maximum of 100MB video across the platform. For this, it is best to use the video compressor feature of Filmora by cropping the video, or changing its resolution while exporting it to contain its size.
2.Using GIFs from Giphy
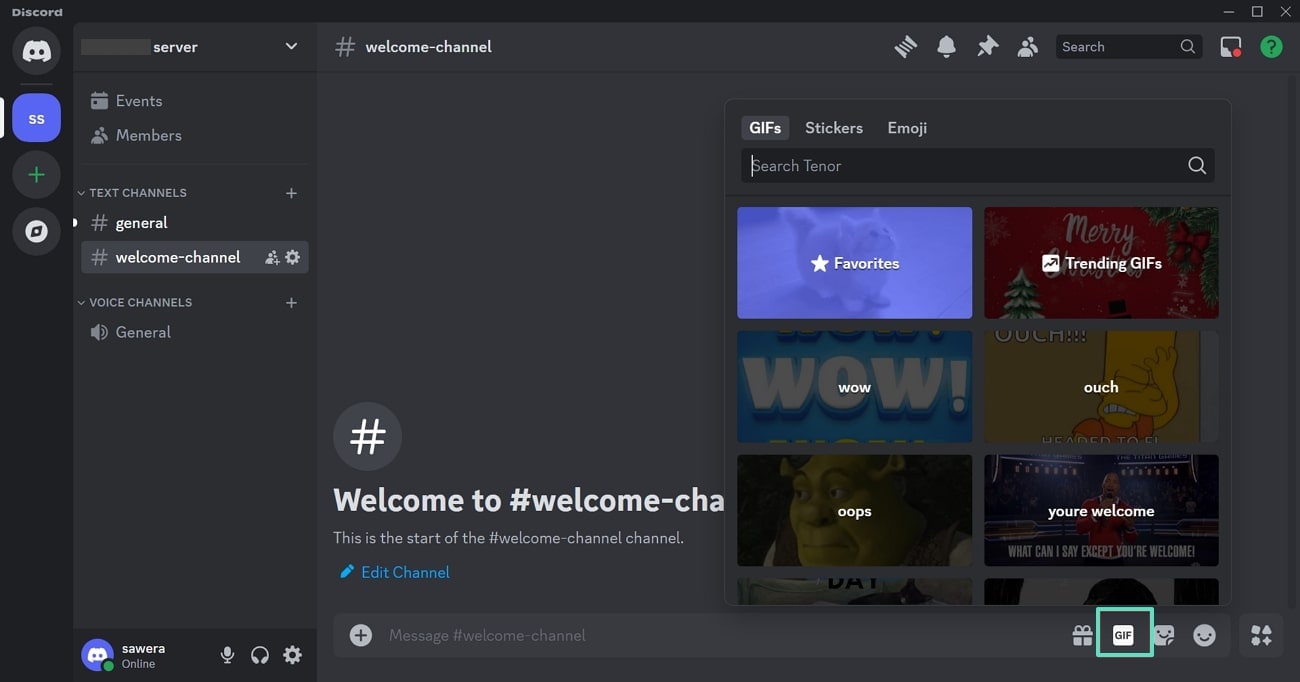
In addition, you can also click the GIF icon in the message box or type /giphy followed by the search term. After that, Discord will display relevant GIFs from Giphy, and you can easily pick one to send. This is another method you can opt for to add fun, animated content to your welcome message.
3.Webhooks for Automated Media
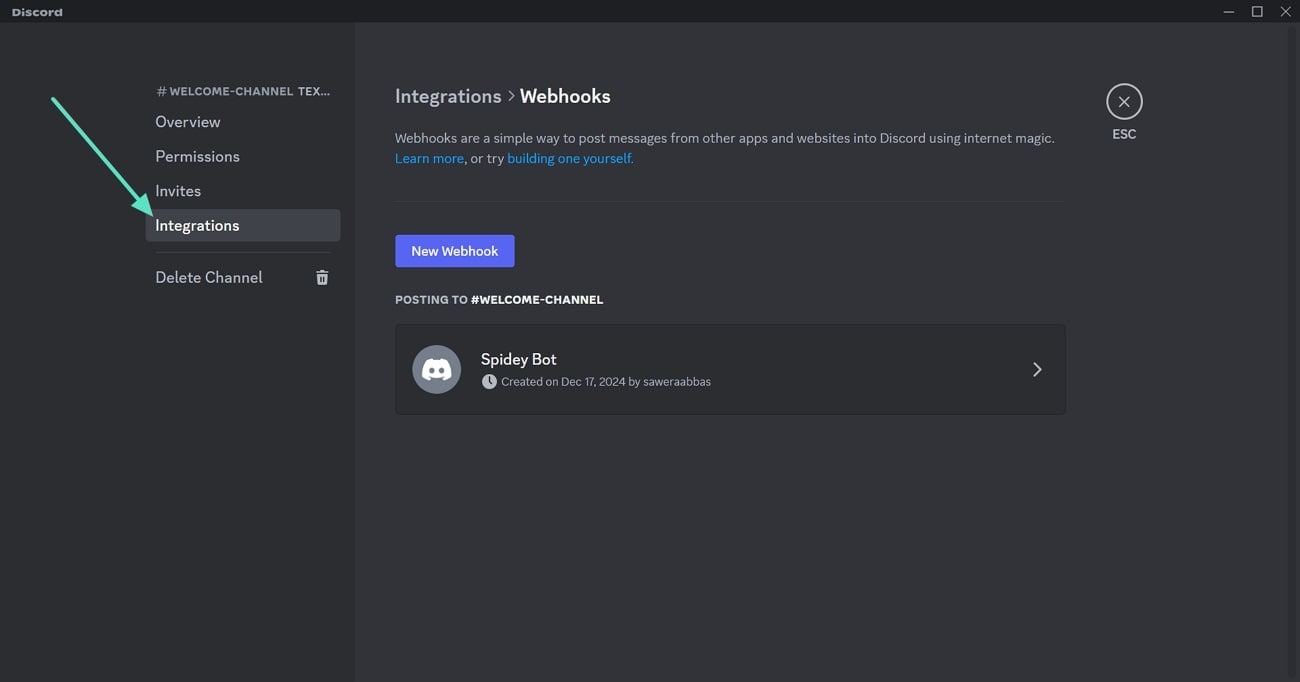
Another seamless option is Webhooks, which allows you to automate media sharing in your welcome channel. You can send videos or GIFs from external sources directly to your channel by setting up a webhook. This can be used to automatically post welcome videos, birthday GIFs, or updates.
4.Uploading Media via Bots
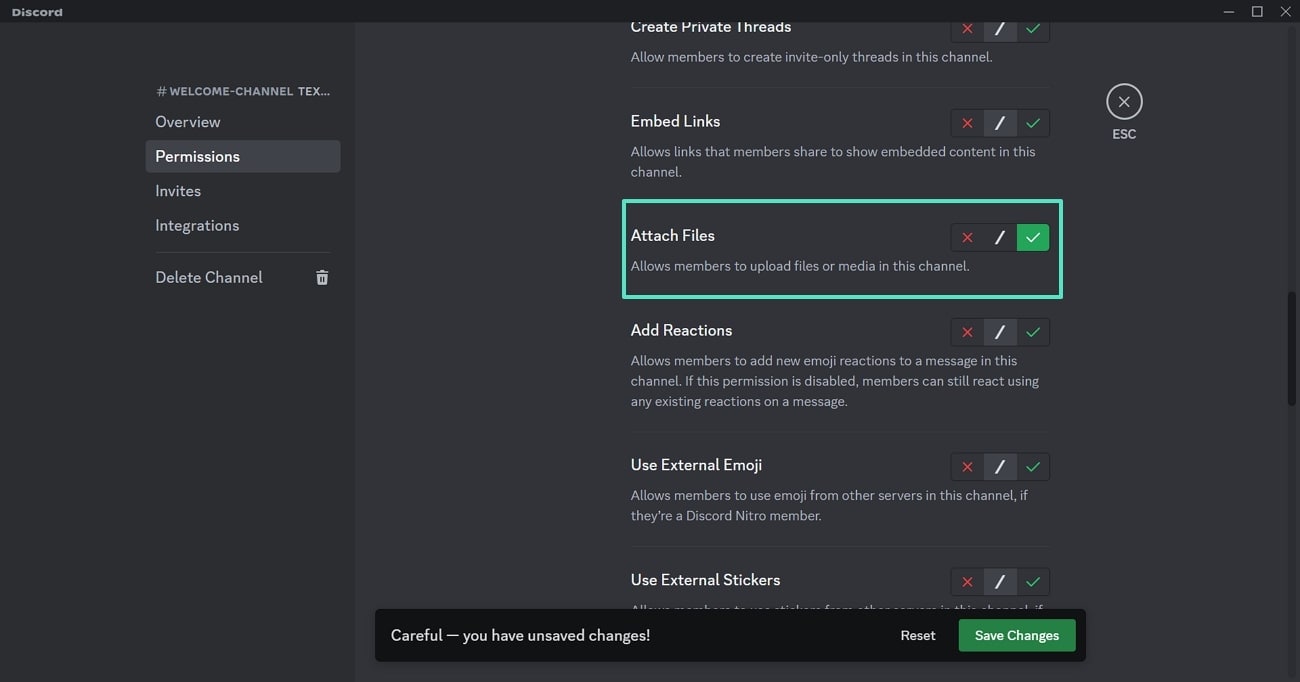
Some bots also let you upload media like videos or GIFs to your Discord channel. For that, bots like MEE6 or Dyno can be configured to automatically post a welcoming video or GIF whenever a new member joins, ensuring your server remains engaging.
5.Embedding YouTube Videos
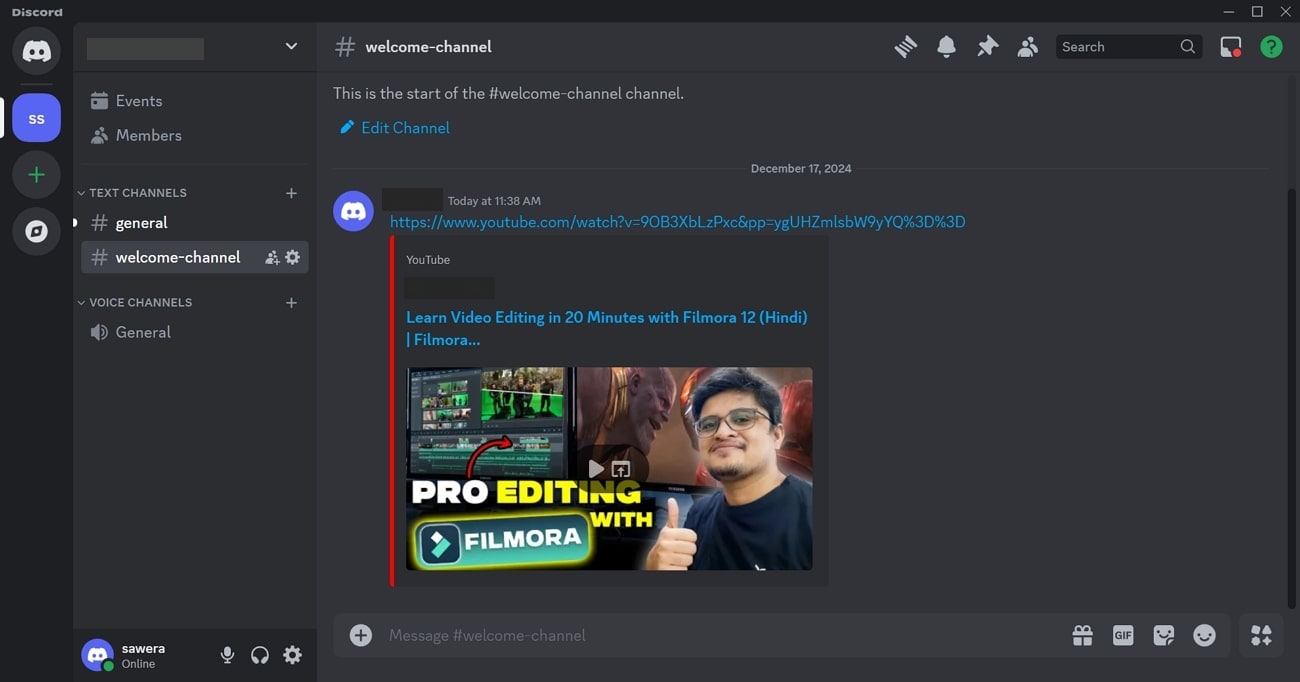
Last but not least, you can embed a YouTube video by simply pasting the link to your welcome channel. Discord will automatically convert the link into a playable video. Hence, it's a great way to share an introductory video or welcome message without uploading large files.
Conclusion
Summing up, learning how to make a welcome channel on Discord is necessary to ensure a smooth and engaging experience for new members. Therefore, in this guide, we have mentioned detailed steps on how you can create a Discord welcome channel and insert an appealing message. Regarding creating GIFs and videos for your channel, you are advised to use Wondershare Filmora since it utilizes a wide range of editing features for personalized content creation.


 100% Security Verified | No Subscription Required | No Malware

