If you are a Twitch streamer, you are probably familiar with OBS Studio. This open-source, powerful tool with marvelous customization options is a perfect ally for creating high-quality streams for platforms such as Twitch.
This tool is great if you want to power your OBS stream Twitch or configure OBS to Twitch, with all its essential tools for a professional-looking stream. But sometimes, the OBS Twitch community asks for more creative ways to enhance their streams and stand out.
If you want to know how to empower your OBS Studio Twitch streams, keep reading and take your streams to the next level.
In this article
How Does Filmora Compliment OBS Studio
Filmora is a tremendous asset to all Twitch streamers that use OBS Studio. This video editor from the Wondershare family is designed to take your Twitch streams to another level.
While OBS Studio handles the live streaming aspect, Filmora takes over when it comes to polishing your content after the stream. With excellent video editing features, you can cut, trim, add transitions and special effects, and use AI-powered tools to take your streams to another level. You can record streams with Filmora's Screen recorder, add voice overs, and record audio from your computer or microphone.
Filmora is also a perfect tool if you want to expand your reach and attract an audience from other social media platforms by creating highlight reels, tutorials, or promotional videos.
With the collaboration of OBS Studio and Filmora, you can control and increase the quality of your Twitch channel, work on your social media presence, and create and edit high-quality streams with ease while enjoying the process.
Use Filmora to Record Your Stream
Before we jump to stream edits and all the magical options Filmora has to offer, let’s see how you can use Filmora to record your stream. It’s funny and super useful how everything is set in one user-friendly environment. Just follow these simple steps:
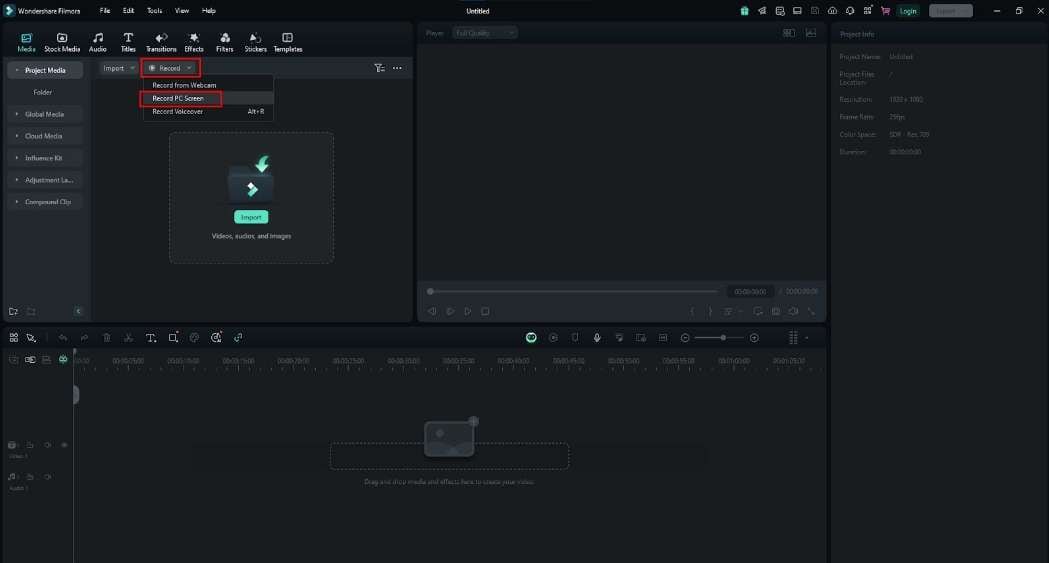
Step 1: First, you’ll need to download and install Filmora. It’s an easy process, and when you are done, launch it and start a New Project. Go to the top bar and click on Record > Record PC Screen.
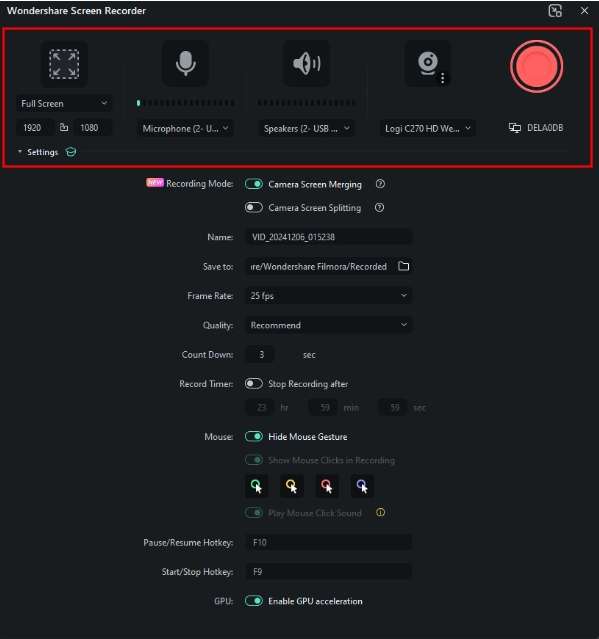
Step 2: Wondershare Screen Recorder will open for you with options to select what area of the screen you want to record, microphone, system sounds, and webcam. You can also change hide or show Mouse Gesture and change the colors if you want to show it. When you are done with setting up the recording options, simply click on the Red button, and the screen capture will start.
During the recording, you will have options to pause and stop the action, and when you are done, the capture of your Twitch stream will pop up in Filmora ready for further editing and preparing for upload.
Use Filmora to Edit the Video
After you are done with using OBS Studio during the streaming on Twitch and recording it with the help of Wondershare Screen Recorder, it’s time for a bit of editing magic. It’s an essential part of this path if you want professional, high-quality, polished content to attract a wider audience and upgrade your channel. But enough talk, let’s get to work.
Video Effects Options
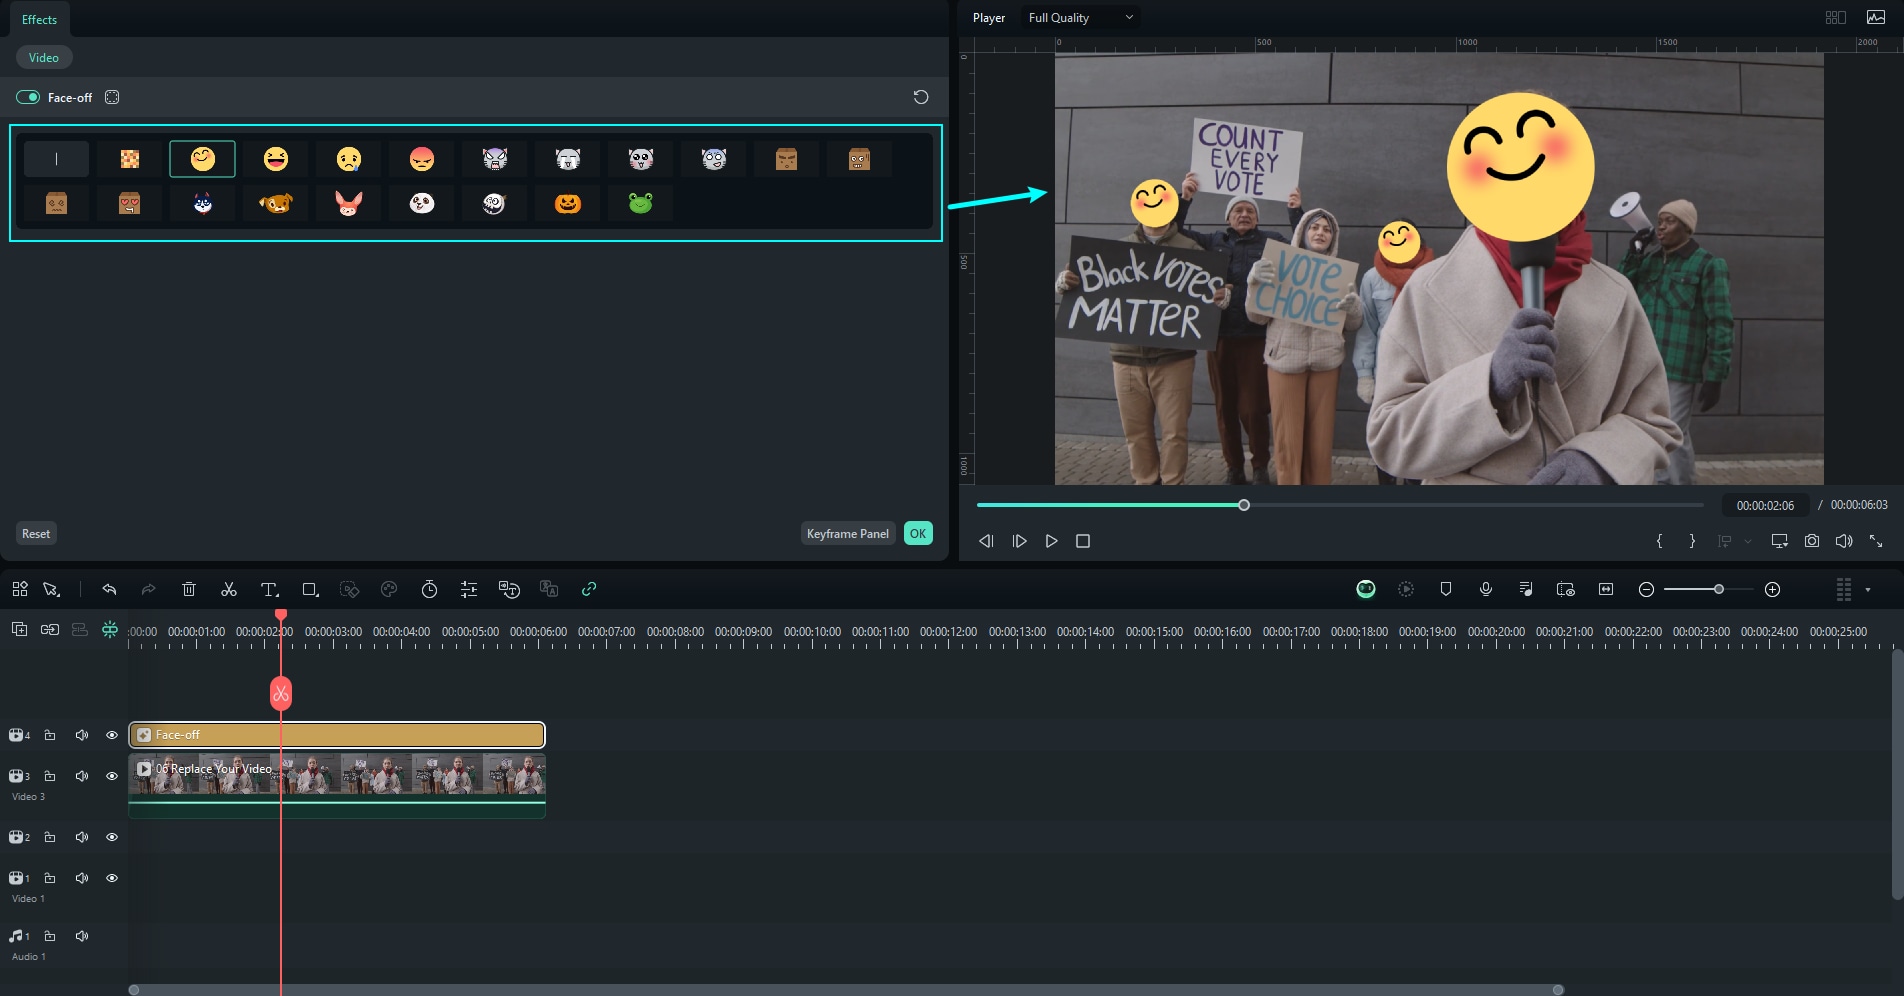
Filmora offers a rich library of effects, and we will just mention some of them and show you how to apply them. The Face-off Effect is a great effect you can use during gameplay showdowns, team competitions, or when you are reacting to the gameplay.
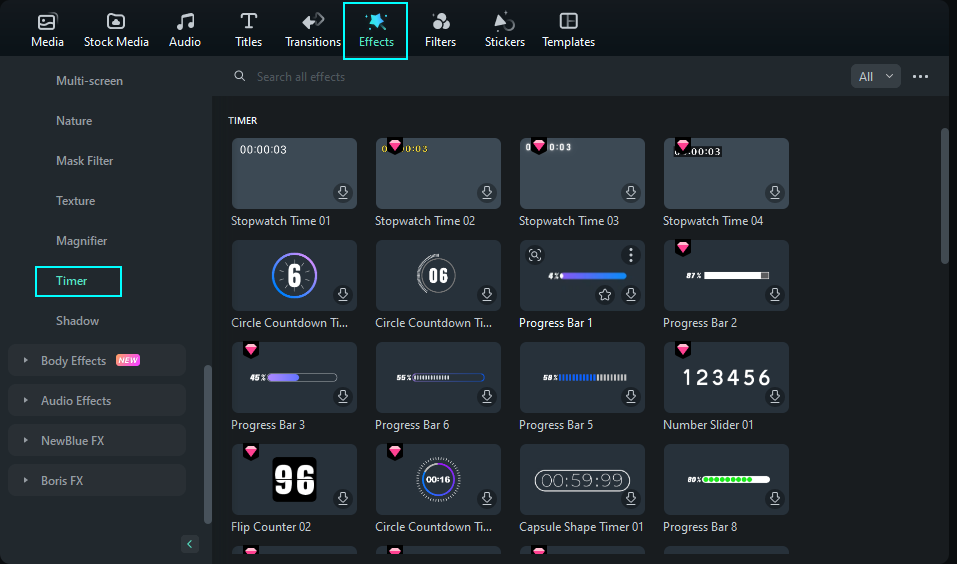
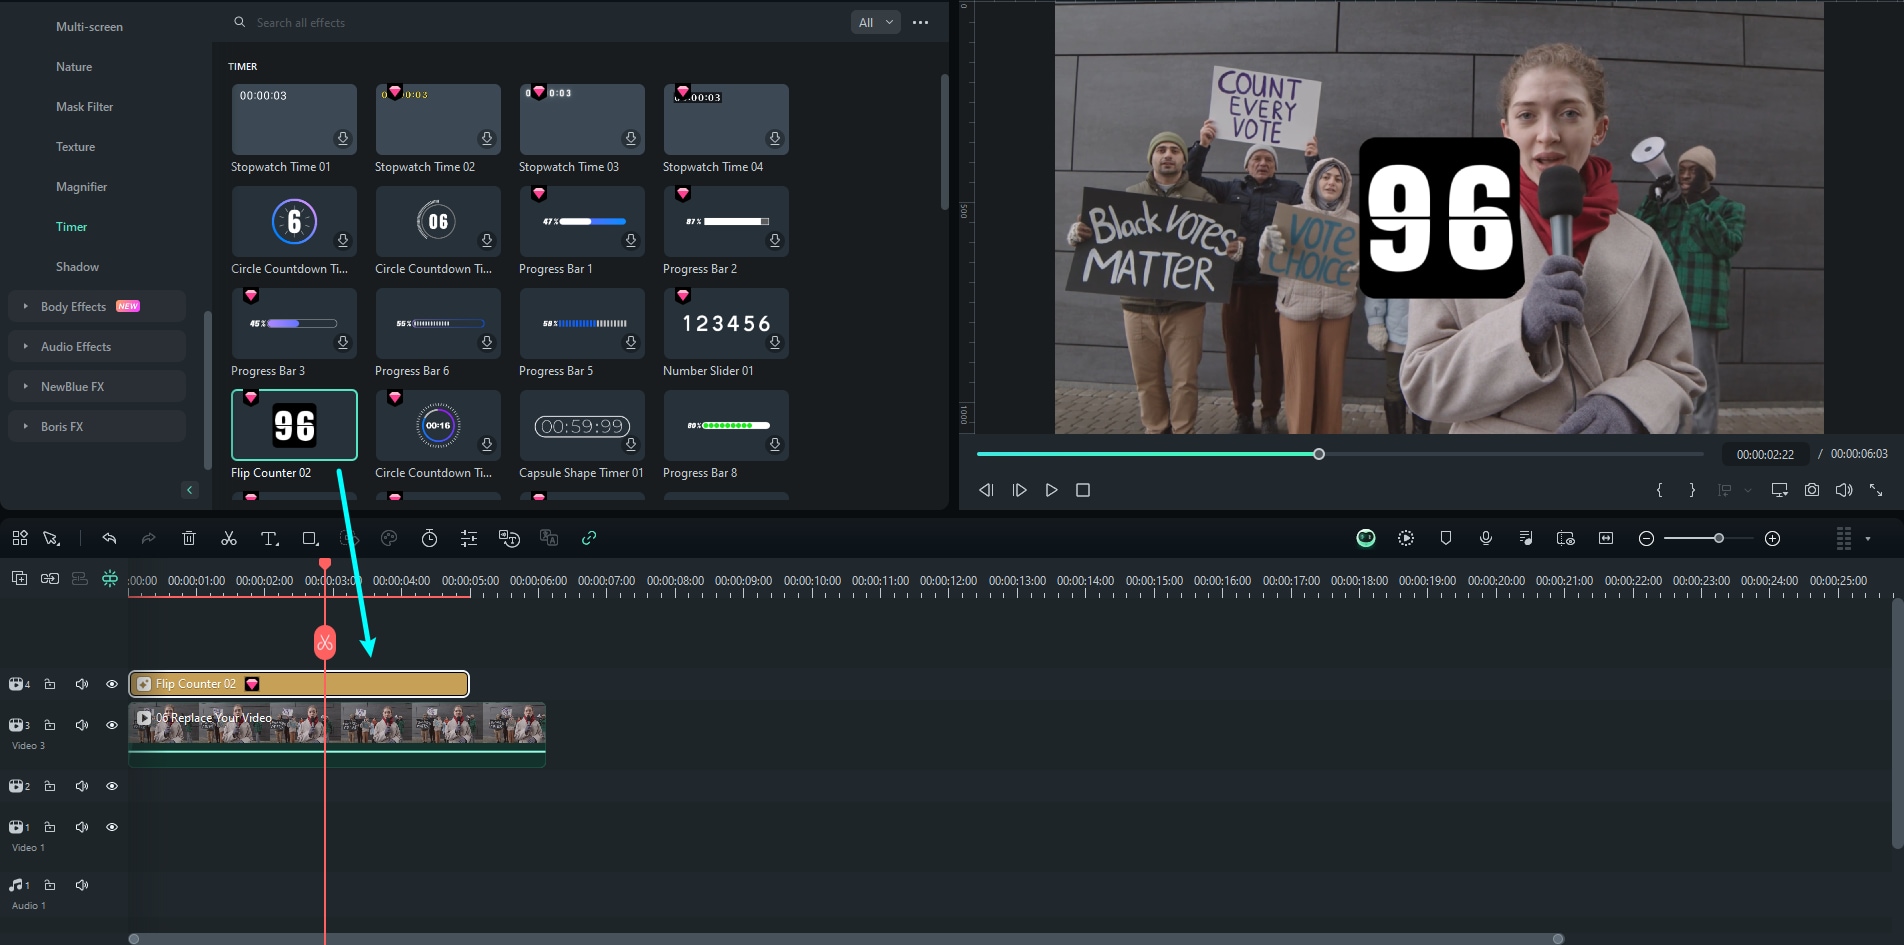
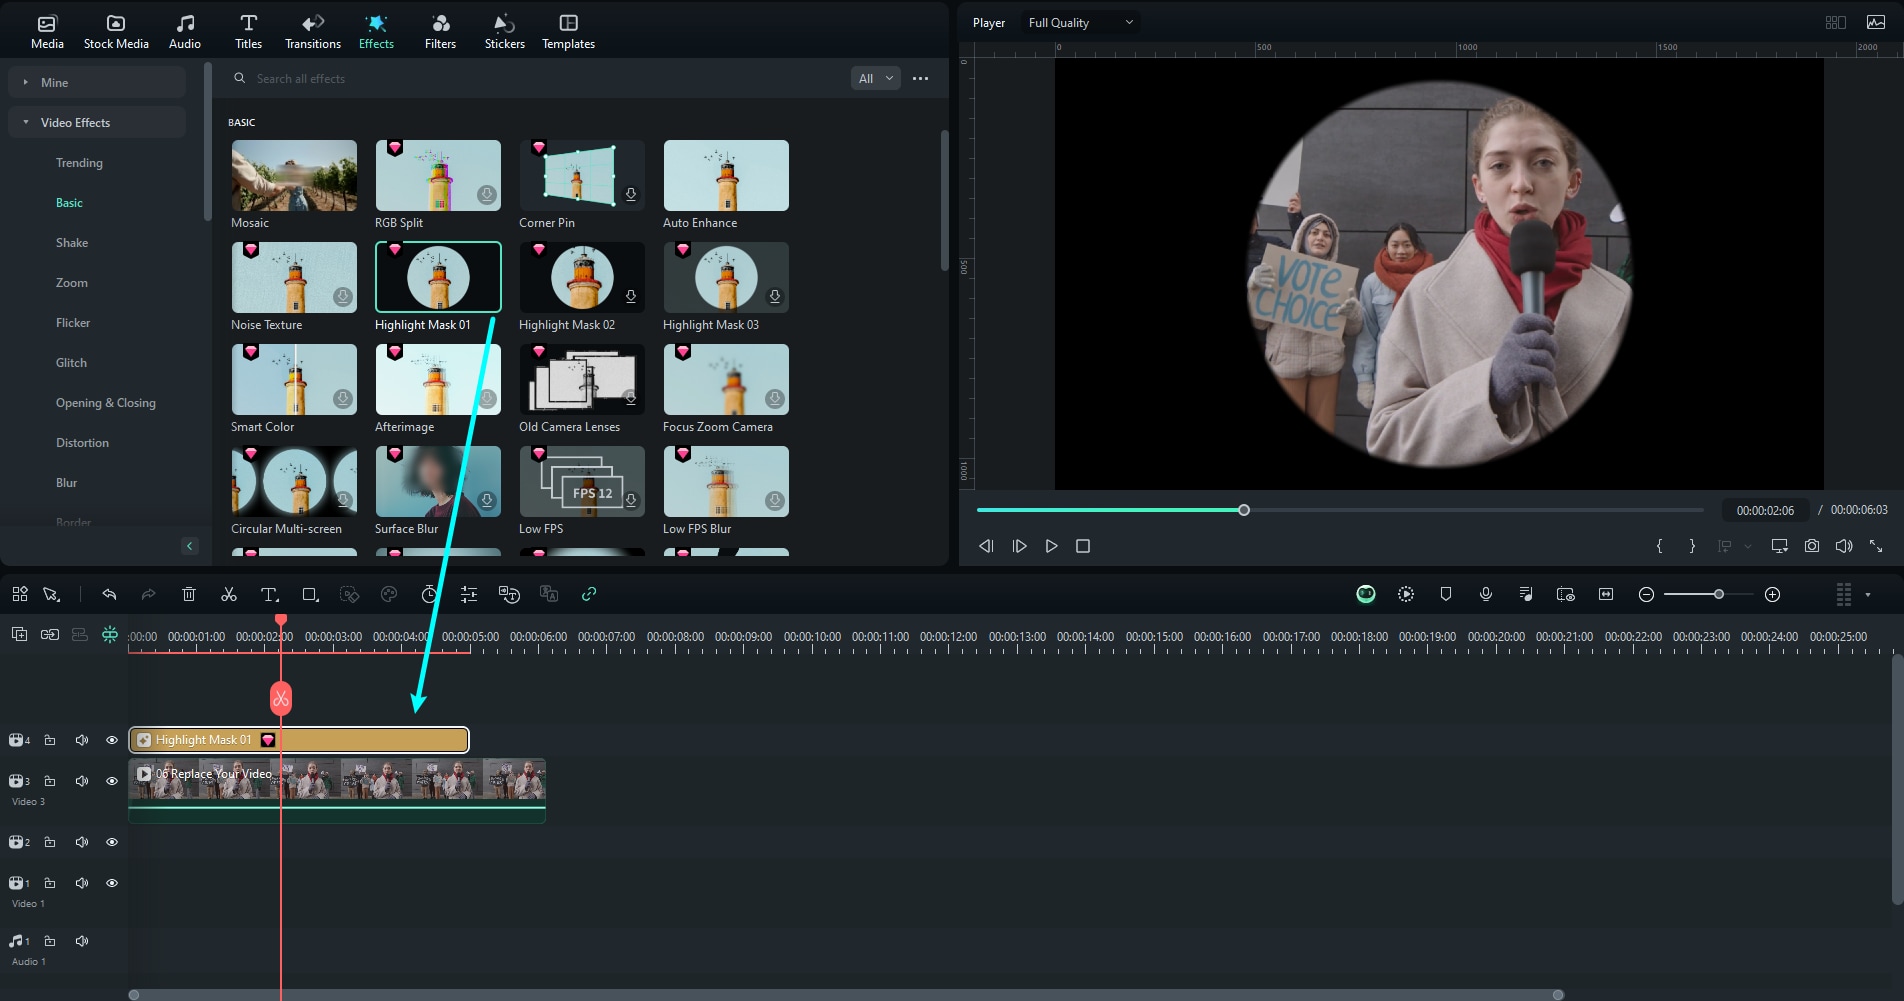
The Timer Effect is excellent for countdowns or showing when a particular milestone (such as a donation goal) will be reached. You can also use Mask effects in your Twitch videos to highlight important parts of your stream by creating a circular or themed frame around your facecam.
Face-off Effect
Step 1: Go to the Effects tab and select Video Effects. Look for a Face-Off Effect or type it into the search area.
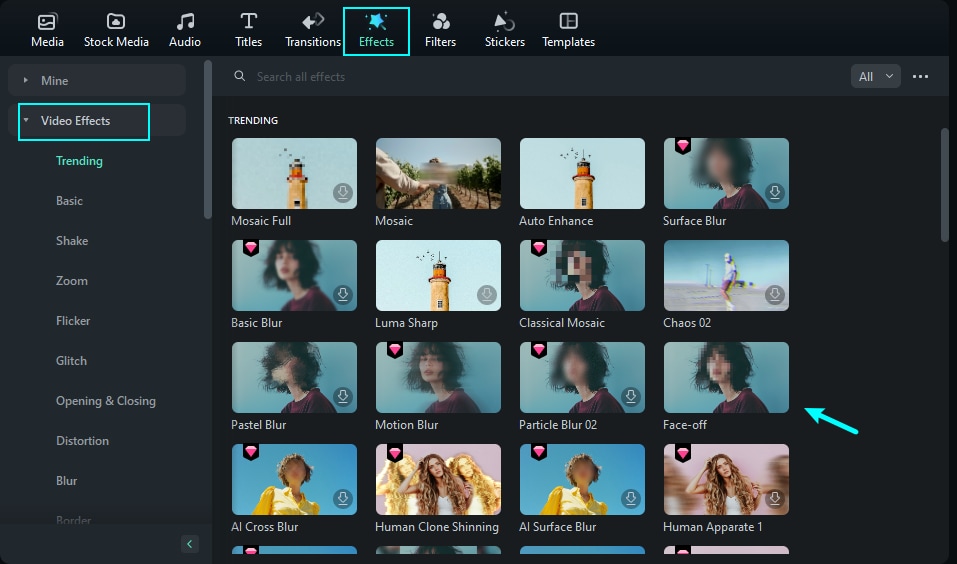
Step 2: Select the Face-off effect and drag it to the track above your video in the timeline. The face will be blurred by default.
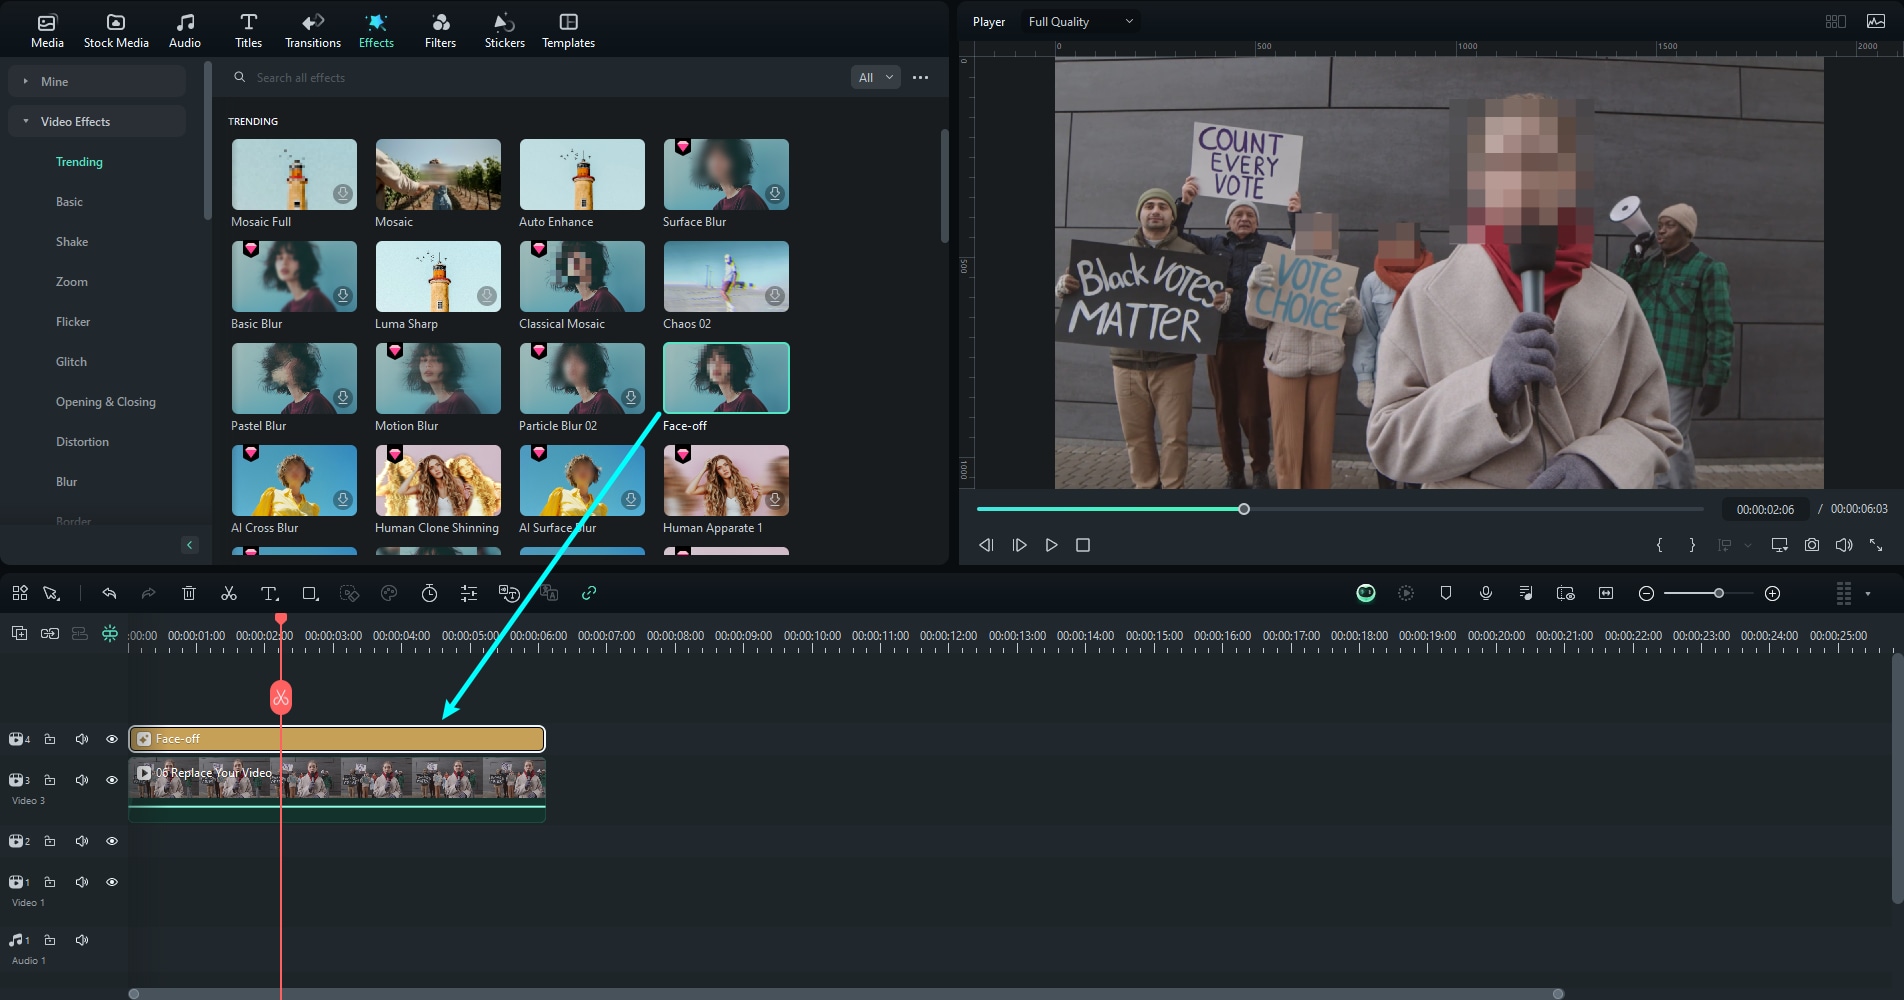
Step 3: Double-clicking on the face effect in the timeline will open the Effect editing panel and change the face presets. It’s a perfect way to add a fun moment to stream videos on your Twitch channel.
Timer Effect
Step 1: The timer effect is perfect for Twitch videos when you want to add a countdown to your gameplay stream or the start of the game. Just go to Effects, find the timer under Video Effects and you will see the options for Timer effects you can add to your video.
Step 2: Choose your favorite Timer effect, drag it to the timeline, put it in a suitable position, and the countdown can start.
Mask Effects
Step 1: For Mask Effects , choose Effects and navigate to the Basic category under Video Effects.
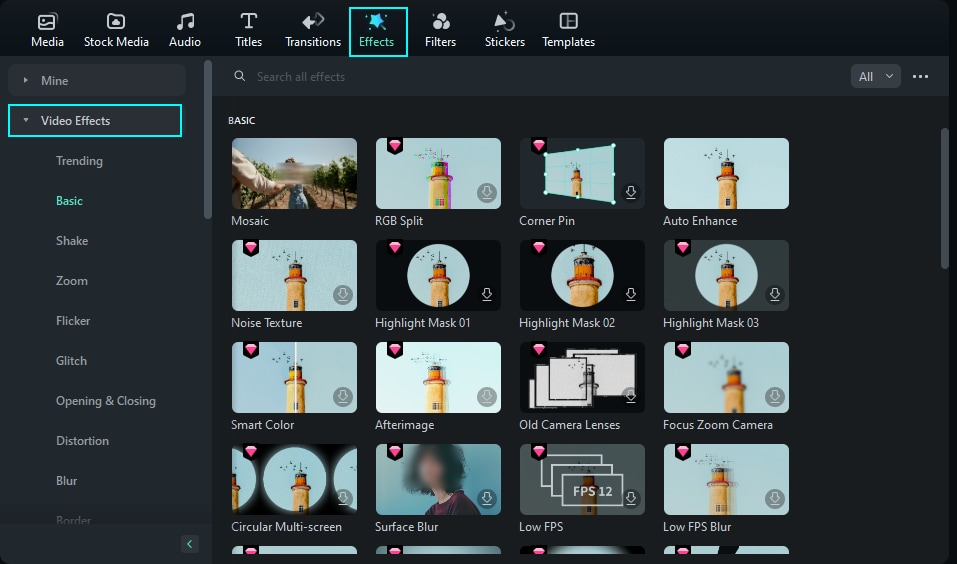
Step 2: Select the mask you want, drag it, and drop it onto the timeline above the media clip. Press Play to check and see how this suits your stream video.
Video Transitions
Transitions in Filmora can add a fun flow and visual appeal to your Twitch videos. This video editor offers a rich library of transitions for smooth scene changes, such as switching from gameplay to a webcam view.
You can easily highlight moments like giveaway announcements or welcome new followers and switch scenes between gameplay and commentary. Just follow the next steps and use this simple yet effective way to improve the quality of your content and viewing experience simultaneously.
Step 1: From the editor's main window, choose the Transitions tab, where you can select the perfect one for your stream video.
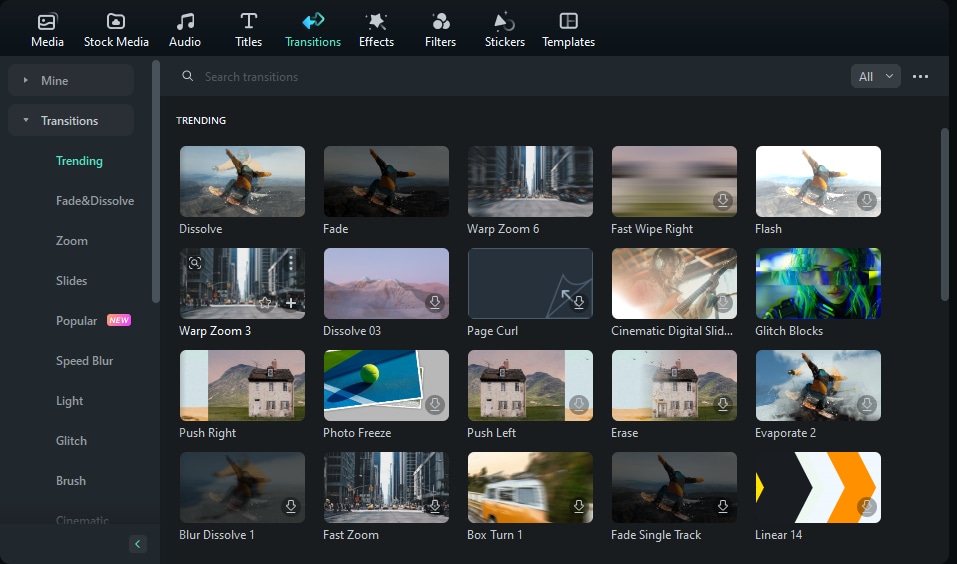
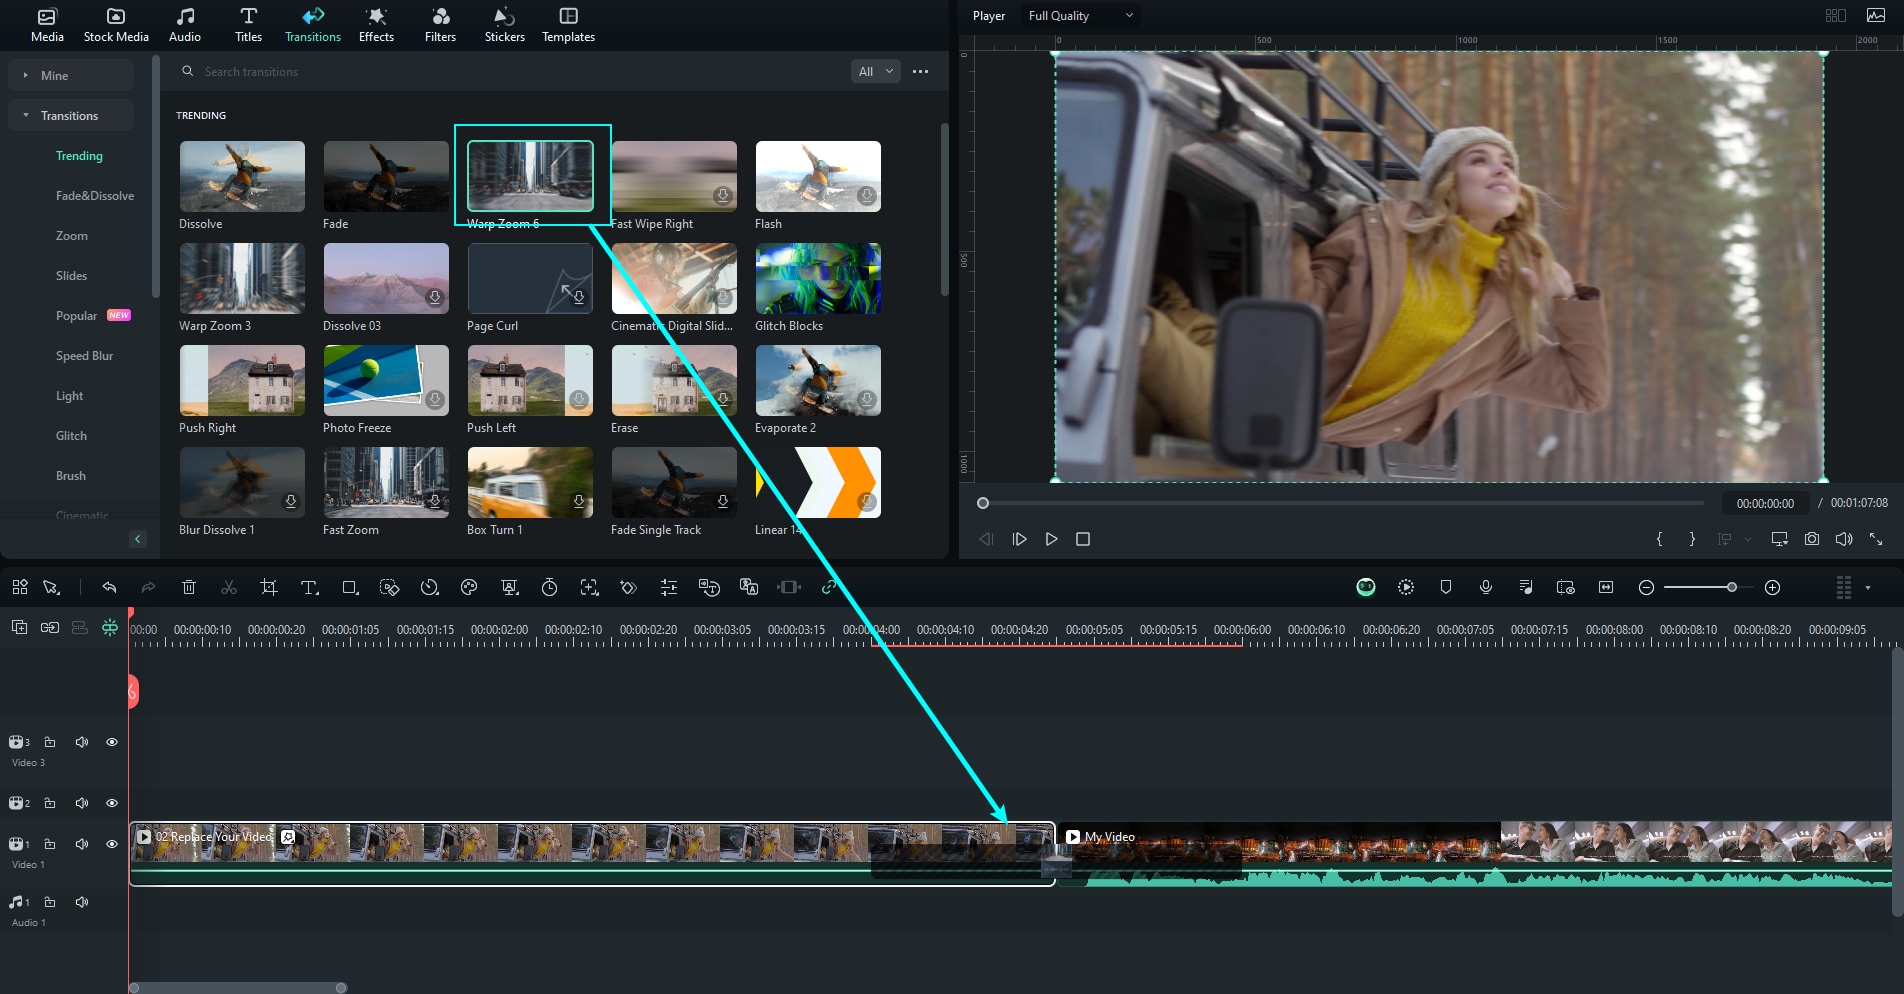
Step 2: Select the one you and by clicking on it, the transition will be downloaded. Select it, drag it and drop it to the timeline at the beginning, end, or between the two videos.
Creative Elements and Stickers
Elements and stickers can add another dose of fun to your Twitch stream videos. With these elements, you can personalize your stream, enhance interactivity, and incorporate branding elements such as logos.
Filmora has a rich library of elements and stickers that you can adjust for your needs. You can use them as stream alerts, interactive visuals, or to enhance emotions and reactions. Either way, these elements can add a personal and professional touch to your content, attract and engage viewers, and make your channel stand out among others.
Follow the next steps in Filmora, and create original videos for your Twitch channel.
Step 1: Click on the Stickers tab and select from the rich library the one you want to add to your video.
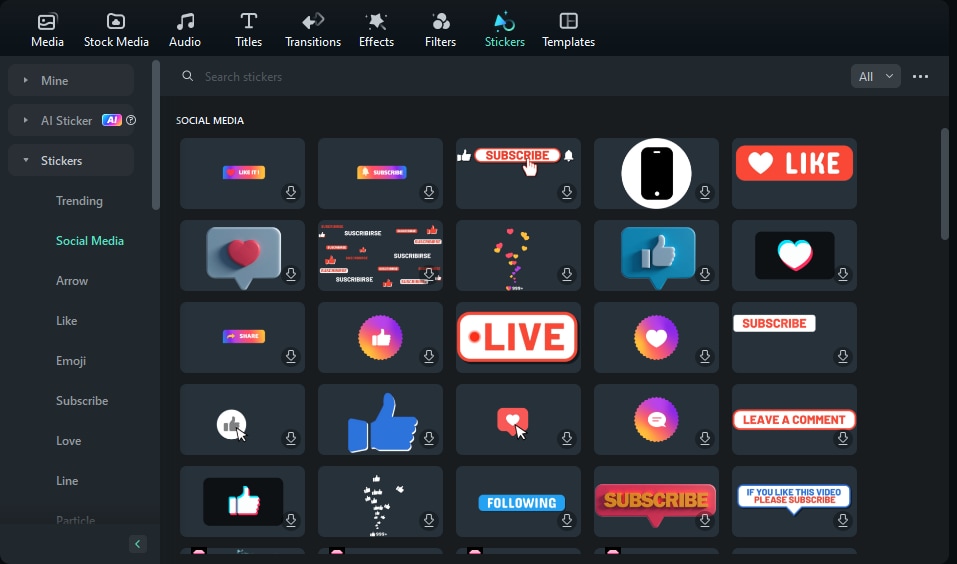
Step 2: Select the perfect sticker for your Twitch content and drag and drop it into the timeline.

All these video effects options in Filmora can add a personal and unique touch to your content, make your brand stand out, and become recognizable. While you can express your creativity with these effects and push boundaries with new concepts and innovations, at the same time, you build consistency in your branding,
Use Filmora’s AI Features
Filmora has a lot to offer besides recording and video editing options. This magical video editor is constantly updated with AI-powered features that perfectly fit Twitch video creation. One of them is the new Smart Short Clips feature that you can use to increase the discoverability of your channel and boost its visibility across different social media platforms.
This useful feature automatically extracts highlights from long videos, such as gameplay, and creates short videos that you can tailor for promotion on other social media platforms like YouTube, Instagram, Facebook, or Twitter.
You get access to 50+ catchy video templates and layouts, such as vertical (9:16) for TikTok, square (1:1) for Instagram, cinematic (4:3) for Vimeo split-screen layout (multiple grids) for comparison, PIP or collage, etc. This way, you can expand the reach of your Twitch content and attract even those users who are not primarily on this platform.
Let's now see in practice how Filmora's smart feature can identify key moments from your Twitch stream video.
Step 1: Launch Filmora and under New Project, you can find Smart Short Clips. You can also access this feature through the Toolbox menu on the left.
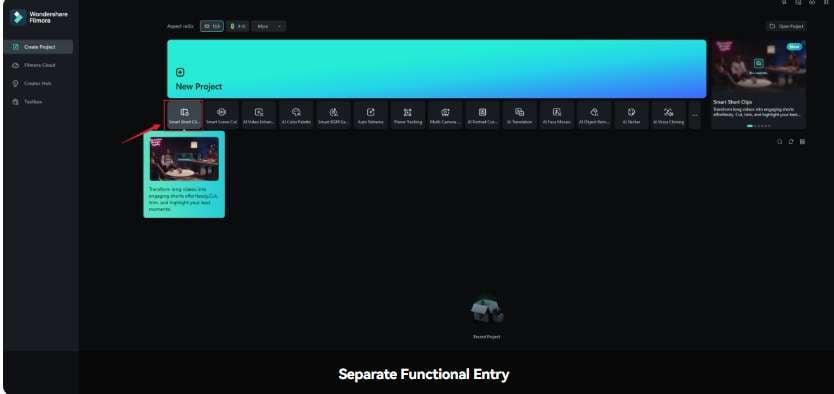
Step 2: Upload your Twitch video or choose it from Filmora Cloud into Filmora.
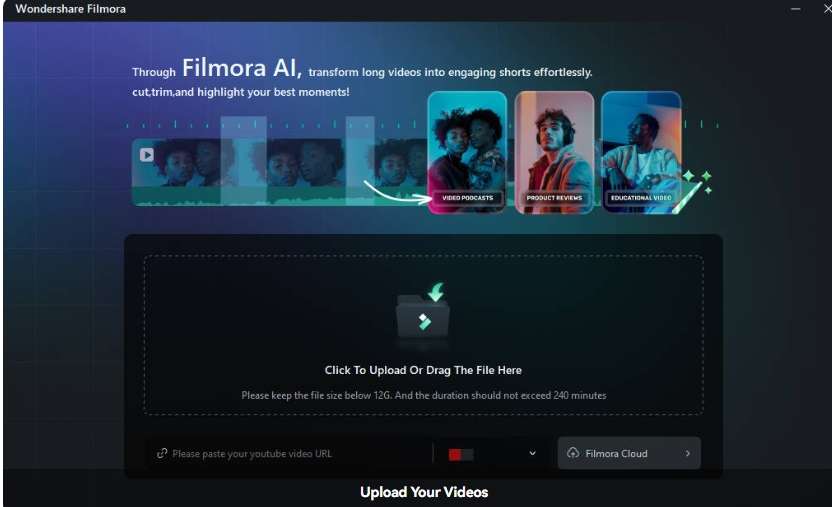
Step 3: When uploading the video to Filmora, you need to select the video source Language, and you can adjust the Duration and Themes if you don't want the default ones.
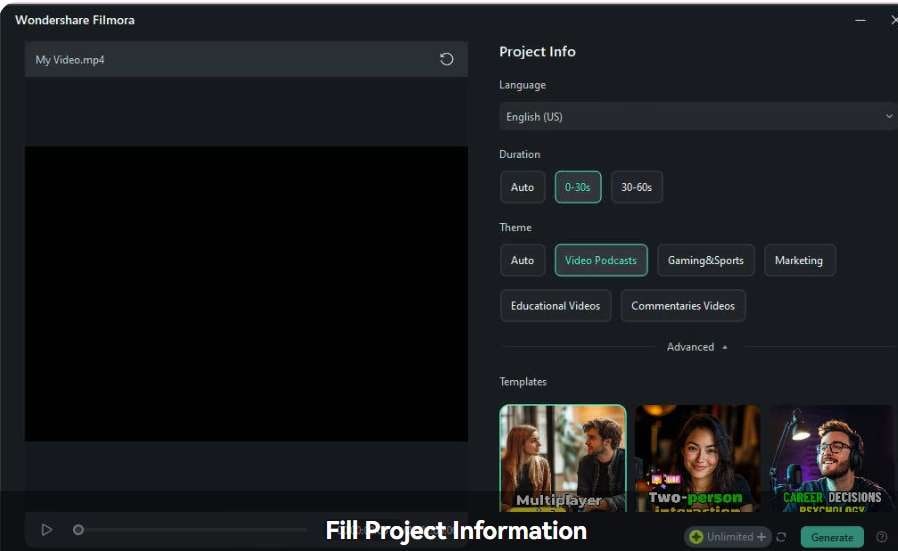
Step 4: In other options, you will find Ratio settings to fit your needs and Smart BGM Generation to auto-generate music that fits your content. Templates are also available, so you can choose one from the library and go to the Generate button.
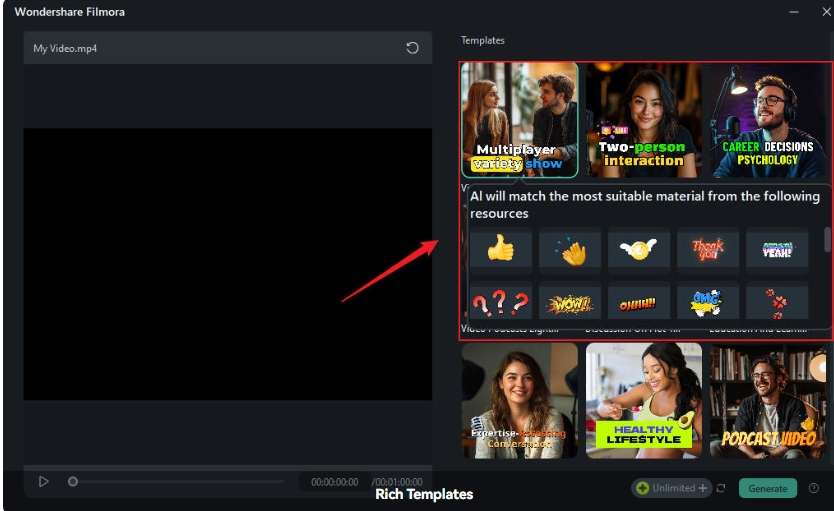
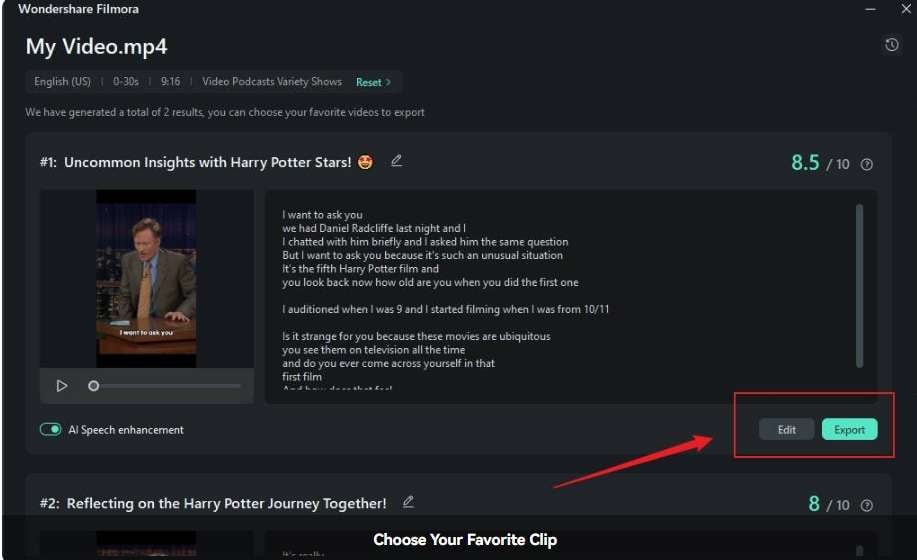
Step 5: Wait a little, until Filmora finishes the process and shows you a few results you can choose from. Select your favorite clip and Export it directly to the platform you want, or continue with Edit if needed.
Conclusion
As you can see, it’s hard to go back to using OBS Studio only for your Twitch content when you introduce yourself to Filmora. With the collaboration of these two powerful tools, you are assured that your Twitch video streams will get everything they need every step of the way.
While OBS Studio suits streamer needs while streaming, Filmora offers everything and more in the production process. Everything is easy and accessible in a user-friendly environment.
From a rich library of transitions, effects, and stickers to AI-powered features like Smart Short Clips, your content will be polished and ready to attract users from every social media platform directly to your Twitch channel.


 100% Security Verified | No Subscription Required | No Malware

