
The popularity of the Twitch platform has grown significantly over the years. New creators are popping up all over the place, and if you want to stand out, you need to diversify your efforts and focus on different platforms like YouTube or TikTok to grow your audience.
For this purpose, you will need video editing tools, and you’re in luck. We have prepared a list of the top five video editing tools that you can use to transform your Twitch streams into videos for other media. Read on to find out how you can become a Twitch video editor.
In this article
Top Tools for Twitch Editing
Wondershare Filmora
The first tool on the Twitch video editor list is the absolute winner. Filmora is perfect for beginners who are new to Twitch video editing, but it also offers many advanced features for industry professionals. As you will see in the text below, Filmora has several useful features, but the team at Wondershare is constantly working on adding new ones.
The free version of Filmora comes with several features, and you can get the paid version for as low as $9.99 per month, which is an excellent price given the sheer volume of features you get.
Recently, they added several useful AI features like Image to Video, Audio to Video, and Smart Short Clips, but we’ll talk about one of them later. For now, let’s see how you can use Filmora for Twitch editing purposes.
Record Your Streams Seamlessly
The first step would be to record your stream . With Filmora, this is an easy process. Just follow these steps.
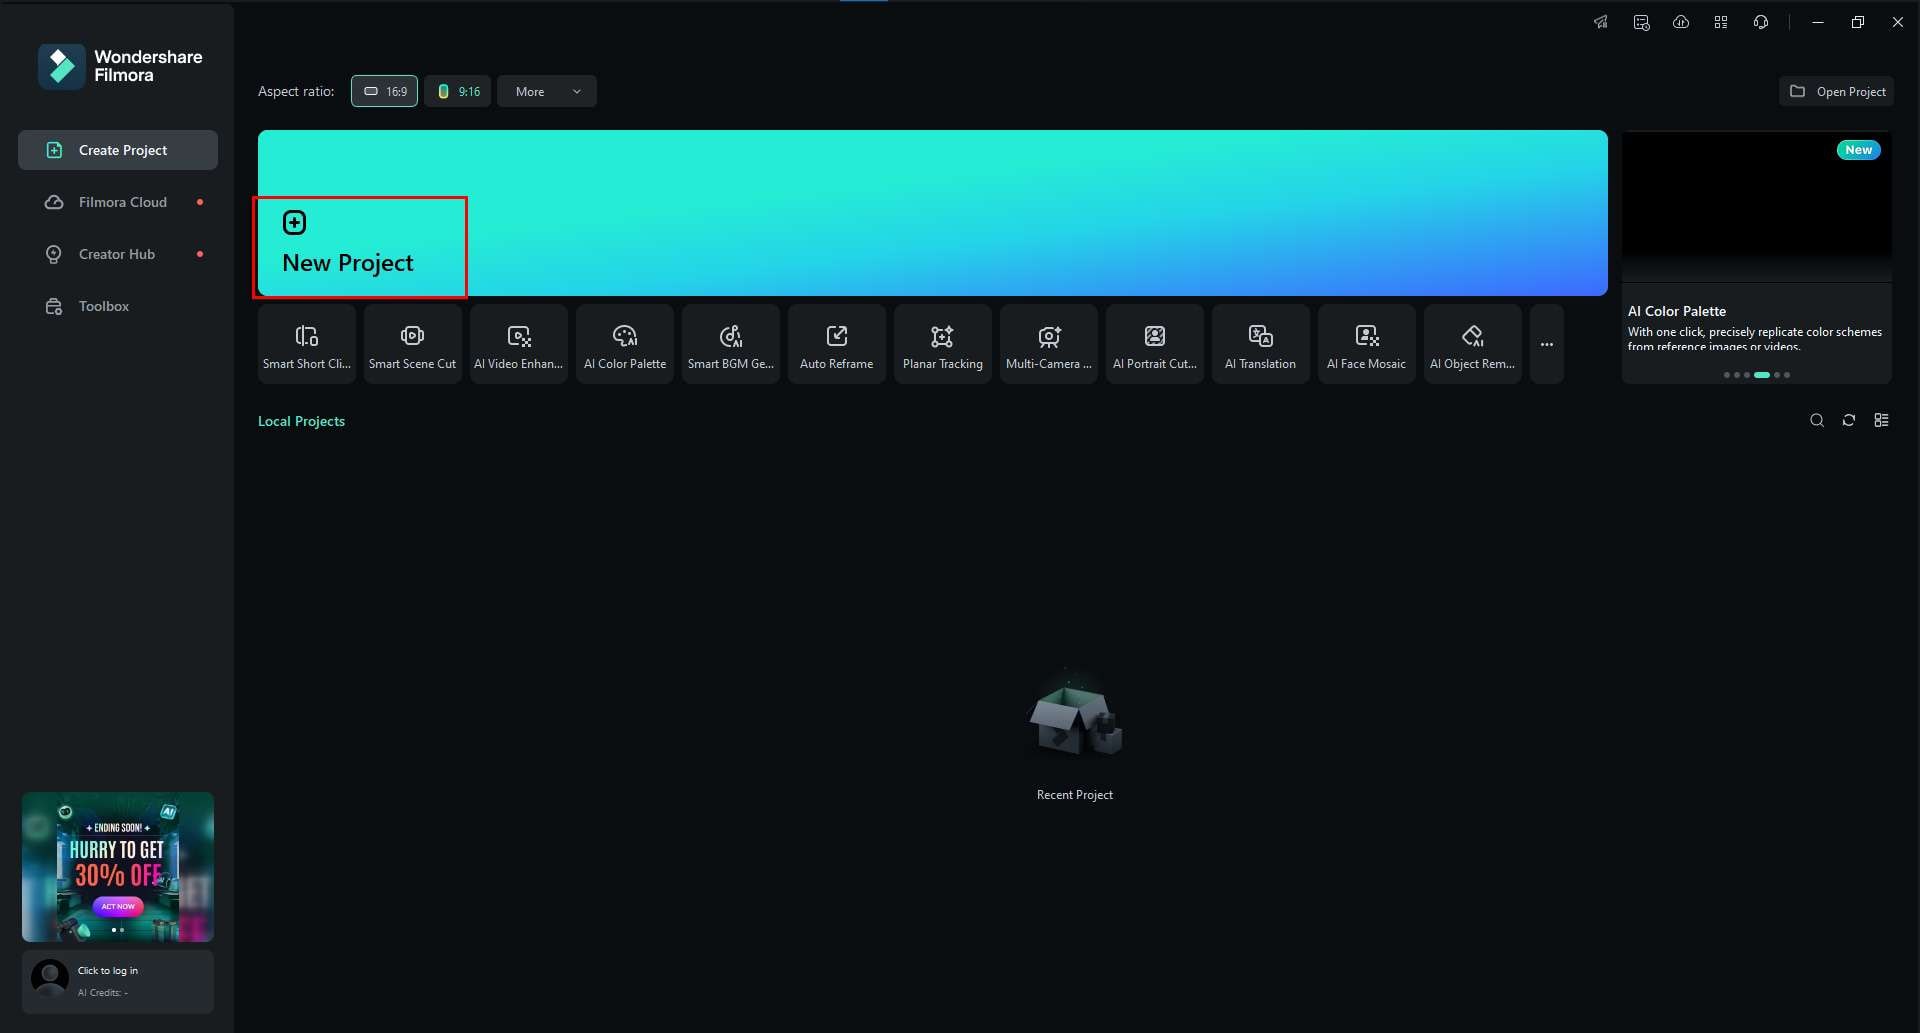
Step 1: Download the software from the below button. Then, run the installation program, follow the prompts, and open Filmora when it is installed. When it is up and running, click on New Project.
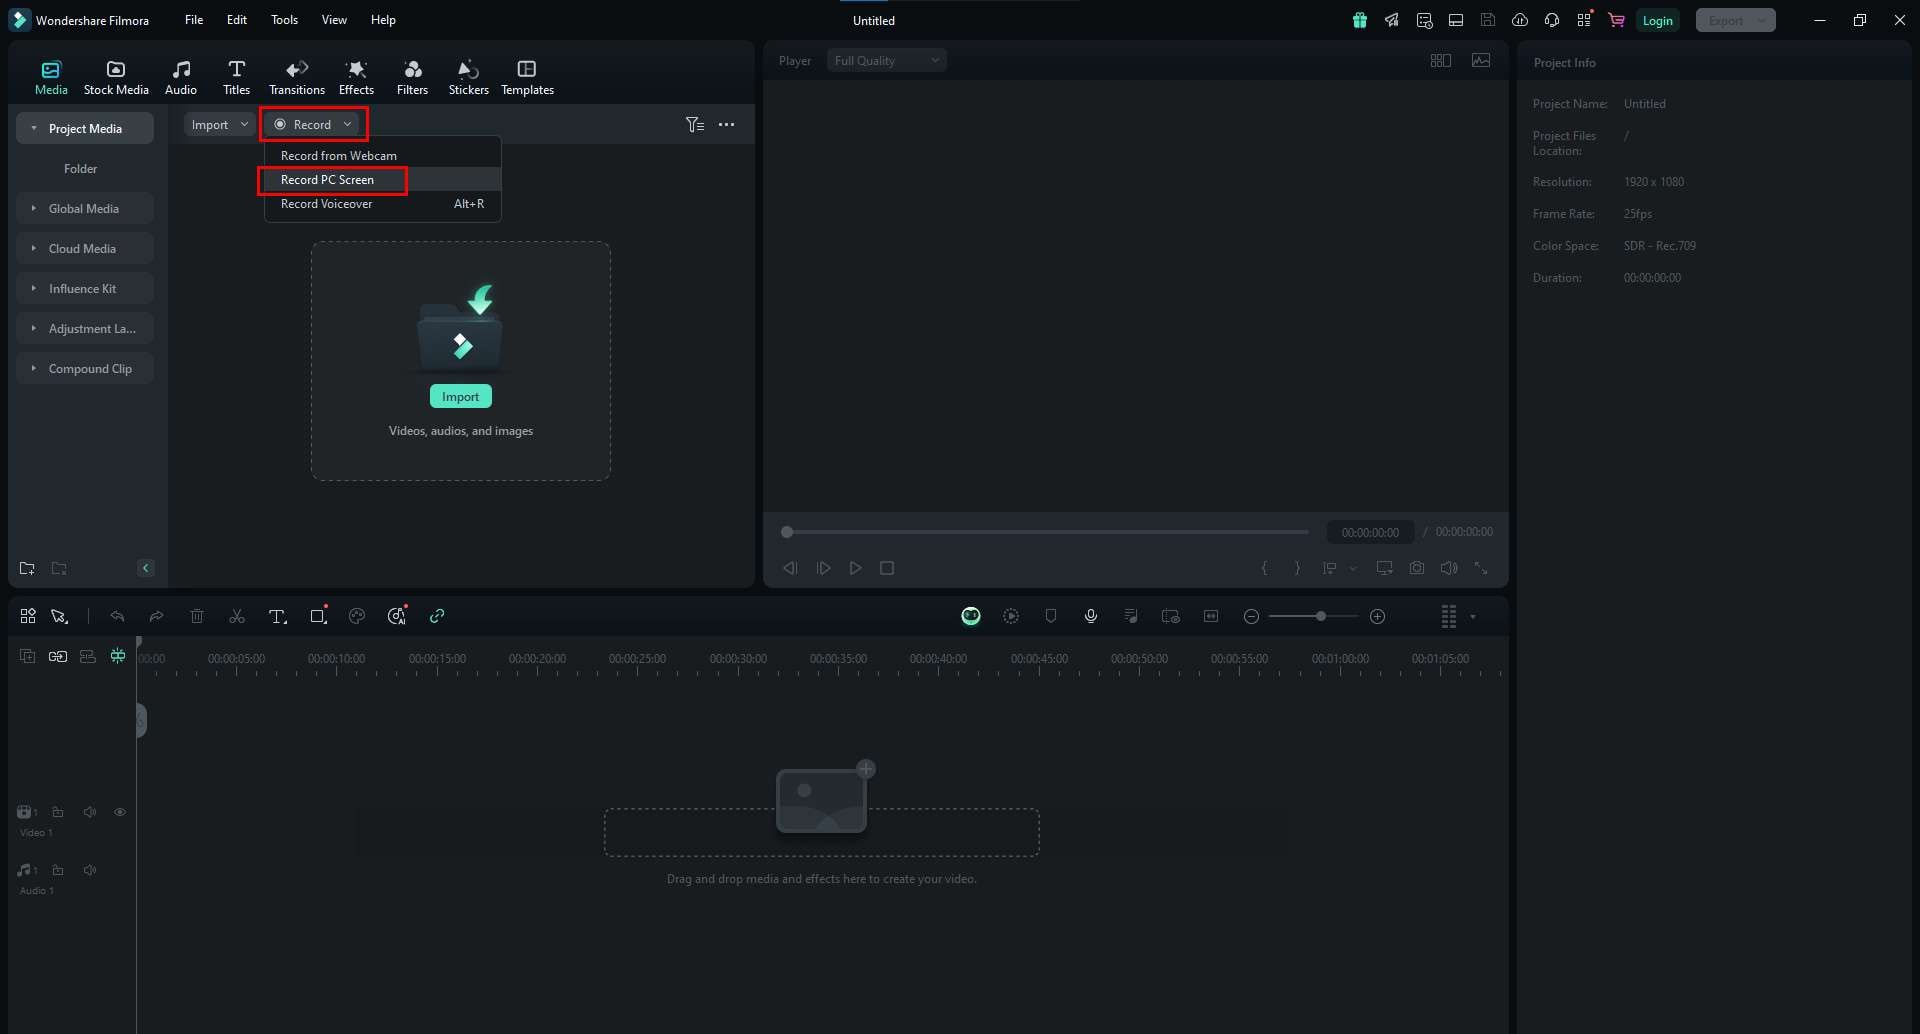
Step 2: Locate the Record button on the top-left corner of the screen. Click on it, and a drop-down menu will appear. Then, click on Record PC Screen.
Step 3: A new window will appear with many options. Here, you can select the video recording device or audio recording device, among many others. Look through the options carefully and make the proper selections.
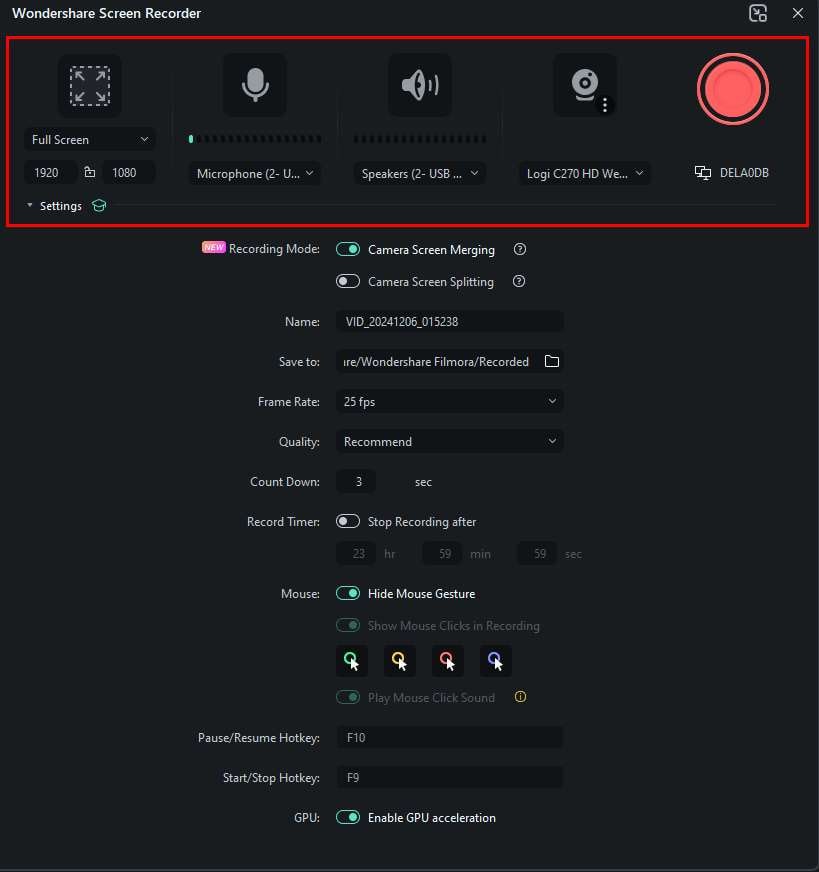
Step 4: Filmora offers several stream recording customization options. Explore this interface and choose whether to record the entire screen or just a particular part of it.
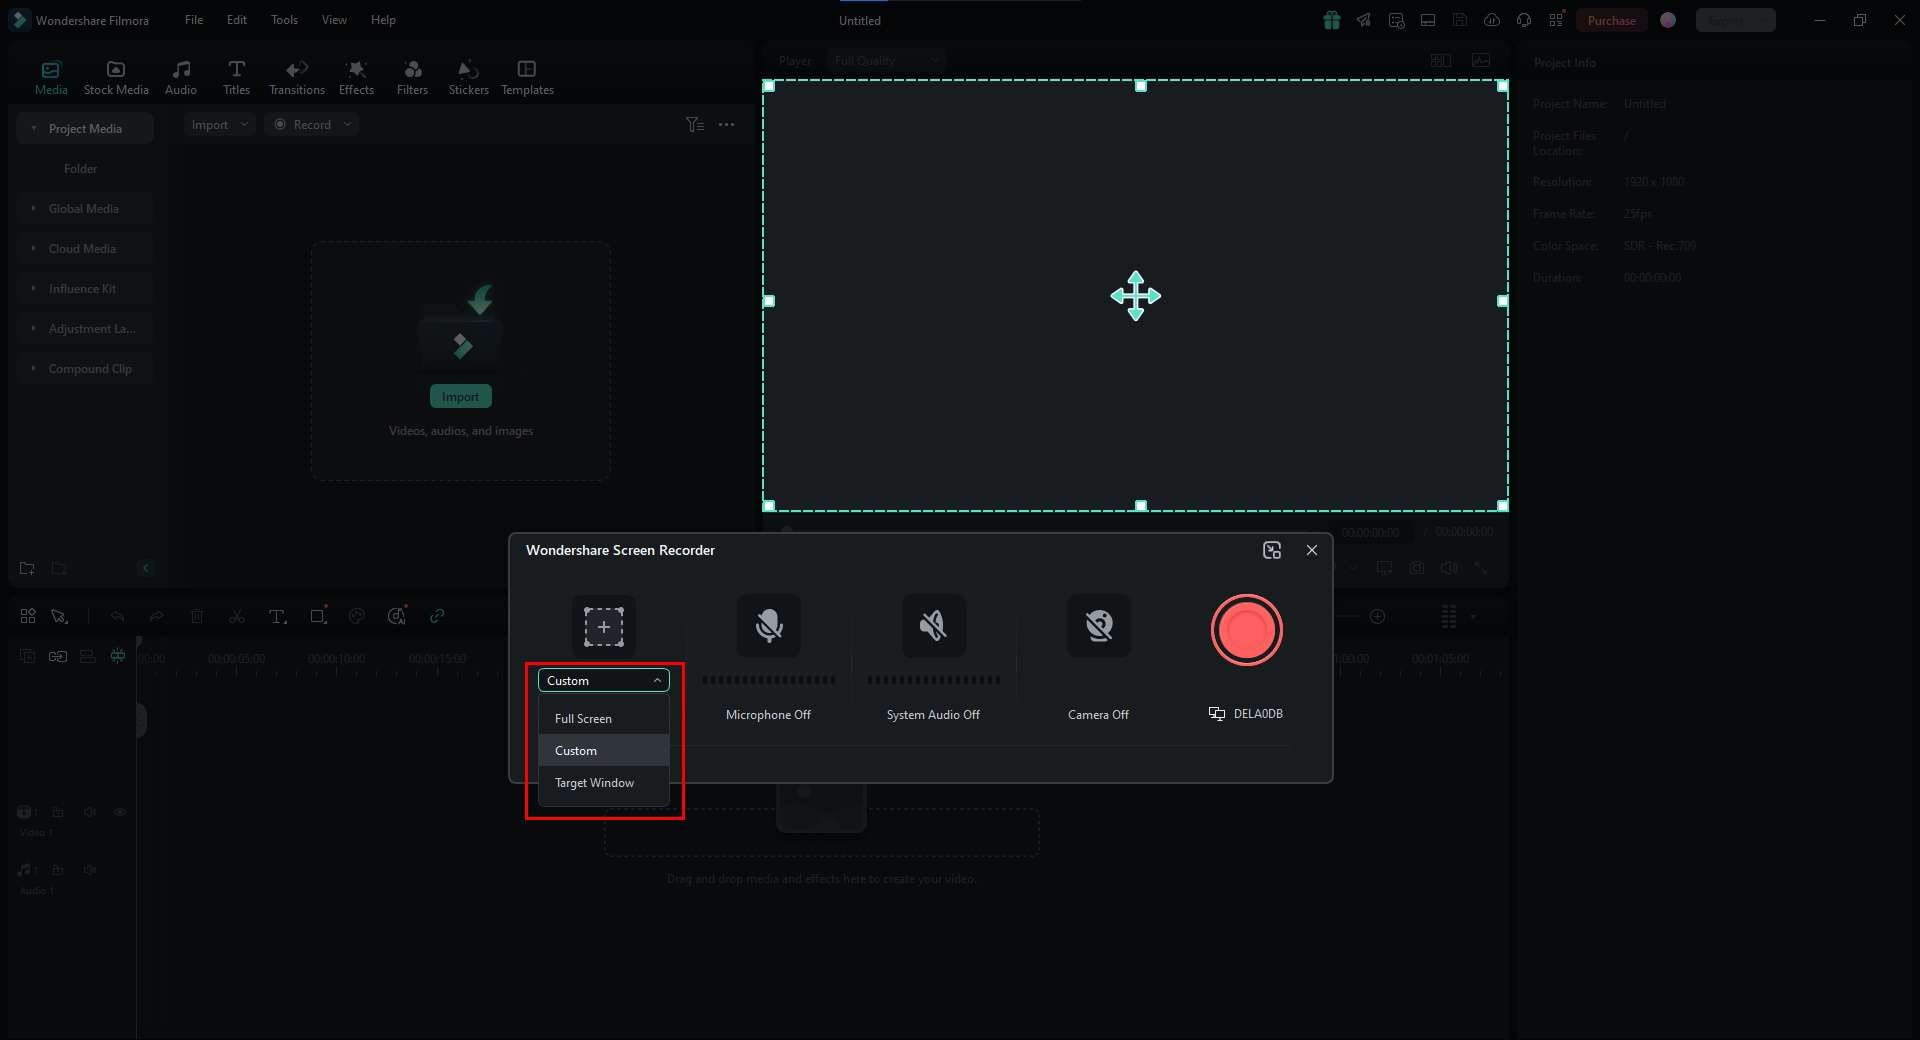
Step 5: Finally, Filmora will present you with a final set of customization options. Check what each of them does, and make the selections that correlate with your needs. When everything is set up, click on the big red circle to start recording. When your stream is done, click the button again to stop recording.
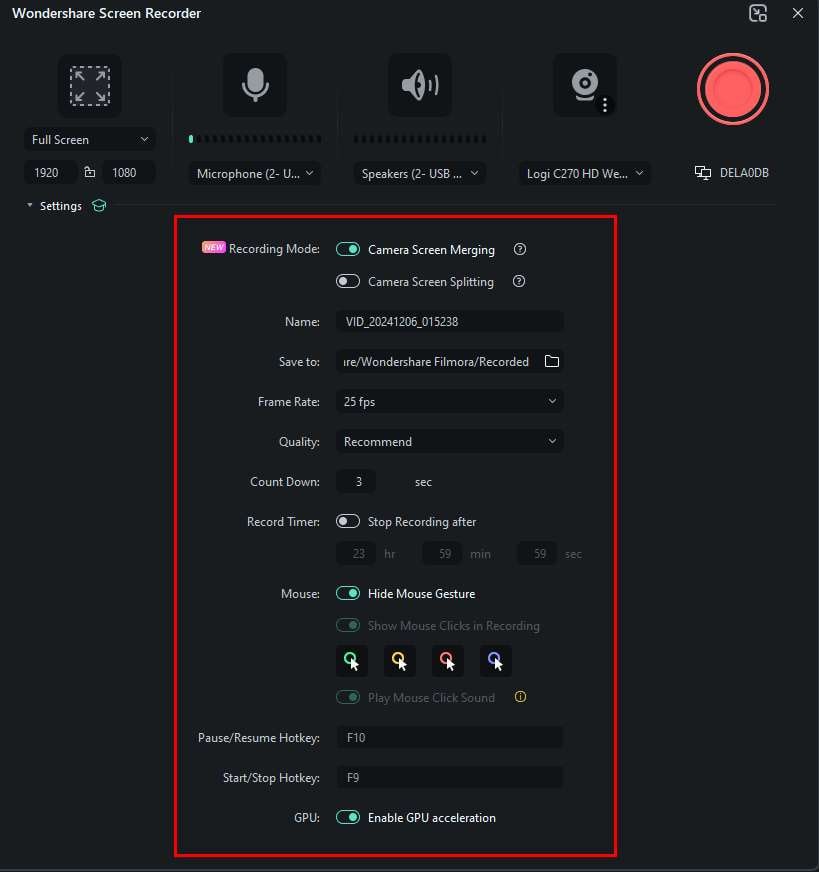
And there you have it! Your stream is now recorded and ready for editing. You will find it in the editor's timeline.
Smart Short Clips - A New AI Feature for Automatic Editing
After you recorded the videos, it comes to the video editing process. Your job now is to cut the video into smaller chunks. Let’s take a look at a special AI feature - Smart Short Clips. It is perfectly suitable for busy days when you need a fast solution to make short clips from your long stream. Note that for this feature to work, you need to download the recording to your hard drive. Here’re what you can get from this feature
- Extracts highlights from long videos for easy sharing.
- Add music or voiceovers for better storytelling.
- Trim, cut, and rearrange clips effortlessly.
- Integrates with social platforms for quick uploads.
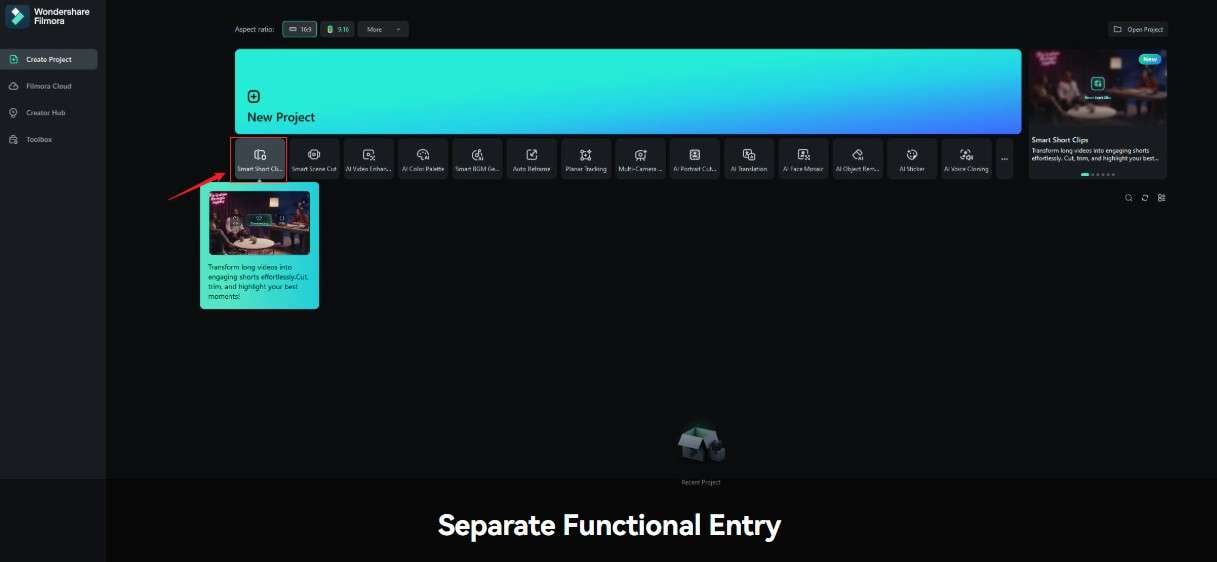
To use this feature, you first need to locate it.
Step 1: Open Filmora and find the Smart Short Clips feature right under the New Project button.
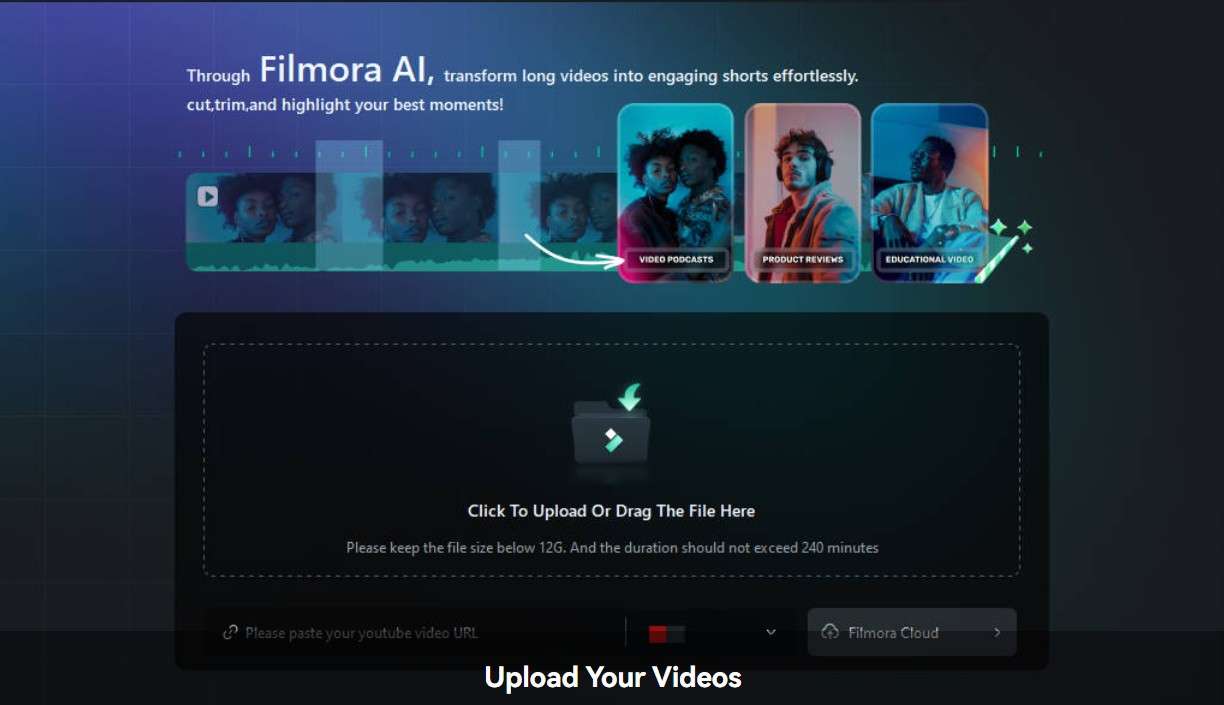
Step 2: Upload your stream video.
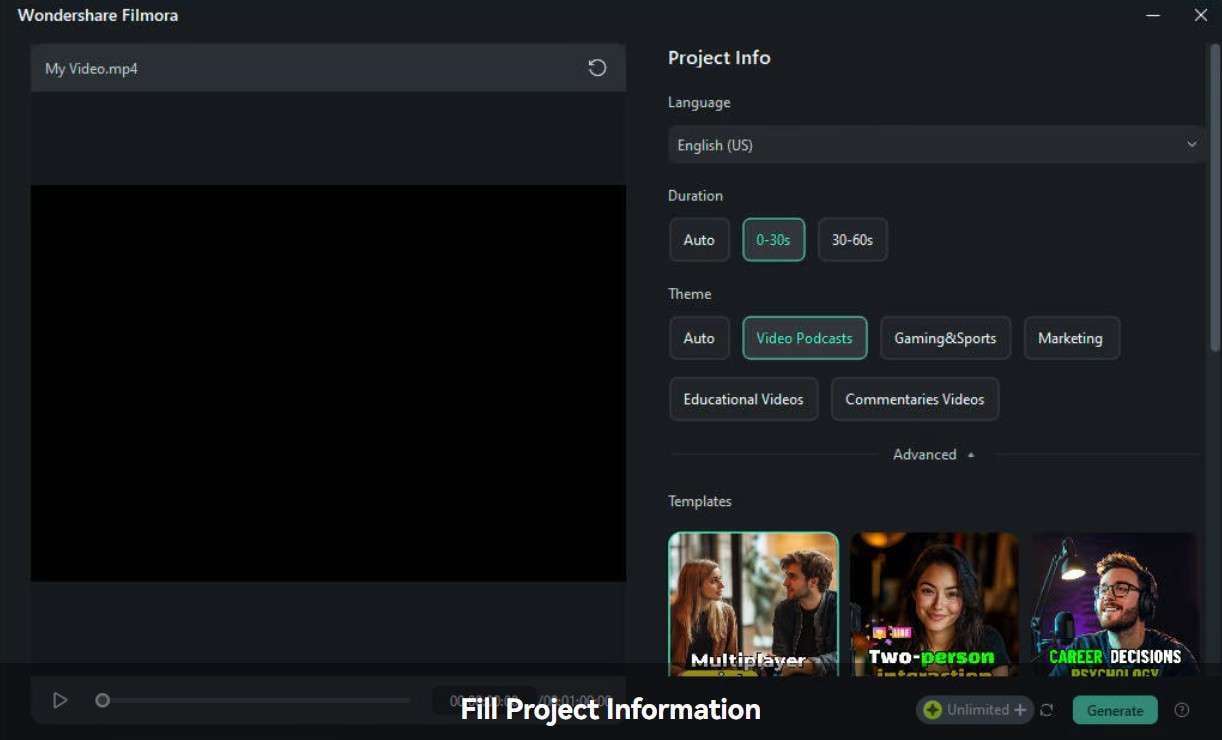
Step 3: Adjust the basic parameters.
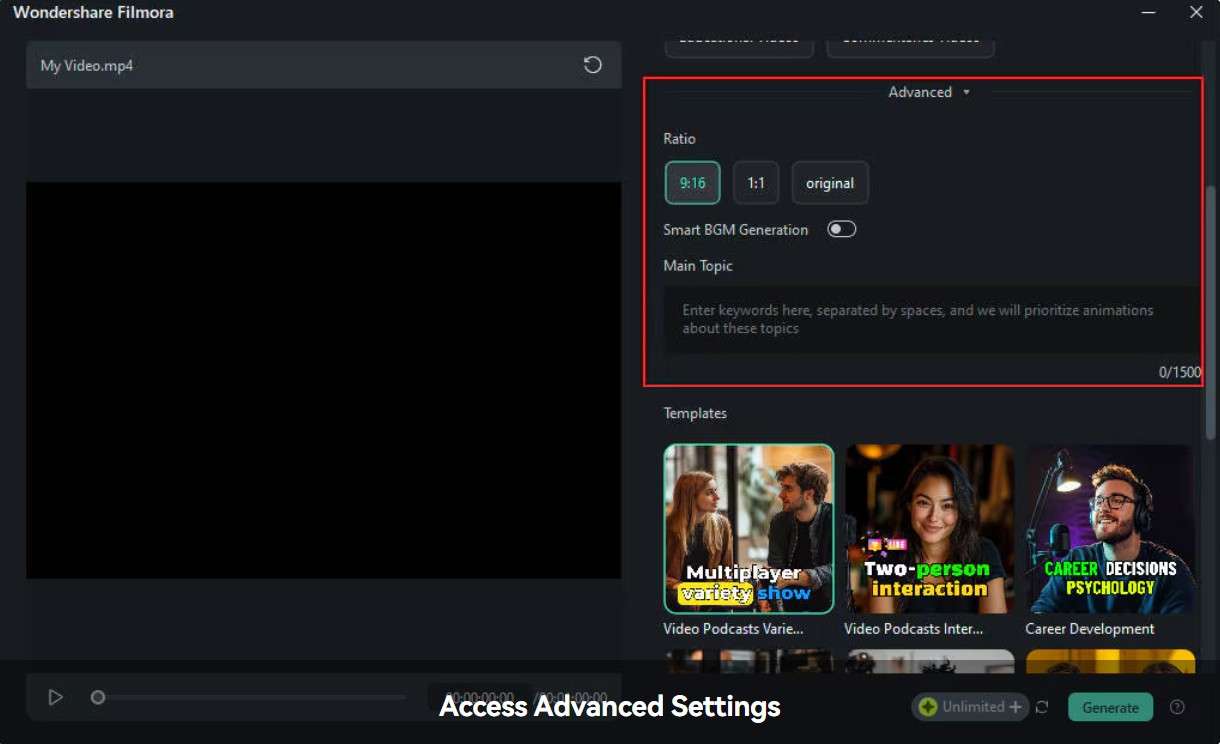
Step 4: Access and adjust advanced settings.
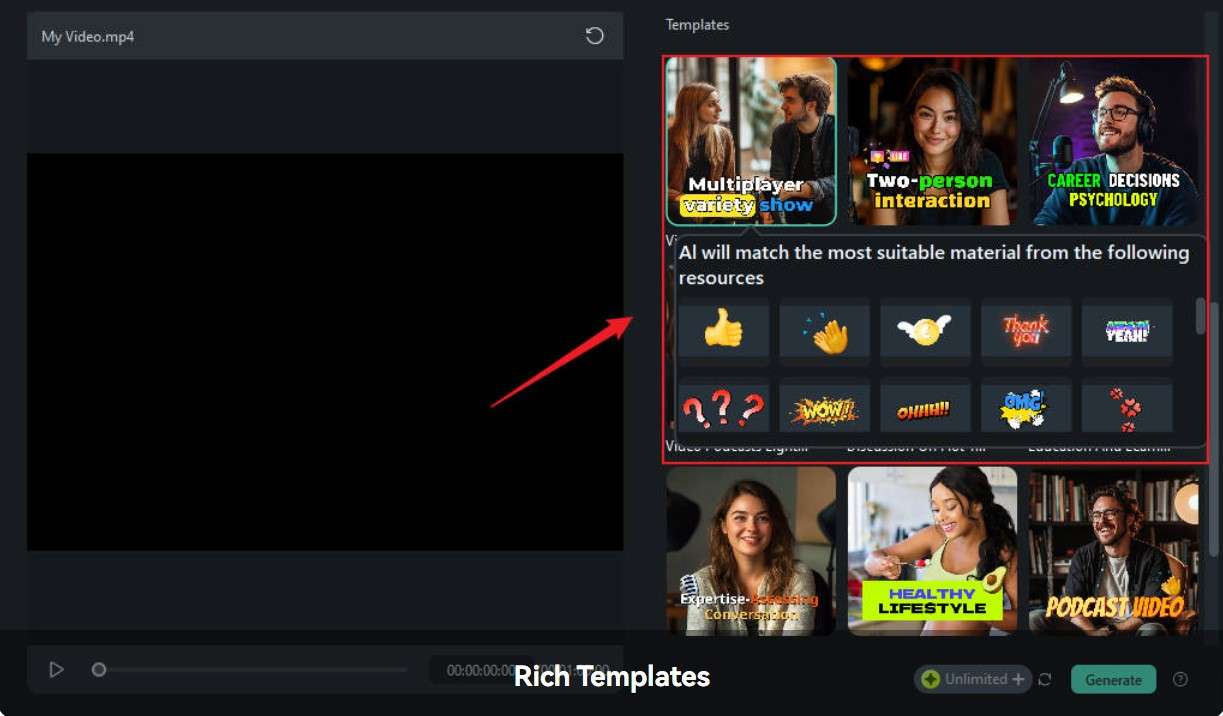
Step 5: Select a template from a vast library of Rich Templates and click on Generate.
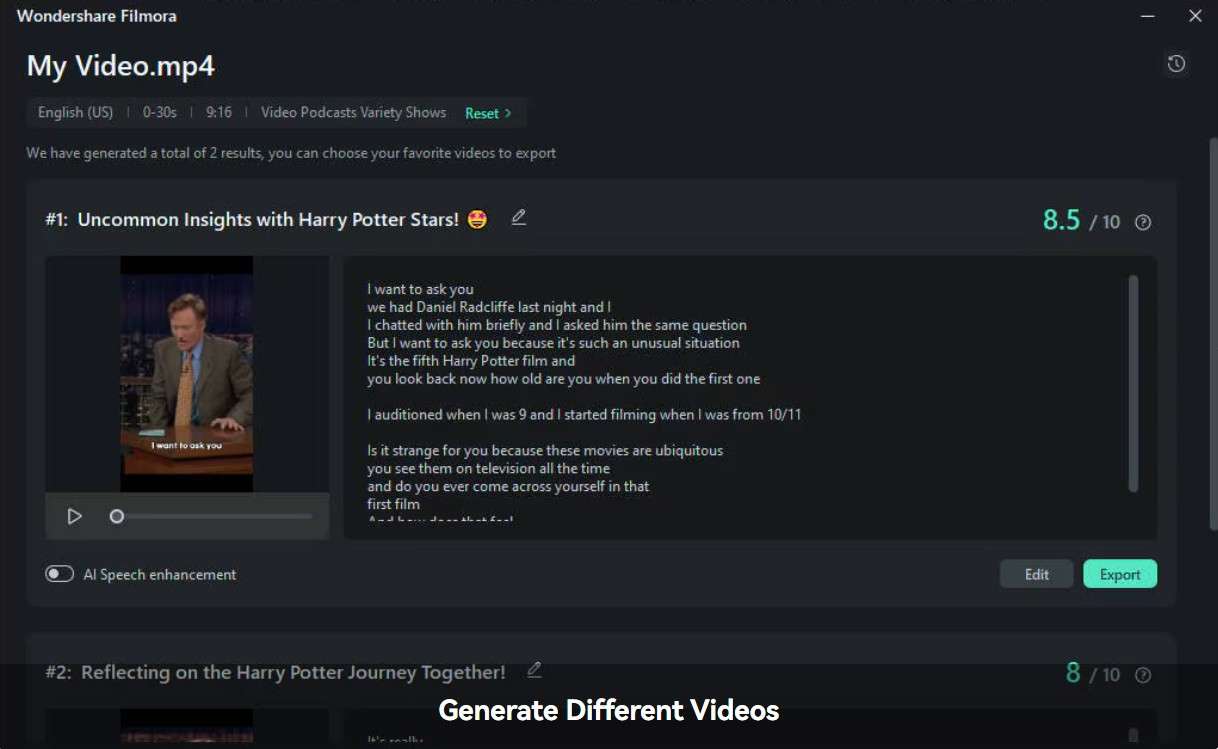
Step 6: Wait for the software to do its job, and then review the results. When you are satisfied with something, click on Export.
Edit Multiple Video Files
Filmora’s split function makes this an easy two-step process.
Step 1: Find the moment in the video where you want to make a split.
Step 2: Click on that moment and then click on the Scissors Icon to make the split there.
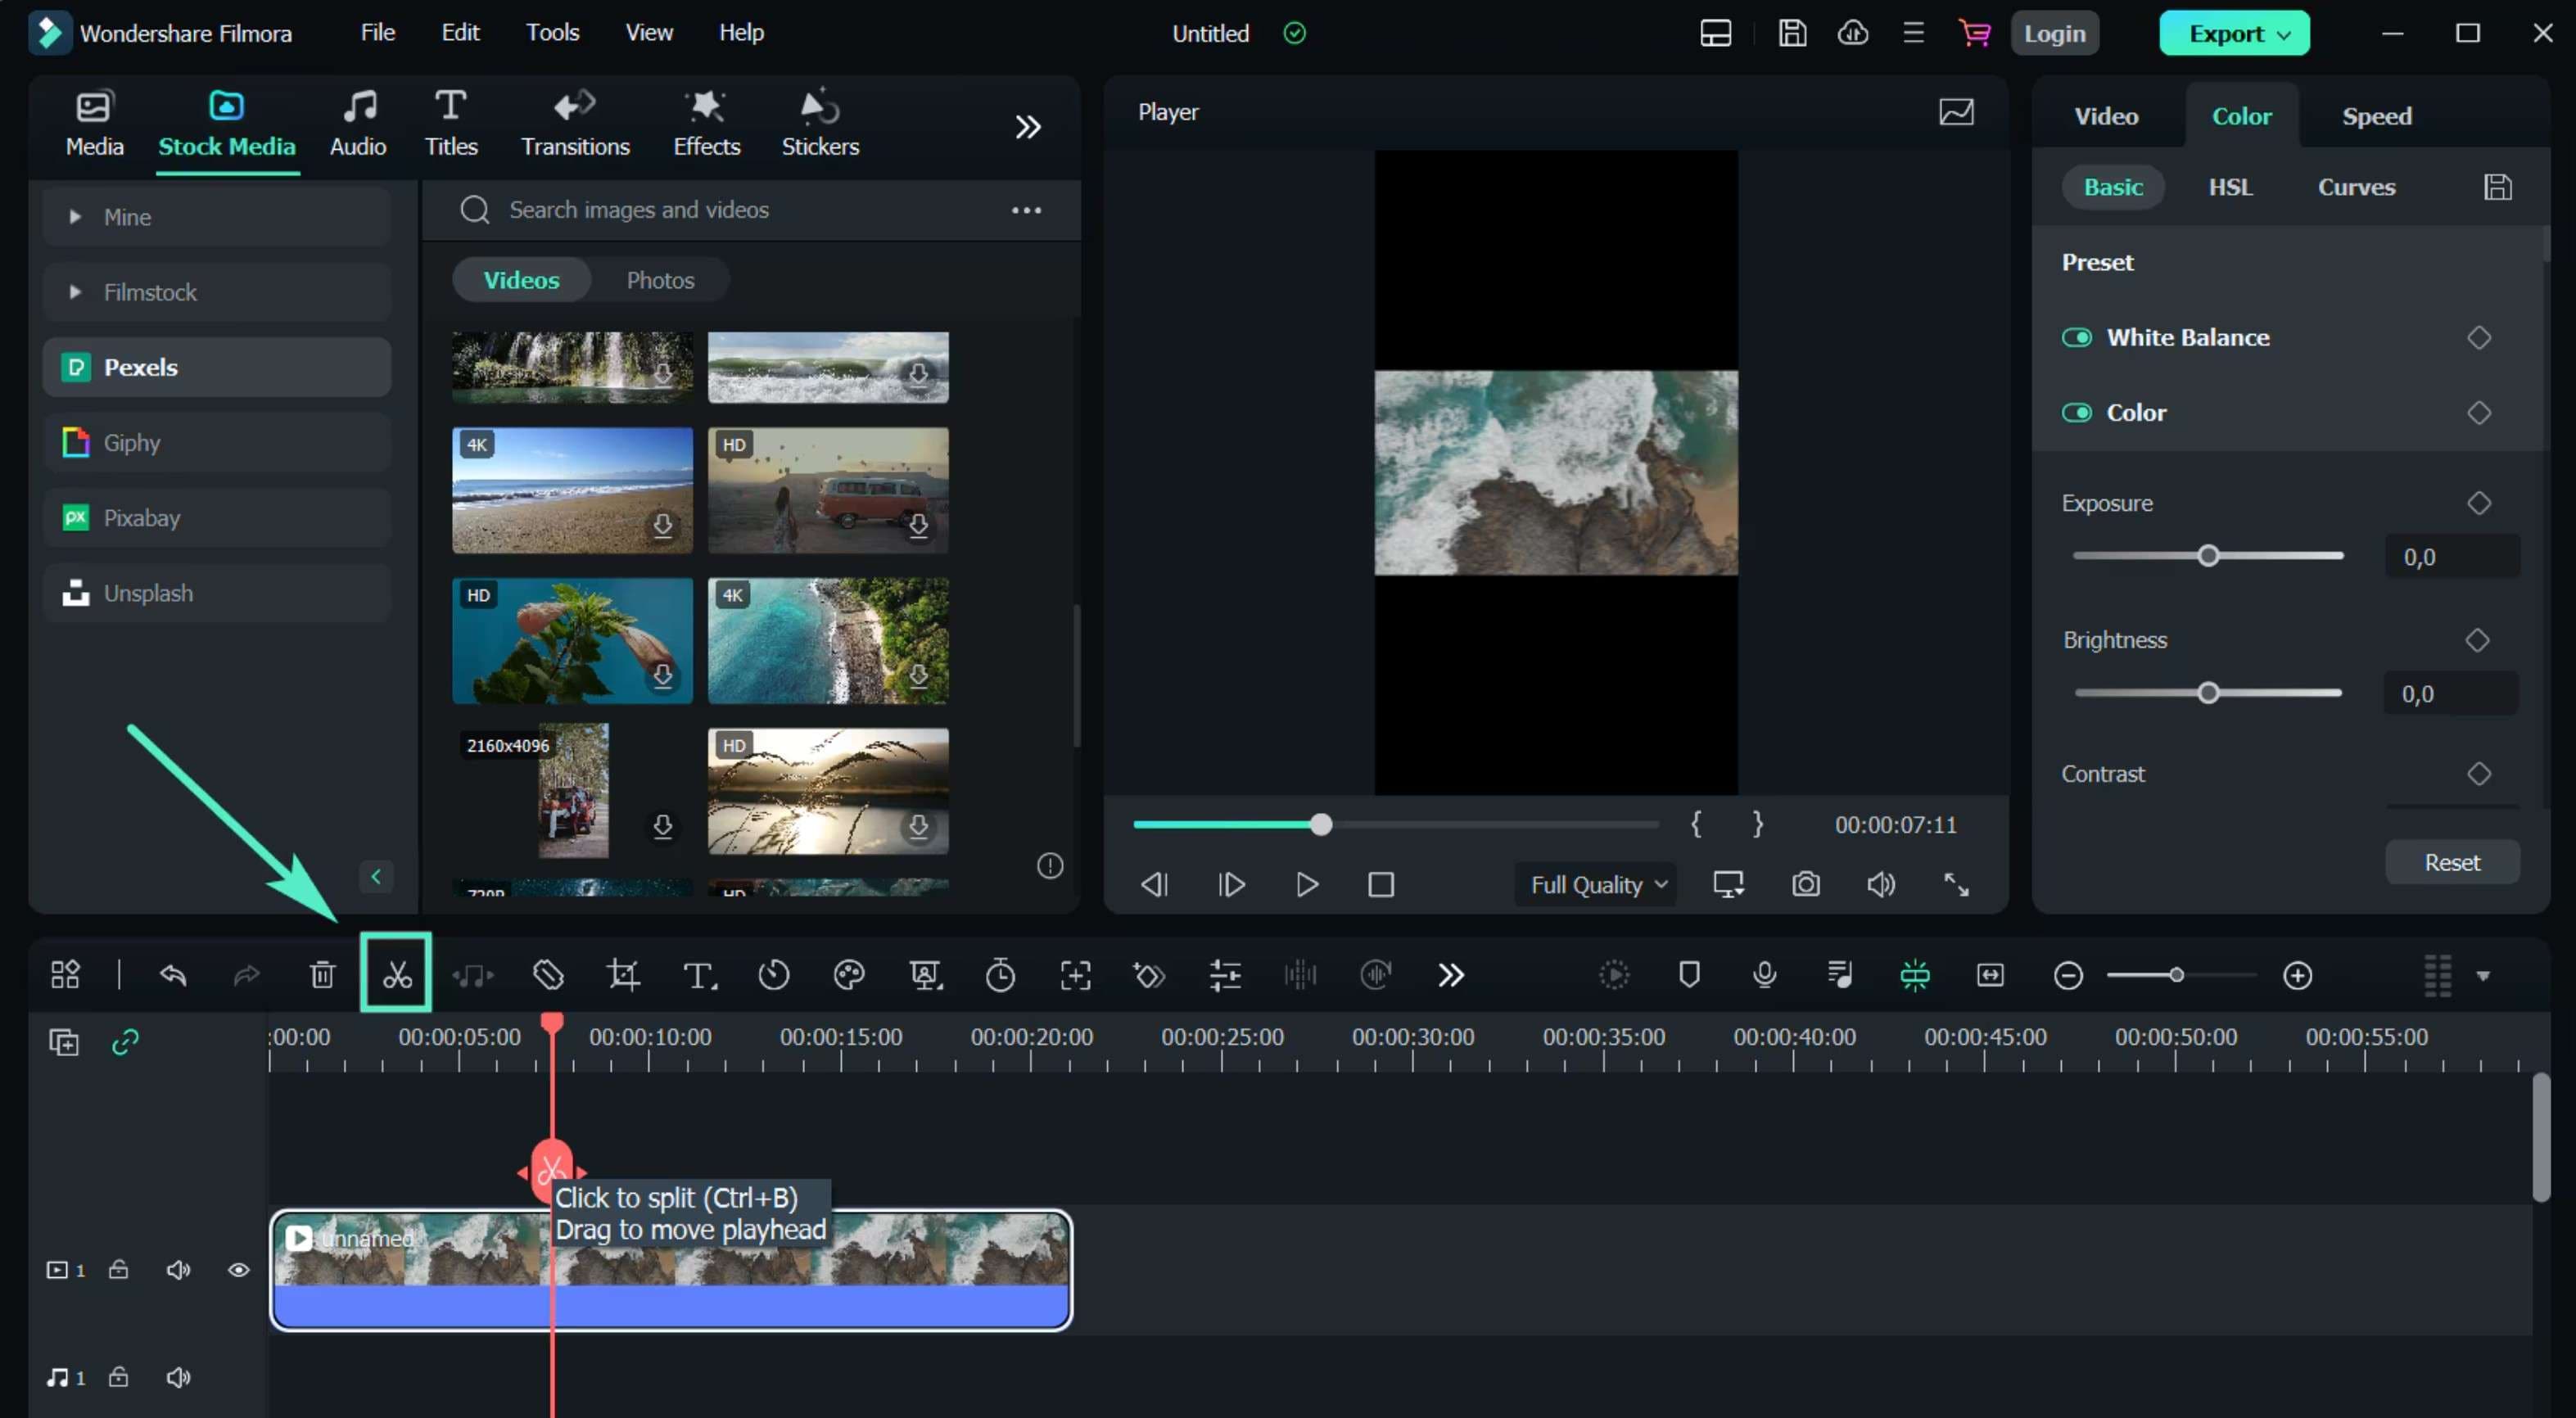
Now that the long stream is split, you can start preparing videos for different platforms in one place. Let’s explore Filmora’s advanced video editing features, which will make your video more interesting and appealing to a wider audience.
Add effects
You can use Filmora to add several types of effects . They have an extensive library, so you can scroll through the options and make your pick. Here is how you can add effects.
Step 1: In the editor timeline, find the moment where you want to add an effect.
Step 2: Click on the Effects tab at the top left of the screen. Find the effect you like and drag it above your video in the timeline. Make sure to place it at the right moment.
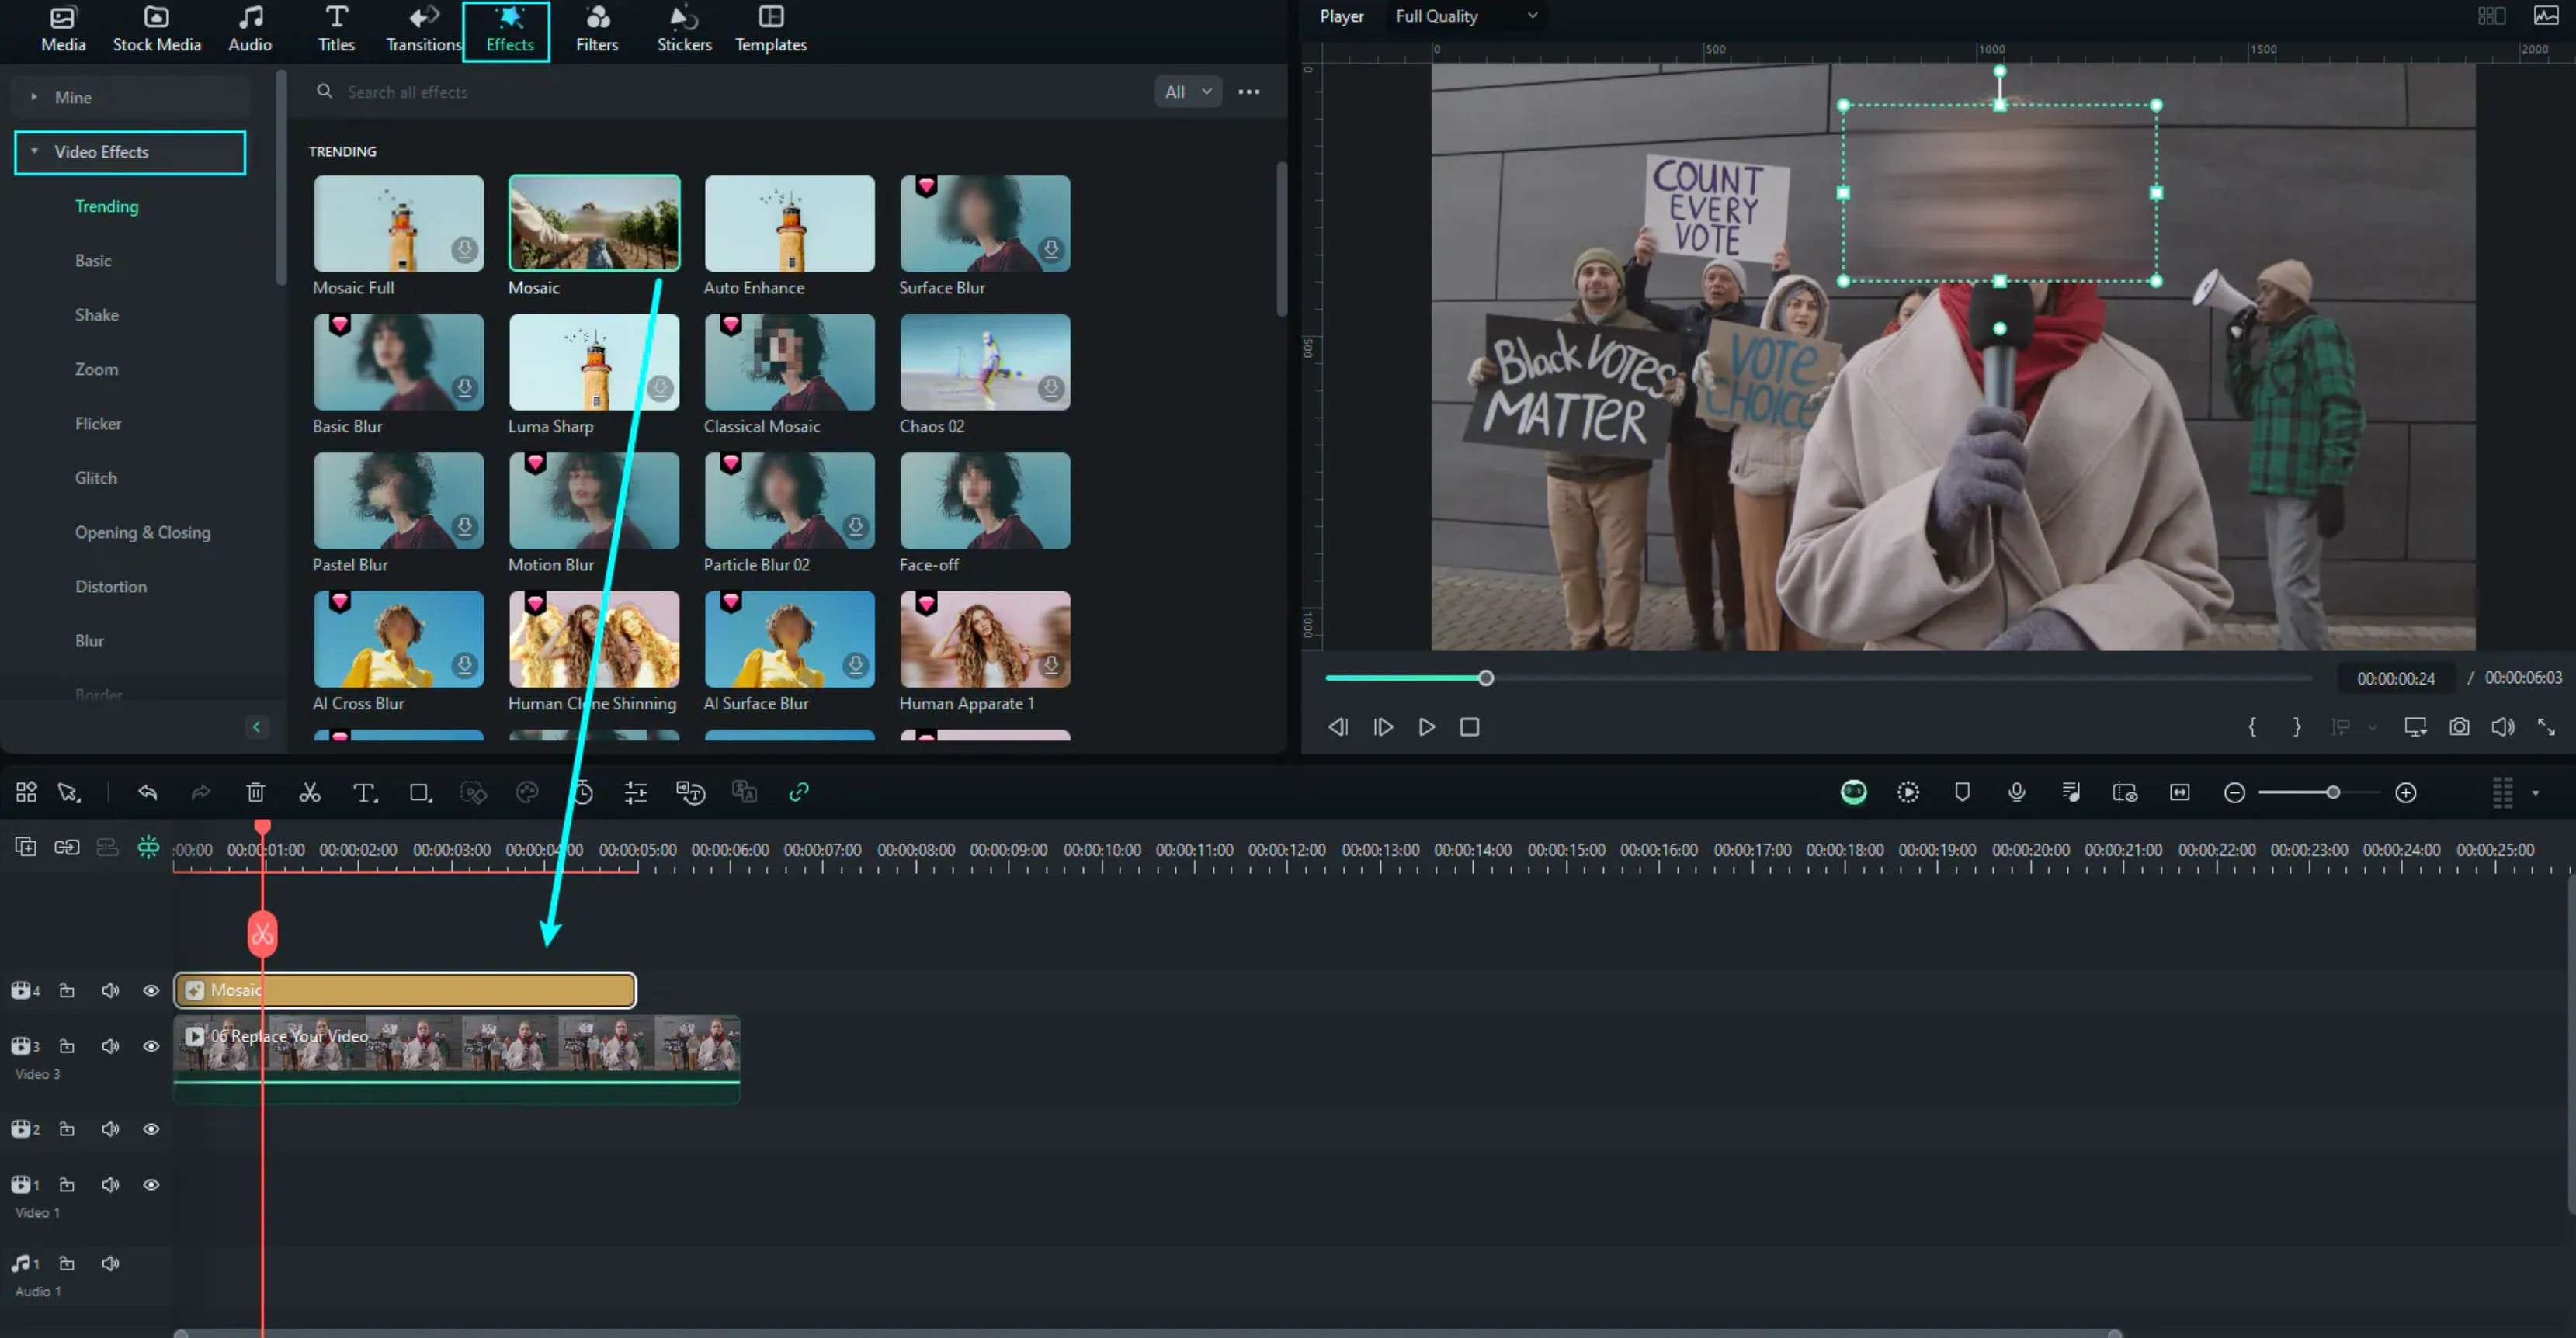
Step 3: You can adjust the intensity of the effect by clicking on it in the timeline and adjusting the sliders. For this example, we will assume that you chose the Mosaic Effect just to showcase this option. Other effects will have different sliders.
Add and adjust transitions
Transitions in videos are excellent for breaking up scenes and keeping viewers interested. Filmora offers several transition options, and the process of using them is rather simple.
Step 1: Find the Transitions tab in the top left and explore the transition effects provided by Wondershare. You will need to download your chosen transition.
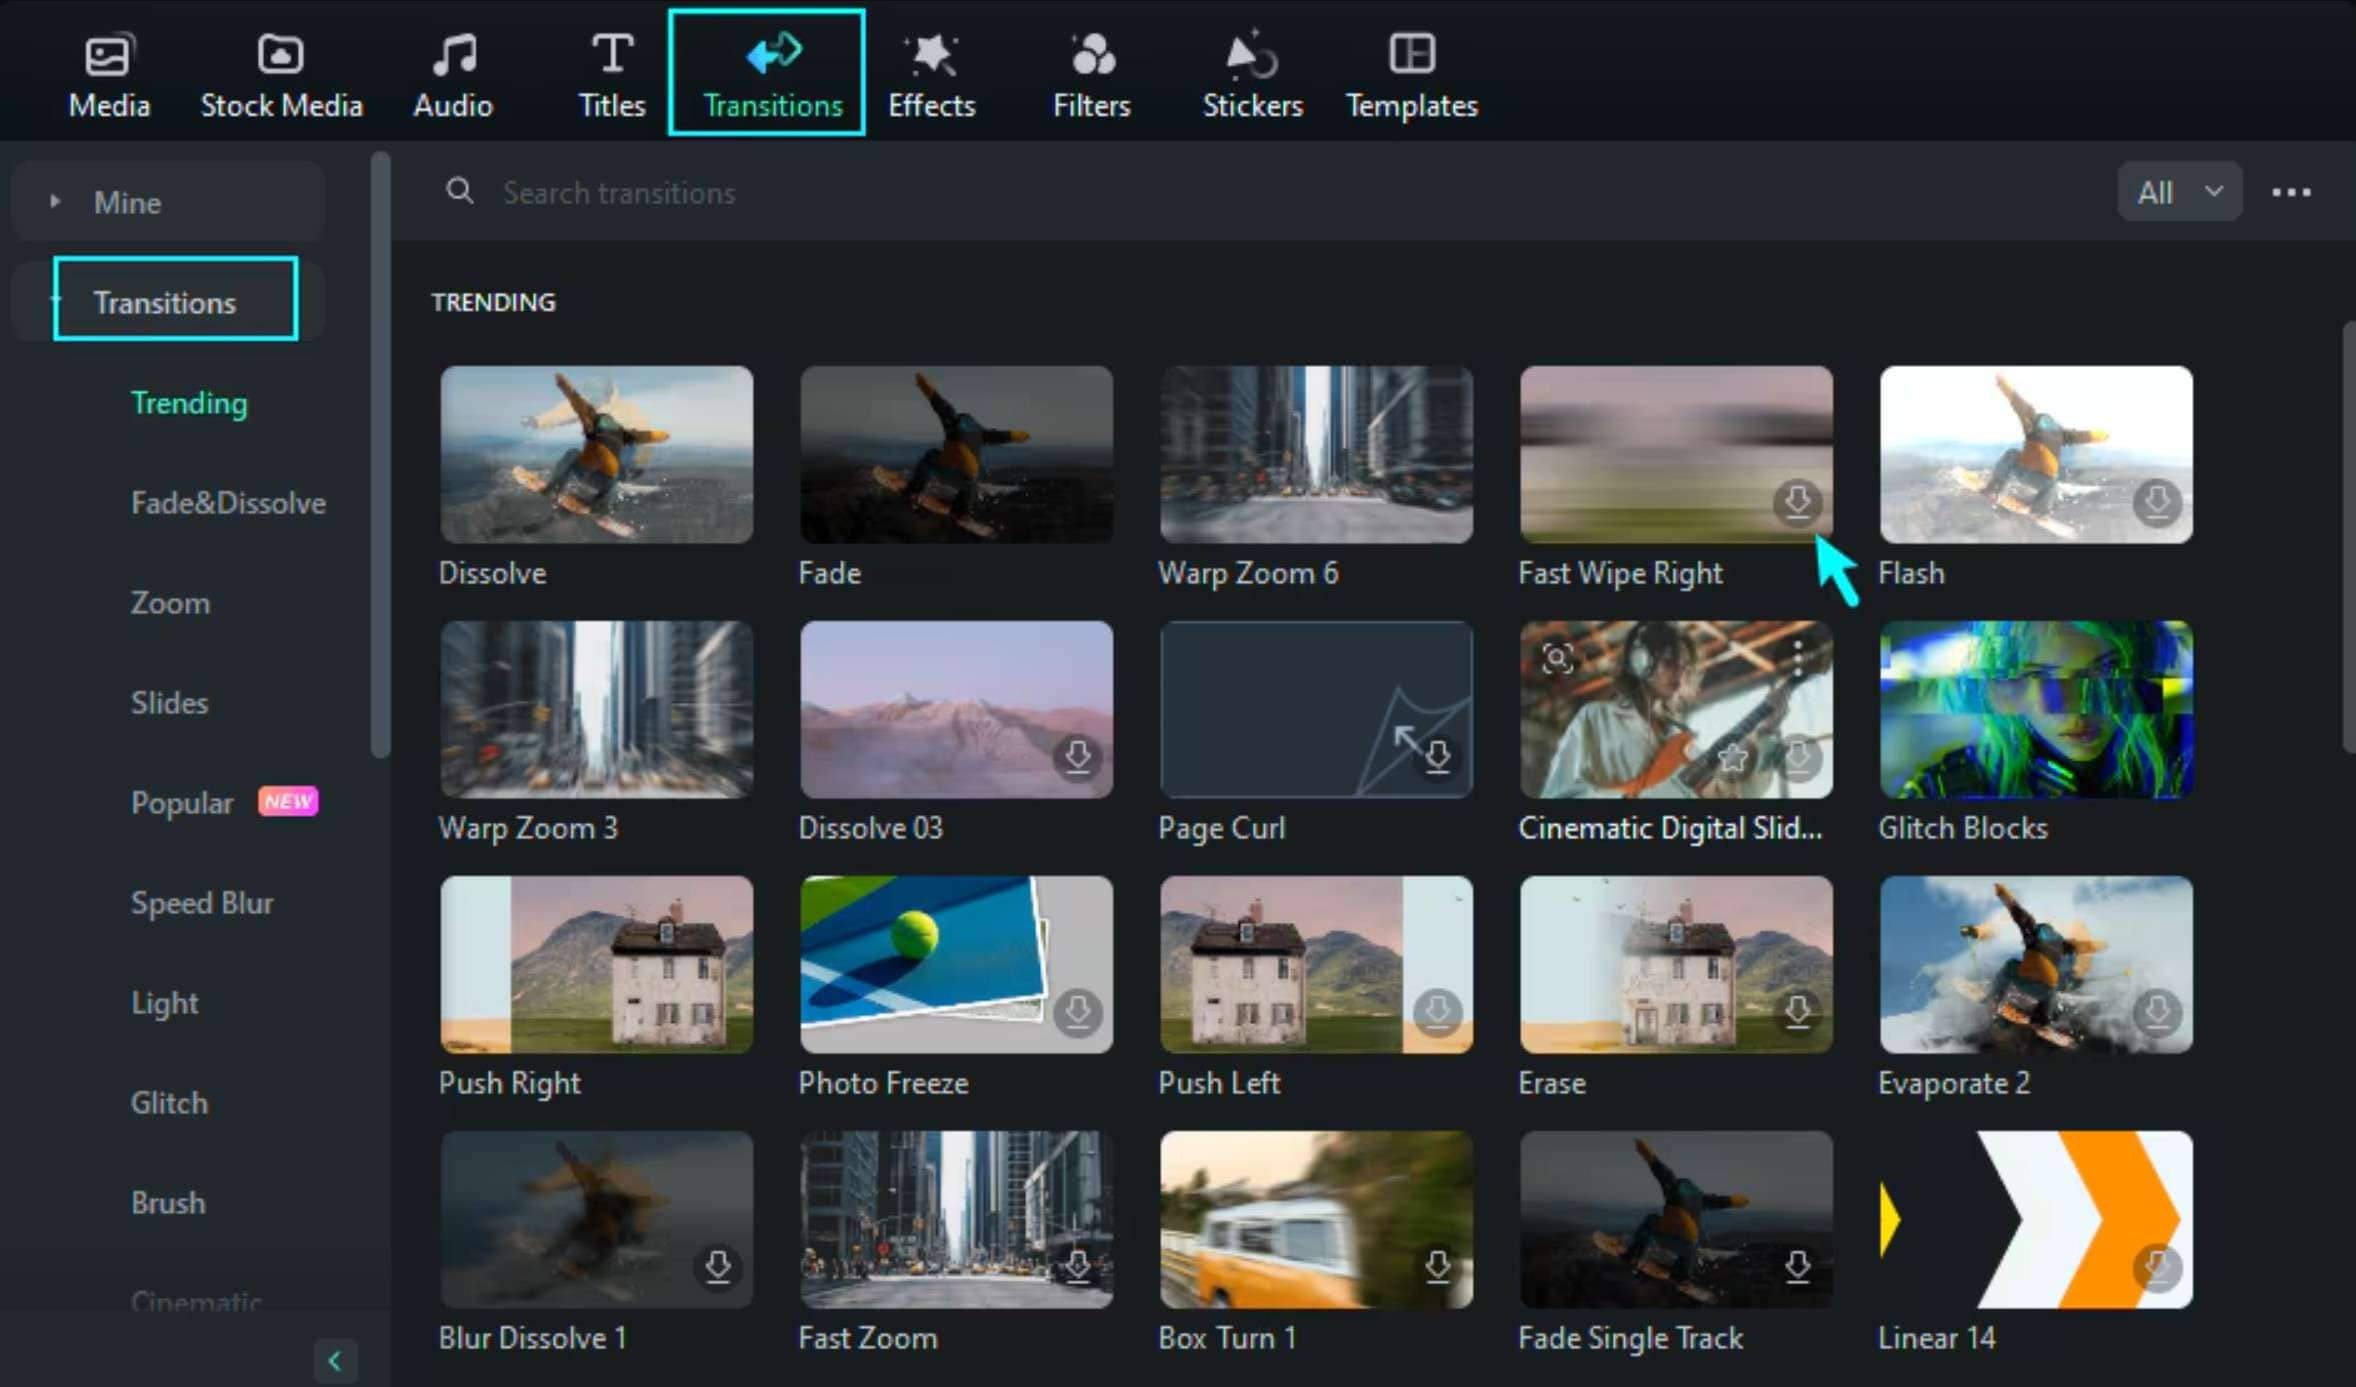
Step 2: Just like with effects, drag the chosen transition effect to the timeline above the video file where the transition is supposed to appear. Please note that you can add transitions between two clips.
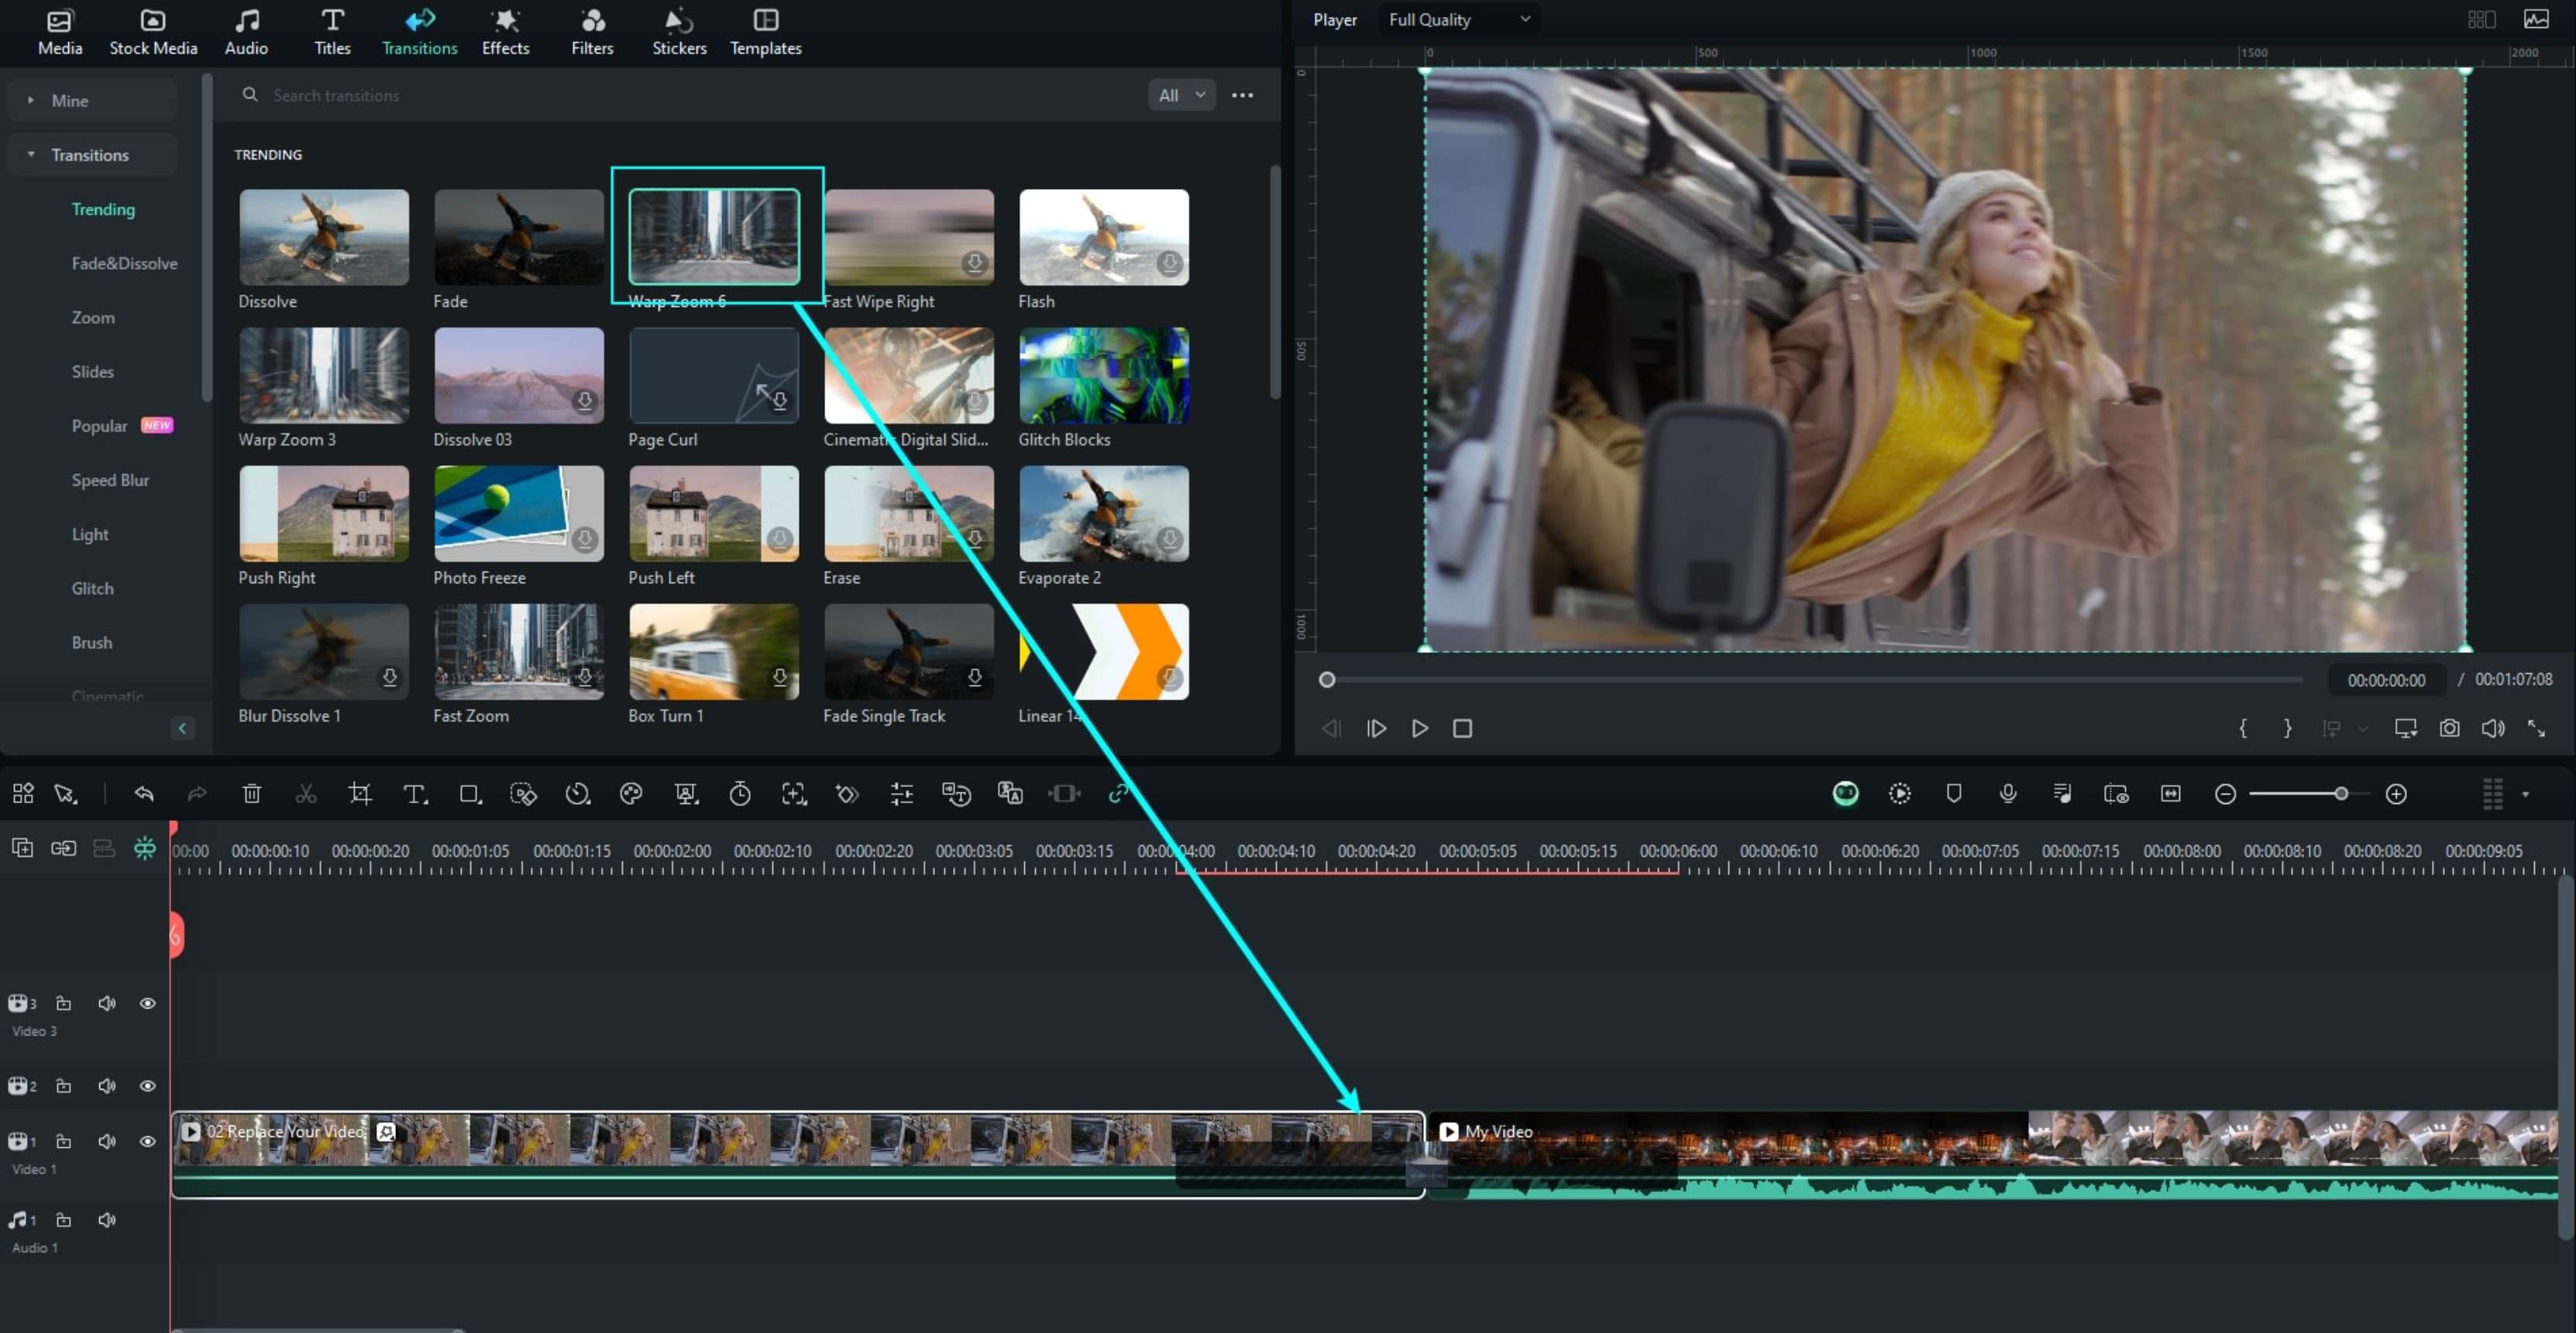
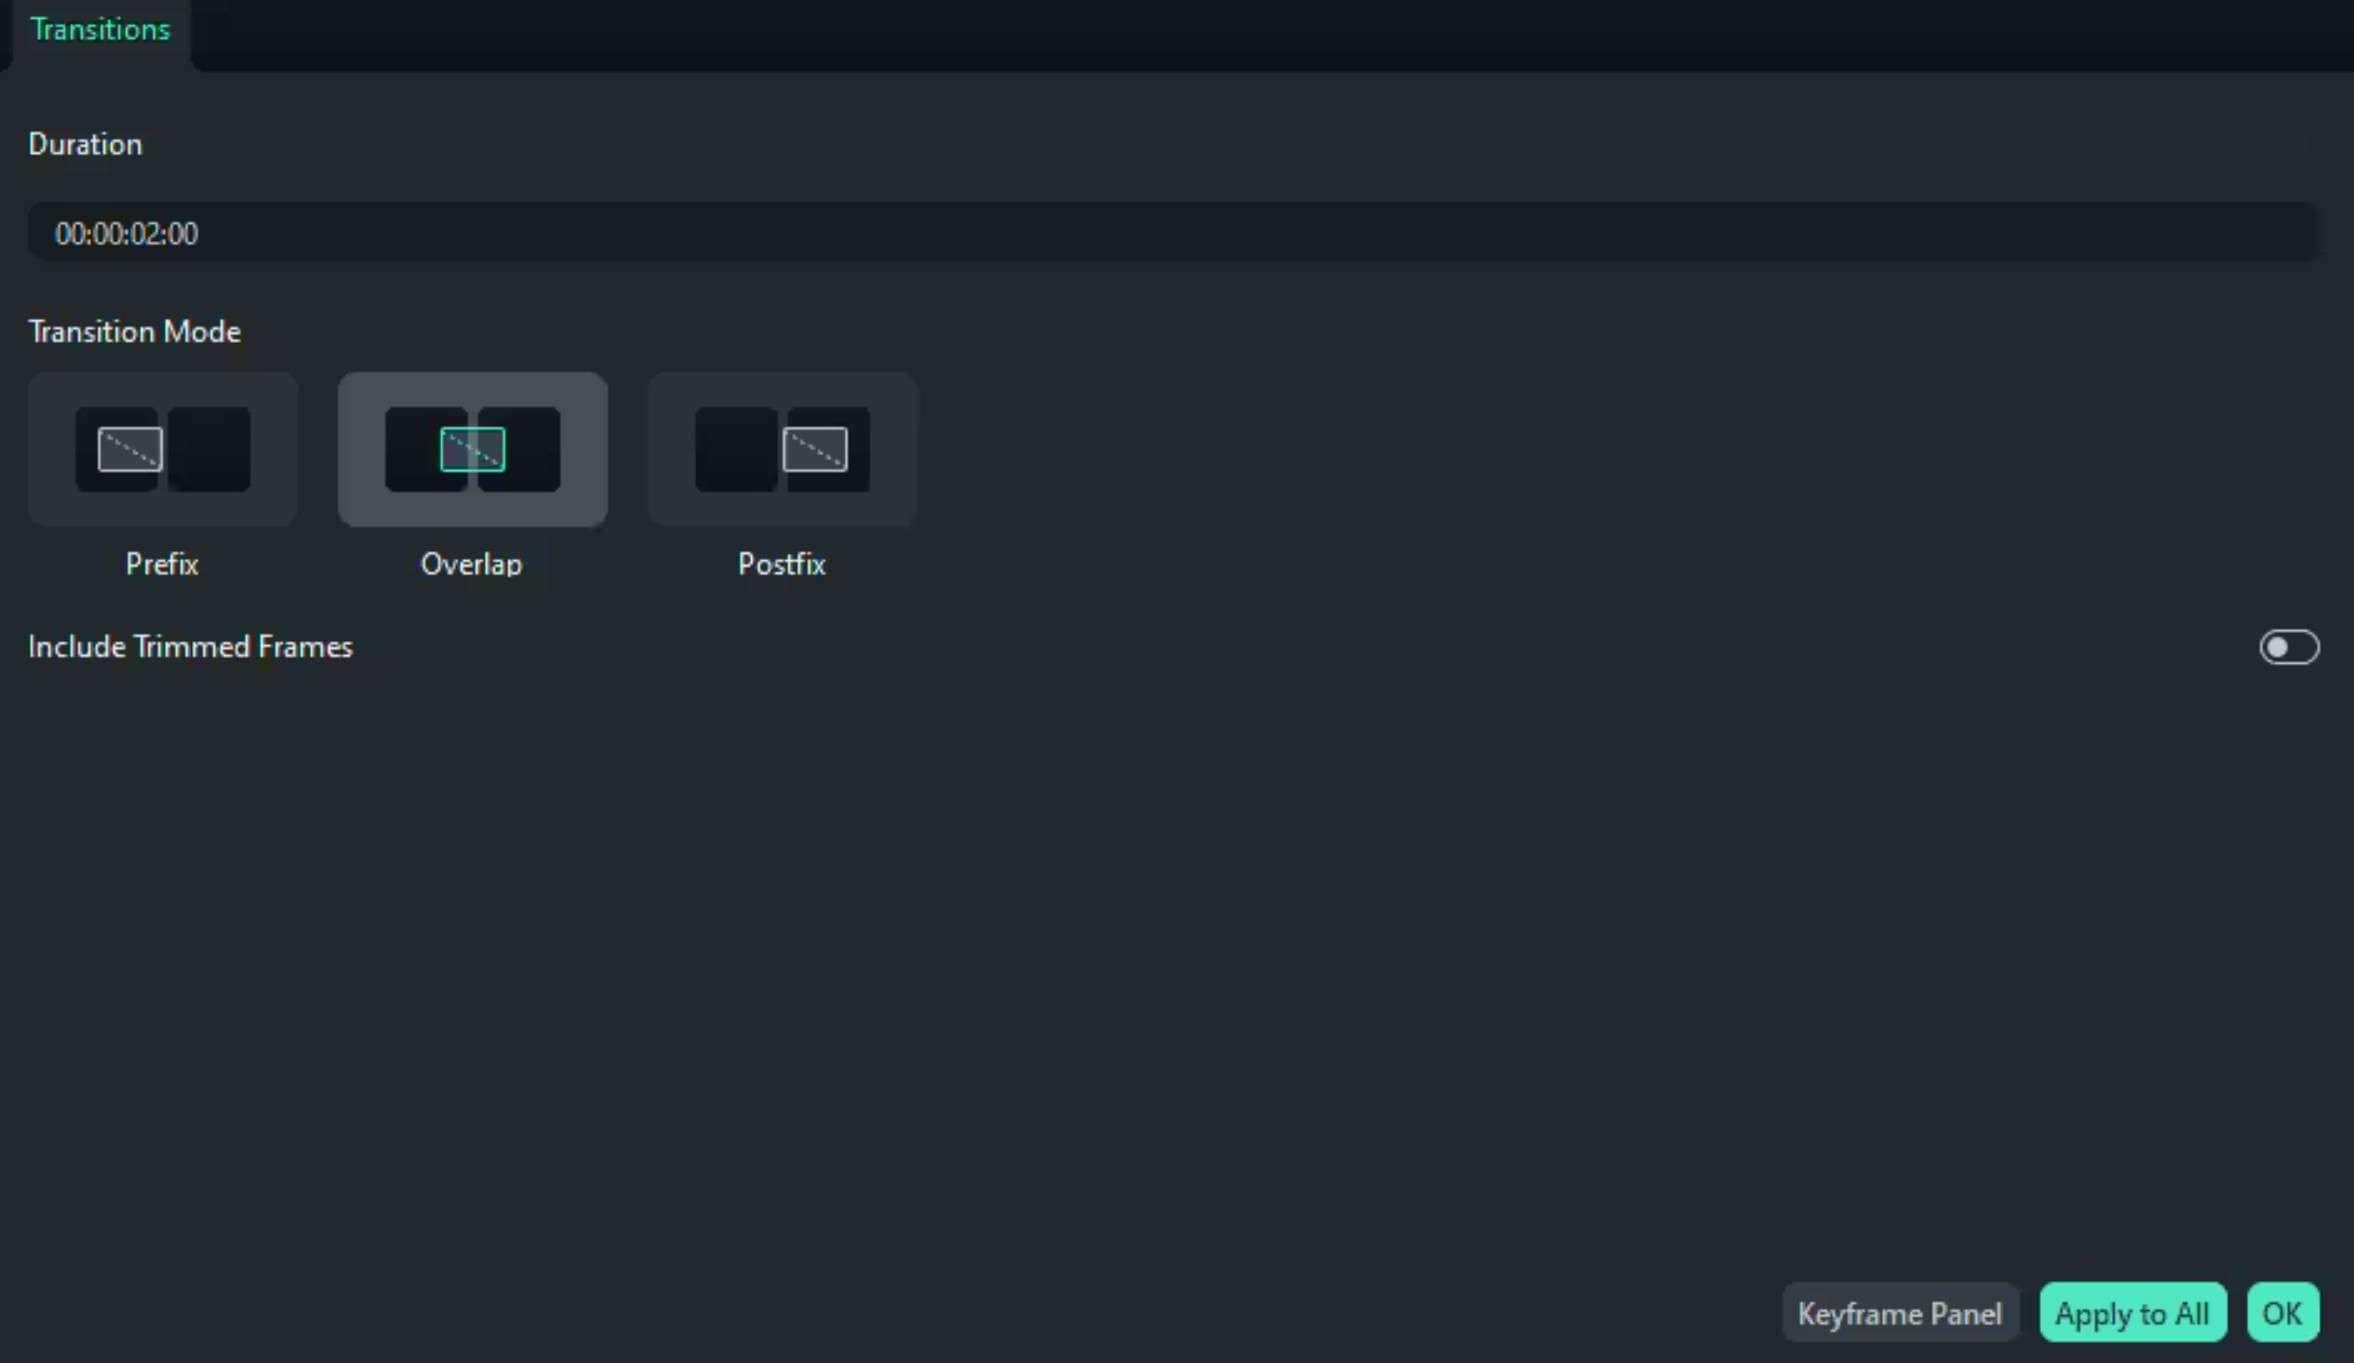
Step 3: Double-click the transition effect in the timeline. A window will appear, allowing you to modify the effect to your liking.
Add stickers
Adding stickers is an excellent way to make your video more fun and more appealing to a younger audience. As with everything in Filmora, this is easy to do.
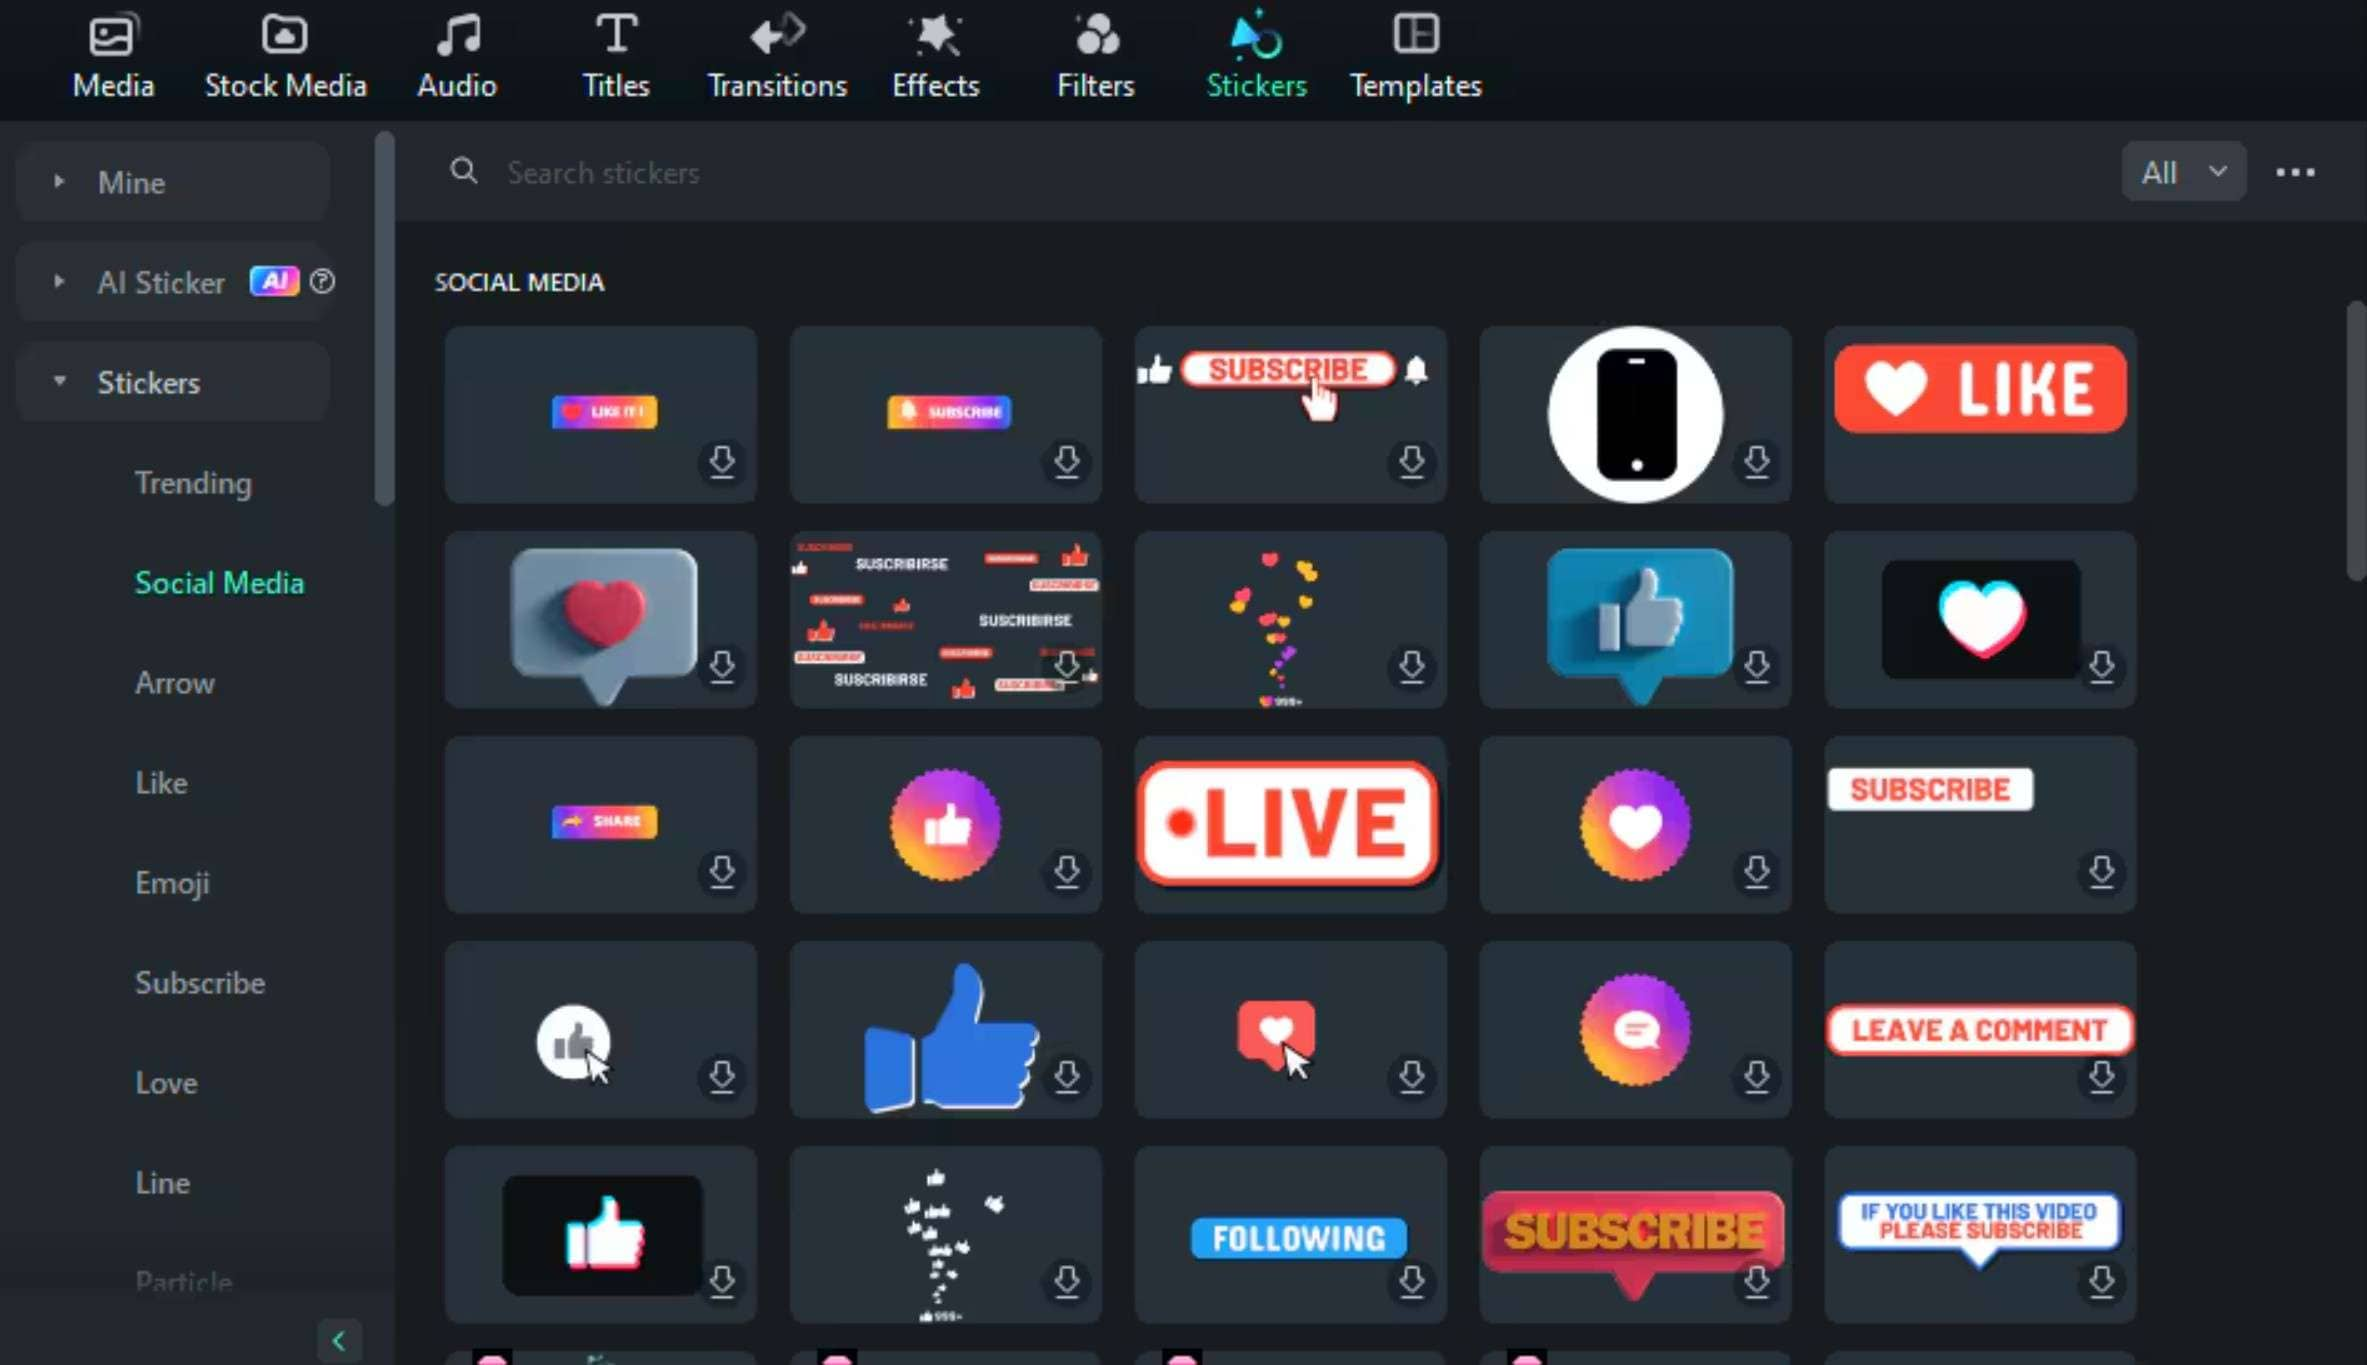
Step 1: Locate the Stickers tab in the same portion of the screen as the previous effects.
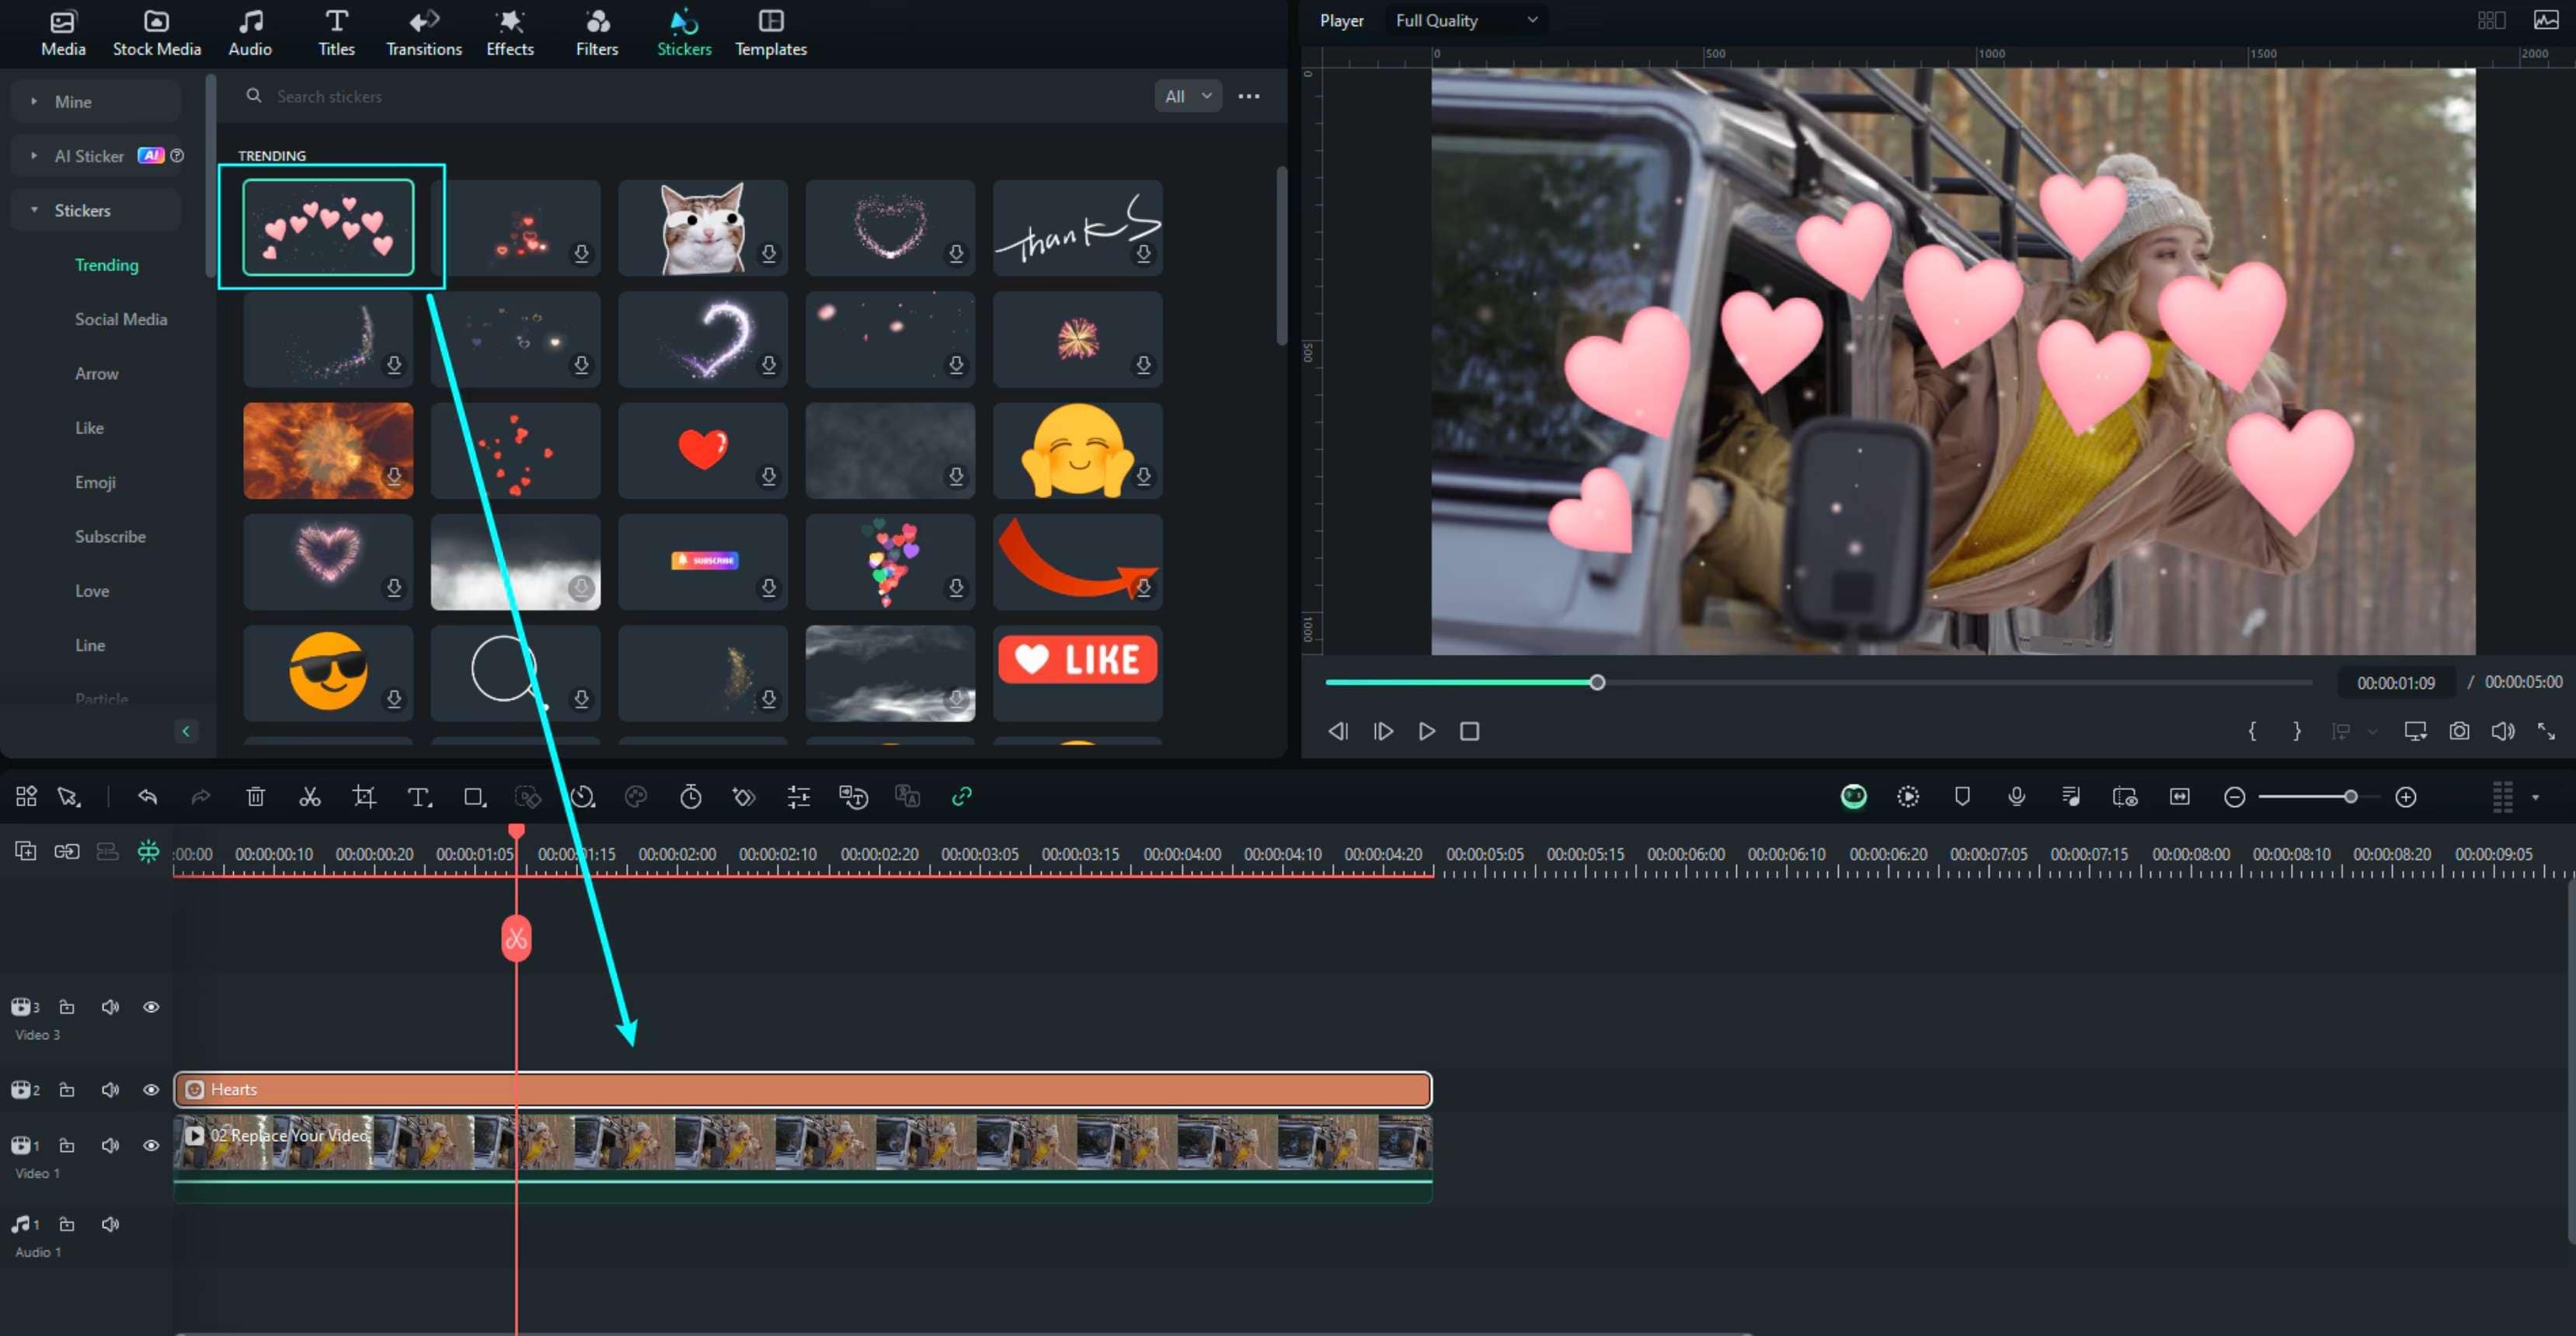
Step 2: Just like with all other effects mentioned here, simply drag the sticker to the timeline above the video and place it above the chosen moment in the video.
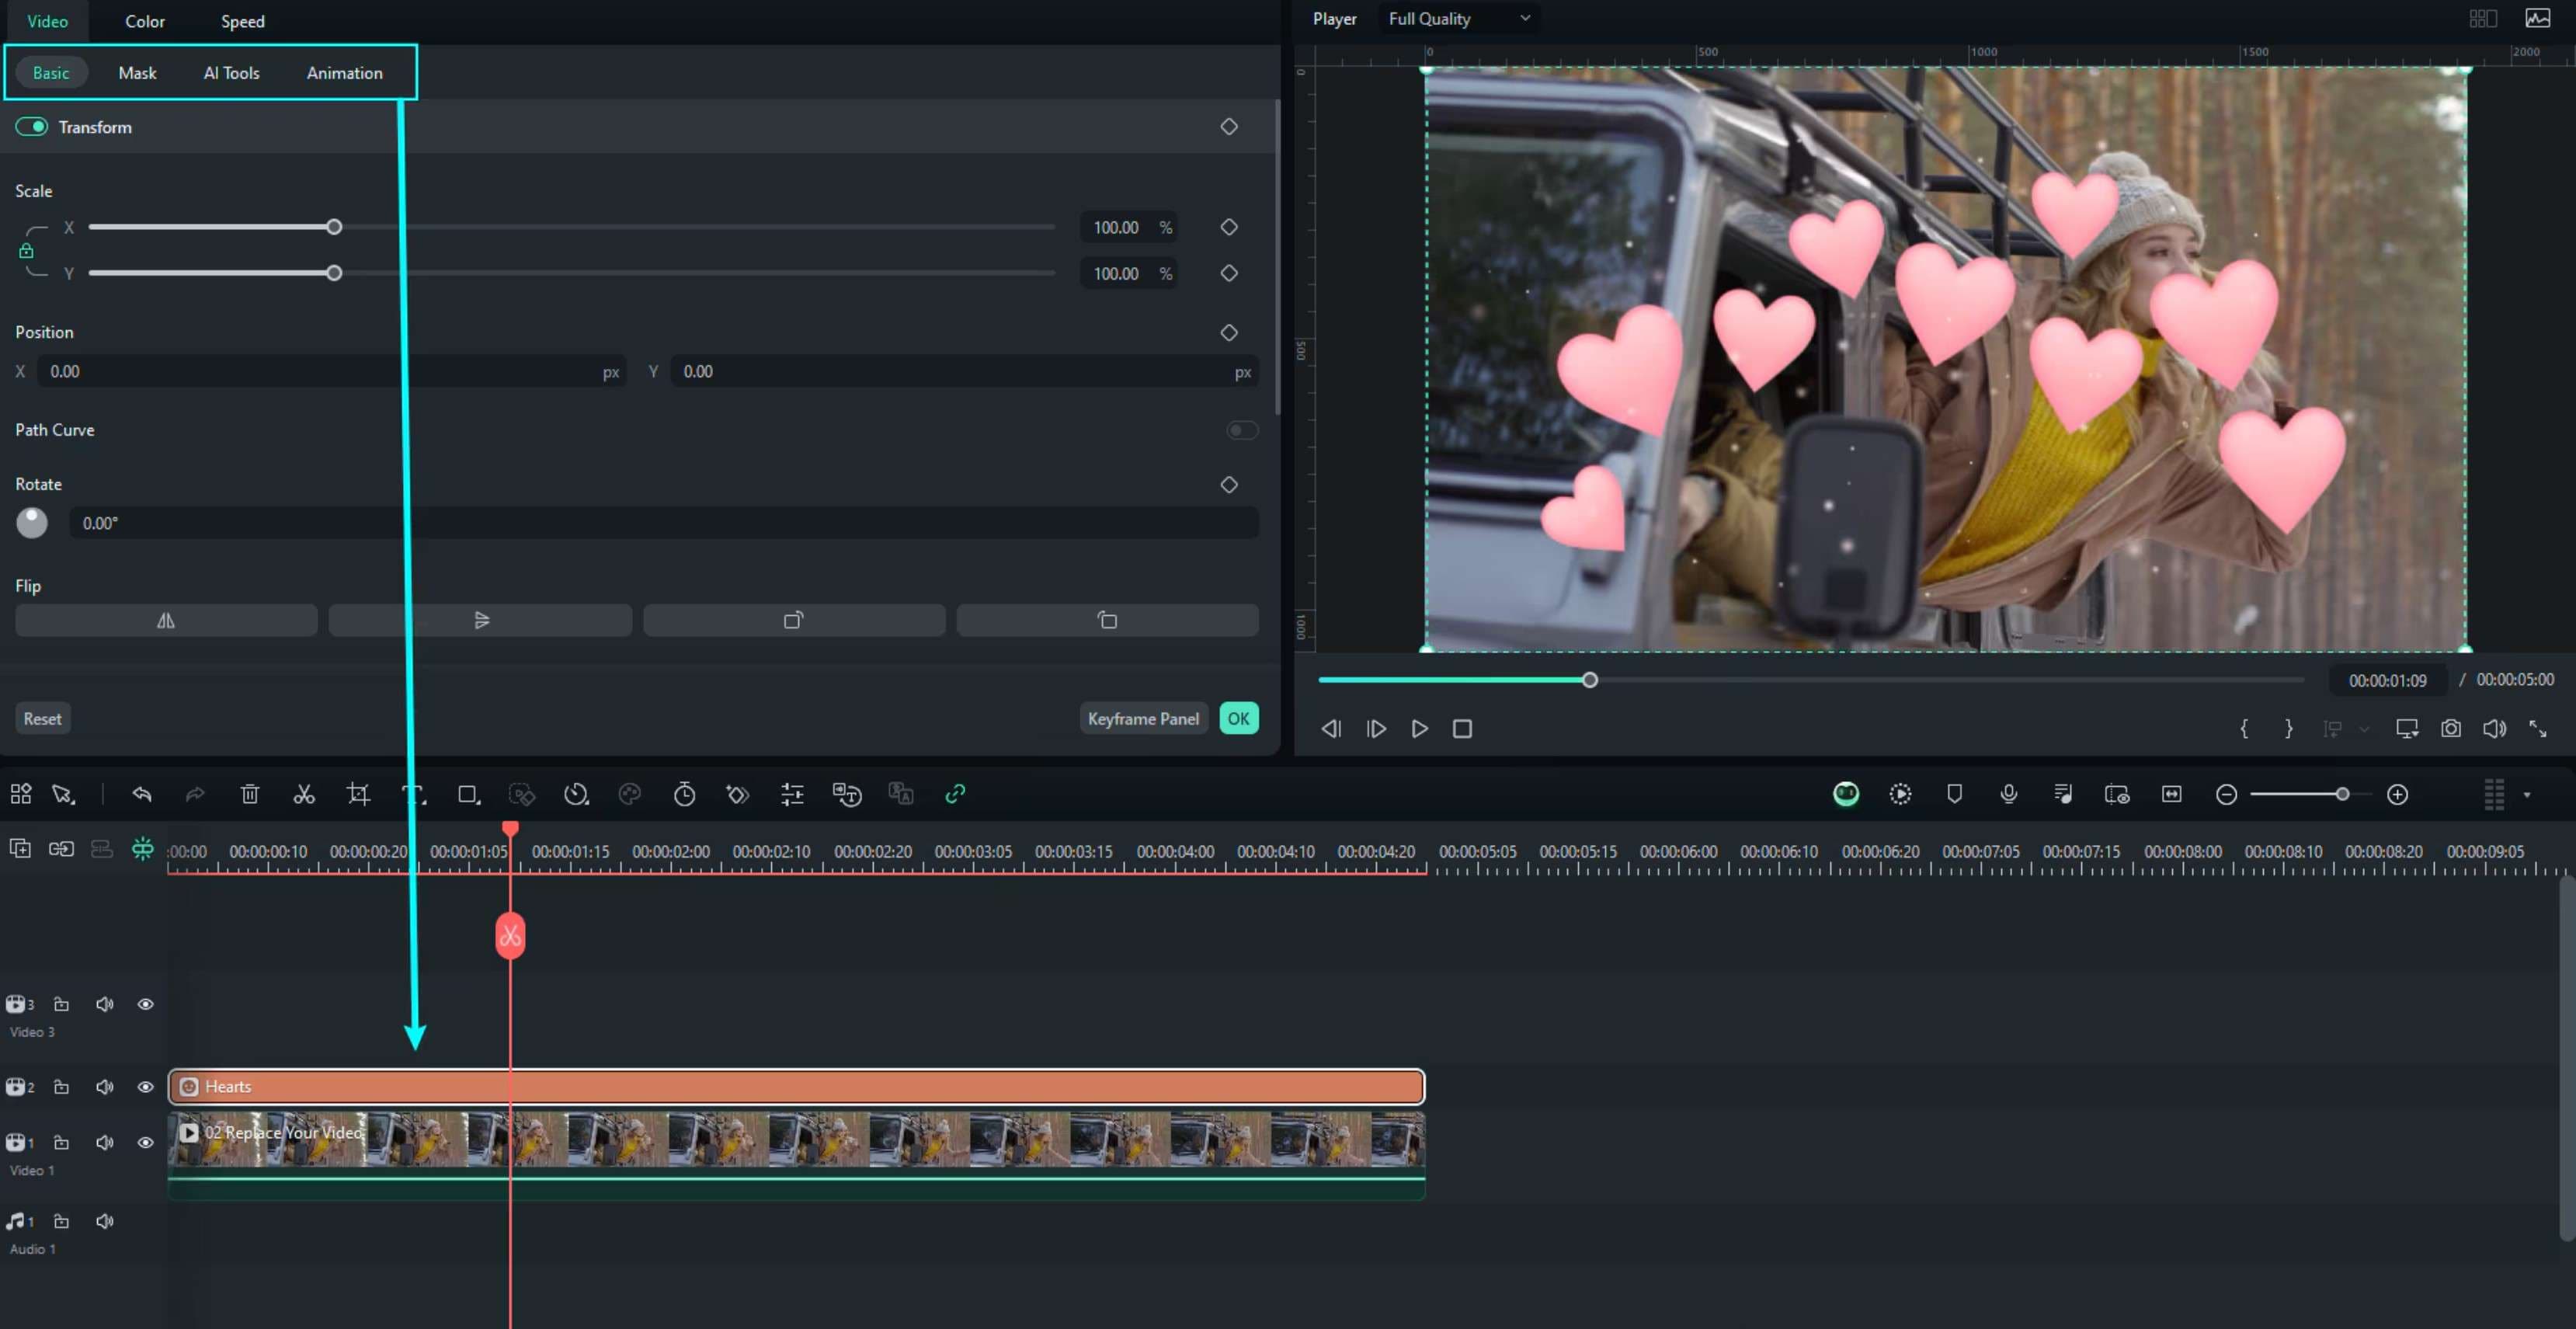
Step 3: Adjust the sticker to your liking by experimenting with the presented sliders. Just double-click on it in the timeline to get this option.
Filmora offers many other effects that you can play with and experiment with. If you followed our steps, you should have transformed your stream into several shorter videos that you can upload to other platforms by now.
So, as you can clearly see, with Filmora, you get everything in one place. It is no wonder that this software is growing in popularity every single day. We have covered only a fraction of its features. If you download the program, you will be able to explore the rest.
Now, we can move on to other tools.
Adobe Premiere Pro
Premier Pro, one of Adobe’s most popular software solutions, has been a go-to choice for professional video editors for years now. But that’s just it. The complexity of this tool and the sheer abundance of features, not to mention the complex interface, make it a tough pill to swallow for beginners.
On a different note, Premier Pro requires a stable, strong, new-gen PC or laptop. It uses a lot of resources, and it might not be the best solution for Twitch streamers who are just starting out. You will need to invest in a good computer, and that’s not where your expenses end. It’s worth noting that Adobe is constantly working on improving the performance of this tool.
Premier Pro costs just north of $270 per year, which is a significant investment compared to cheaper alternatives. It does offer every feature you can think of, and it is a stable software solution, but as we have outlined in this text, there are better alternatives.
CapCut
CapCut has been gaining popularity in video editing circles for quite some time. It is easy to use, but it lacks the advanced features offered by Filmora. It is marketed toward video editing for social media, so it might not be perfect if you are looking for an all-in-one solution for social media and video platforms. It’s excellent for influencers, but you want to be more than that.
The good thing about CapCut is that it is free. It also won’t strain your CPU and GPU that much. It does come with several templates and options to achieve video editing results quickly, but the lack of advanced features makes it not perfectly suitable for aspiring Twitch streamers.
The premium version of CapCut costs $7.99 per month, or about $95 per year, which is much more affordable than Adobe’s Premiere Pro. However, it might not be the best option if you want to make your videos stand out on all platforms, including YouTube.
DaVinci Resolve
DaVinci Resolve has grown rapidly. Currently, it is marketed as Hollywood’s number-one video post-production tool, and with good reason. More and more professional movie editors are joining in and using the features provided by the team at Blackmagic Design to make movie magic.
But are we talking about making movies here? No, we are talking about transforming Twitch streams into shorter clips for other platforms. This tool might not be a suitable solution because, just like Premiere Pro, it has very high system requirements. You will need a strong CPU, GPU, and a lot of RAM.
A simpler solution with enough features to cover your needs would be a better option here. Plus, the DaVinci Resolve will cost you a pretty penny. Currently, it stands at just south of $300, but it is a one-time purchase, which is good. But, as you can deduce, if you do not have experience in video editing, this might not be the right tool for you.
Final Cut Pro
Final Cut Pro is Apple’s product, and if you have an Apple device, this is an excellent tool. It is optimized for this device, so you don’t have to worry about system requirements. It will run smoothly and seamlessly. It also has some cool features like support for 360-degree footage and wide color spaces. It also has multicam editing functionalities. Overall, users are very satisfied.
But just like any Apple product, this one is tied to Apple’s ecosystem. What happens if you don’t have a device with macOS? You cannot even access this tool in this case. This makes it a sub-par choice for aspiring Twitch streamers. Apple’s products aren’t cheap, and if you are looking to purchase a computer or laptop on a budget, you will surely go with a different solution.
On top of all this, the price for Final Cut Pro is pretty steep. It will set you back $299.99, the same as DaVinci Resolve. They also have another similarity, which is that this is a one-time purchase.
Comparison of Top Twitch Editing Tools
Choosing the right Twitch video editing software involves balancing ease of use, cost, and platform compatibility. Below is a simplified comparison of the five main tools to help you quickly see their key differences.
| Software | Ease of Use | Key Features | Platform | Best For |
| Wondershare Filmora | Easy | AI smart clips, effects, easy recording | Windows, macOS | Beginners&pros |
| Adobe Premiere Pro | Complex | Professional-level editing tools | Windows, macOS | Experienced professionals |
| CapCut | Very easy | Quick social media templates | Windows, macOS, Mobile | Social media creators, quick edits |
| DaVinci Resolve | Complex | Advanced color grading, post-production | Windows, macOS, Linux | High-end, professional editors |
| Final Cut Pro | Intermediate | Multicam, 360° video, optimized performance | macOS only | Mac users needing pro features |
Filmora offers the best overall value for most Twitch streamers, combining ease of use with essential features at an affordable price. Premiere Pro and DaVinci Resolve cater to professionals but require more investment in learning and hardware. CapCut is lightweight and simple for quick edits mainly for social media. Final Cut Pro is excellent but confined to Apple users.
Conclusion
After reading the entire text, there is only one conclusion. Wondershare’s Filmora is the best option for Twitch editing. It has the right amount of features and the right price for the paid version, and one can only wonder which new features will be released in the near and distant future.
If you think that some other tools on the list will be a better fit for you, go for it, but we advise you to at least give FIlmora a try. When you experience it firsthand, you will realize why we put it on top in this article.
Good luck with becoming a popular Twitch streamer as fast as possible!


 100% Security Verified | No Subscription Required | No Malware


