
 100% Security Verified | No Subscription Required | No Malware

Creating photo collages in Microsoft Word 2024 is easier than ever. While Word is primarily a text editor, its enhanced image tools make it a powerful free collage maker for Windows users.
In this comprehensive guide, you'll learn 7 proven methods to create professional-looking photo collages using Microsoft Word's built-in features, plus exclusive tips for leveraging Microsoft Designer integration and AI-powered layouts.
Part 1 Microsoft Word 2024 vs Previous Versions - What's New
Microsoft Word 2024 introduces revolutionary AI-powered design suggestions and seamless Microsoft Designer integration that makes creating photo collages faster and more intuitive than ever before.
While different versions of Word (from early “Microsoft Office” releases to the latest updates) may vary slightly in icons and layout, the basic process remains the same:
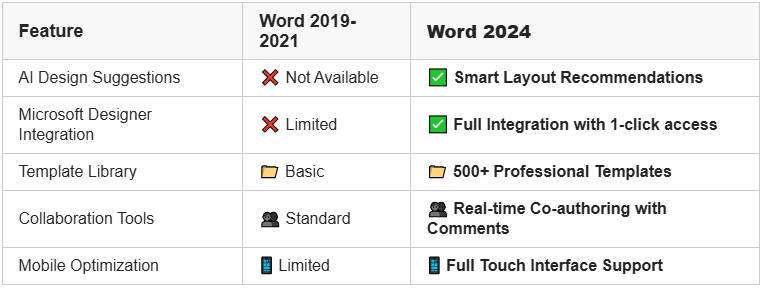
🔧 Key Improvements:
●Enhanced SmartArt Graphics: Now includes 25+ new collage layouts specifically designed for photos
●Automatic Image Optimization: Word 2024 automatically compresses and optimizes images for faster loading
●Cloud Integration: Seamless access to OneDrive, SharePoint, and Microsoft Designer assets
●Choose your page layout and dimensions
●Insert your selected images
●Arrange and edit them as needed
Newer versions of Word offer even more user-friendly features like enhanced image editing, drag-and-drop layout, and built-in collage templates. These updates make it easier than ever to create personalized photo collages with minimal effort — no third-party tools required.

The main difference between older and newer versions of Microsoft Word lies in the range and quality of available features. Earlier versions focused primarily on text editing and lacked tools for working with images or creating collages.
In contrast, recent versions include dedicated tools for image arrangement and collage creation. Features like SmartArt—a built-in graphic tool—act as a simple collage maker, allowing users to organize photos creatively with pre-designed layouts. These enhancements make it significantly easier to design visually appealing photo collages directly in Word without needing additional software.

Microsoft Word 2013 and 2016 include a Developer option, accessible via the "Customize the Ribbon" settings. This feature allows users to define the number of images and insert them directly from files, streamlining the collage creation process.
In addition, Word Tables—available in all versions—offer full control over layout and alignment. By inserting a table and placing images into individual cells, users can easily organize and structure their photo collages with precision and flexibility.


There is so something called the "Effect” option which can be found in the "Format Picture” option, and this can be efficiently used to add various artistic effects and modify the pictures in ways that the user wants.

The most commonly used version of the Microsoft Word software to create photo collages is expectedly the newest as it comes with the maximum features which enable the user to go beyond text and control designs, graphics, and everything else.
Part 2 How To Make A Photo Collage In Microsoft Word
Creating a photo collage in Microsoft Word involves several key steps. In this section, we'll explore each method and how to use Word's features effectively. Here are the main options for making a collage:
Freestyle Collage Creation
●Access the Developer Tab: Go to the Ribbon and click on the "Developer" option. If it's not enabled, activate it via "Customize the Ribbon."
●Insert Placeholders: Click on the 'Picture Content Control' button in the 'Controls' section to create placeholders for your images.
●Add Pictures: Click on each placeholder, select the 'Picture' option, and specify the source of your images.
●Arrange Images: To organize images, right-click on a picture, select "Wrap Text," then "More Layout Options," and choose 'In Front of Text' to arrange them freely.
●Format Images: Adjust the size and shape of images as needed using the "Picture Tools" tab for borders, styles, and shadows.

Using SmartArt
Method 1: Quick Start with SmartArt (Recommended for Beginners)
⏱️ Time Required: 3-5 minutes
👤 Skill Level: Beginner
🎯 Best For: Family photos, social media, quick presentations
●Insert SmartArt: Click on the 'Insert' tab, select 'SmartArt,' then choose 'Picture' and pick a collage layout that suits your needs.
●Insert Photos: Click the picture icon in each placeholder, select 'Insert,' and add your images proportionally.
●Resize and Crop: Use the 'Picture Tools' tab to resize or crop images as desired.
●Rearrange Images: Adjust the arrangement by selecting 'Move Up' or 'Move Down' in the SmartArt frame to reposition your pictures easily.

If you are trying to make a photo collage, you can also go with the Wondershare Filmora Video Editor, which has some amazing features, to make your job much easier. It has over 10 million stock media, a huge number of preset templates, and a feature called "Speed Ramping", which you can use to adjust the speed of your video. It has various kinds of stock media such as "Pixabay", "Giphy" and "Unsplash".


It works on a variety of operating systems, such as Windows 7, Windows 8.1, Windows 10, and also Windows 1It has a minimum RAM requirement of 4GB, though 8 GB is recommended for 4K and HD videos. It also requires a minimum of Intel HD Graphics 5000 or newer versions.
Part 3 Transform Your Ideas into Videos with Filmora
Do you often have brilliant video creation ideas in mind while working on your collages? Filmora's AI Idea to Video feature allows you to transform those inspirations into engaging short video stories. Whether you want to showcase your collage creations or add captivating narration, this feature provides powerful support. If you're not satisfied with the generated results, you can continue refining them until you achieve your desired outcome.
To get a better understanding of how to utilize the AI Idea to Video feature, follow the simple guide below:
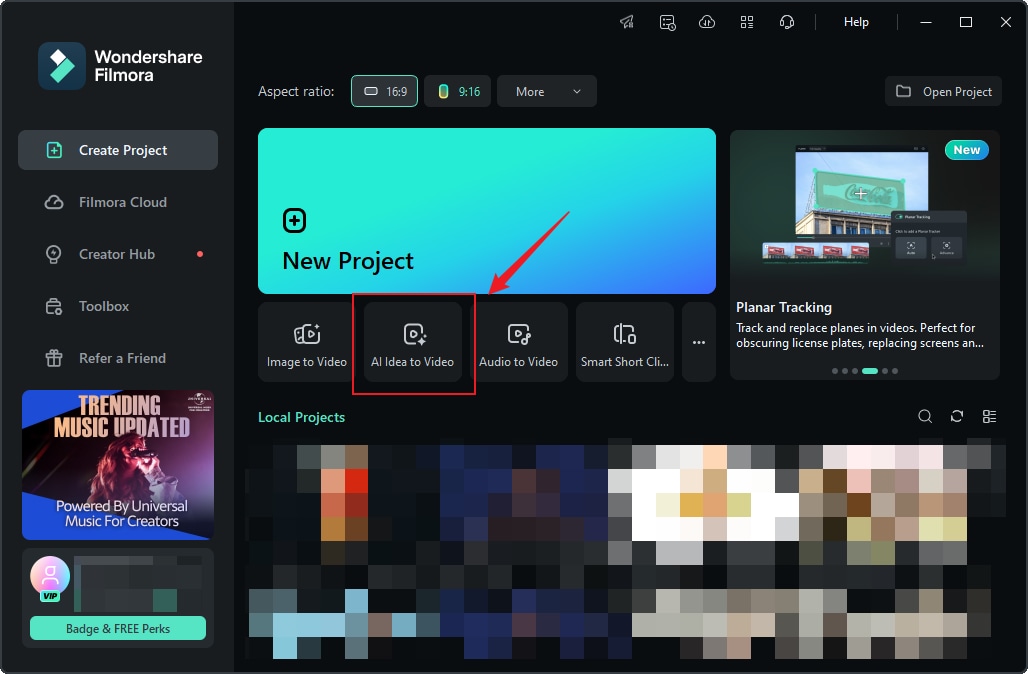
Step 1: Enter the "AI Idea to Video" Interface from the Startup Page.
On the startup page, find the "AI Idea to Video" feature box and click to enter.
Step 2: Enter Your Story Script.
After entering the "AI Idea to Video" feature interface, you can input your story idea and customize the video length, language, and style. Once the settings are complete, click "Launch AI Script."
Step 3: Customize the Generated Scene Content.
Filmora will generate several scene descriptions based on your input script, and display task settings and video scene configurations. You can manually edit the content to let Filmora regenerate it. Additionally, for each scene, you can upload images to generate videos from images. Once you confirm that the scene descriptions and related settings are satisfactory, click "Generate" to create the short video.
Step 4: Wait for the Video to Generate.
It will take a few minutes to generate the short video. You can click "Hide" to conceal the process.
Step 5: Enter the Storyboard Page to Edit the Video.
After entering the Storyboard page, you can view the generated results for each scene. If you added subtitles or transition effects during the initial setup process, they will appear on the timeline. You can also use the features in the Filmora toolbar to edit the video, such as changing fonts, adding audio, adjusting transitions and filters, and more.
Step 6: Edit the Generated Results.
If you're not satisfied with the generated scene results, you can modify the scenes, tasks, or other settings and regenerate them.
● Key Takeaways from This Episode →
●Thus, the entire article can be summarized by saying that there are quite a few ways in which you can create a photo collage in Microsoft Word, using collage Microsoft word and various other Microsoft auto collage options which can be used to make photo collages easily in Microsoft Word.
●With the release of newer versions with more and more features and options, it becomes easier to exercise control over graphical content in Microsoft Word.
●So, the processes are quite straightforward and simple and there should not be much problem in following them as mentioned so many times, there are many collage maker Microsoft options which you can use to make a photo collage with pictures and shapes that you desire.
●The immensity of options enables you to create collages in whichever you like.
