
 100% Security Verified | No Subscription Required | No Malware
 TL;DR:
You can permanently rotate videos in Windows using the pre-installed Photos App or Clipchamp for quick 90-degree adjustments, Wondershare Filmora for precise custom angles, or VLC Media Player for temporary viewing corrections.
● Windows Media Player lacks rotation capabilities, meaning Windows 10 users must utilize the Photos App's "New Video Project" feature, while Windows 11 users rely on the Microsoft Clipchamp timeline to apply strict 90-degree orientation changes.
● VLC Media Player rotates videos instantly during playback via the "Geometry" effects tab, but permanently saving this change is complicated and requires re-encoding the file using the "Convert/Save" menu and activating the "Video transformation filter".
● Wondershare Filmora enables quality-lossless rotations by allowing users to shift the video's central pivot using exact X and Y anchor point coordinates, whereas browser-based alternatives like Clideo offer quick processing but may embed a watermark on the final MP4.
Ask AI for a summary
 ChatGPT
 Perplexity
 Gemini
 Claude
 Grok
Grok
Filmed a video in the wrong orientation? Don't worry. This guide shows you exactly how to rotate a video on Windows 10, Windows 11, or any PC, quickly and easily. Whether your video is sideways or completely upside down, you'll learn how to fix it permanently.
We cover four simple methods, from using free built-in tools like the Photos App and Clipchamp, to the ever-popular VLC Media Player. Plus, we'll reveal the best way to rotate video to any custom angle without losing quality using Filmora. Let's get your video looking perfect in minutes.
Table of Contents
Method 1: Rotate Videos with Windows' Built-in Tools (Photos App for Win 10, Clipchamp for Win 11)
One of the fastest ways to rotate a video is by using the free, built-in applications that come with your operating system. Depending on whether you are using Windows 10 or Windows 11, the tool and steps will differ slightly. Follow the guide for your specific system below to correct your video's orientation.
For Windows 10 Users: Using the Photos App
If you're on Windows 10, the native Photos app includes a simple video editor perfect for quick rotations.
Step 1: From Start menu, search for "Photos" and open Photos app.

Step 2: Select Video Editor option which is available at the top of the screen. Once, Video Editor opens, click on New Video Project button.

Step 3: Put a name for the project and click on Ok. Thereafter, click on Add button and select the video file from your hard drive that you want to rotate.

Step 4: Drag and drop the video file into Timeline. Thereafter, Click on Rotate icon to turn the video by 90 degrees. You can click again to rotate the video further by 90 degrees again.

Step 5: Once done, click on Finish Video option and save the video file in the destination folder.
For Windows 11 Users: Using Microsoft Clipchamp
Windows 11 comes with a more powerful, pre-installed video editor called Microsoft Clipchamp. It also makes rotating videos simple.
Step 1: Launch the Clipchamp application from the Start Menu. Click on the Create a new video button.
Step 2: Drag and drop your video file into the "Import media" area, or click the button to browse your files. Once imported, drag the video from your media library down into the timeline at the bottom.
Step 3: Click on your video in the timeline to select it. A floating toolbar will appear next to the video preview. On this toolbar, click the Rotate icon. Each click will turn the video 90 degrees to the left.
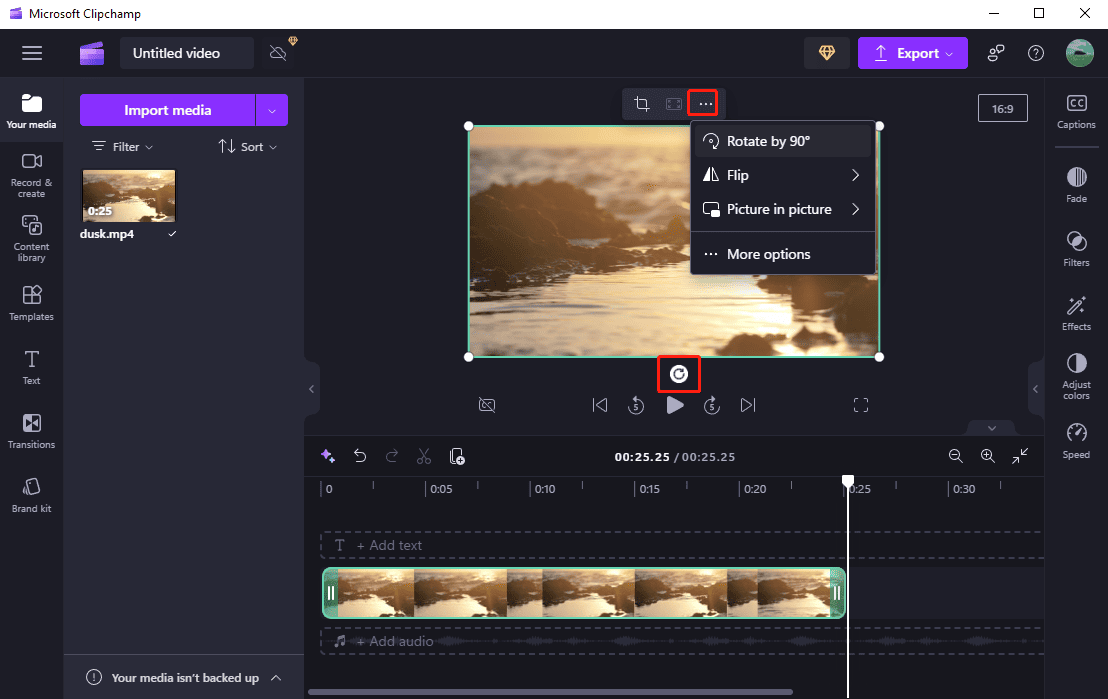
Step 4: When the video is correctly oriented, click the Export button at the top-right corner. Choose your desired video quality (e.g., 1080p) to save the permanently rotated video to your computer.
Method 2: Rotate Video to Any Angle on Windows with Filmora (Recommended)
For maximum flexibility and professional results on how to rotate a video in Windows, the best software is Wondershare Filmora. It is a professional video editor and there are loads of features to edit the video including rotation. You can make a video more attractive and crisp to publish on professional platforms like YouTube. Here are the steps to rotate a video on Filmora.
Step 1: Download and install Filmora. Open the software and import the video file that you want to rotate. Then drag and drop it on Timeline.
 secure download

Step 2: From Video Editing panel, expand Transform option and use the slider on Rotate option to rotate the video at any angle. Once done, click on OK button.

Step 3: Go to Export option and click on Export button. The new video files with its new rotation will be saved in the destination folder.

Advanced Tip: Customize the Anchor Point for Creative Rotations
For more creative control, Filmora now allows you to change the video's anchor point. The anchor point is the central pivot for all transformations (like rotation and scaling) and is set to the video's center by default. By moving it, you can make the video rotate around a new custom point.
There are two ways to modify the anchor point's position:
- In the Properties Panel: Under Transform, locate Anchor Point and enter the specific X and Y coordinate values for precise placement.
- In the Preview Window: Select the video clip in the timeline. In the preview screen, you will see the anchor point icon (a circle with a cross). Simply click and drag this icon to your desired new position.
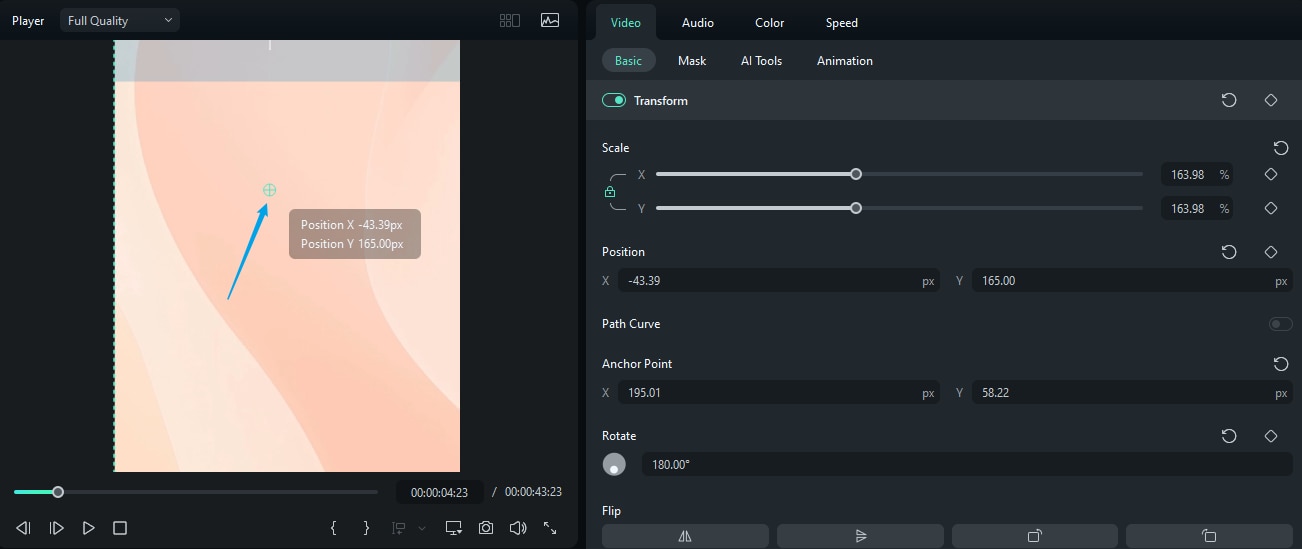
Once you are satisfied with the rotation and anchor point, click OK.
Step 3: Export the Final Video Click the Export button. Choose your desired format and settings, and click Export again. Your newly rotated video file will be saved to your destination folder.
Bonus Tip: How to Rotate a Video on Mobile with the Filmora App
On the other hand, the best way to learn how to rotate a video on your mobile device is by using a dedicated video editor. This is a good habit because you can practice your skills even when away from a computer. It’s recommended that you try out Filmora for this purpose.
Check out how to rotate videos on Filmora mobile below:
Step 1: Download and install Filmora on your iOS or Android device.
Step 2: Go to New Project, then Import the videos you want to rotate on the next page.

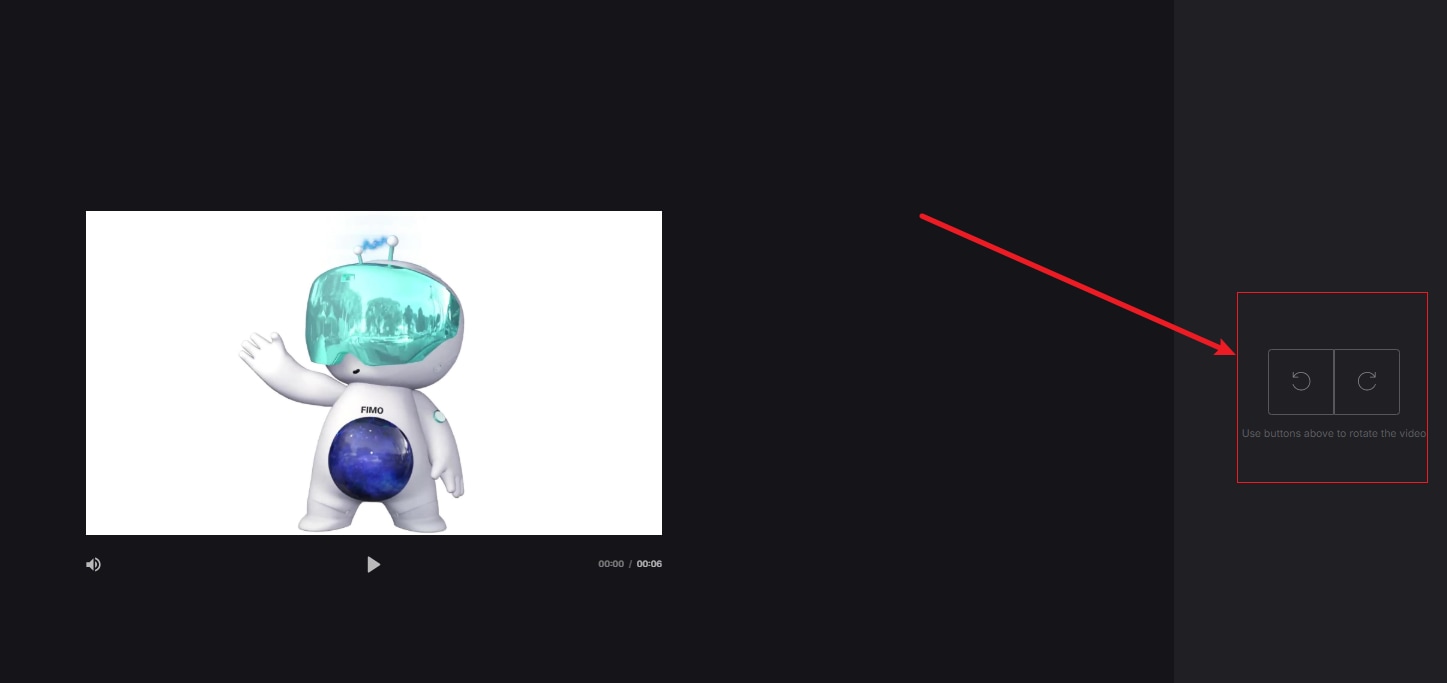
Step 3: Locate the Rotate menu from the bottom toolbar. Then, select if you want to rotate to the Right or Left. You can also choose to Mirror or Flip the video entirely.

Tip: Alternatively, you can pinch with two fingers and twist in the direction you want to rotate the videos naturally.
With three simple steps, you can quickly rotate, flip, or mirror your videos with Filmora. Try it out today and enjoy more powerful editing features in your hand.
secure download
Method 3: How to Rotate and Save a Video in VLC Media Player
VLC Media Player is a powerful, free tool that many Windows users already have installed. While it's known for playing almost any video format, it can also be used to rotate a video. The process involves two key parts: first, rotating the video for temporary viewing, and second, saving that rotation permanently by re-encoding the file.
Part A: Temporarily Rotate for Viewing
If you just want to watch the video in the correct orientation for one time, this is the quickest way.
Step 1: Open your video file with VLC Media Player.
Step 2: Go to the top menu bar and click Tools > Effects and Filters.

Step 3: In the "Adjustments and Effects" window, click on the Video Effects tab, and then the Geometry sub-tab.

Step 4: Check the box for Transform and select your desired rotation (e.g., "Rotate by 90 degrees"). The video will rotate instantly in the background. You can also use the "Rotate" dial below for custom angles.

Step 5: Click Save and then Close. Your video will now play with the correct orientation for this viewing session only.

Note: This change is temporary. If you close and reopen the file, it will revert to its original orientation. To save the changes forever, proceed to Part B.
Part B: Permanently Save the Rotated Video
To save the rotated video as a new file, you need to use VLC's Convert/Save feature. Make sure you have already set your desired rotation as described in Part A.
Step 1: From the VLC menu, go to Media > Convert / Save...
Step 2: In the "Open Media" window, add the video file you just rotated and click the Convert / Save button at the bottom.
Step 3: In the "Convert" window, select a Profile for your new video. "Video - H.264 + MP3 (MP4)" is a great choice for wide compatibility.
Step 4: Click the wrench icon (Edit selected profile) next to the profile dropdown.
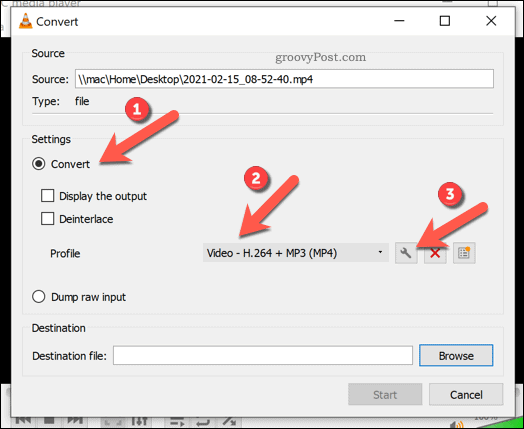
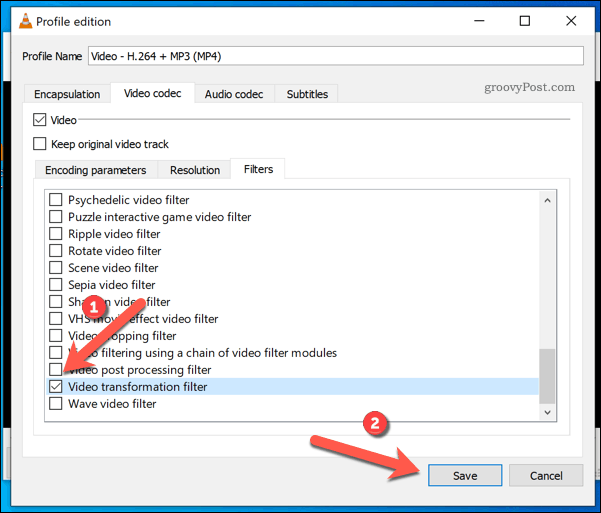
Step 5: In the "Profile edition" window, click the Video codec tab, and then the Filters sub-tab.
Step 6: Scroll down and check the box for the Video transformation filter. Click Save. This is the most crucial step, as it tells VLC to apply the rotation effect you selected in Part A during the conversion.
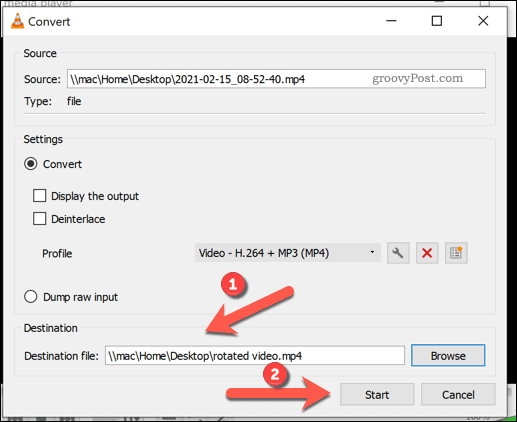
Step 7: Back in the "Convert" window, choose a Destination file by clicking Browse. Be sure to give it a new name to avoid overwriting your original.
Step 8: Click Start. VLC will begin the process of exporting a new, permanently rotated video file. The timeline slider will move as if it's playing, which indicates the conversion progress. Once it's finished, your new file will be ready in the destination folder.
Now that we've explored the free methods available on Windows, you might be wondering which option is truly the best for your needs. To help you decide, here is a quick comparison of the key features.
| Feature | Windows Photos / Clipchamp | VLC Media Player | 👍 Wondershare Filmora [Recommended] |
|---|---|---|---|
| Rotation Angle | 90° Increments Only | Any Angle ⚠️ (Complex to save) | ✔️ Any Angle (0-360°) with Easy Slider |
| Ease of Use | Very Easy | Medium (Saving is difficult) | ✔️ Very Easy & Intuitive |
| Output Quality Control | Basic | Variable (Depends on settings) | ✔️ Excellent / Full Control (No quality loss) |
| Permanent Save | ✔️ Yes (Easy) | ✔️ Yes (Very Complicated) | ✔️ Yes (Easy & Fast Export) |
| Additional Features | ❌ Very Limited (Trim, basic filters) | ❌ None (It's a player) | ✔️ Extensive (Crop, Effects, Titles, Audio, Color Grading & more) |
As you can see, while free tools are fine for a simple 90-degree turn, they lack the flexibility and power for more advanced tasks. If you need precise control over the rotation angle, want to ensure the highest output quality, and gain access to a full suite of editing tools, Wondershare Filmora is the clear choice.
Method 4: How to Rotate a Video Online for Free
If you prefer not to install any software, an online video editor is an excellent solution. These tools work directly in your web browser and are perfect for quick, one-off tasks. We'll use Clideo's Rotate Video tool as an example, which is straightforward and effective.
Note: Most free online tools, including Clideo, may add a small watermark to the final video.
Step 1: Open your web browser and navigate to the Clideo video rotator tool at clideo.com/rotate-video.
Step 2: Click the large blue Choose file button. You can upload a video from your computer, Google Drive, Dropbox, or even paste a URL.
Step 3: Once your video is uploaded, you'll see a preview. On the right side, use the Rotate buttons to turn your video 90 degrees left or right until it has the correct orientation.
Step 4: When you're happy with the result, click the Export button at the bottom right. Clideo will process your video.
Step 5: On the final screen, you can preview the result. Click the Download button to save the permanently rotated MP4 file to your computer.
FAQs About Rotating Videos on Windows
1. How do I rotate a video in Windows 10?
To rotate a video in Windows 10, you can use the built-in Photos app. Open the app and select the video you want to rotate. Click on the Edit & Create button at the top of the screen and select Rotate left or Rotate right to adjust the video orientation.
2. Can I rotate a video in Windows Media Player?
No, you can't rotate a video in Windows Media Player. This feature is only available in the Photos app. However, you can use a third-party video editing software to rotate your videos.
3. How do I save the rotated video?
After rotating the video in the Photos app, click on the Save a copy button at the top of the screen. You can then choose the destination folder and file name for the newly rotated video.
4. What should I do if the video is upside down after rotating it?
If the video is upside down after rotating it, you may have rotated it in the wrong direction. Try rotating it in the opposite direction and see if that fixes the issue. If not, you may need to use a third-party video editing software to rotate the video.
5. Can I rotate a video without losing quality?
Rotating a video can sometimes result in a loss of quality, especially if the video is compressed or low-resolution. However, using a good video editing software can help minimize the loss of quality. Make sure to save the rotated video in the same format and resolution as the original file to avoid further loss of quality.
Conclusion: Which Method is Best for Rotating Your Video?
Now you know how to rotate a video on Windows using four different methods. Here's a quick summary to help you choose:
- For quick 90-degree rotations: The built-in Photos (Win 10) or Clipchamp (Win 11) apps are perfect.
- If you already use VLC: It's a capable option for both temporary and permanent rotations.
- For maximum control and quality: If you need to rotate to a specific angle, avoid quality loss, or access more editing tools, Wondershare Filmora is the clear winner. It offers precise rotation, anchor point control, and a full suite of features to perfect your video.
While free tools get the basic job done, they can't match the power and flexibility of a dedicated video editor. If you're ready to fix your video's orientation and unlock your creative potential, download Filmora today and see the difference for yourself.
