Filmora
Filmora - AI Video Editor
Edit Faster, Smarter and Easier!
OPEN
Filmora Video Editor
Effortlessly create video with AI.
  • Various AI editing tools to increase your video creation efficiency.
  • Offer popular templates and royalty-free creative resources.
  • Cross-platform functionality for editing everywhere.

Unlink Audio and Video in DaVinci Resolve [Detailed Steps]

Liza Brown
Liza Brown
Nov 22, 24 • Proven solutions

There are various reasons why someone might want to remove audio from a video. Some of the film shots will have a lot of background noise, which might be distracting while watching the video. Some people like to include alternative audio or a soundtrack to make their films more presentable and attract people. So, whether you want to watch a silent video or one with a separate audio file, you'll have to erase the original audio.

How To Detach Audio and Video in Da Vinci Resolve

DaVinci Resolve is a sound and video editing program for all types of files. It has numerous applications. Let's begin with audio extraction from a video clip below:

  1. Launch the DaVinci Resolve and open the file from File>Open>Select video clip.
unlink-audio-video-davinci-
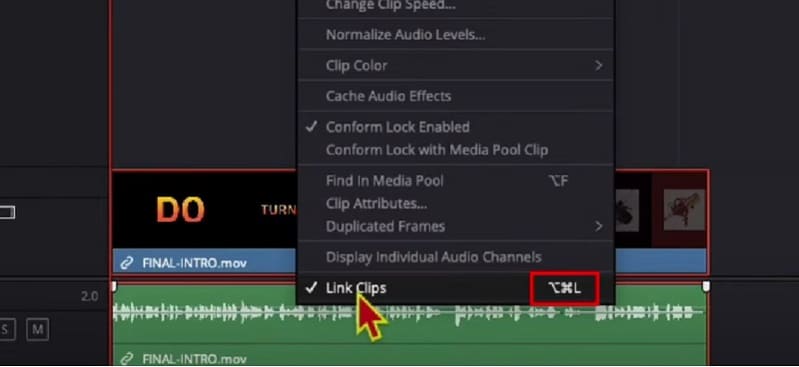
  1. All you have to do with DaVinci Resolve is tap on the chain link in the toolbar above to delete audio from any clip. Alternatively, you may just press down the "ctrl + shift + I" keys to connect and unlink the audio from your clip. Inspect the equalizer after that, and you're done.
unlink-audio-video-davinci-
  1. You can now export the footage on your computer once you've finished editing and are pleased with the progress.

Other Alternatives

Suppose you find Da Vinci Resolve very complicated, and you get confused a lot while using it. I prepared a list of a few alternatives that you may use to detach the audio to your videos.

Besides extracting sound from video, the software listed below also has functionality for editing the audio file. Here are some of the most excellent and most popular audio separation and replacement tools:

#1: Wondershare Filmora – Overall Best

It is available on Windows and Mac.

Wondershare Filmora is a popular video editing program used all over the world. Filmora includes all the capabilities that will give you the most outstanding results, whether you're doing easy video editing, advanced video editing, or even making movies. It also has specific editing features for social media videos.

Follow these steps below, and let's look at how to detach audio from a video file with Filmora:

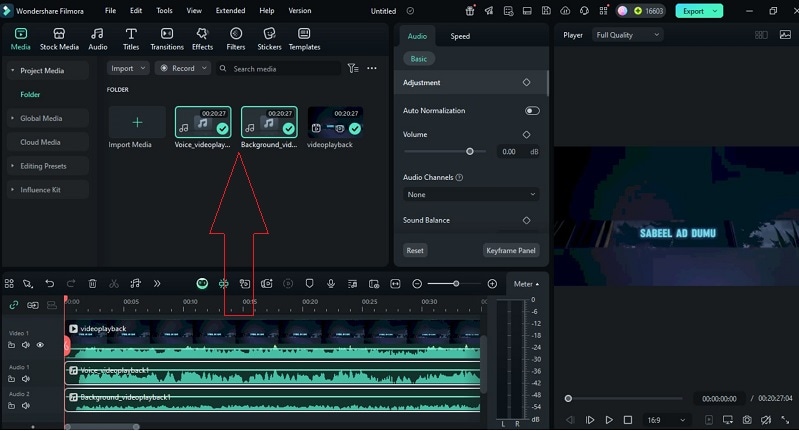
  1. Launch Filmora, then click on File-Import Media and load the video clip to the Media Library, wherein the sound needs to be deleted.
unlink-audio-video-davinci-
  1. Drag and drop using the mouse the video clips from the Media Library to the Timeline when it has been imported.
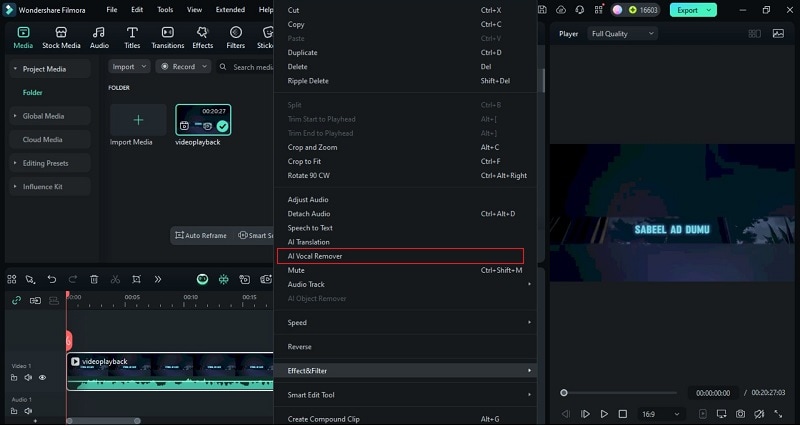
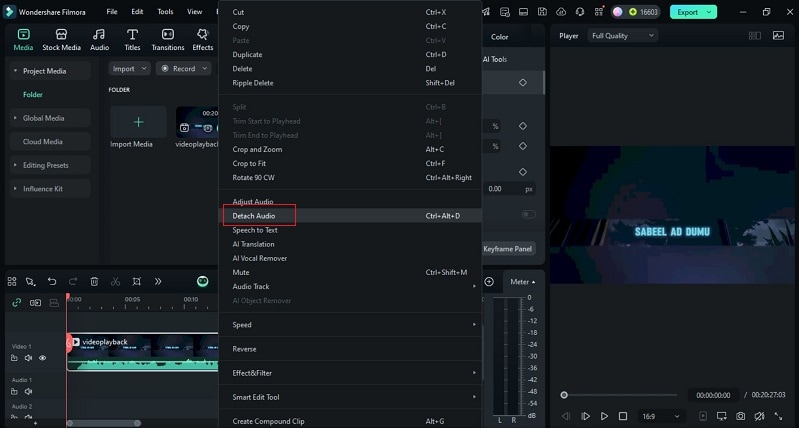
  2. Click Detach Audio from the context menu of the video file on the timeline.
unlink-audio-video-davinci-
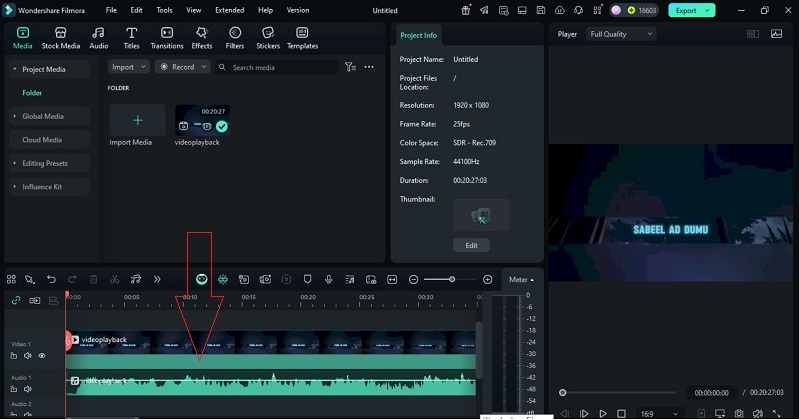
  1. The audio will now show on the audio track below in a different format.
unlink-audio-video-davinci-
  1. To completely remove the audio file, press on it and simply tap the Delete icon.
unlink-audio-video-davinci-

You may add a new sound to your video clip in the same manner, you did with the video (import, drag, and drop). Filmora also offers options that enable you to edit and add effects to an audio track.

#2: VSDC Video Editor

It is available on Windows and Mac.

VSDC is a popular video editing program that can handle high-resolution videos such as VR 360-degree, 4K UHD, and 3D films. It also allows users to capture speech and film from the screen and save the material in any format they want. Let's look at how VSDC can be used to eliminate audio from video:

  1. Upload the clips you want to edit into VSDC.
  2. Pick the Properties option from the toolbar by right-clicking on the file with the cursor. A small window will drop down from the right side of the screen.
unlink-audio-video-davinci-
  1. You will find a Split to Audio and Video tab at the very bottom of the window; select it.
unlink-audio-video-davinci-
  1. On the timeline, the sound will now be divided from the video.
unlink-audio-video-davinci-
  1. Erase the audio file by clicking on it. Then, the video is now playable without audio.

VSDC also gives you the option of muting the audio rather than deleting it; however, deleting the audio is preferred.

#3: AudioRemover Tool

It is available on Windows, Mac, and Online.

The AudioRemover Tool is a program that allows you to eliminate audio from any video without having to re-encode it. It is an online service that can be accessed using a browser on Windows and Mac computers. The AudioRemover program can be used by those who do not want to download and install video editing software or just wish to remove audio from video files without additional editing. It can handle any video format, including MP4, MOV, and AVI.

Let's look at how you can use this application to delete audio:

  1. Open the online AudioRemover.
  2. Choose the source video using the Browse tab, then press the Upload Video icon.
unlink-audio-video-davinci-
  1. You can save the media files (without audio) once the uploading is finished by clicking the Download File button next to the Completed indication.
unlink-audio-video-davinci-

This program requires an active connection to the internet, and you cannot upload files larger than 500 MB.

#4: Windows Movie Maker

It is available on Windows.

Because it used to be included in the Windows Essentials software set, Windows Movie Maker is among the most popular accessible editing programs. Let's have a look at how Movie Maker handles audio extraction.

  1. Upload the video you want to modify into Windows Movie Maker.
unlink-audio-video-davinci-
  1. Create a timeline for the video. Remove audio by right-clicking it (You may also click Detach Audio, and then it will detach the sound from the audio track)
unlink-audio-video-davinci-
  1. It will immediately erase the sound, and it will not show any Audio input anymore.
unlink-audio-video-davinci-

Wrapping Things Up

People's viewing experiences are greatly influenced by the audio accompanying a video. No matter how wonderful or perfect a video clip is, if the audio playing while watching it is terrible, it may be a very frustrating experience. So, we've gone over a few different software options for removing audio from a video file and replacing it with another audio in a couple of moments.

Frequently Asked Questions

How to Insert Audio to Video Clip in Da Vinci Resolve?

There may be times that your video may require the addition of music, background audio, or wooshing sounds.

To begin, open Resolve and import your audio clip:

  1. Navigate to the "Edit" page.
  2. Select the tab "Media Pool."
  3. Right-click and choose "Import Media" or push "Ctrl + i."
  4. Pick your audio clip and browse to your location.
  5. Select "Open."

The audio clip is now imported into the "Media Pool." After that, you'll need to figure out which part of the audio track you'll use.

Double-click the audio clip to play it. In the "Source Viewer," it will appear.

Set the needed audio parts in (press I) and out (press O). Alternatively, if you need the entire soundtrack, there's no need to set in and out.

Drag & drop the audio track (from the media pool) underneath the video you want to use. It will then add the sound file with the selected portion of the audio. You can now modify the audio to match the visual.

How to Link Your Audio and Video in DaVinci Resolve?

It's best to link the soundtrack (music, sound effect, or background music) to the relevant video once you've adjusted the audio file.

Here's how to connect audio and video in a timeline:

  1. Press "Ctrl" or "Cmd" to toggle both the video and audio.
  2. Right-click and choose "Link Clips." You may also use the shortcuts “Ctrl + Alt + L" or "Option + Command + L."
  3. The sound and visual are now both connected.

Thus, you can rest guaranteed that the audio will follow your movie wherever it goes. There will be no issues with out-of-sync!

How Do You Link Many Audio and Video Files Together in DaVinci Resolve?

Several video and audio segments can be linked together to form a single one. You can rearrange them anywhere in the timeline, and they will not be out of sync.

This is how you connect many clips:

  1. By holding down the "Ctrl" or "Cmd" key, you can choose all the video and audio clips you want.
  2. Right-click and choose "Link Clips." You may also use the shortcut keys "Ctrl + Alt + L" or "Option + Command + L".
  3. Now, all your video or audio files are linked together.

Is Any Music Available to Use for Editing?

Understanding copyright law can be complicated. It's best to use free music for video editing if you don't want to be accused of copyright violation.

Additionally, you can purchase two licenses to avoid copyright concerns. The producer controls the synchronization license, and the master license to use the song recording is managed by the publishing company.

If you don't want to go into legal trouble, the only thing you need to remember is never to utilize any illegal video.

Is There Any Free Music in DaVinci Resolve?

DaVinci Resolve does not include any free music; however, it does include royalty-free sound effects noise. To get started, you can download and install the available sound package.

What Software Provides Free Music?

The Audio Collection in Wondershare Filmora has over 50 royalty-free audio tracks for videos, with more to come.

For video production, you can acquire free background music.

In addition, Filmora has 25 sound effects, including animal sounds, video game sounds, and beeps. With Filmora, you may use more advanced editing features like keyframing, background noise elimination, cut, trim, crop, PIP effects, green-screen effects, and more to add free-choice music to your film.

Filmora will enhance the appeal of your video by giving free background music. You may also tweak the background sound, such as speeding up and slowing down, fade-in and fade-out.

You May Also Like

LumaFusion: Top Features and Compatibility on Android, iOS, Mac, and More

Before downloading LumaFusion, let’s take a closer look at what it offers in our review. We’ve covered LumaFusion key features, pros and cons, and compared it to leading video editors like Filmora.

Posted byAndrew Murray|2024-12-05 10:02:17
Step-by-Step Guide on How To Resize Video in Davinci Resolve

Here are a number of tools used in the market to resize the videos. We are going to teach How to resize the video in Davinci Resolve and Fimora.

Posted byJames Hogan|2024-12-05 09:59:54
Top 22 Free Video Editing Software

The necessity of the creation of video content for social media has urged many editing software to come out on the market. We have reviewed some, free of them in this article for you.

Posted byLiza Brown|2024-12-09 10:56:30
A Beginner's Guide to Use Snapseed Photo Editing Features

Have you heard about Snapseed photo editing? This piece of writing will comprise descriptive information to edit your pictures effortlessly.

Posted byMax Wales|2024-12-09 10:56:03
How to Reverse a Video on iPhone

Want to reverse a video on your iPhone? This guide will show you the quickest and easiest way to do so!

Posted byRichard Bennett|2024-12-09 10:55:29
How to Improve Video Quality in Zoom Meetings?

Since the usage of Zoom Meetings has increased a lot in the past few years, let us talk a little about this video conferencing tool and zoom recording resolution.

Posted byMax Wales|2024-12-09 10:54:53
Minitool Movie Maker Review and Alternatives

This article is a complete pack of information on MiniTool MovieMaker. Learn about its features, steps, and also its alternatives from one platform.

Posted byMax Wales|2024-12-09 10:55:49