

Bad lighting can ruin a perfect shot, but AI relight After Effects workflows are changing the game in 2026. Traditional masking is slow, but using an AI relight After Effects free tool or professional plugin can reshape your lighting in seconds. Whether you're looking for an AI relight After Effects free download or a pro workflow, this guide covers the best ways to fix flat footage fast.
Part 1. What is AI Relighting and Why It's Changing VFX
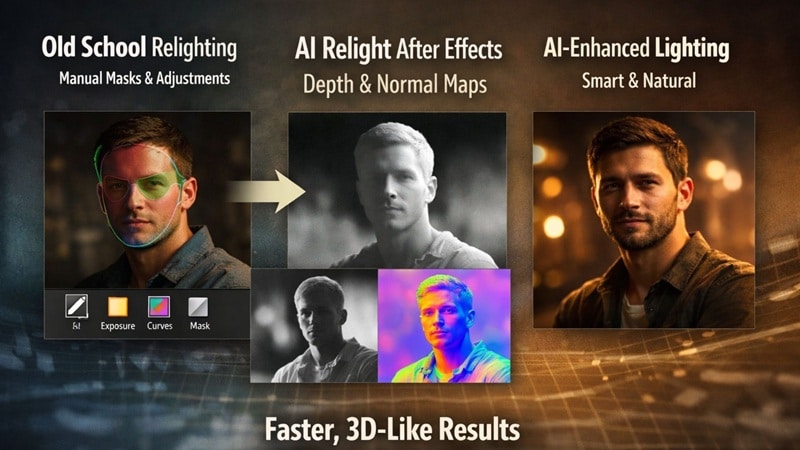
Fixing lighting in After Effects usually means a lot of manual work. You add adjustment layers, draw masks, and keep tweaking until the light looks close enough. It works, but it takes time and a lot of patience.
AI relighting takes a different approach. Instead of treating your footage like a flat image, AI uses depth maps and normal maps to understand where the subject is, what's in the background, and how light should hit different surfaces. That's why the lighting often feels more natural and slightly more three-dimensional, even on normal video clips.
That's why many editors are starting to use AI relight techniques in After Effects, even though there isn't a native AI Relight button yet. Here are a few reasons why AI relighting becomes the favorite:
- Faster Lighting Fixes: Since AI separates the subject and background more accurately, you spend far less time masking and cleaning up edges.
- Better Results on Tricky Shots: Hair, faces, and uneven backgrounds are much easier to handle compared to manual relighting.
- More Time for Creative Work: With less time spent fixing technical issues, you can focus more on mood, style, and storytelling.
Part 2. Top 3 Professional AI Relight Plugins for After Effects (2026)
To be clear, if you want to use AI relight in After Effects, you will need plugins. Like we mentioned, After Effects still does not have a built-in AI Relight feature, so these tools handle the heavy lifting.
Each plugin approaches AI relighting a bit differently. So, we'll recommend some of the most reliable options editors are using right now.
1. Baskl AI Relight: Real Lights, Real Control

- Uses AI depth to make lighting look more natural.
- Easy to use if you already know After Effects.
One time purchase at $129 for a single user license.
- Narrative scenes.
- Controlled studio footage.
2. Beeble SwitchLight: VFX-Grade Relighting Passes

- Extremely realistic relighting.
- Great separation between subject and environment.
Free version available, with paid plans starting at $19 per month.
- VFX-heavy shots.
- Professional compositing workflows.
3. KeenTools GeoTracker: Smart Relighting for Faces and Objects
- Excellent tracking stability so it works well with moving subjects.
- You can bring more lighting color into the scenes in a more natural way.
Free version available, with paid plans starting at $18 per month.
- Talking-head videos.
- Product and close-up relighting.
Part 3. How to Get AI Relight After Effects Free: 3 Legit Download Methods
All the plugins we just talked about are solid options for AI relight in After Effects. But let's be honest, not everyone wants to spend money on plugins right away. If you are editing on a tight budget or just want to test things out first, that is totally fair.
Thankfully, you can still try AI relight in After Effects for free using a slightly different approach. So, let's break them down!
Strategy 1: Plugin Trials and Freemium Downloads
If you look around enough, you will find more than a few AI relight After Effects free download options from aescripts that let you test the plugin before paying. Just keep in mind that trial versions usually come with limits. Some add watermarks, others cap export quality or restrict render time.
Strategy 2: Stable Diffusion + After Effects (Open-Source Route)
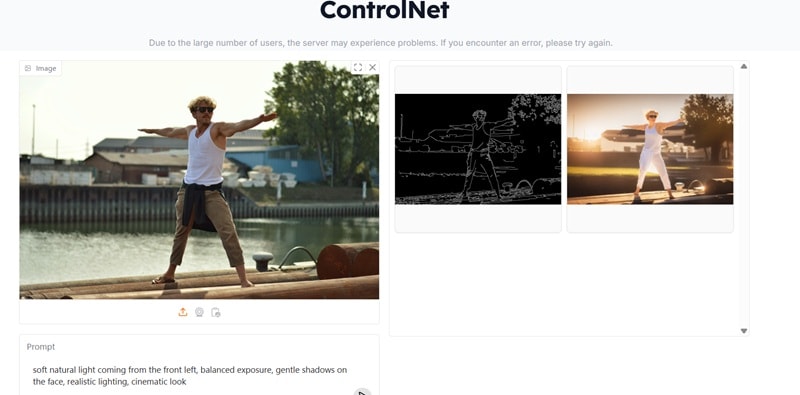
This is another way to try AI relight in After Effects for free, but it works best if you are okay with a bit of setup. You use Stable Diffusion with ControlNet Relight, which helps the AI understand lighting direction and depth. From there, you generate depth or normal maps and bring those files into After Effects to guide your lighting.
Strategy 3: ProductionCrate Community Presets
ProductionCrate offers free height relighting overlays and presets made by the community, and while these are not true AI tools, they still work well for simple lighting improvements in AI relight After Effects workflows. You can drop these presets into your project and make small adjustments to brighten a face, add contrast, or give the scene a more stylized look.
Part 4. Step-by-Step Tutorial: How to Relight Any Video with AI
Now that you understand the concept of AI relight After Effects and how you can get it set up, it's time to actually put it to use. To make things easier, there is a really helpful YouTube tutorial straight from the aescripts plugin team. It walks through how to use AI relight in After Effects in a clear and practical way.
- Start a new project on After Effects and go to File > Import > File.
- Select your video clip and click Open.
- Drag the clip from the Project panel onto the New Composition button so After Effects creates a comp that matches your footage settings.

- Go to the Effects menu.
- Find AI Relight and apply it to your clip.
- Right after applying it, you will usually notice a slight color change. That happens because Light 1 is enabled by default.

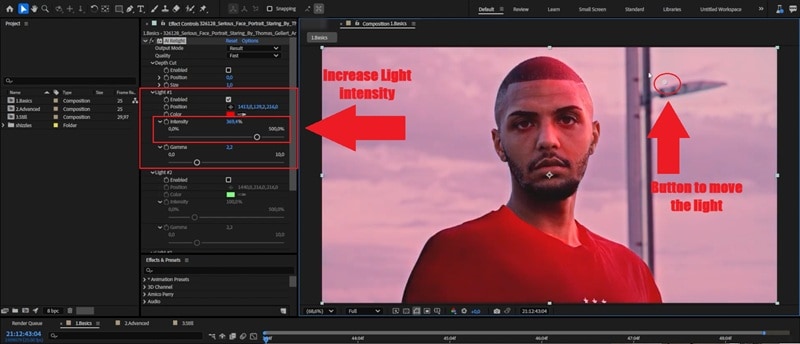
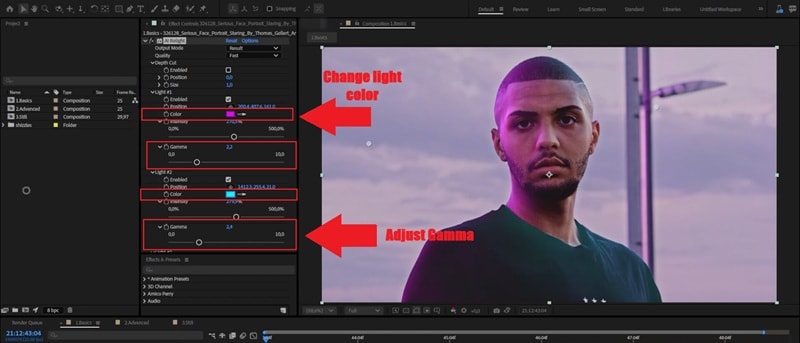
- In the Effect Controls panel, find Light 1 settings.
- Increase the Intensity so you can clearly see what it is doing.
- Move the light around and watch how it follows the natural shape of the subject instead of acting like a flat overlay.
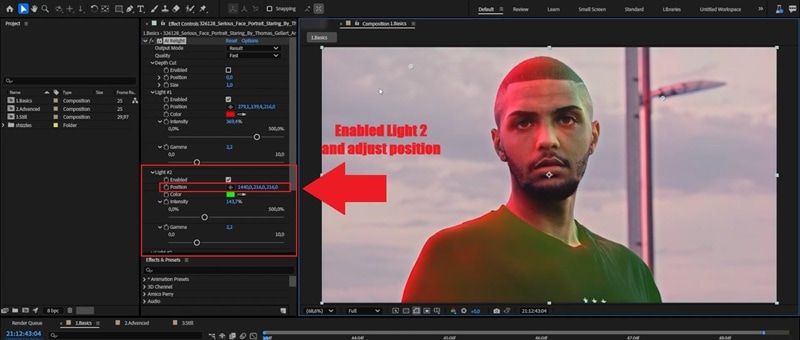
- Enable Light 2 in the same effect controls.
- Place it somewhere different to fill shadows or add extra shape.
Each light has a 3D position, so you can move it left and right, up and down, and also adjust the Z position to push it forward or back.
- Pick a new color for each light if you want a warmer or cooler vibe.
- Warm tones usually help skin look healthier, while cooler tones can give a moodier look.
- Tweak the Gamma so the light fades naturally and does not look harsh.
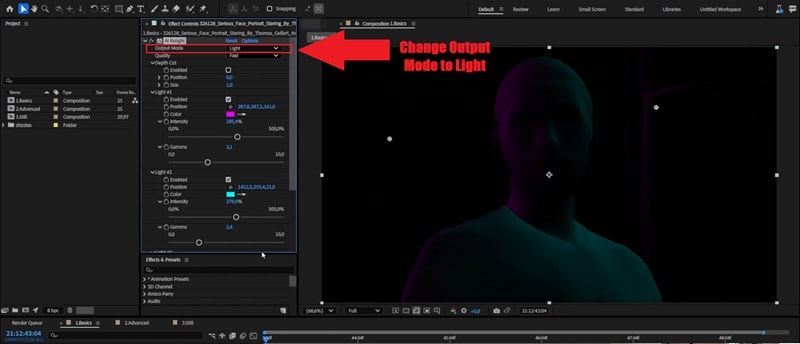
Find Output Mode in the effect controls. Change it to Light. This hides the original footage and shows only what the plugin is generating. Make sure your light placement makes sense.
Start with Fast since it is smooth for previews. Be careful going past Balanced because higher quality increases internal resolution and can hit your GPU hard, which may cause lag or crashes.

Part 5. AI Relight vs. Traditional Relighting: Which Should You Use?
After trying AI relight in After Effects yourself, surely you've noticed the difference from manual relighting. That said, one is not automatically better than the other. Choosing between AI and traditional relighting really comes down to how fast you need to work, how much control you want, and what kind of project you are editing.
To make things easier to compare, here is a quick side-by-side look.
| Aspect | AI Relight | Traditional Relighting |
| Speed | Very fast since AI handles depth and separation | Slower due to manual masks and adjustments |
| Accuracy | More consistent lighting on faces and objects | Depends heavily on skill and time spent |
| Hardware | Needs a decent GPU for smooth performance | Runs well on most systems |
| Setup | Quick once the plugin is applied | Requires more layers and setup |
| Control | Guided by AI with adjustable settings | Full creative control over every detail |
| Price | Often requires paid plugins | Uses built-in After Effects tools |
|
Show More
Show Less
|
||
Part 6. How to Resolve After Effects Crashes Caused by AI Plugins
Using AI relight in After Effects can feel like a big upgrade. Everything moves faster, and the lighting looks better with way less effort. However, AI plugins are heavy, and crashes can happen. This usually shows up when you raise the quality too high or switch to views that show the full 3D shape.

It is frustrating, but the good news is that most crashes are easy to avoid if you work a bit smarter. Here are a few simple things that help keep After Effects stable.
- Watch Your GPU and VRAM Usage: AI relight in After Effects uses a lot of GPU power. If your card runs out of VRAM, After Effects may freeze or crash. Start with lower quality settings and only increase them when needed.
- Work in Low Preview Mode First: While adjusting lights and testing ideas, keep the preview resolution low and stick to Fast quality. This makes the whole editing process feel lighter and smoother.
- Clear Cache and Manage Memory Regularly: After Effects can slow down when the cache piles up. Clearing it from time to time and making sure enough memory is allocated helps keep everything responsive, especially during longer sessions.
- Do Not Stack Too Many AI Plugins: Using multiple AI effects on one clip can overwhelm your system. Try to use one AI plugin at a time and render between steps if needed.
Part 7. A Smarter, Faster Option: Filmora AI Relight
After going through professional plugins, free workarounds, and all the setup that comes with AI relight in After Effects, it becomes pretty clear that the results are solid, but the process can feel heavy. It works best when you have time, the right plugins, and a machine that can handle it. For quicker projects, that same workflow can slow you down more than you want.
While plugins offer power, the setup can be heavy. For a faster alternative, Wondershare Filmora provides a native AI Relight tool that requires no extra downloads. Unlike the AI relight After Effects free download process which involves complex installations, Filmora allows you to adjust cinematic lighting with a single click. It's the perfect balance for editors who want professional results without the After Effects learning curve.
On top of that, you can use Filmora AI Relight in two simple ways, depending on how much time and control you want:
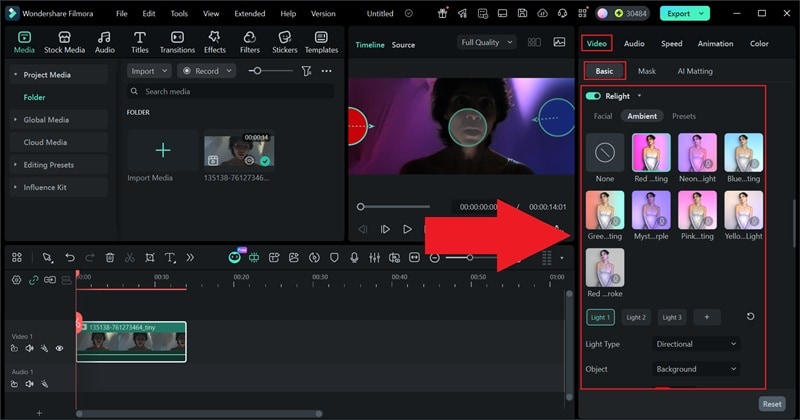
- Preset Templates: One-click lighting options like Basic Front Light or Ambient Color Light. Great for quick fixes, social videos, and short edits.
- Custom Adjustment: Add up to eight light sources and move them around on screen. Adjust color and strength to shape the lighting the way you want.
Key Highlights: Why Filmora Might Be the Better Choice
1. Lighting Fixed in One-Click
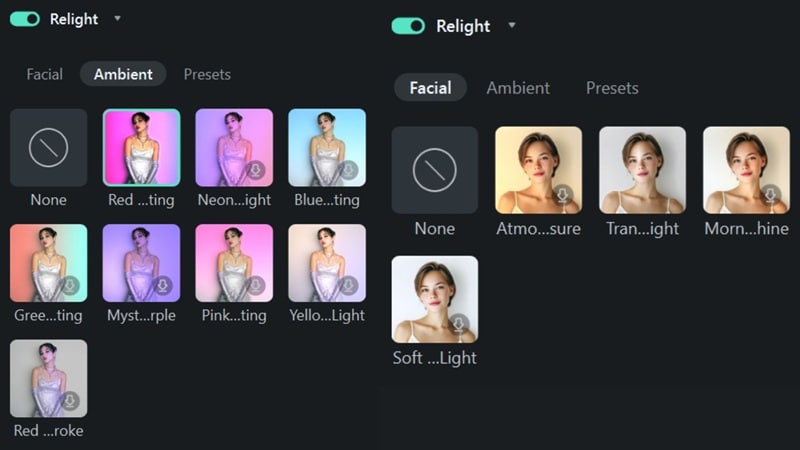
Filmora makes lighting easy with ready-to-use presets like Facial Light and Ambient Color Light. You click once and the scene instantly looks more balanced, which is great for quick edits and social videos.
2. More Control When You Need It
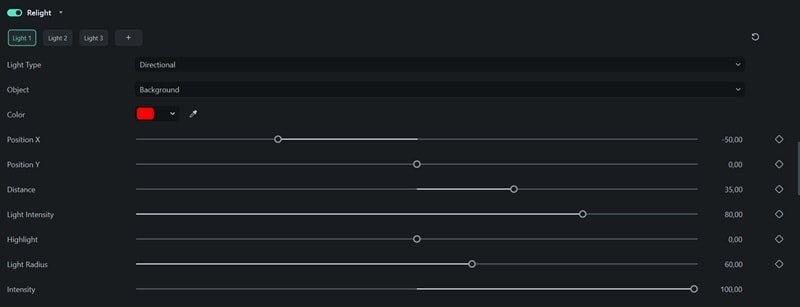
When you want to go beyond presets, you can add up to 8 light sources and adjust their color, position, and strength. It gives you flexibility without turning the process into a chore.
3. Lighting You Can See and Touch
All the lights show up directly on the preview as movable orbs. You drag them around, see the changes right away, and tweak until it feels right. It keeps the workflow smooth and hands on without slowing you down.
How To Access AI Relight In Filmora
Getting to AI Relight in Filmora is very straightforward. Just make sure you are using the latest version of Filmora, then open the app and follow the steps below:
- Import your video and drag it onto the timeline.
- Click the video clip to open the property panel.
- Select Video, then Basic, and scroll down until you find the feature.
- Turn on AI Relight.
- Choose a preset or adjust the lighting until it looks right.
Conclusion
Fixing lighting with AI relight in After Effects can completely change how your footage looks, especially when flat shots need more depth and focus. So, we walked through how AI relighting works, how to use it properly, and even how to try AI relight in After Effects for free using legit methods.
While the results can be impressive, the setup still relies on plugins and stronger hardware, which may not fit every workflow. If you want something more straightforward, Filmora offers a built-in AI Relight feature that keeps everything inside the editor. You can apply lighting presets in one click, fine-tune the look when needed, and move on without slowing down your edit.
For creators who want good lighting without extra setup, Filmora feels like a clean and practical step forward.
