

As a professional video editor, you know that lighting can make or break a shot. DaVinci Resolve AI Relight (part of the Relight FX library) has become a go-to tool for digital relighting without the need for reshoots. Whether you need to fix flat faces or harsh shadows, mastering the Relight DaVinci Resolve workflow is essential for cinematic grading. In this guide, we'll show you how to use this AI-powered tool effectively and introduce a time-saving alternative for those who need pro results fast.
Part 1. Understanding the DaVinci Relight FX: How It Works
Understanding the basic idea behind how relighting in DaVinci Resolve works will make the tool much easier to use and less intimidating. Think of it like this:
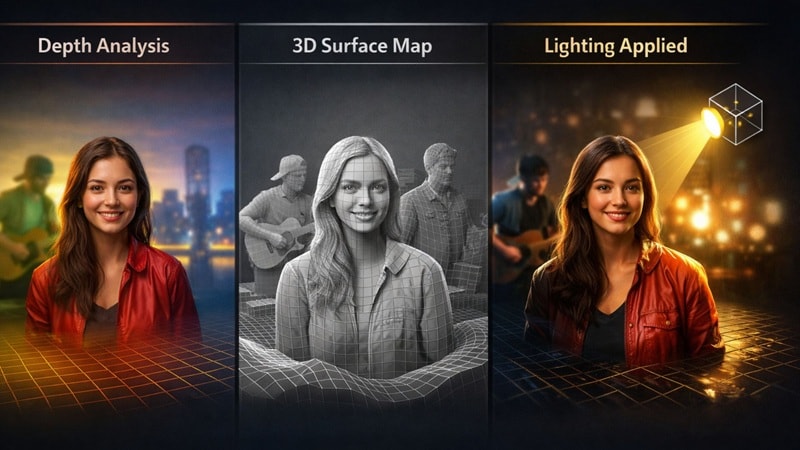
- AI figures out depth first: DaVinci looks at your footage and estimates what is closer to the camera and what is farther away. This helps it tell the subject apart from the background.
- A simple 3D map is created: Based on that depth, DaVinci builds a rough 3D surface map of faces, people, and objects so it understands their shape instead of seeing everything as flat.
- Light is added on top of that map: When you place a light, it reacts to this 3D map. The light falls on faces and objects in a more natural way instead of brightening the whole frame.
That foundation is what makes this feature feel way more natural than simple brightness or contrast tweaks. That said, one thing you should know upfront is that AI relight in DaVinci Resolve is only available in DaVinci Resolve Studio, the paid version. It costs $295, and you will not find this feature in the free edition, so it is something to keep in mind before building your workflow around it.
Part 2. Step-by-Step Tutorial: Relight DaVinci Resolve for Cinematic Looks
The easiest way to get comfortable with relight DaVinci Resolve is to jump in and try it yourself. If you want a clear visual example, there is a straightforward walkthrough on YouTube by Transient Mobile that shows the process in real-time.
Follow along with it to see how AI relight in DaVinci Resolve is actually used to shape light and bring more depth into a shot.
- Download and install DaVinci Resolve Studio on your computer.
- Open your project and switch to the Color page.
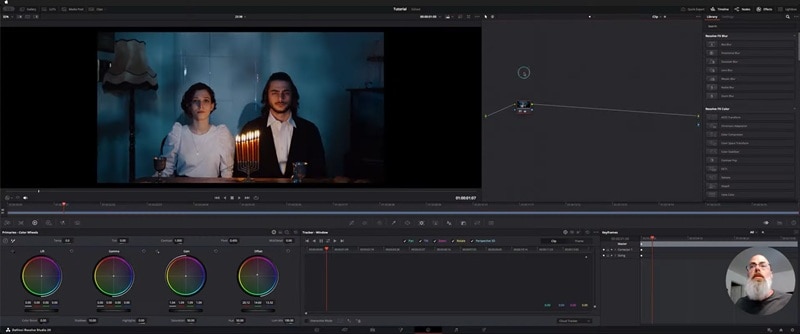
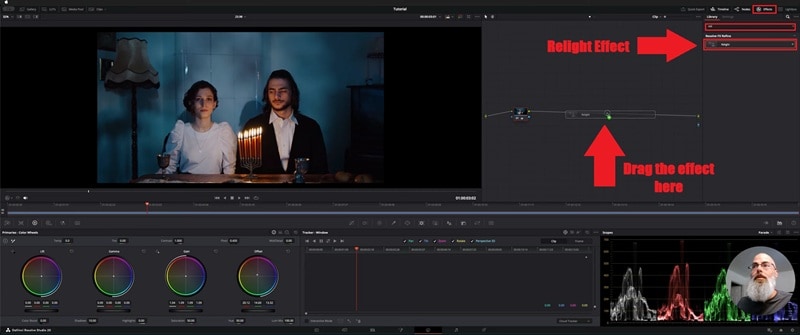
- Open the Effects Library on the Color page and type “Relight” in the search bar.
- Drag the Relight effect onto a new node in your node tree.
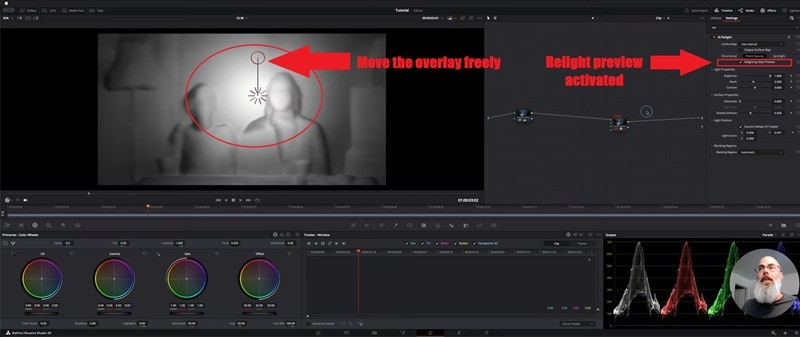
- You will see a depth preview of your clip showing what is closer and what is farther from the camera.
- Bright areas are closer, and darker areas are farther away.
- Move the overlay around to quickly check if the depth looks accurate.
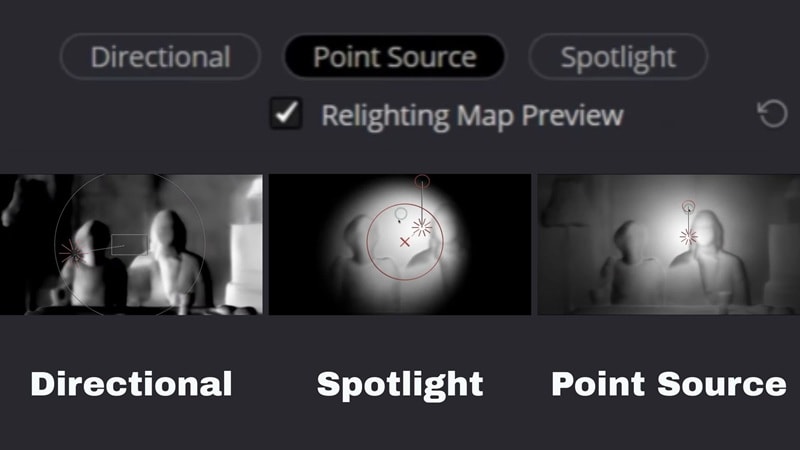
- Directional Light: Simulates distant light sources (like sunlight), perfect for consistent AI relighting across the whole frame.
- Spotlight: Provides a cone-shaped light source, ideal for highlighting subjects in DaVinci Resolve Studio.
- Point Source: Acts like an omnidirectional bulb, adding depth to specific 3D areas of your footage.
- Uncheck Relighting Map Preview once you are done positioning the light.
- Right-click in the node area and choose Add Alpha Output.
- A small blue output dot will appear on the right side.

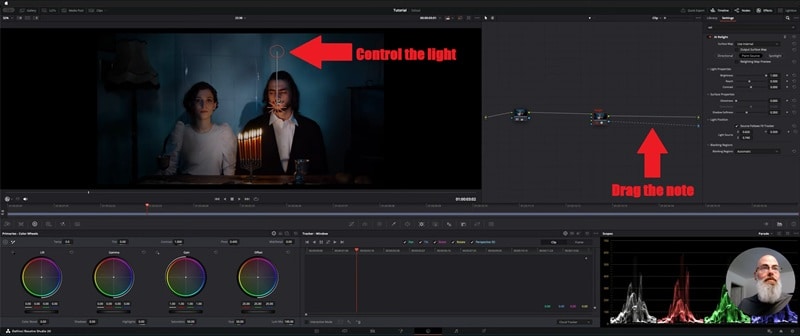
- Drag the arrow from your Relight node to the blue alpha output. The lighting will apply to your image immediately.
- Move the light around and see how it affects faces and objects.
- Adjust brightness, angle, and position until the lighting looks natural.
Part 3. Common Challenges: Why AI Relight DaVinci Resolve Might Fail
After you spend some time using the tool, you start to see both the good and the limits of it. AI relight DaVinci Resolve can look amazing, but it does not always nail the result on the first try. If your lighting feels strange or unnatural, there is usually a clear reason behind it.
So, let's go over the most common things that can cause the feature to fall short so you know what to watch out for:
- Heavy Hardware Demands: The feature leans heavily on your GPU, so if your system is on the weaker side, things can slow down fast or feel laggy during playback.
- Steeper Learning Curve: Relight DaVinci Resolve works best when you understand light direction, contrast, and node workflows. Without that foundation, the results can feel off or frustrating.
- Version Issues: AI relight in DaVinci Resolve only works in the Studio version, and older builds may not support it properly, which can catch some editors off guard.
Part 4. The Best AI Relight Alternative: Why Wondershare Filmora is Faster
While DaVinci Resolve AI Relight is undeniably powerful, its heavy reliance on high-end GPUs and complex node workflows can be a bottleneck for fast-paced creators. If you find yourself spending more time troubleshooting nodes than actually editing, Wondershare Filmora offers a smarter, more efficient way to achieve professional lighting.
Unlike the manual intensity of DaVinci, Filmora's AI Relight is designed for instant impact. It automatically maps the 3D space of your clip to balance exposure, shadows, and highlights with a single click. Whether you're a YouTuber needing a quick face-light boost or a social media editor working on a tight deadline, Filmora delivers cinematic depth without the "Studio Version" price tag or the steep learning curve.
You can use Filmora AI Relight in two straightforward ways:
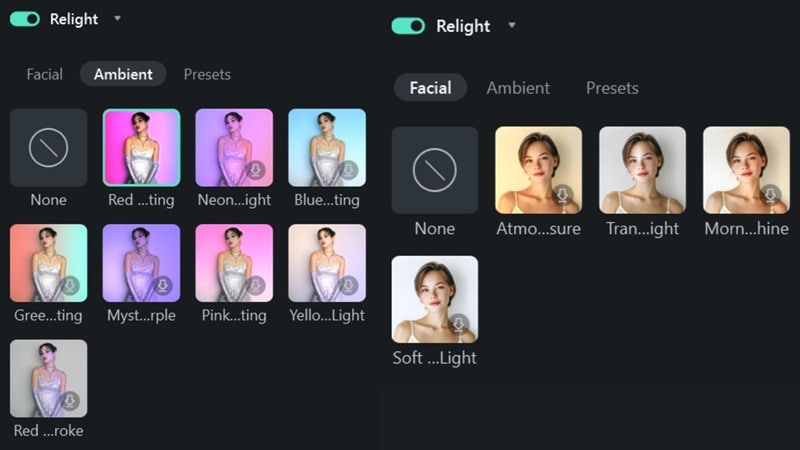
- Preset Templates: One-click options like Basic Front Light or Ambient Color Light. Perfect for quick fixes, short-form videos, and social content.
- Custom Adjustment: Add up to 8 light sources, move them visually on screen, and adjust color and strength to shape the lighting exactly how you want.
What Makes Filmora AI Relight So Easy to Love
1. One-Click to Fix Lighting Issues
Filmora AI Relight is built for speed. With a single click, the AI analyzes your clip and fixes flat lighting, harsh shadows, and dull highlights right away. You get a clean result without wrestling with settings like you often do with AI relight DaVinci Resolve.
2. Real Control Without the Headache
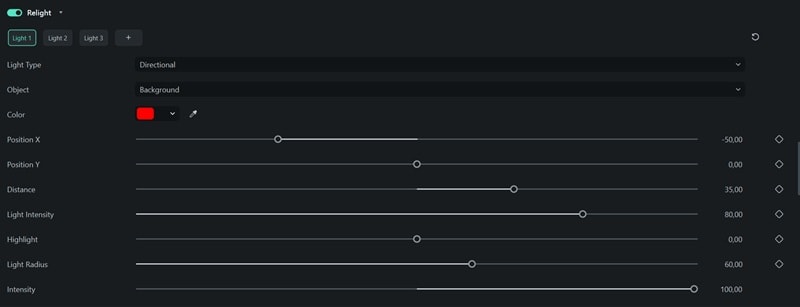
When you want more control, Filmora gives it to you in a simple way. You can add up to 8 lights and adjust their position, color, and strength without digging through complex panels. It feels flexible but never overwhelming.
3. Adjust Everything Directly on the Video
Lights appear as clear orbs right on the preview screen, so you move them exactly where you want. What you see is exactly what you get, which makes the whole process feel fast and natural.
How to Find and Use AI Relight in Filmora
Turning on AI Relight in Filmora is quick and easy, even if you are new to video editing. As long as you are using the latest version of Filmora, you can have it running in just a few clicks, without the complexity you often see in AI relight DaVinci Resolve.
Just follow the steps below:
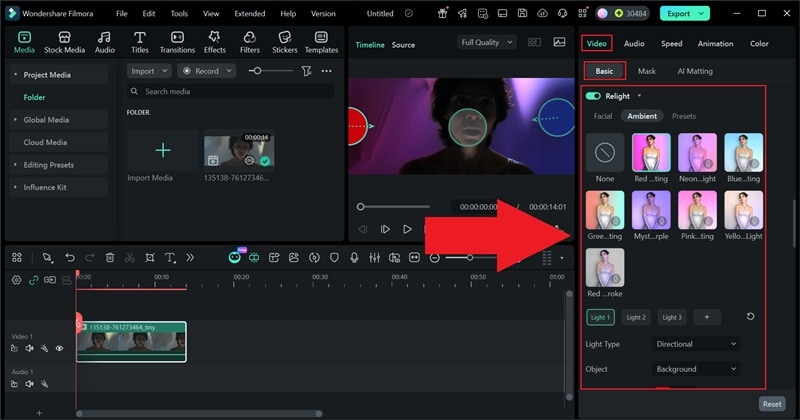
- Import your video and place it on the timeline.
- Click on the clip so the settings panel opens.
- Go to Video, choose Basic, and scroll down to find AI Relight.
- Switch it on and pick a preset or fine-tune the lighting until it feels right.
Part 5. DaVinci Relight vs. Filmora AI Relight: Which One Should You Choose?
At this point, you have seen how both tools handle lighting, and honestly, it mostly comes down to how you like to edit. Some people enjoy digging into details and shaping every light by hand, while others just want their footage to look good fast.
To make things clearer, here is a side-by-side look at DaVinci relight and Filmora AI Relight so you can see where each one really shines.
| Feature | DaVinci Relight | Filmora AI Relight |
| Learning Curve | Takes time to learn, especially if you are new to nodes and color work | Very easy to pick up with almost no setup |
| Lighting Control | Mostly manual adjustments that rely on your lighting knowledge | AI-driven automation with optional manual tweaks |
| Hardware Needs | Heavy on GPU and works best on powerful machines | Runs smoothly on most modern computers |
| Editing Speed | Slower workflow due to detailed setup | Fast results with just a few clicks |
| Best Use Cases | Professional color grading and cinematic projects | Social content, YouTube videos, and quick edits |
|
Show More
Show Less
|
||
Part 6. Creative Tips for Better Video Lighting in 2026
No matter if you use AI relight in DaVinci Resolve or something simpler like Filmora, good lighting habits always make a difference. These tools can help a lot, but they work best when you meet them halfway.
Keep these tips in mind, and your footage will almost always look better:
- Start with Clean Footage First: Before you touch AI relight DaVinci Resolve, fix basic exposure and color. A balanced clip gives the relighting tool something solid to work with, and the result always looks more natural.
- Keep Your Adjustments Gentle: Small lighting changes usually feel more real than heavy ones. Subtle tweaks blend into the scene instead of screaming that the lighting was fixed in post.
- Use a Soft Edge Light for Separation: Adding a little light around the edges of your subject helps them pop from the background. It adds depth without making the shot feel fake or overdone.
- Stick to the Original Light Direction: If the light was coming from one side when you filmed, keep it consistent. Matching the original setup keeps the scene believable.
- Check on Different Screens: Lighting can look different on phones, tablets, and monitors. A quick check across devices helps you catch issues early and avoid surprises later.
Conclusion
AI relight in DaVinci Resolve is a powerful tool that can seriously improve lighting after a shoot, especially once you understand the core idea behind it. So, we break down the concept behind DaVinci relight and show how to use it properly. After trying it out, the results can look great, but you will also notice its limits, from heavier hardware needs to a more hands-on workflow.
That is where Filmora steps in with a simpler approach to AI relighting that focuses on speed and ease without sacrificing good results. Unlike relight DaVinci Resolve, Filmora AI Relight leans more on automatic adjustments and visual controls, making it easier to get clean lighting fast. Don't let complex workflows dim your creativity. If you're looking for a DaVinci Resolve alternative that prioritizes speed without sacrificing cinematic quality, Download Wondershare Filmora today and experience the future of AI-driven relighting.
FAQs
-
Is AI Relight available in the free version of DaVinci Resolve?
No, the AI Relight FX is a feature exclusive to DaVinci Resolve Studio (the paid version). If you are using the free edition, you will need to upgrade to access this neural engine-powered tool. Alternatively, you can use Wondershare Filmora, which offers AI Relight features with an intuitive interface and more flexible pricing.
-
Why is DaVinci Resolve AI Relight so slow on my computer?
The Relight FX heavily relies on your GPU to generate 3D depth maps and process real-time light physics. For smooth playback, a high-end graphics card with at least 8GB of VRAM is recommended. If your hardware is struggling, Filmora AI Relight is a great optimized alternative that provides cinematic lighting effects even on standard modern laptops.
-
How does AI Relighting differ from traditional brightness adjustments?
Unlike simple brightness tweaks that wash out the entire image, AI Relight uses neural networks to understand the geometry of the scene. It allows you to add virtual lights that react to the contours of faces and objects, creating realistic shadows and highlights that mimic physical on-set lighting.
-
Can I use AI Relight for color grading in DaVinci Resolve?
Yes! AI Relight is an excellent tool for shaping the mood during the color grading process. By using it in a node-based workflow, you can isolate subjects and guide the viewer's eye. For those who find node workflows too complex, Filmora's visual light orbs allow you to drag and drop lighting directly on the preview screen for faster color shaping.
