
 100% Security Verified | No Subscription Required | No Malware

Want to learn how to upload videos to YouTube? Millions of people watch YouTube every day. Creating and posting YouTube videos can be a lot of fun, and if you get a lot of views and become popular, you can also make money. YouTube videos are a creative way to connect with people worldwide.
These simple steps can assist you in learning how to upload YouTube videos from a desktop computer. You are going to Learn:
In this article
Part 1: 🎬 Essential Guidelines for Uploading Videos to YouTube
Before uploading videos to YouTube in 2025, it's essential to understand the platform's current specifications and best practices to ensure your content reaches and resonates with your target audience. Here's an updated guide:
1. Video Length and File Size
- Default Upload Limit: Unverified accounts can upload videos up to 15 minutes long.
- Extended Uploads: To upload videos longer than 15 minutes, verify your account via phone number. Verified accounts can upload videos up to 12 hours in length or up to 256 GB in size, whichever is less.
2. Video Resolution and Aspect Ratio
- Supported Resolutions: YouTube supports a range of resolutions from 240p to 8 K.
- Recommended Resolution: For optimal quality, upload videos in at least 1080p (1920x1080 pixels).
- Aspect Ratio: The standard aspect ratio is 16:9. To avoid letterboxing or pillarboxing, ensure your video matches this ratio.
3. Frame Rate and Bitrate
- Supported Frame Rates: YouTube supports frame rates between 24 and 60 frames per second (fps).
- Recommendation: Use higher frame rates (e.g., 60 fps) for fast-motion content, such as sports or gaming videos.
- Bitrate Recommendations: 8 Mbps(For 1080p at 30 fps); 12 Mbps(For 1080p at 60 fps); 35-45 Mbps(For 4K at 30 fps).
4. Video Format and Codecs
- Preferred Formats: MP4 is the recommended format, using the H.264 video codec and AAC audio codec.
- Other Supported Formats: YouTube also accepts formats like MOV, AVI, WMV, FLV, 3GPP, MPEG-PS, WebM, and DNxHR.
5. Metadata Optimization
- Title: Craft a concise, descriptive title incorporating relevant keywords to improve searchability. Keep your title under 70 characters to prevent truncation.
- Description: Provide a detailed overview of your video content, including pertinent keywords, timestamps, and links to related content or external resources. Place important information and links within the first three lines to ensure visibility before the 'Show More' cutoff.
- Tags: Use relevant tags to help YouTube understand your video's content and context, aiding in accurate categorization and discoverability.
6. Additional Tips
- Thumbnails: To attract viewers' attention, design custom thumbnails with a resolution of 1280x720 pixels (16:9 aspect ratio).
- Captions and Subtitles: Adding captions can enhance accessibility and viewer engagement, especially for non-native speakers or the hearing impaired.
- End Screens and Cards: Utilize these features to promote other videos, encourage subscriptions, or direct viewers to external links.
- Content Guidelines: Ensure your content complies with YouTube's Community Guidelines to avoid removal or penalties.
Part 2: How to Upload YouTube Videos from Desktop, iPhone, or iPad
Want to share your content with the world? Uploading videos to YouTube is easier than you think—whether you're using a desktop or a mobile device. Whether you're editing on a computer or capturing moments on your iPhone or iPad, knowing how to upload a YouTube video efficiently is key to growing your channel. In this guide, we'll walk you through how to upload YouTube videos on desktop and step-by-step instructions for uploading from your iPhone or iPad, so you can start reaching your audience anytime, anywhere.
How to Upload YouTube Video on Desktop:
Step 1: Sign in to YouTube Studio
Navigate to YouTube Studio and sign in using your Google account credentials. Ensure you're signed into the correct account, especially if you manage multiple channels.

Step 2: Click the 'Create' Button
In the top-right corner, click the Create button (camera icon with a plus sign) and select Upload videos from the dropdown menu.
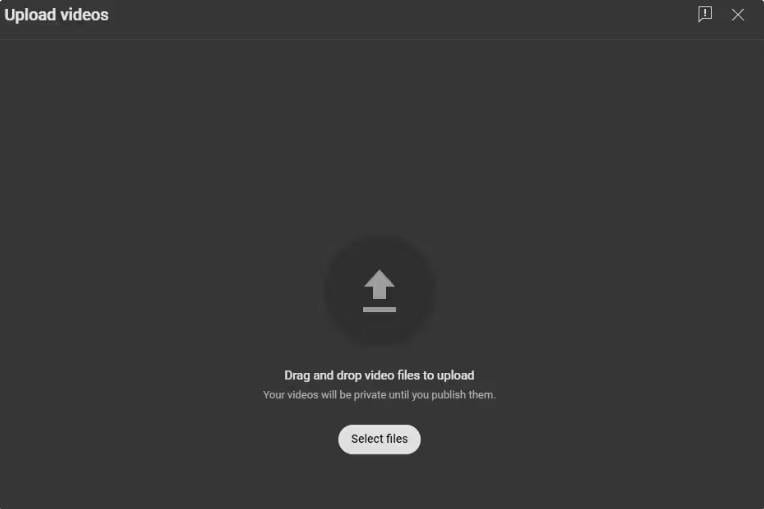
Step 3: Select Your Video File
Drag and drop your video file into the upload window or click Select Files to browse and choose the file from your computer. You can upload up to 15 videos simultaneously.
Step 4: Manage the upload
While the video uploads, fill in the following:
- Title: Keep it under 100 characters.
- Description: Summarize the content and include relevant keywords.
- Thumbnail: Upload a custom image or select from auto-generated options.
- Playlist: Add to an existing playlist or create a new one.
- Audience: Indicate if the video is made for kids to comply with COPPA regulations.
Step 5: Set Visibility
Choose who can view your video:
- Public: Accessible to everyone.
- Unlisted: Only viewable by those with the link.
- Private: Only you and selected users can view.
- Scheduled: Set a future date and time for the video to go live.
Step 6: Finalize and Publish
After setting the visibility, click Save or Publish to complete the upload process. YouTube will process the video, which may take time depending on the file size and resolution.
How to upload a video to YouTube from iPhone or iPad

Are you ready to start on that big adventure and share your videos on YouTube? Follow these steps to learn how to upload a video to YouTube from your iPhone.
Method 1: Upload using the YouTube iOS app
Using the YouTube app is the simplest way to upload your YouTube videos. The YouTube app should be installed on your iOS device.
- Launch the YouTube app on your device, then sign in to your account. If you don't have an account yet, you will need to "Sign up" for a new one before continuing the upload process.
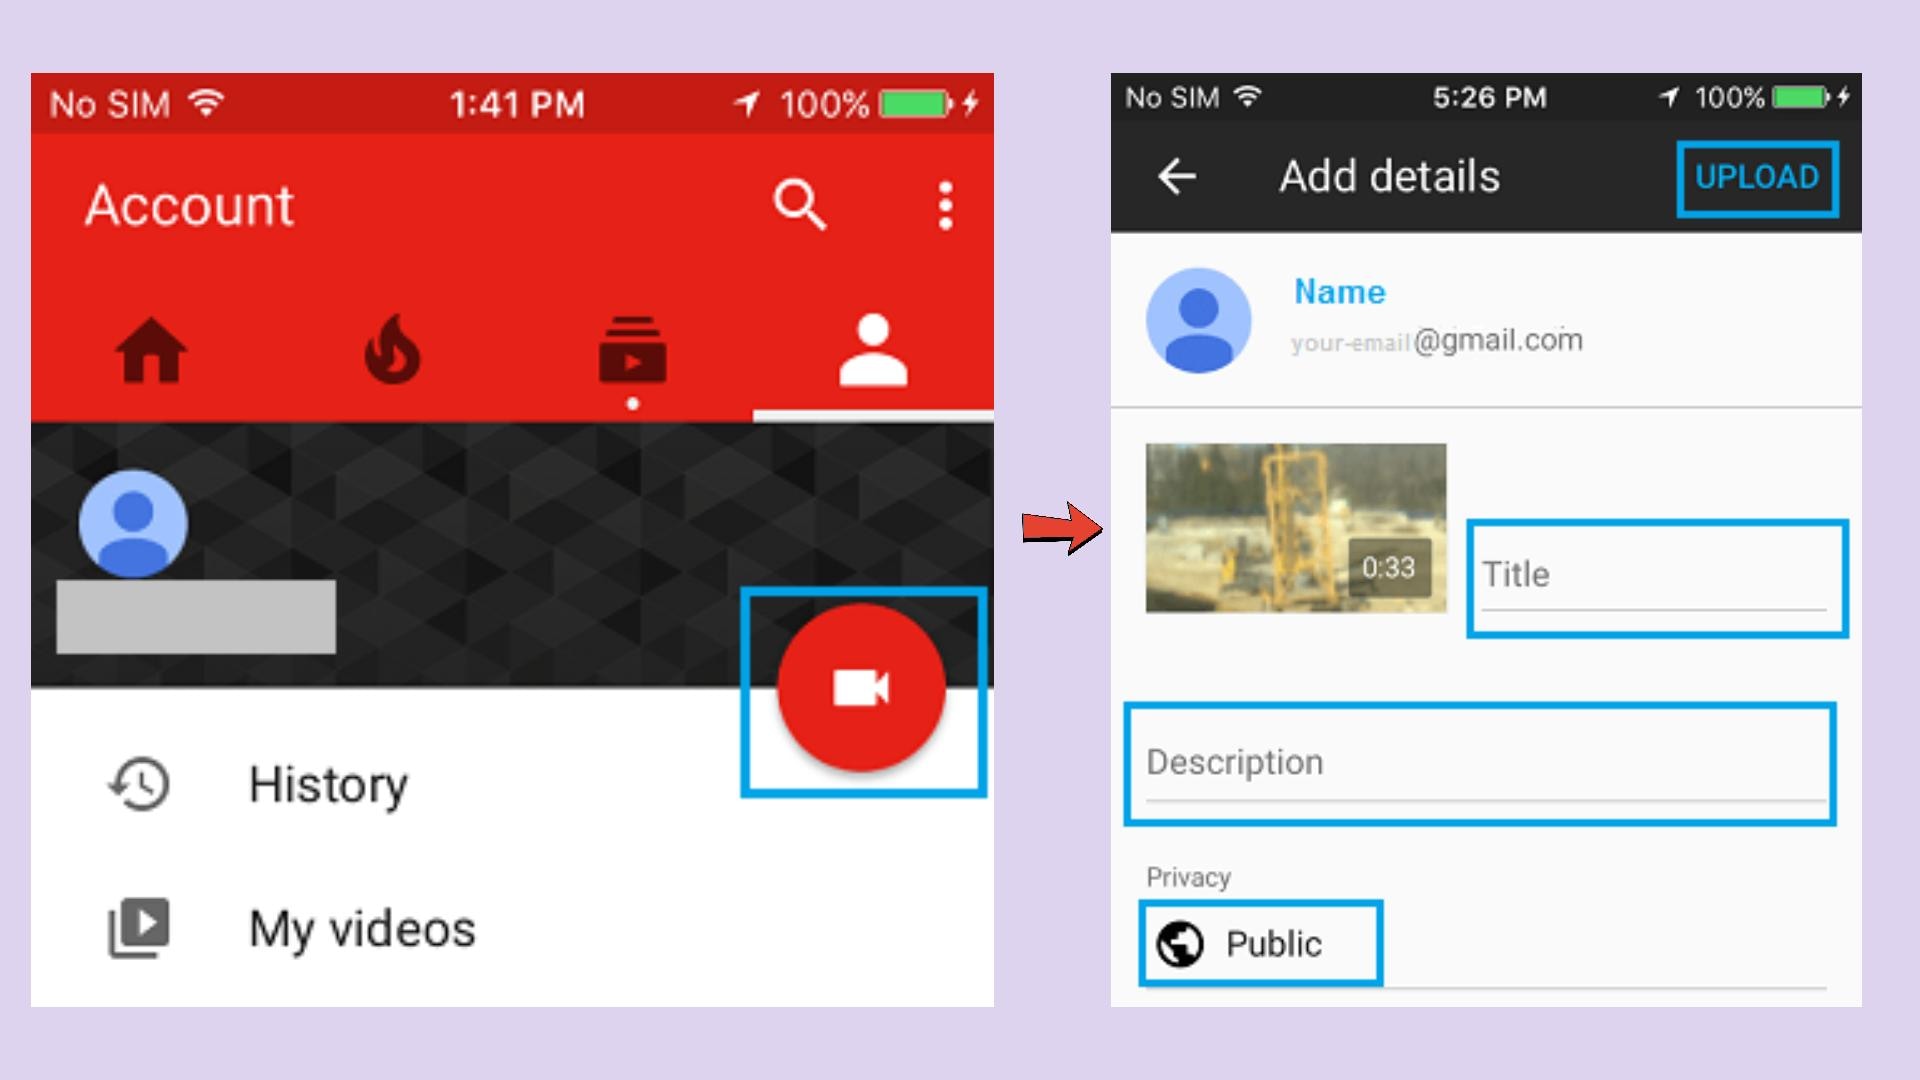
- Click on the "+" icon found at the bottom of the screen.
- Then choose the "Upload a video" option from the populated list of options.
- Check out the pop-up that appears and "Allow access" to it.
- Edit your video to your preference by trimming or cropping as you desire. Then click on the "Next" option.
- Add "title and description" to your video. Remember, the title should contain less than 100 characters and the description no more than 500 characters.
- Then set the visibility mode as "Public" to enable you to share your video over the internet.
- Click on the "Upload" button to finally upload your video to YouTube.
Method 2: Upload using Photo App
The Photo App has a "Share" option that you can use to upload your videos to YouTube. Here is the guide.
- Go to your iOS device and tap on the "Photos" app.
- Tap on the "Videos Folder" to locate the video you wish to upload to YouTube.
- Tap on the video that you want to upload.
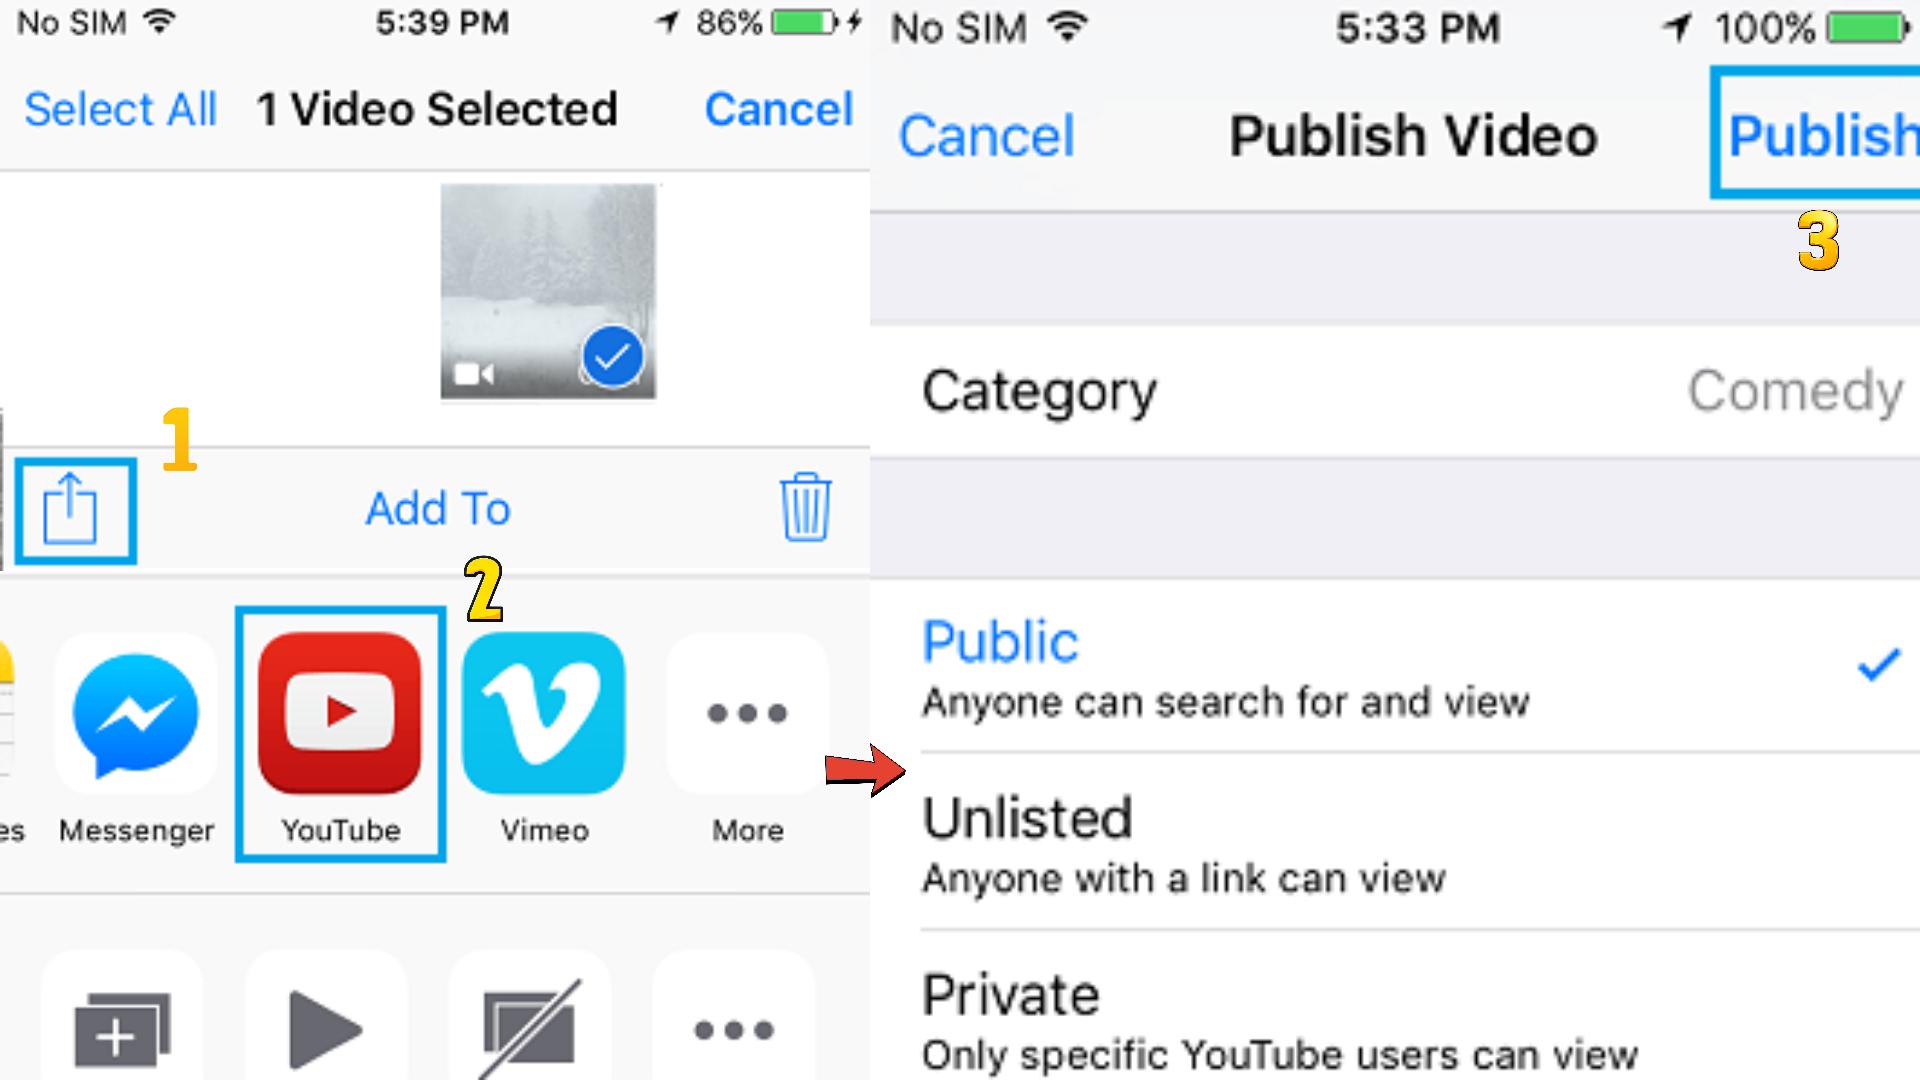
- Tap on the "Share" icon located at the bottom left of your iOS device screen.
- A "Share" menu will appear, offering various options to share your video.
- Choose the "YouTube" option. Make sure you're signed in to your Google Account to proceed.
- Provide a "Title" and "Description" for your video, then set the "Privacy" to "Public."
- Tap the "Publish" button in the top-right corner of the screen to make your video viewable by the public.
Method 3: Upload video to YouTube using Safari
Safari is another alternative method to upload a video to YouTube.
Step 1. First, go to "youtube.com" on Safari and sign in.

Step 2. Then tap on the "account" icon at the top right side of the screen.
Step 3. Hit on the "Upload" icon and wait to be redirected to the YouTube Studio desktop site.
Step 4. Click on the "Select Files" option.
Step 5. Choose the video you wish to add to YouTube from the "Photo" library and tap on the "Add" button.

Step 6. Add your video's "title and description" and hit the "Next" button.
Step 7. Tap on the "Next" button once more to go to the "Visibility" page.
Step 8. Select the "Public" option to upload your video to the public.
Part 3: How to Edit Uploaded/ Published YouTube Videos
Let me walk you through a familiar situation, you spend all night trying to make your video perfect, uploaded it on your YouTube channel and shred it to your social media accounts. Then you noticed that you need to repair something. The normal approach back then is to delete the video, re-edit using offline tools and then re-upload it again. Clearly, this process takes too much time. Furthermore, it changes the ID of your video which means that the previous embed will no longer work.
Note: Under this situation, you can't add more footage or effects to the existing videos.
1. Sigin in
The first thing you need to do to edit uploaded/published YouTube videos is to sign-in with your Google account.

2. Locate the video you want to edit
After signing-in, you now have the option to view all your uploaded videos. Go My Channel > Choose YouTube Studio (it's a beta version right now).

Click the "Videos" button, and you will see all your uploaded videos here. Choose the one you want to edit

3. Edit YouTube videos
Click on the video you want to edit, and you can see all the info about this video, including title, description, visibility, etc. Choose "Editor" at the left side of the interface, and you will be led to the YouTube video editor's interface, You can now trim the existing YouTube video by dragging the sliders on the timeline.
- Superb video stabilization with low distortion.
- Vast video/audio effects and creative assets.
- Powerful AI for effortless content creation.
- Intuitive, professional yet beginner-friendly.
- Works on Mac, Windows, iOS, and Android.


4. Save
After you are happy with your edited video, you can now click save.
Note: In case you are not happy with the video that you edited, you can always revert back to your original video. Videos with more than 1,000 views will be saved as a new video after the editing. You may also add notes and annotation to your Videos. This annotation may appear alongside with the video depending on the time that you want it to appear.
Conclusion
Now that you've learned how to upload and edit YouTube videos from both desktop and mobile devices, you're ready to take your content to the next level. Whether you're sharing a vlog, tutorial, or promotional clip, mastering these essential steps ensures your videos look polished and reach your audience with impact.
Don't just upload—optimize. Take advantage of video descriptions, titles, tags, and editing tools to enhance engagement and grow your channel. Start creating and sharing with confidence—your next viral video is just a few clicks away!
 secure download
