One video editing technique that many people are not very familiar with is keyframe interpolation. This technique is vital for making animations look realistic and flow better, as it smooths out the transition between keyframes by generating intermediate frames. Adobe After Effects, a widely used professional tool, excels at keyframe interpolation.
By understanding keyframe interpolation in Adobe After Effects, you can elevate your motion graphics by adding realism to your animations and significantly speeding up your workflow. So, let's dig right into it and break down the concepts of keyframe interpolation and its various types.
In this article
Part 1. Basic Concepts of Keyframe Interpolation
To understand keyframe interpolation, you first need to know about keyframes. Keyframes mark the start and end points of a change in an animated object's properties, like position, rotation, scale, and opacity. And interpolation fills in the values between these keyframes, creating smooth transitions and movements.
To put it simply, keyframe interpolation is a technique that makes animated characters or objects move smoothly from one position to another. It's like drawing a character jumping and then drawing it landing. By adjusting the interpolation method, you control how an object moves or changes over time, thus making the animation look more realistic.

Keyframe interpolation makes animation easier by reducing the need to adjust each frame manually. It's crucial for animators and designers to help create smooth movements, transitions, and effects, and offer the flexibility to realize their creative ideas.
Although all keyframe interpolation methods used by After Effects are based on the Bezier interpolation method, there are several keyframe interpolation techniques available for animators. These include linear, auto bezier, continuous bezier, bezier, and hold.
Linear Interpolation: This is the most straightforward type of interpolation. It creates a constant, straight-line transition between two keyframes. For instance, if you animate an object moving from one side of the screen to the other, linear interpolation will ensure it travels at a steady speed.
Auto Bezier Interpolation: This method uses smooth curves to adjust movement between keyframes, automatically adding ease-in and ease-out effects. It's useful for animations where objects start and stop suddenly or for animating characters walking or running.
Continuous Bezier Interpolation: This method offers greater control over the motion path by letting animators manually adjust the Bezier curve handles. This technique of interpolation is ideal for animating complex motions like a character's intricate dance moves or a camera smoothly panning across a scene.
Bezier Interpolation: This method offers the highest level of control by allowing you to manually adjust the shape of the value graph or motion path segments around each keyframe. This enables highly customizable and smooth transitions with varied acceleration and deceleration rates. For example, if animators want to create intricate animations such as a character's expressive gestures or a complex object trajectory, this type of interpolation is perfect for it.
Hold Interpolation: Hold interpolation keeps a property's value constant until the next keyframe is reached, with no intermediate changes or transitions. This technique is ideal for animators to use where a character pauses mid-action before transitioning to a new pose or for displaying a static message before it changes to the next one.

Part 2. Spatial and Temporal Interpolation in After Effects
Adobe After Effects interpolation not only affects how properties change over time but also how they move through space. Understanding both spatial and temporal interpolation is crucial for creating smooth and realistic animations. Here's a closer look at each:
1. Spatial Interpolation
As the name suggests, this interpolation deals with how an object moves through space between keyframes. It determines the path that an animated object follows. In After Effects, spatial interpolation techniques help control the trajectory and smoothness of an object's movement across the screen. Key options include:
Linear Spatial Interpolation: This creates a straight path between keyframes, resulting in uniform movement. For example, if you animate a ball rolling in a straight line across the screen, linear spatial interpolation will make it move at a constant speed without any deviation.
Bezier Spatial Interpolation: This provides greater control over the path by adjusting Bezier handles, creating smooth, curved trajectories. For example, if you animate a character walking along a curved path, Bezier spatial interpolation will allow you to fine-tune the path's curvature, making the movement appear more natural and fluid.
2. Temporal Interpolation
Meanwhile, temporal interpolation refers to how the values of a property change over time between keyframes. It focuses on the rate of change and the timing of animations. Temporal interpolation techniques help manage the speed and smoothness of transitions.
The main difference between spatial and temporal interpolation is that spatial interpolation involves only two keyframe techniques, while temporal interpolation encompasses all types of keyframe interpolation techniques.
Linear Temporal Interpolation: Creates a constant speed between keyframes, with no easing.
Auto Bezier Temporal Interpolation: This automatically smooths transitions with ease-in and ease-out effects. For example, if you animate a ball bouncing, auto bezier interpolation will make the ball start slowly, speed up in the middle of the bounce, and then slow down as it reaches the peak of its arc.
Continuous Bezier Temporal Interpolation: This offers smooth, customizable transitions by allowing manual adjustment of Bezier handles. For example, if you animate a character's arm swinging, continuous bezier interpolation lets you adjust the movement’s acceleration and deceleration to create a more natural swinging motion.
Bezier Temporal Interpolation: Offers precise control over acceleration and deceleration with fully adjustable Bezier curves.
Hold Temporal Interpolation: This keeps a property's value constant until the next keyframe, resulting in abrupt changes or pauses. For example, if you animate a character blinking, hold interpolation will keep the eyes closed between blinks and then abruptly switch to open, creating a distinct pause.
Besides the keyframe interpolation techniques discussed, other factors like frame rate, easing curves, and timing can also impact the smoothness of an animation. Animators need to consider these elements to ensure their animations are fluid and seamless.
Part 3. Alternative to Keyframe Interpolation: Wondershare Filmora
In video editing, there's a technique called Frame Interpolation that works similarly to keyframe interpolation in After Effects. It helps make your video look smoother by creating new frames between existing ones. This technique analyzes the motion in your video and fills in the gaps, making movements look more fluid and continuous.
Frame Interpolation can be found in video editing software like Wondershare Filmora. With its AI Frame Interpolation, you can make any videos smoother by automatically creating extra frames as it gives a more seamless and fluid transitions. It's especially useful for slow-motion effects or improving the look of fast-moving scenes.
Filmora also supports a range of video formats including MP4, MKV, WEBM, MOV, and GIFs. You can resize your video before or after interpolation, and it guarantees a smooth export process with high-quality, lossless video.
You can access Filmora on both Windows and MacOS, and it's notably more affordable than other video editing software with similar advanced features like After Effects. You can begin with a free version, and subscription plans start at just $9.99/month or $29.99/year. It’s a cost-effective solution for those seeking high-quality interpolation tools without the high price tag.
Here's a step-by-step guide on how to use the AI Frame Interpolation feature in Filmora:
Step1Open Filmora and upload your video
Make sure you have the latest version of Wondershare Filmora. Once you've finished completing the download process, double-click to open the program and click the "New Project" button on the main menu.
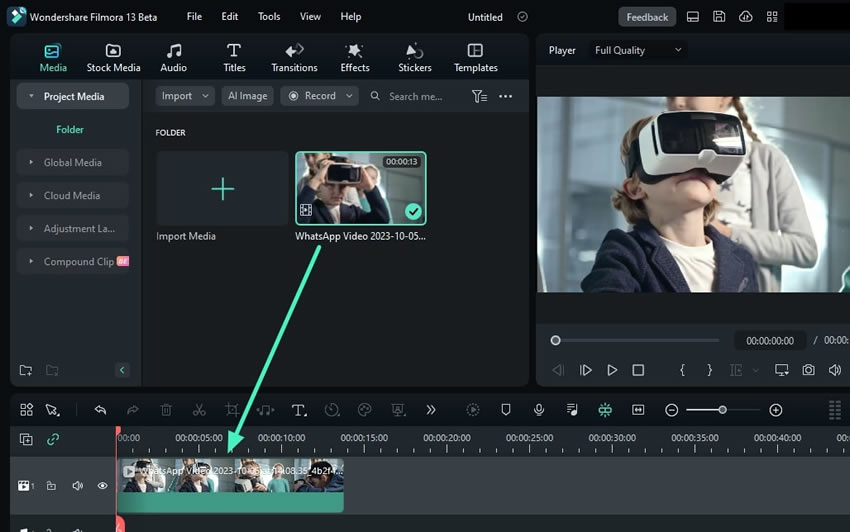
To upload your video, simply go to Media > Project Media and click the "Import" button. Once your video is uploaded, drag it to the editing timeline.
Step2Use the AI Frame Interpolation feature
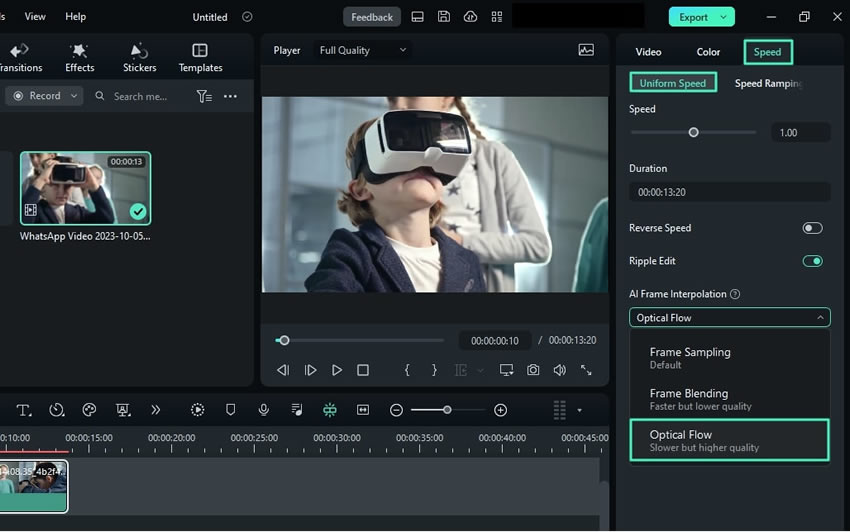
To use the AI Frame Interpolation feature, go to the "Speed" tab on the right settings panel. Select "Uniform Speed," and you'll see the "AI Frame Interpolation" options below.
If you want to make your video have fast-moving scenes, choose "Frame Blending", though it will have a lower quality. But if you want to add slow-motion effects, choose "Optical Flow" instead.
Step3See the results after exporting your video
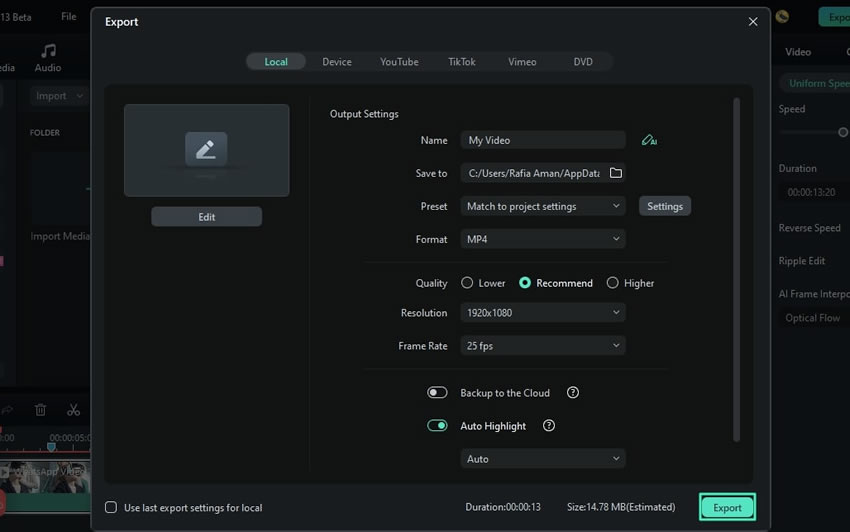
To see the final results, you need to save your video by clicking on the "Export" button in the upper right corner of the screen. Name your video and choose where to save it. Once you’re finished, click "Export" and then play your video to view the effects you applied.
Tip: Using Filmora's keyframing feature
In addition to AI Frame Interpolation, Filmora also includes a Keyframing feature, which provides similar effects to keyframe interpolation in After Effects. Keyframes let you set values at specific points to create smooth animations over time.
Step1Upload and add video to the timeline
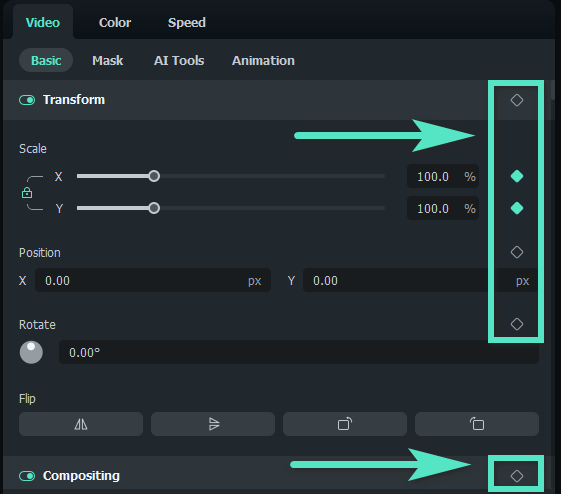
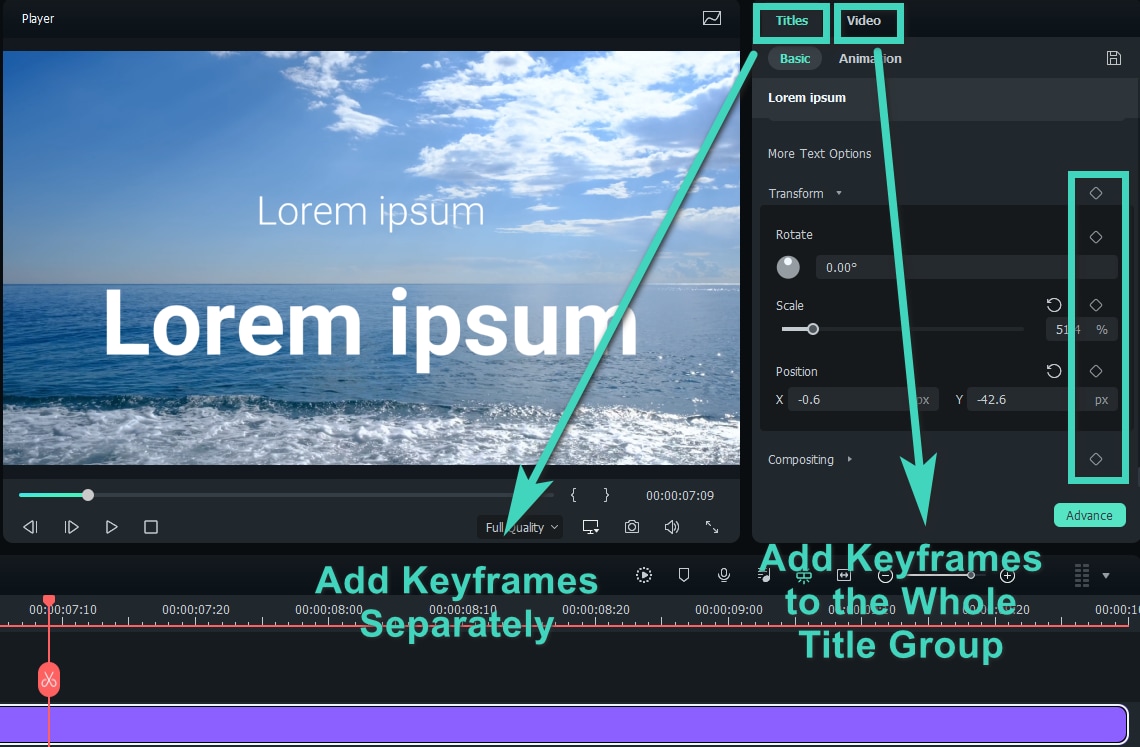
To use the keyframing feature, upload your video and add it to the editing timeline. Click the diamond keyframe icon in the timeline toolbar, or go to Video > Basic and click the diamond icon to set a keyframe. Move the progress bar to where you want to add the start keyframe.
Step2Edit keyframes by adjusting parameters
The next step is to adjust the parameters. You can modify them in the property panel or directly on the video. Drag the slider, change the values, or apply features to suit your needs.
With keyframes, you can adjust video settings like Transform, Compositing, AI Tools, and Animation. Animate entire title groups or individual elements, set keyframes for various effects, including OpenFX, and explore Filmora's effects library. You can also use keyframes to customize animations for stickers and split screens.
Step3Add other keyframes
To activate the animation feature, add at least two keyframes with different settings to your clip. Without this, the effect will stay the same throughout the video.
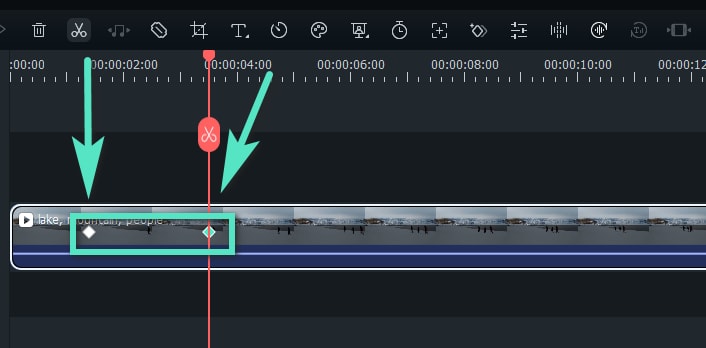
After setting the first keyframe, you'll see a diamond icon on the timeline. Drag the progress bar to a new point to add another keyframe, marking either the end of the animation or a different effect. Adjust the parameters as needed.
Step4Save changes
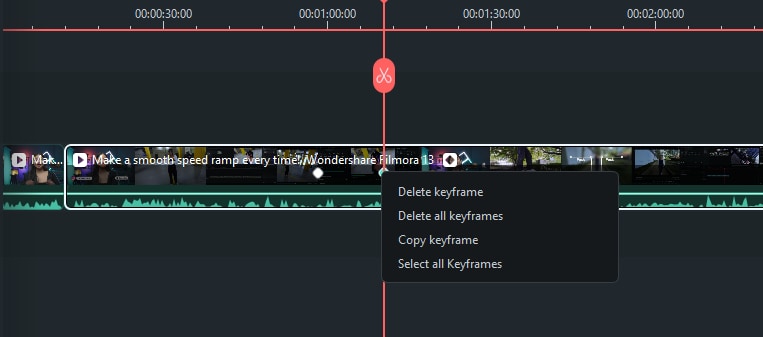
If you made a mistake and want to delete a keyframe, right-click the diamond icon on the clip. When the icon turns yellow, choose "Delete Keyframe" or "Clear All Keyframes."
After adding and editing your keyframes, click "Ok" to save. The system will then analyze the changes between keyframes and export the effect with smooth transitions.
Conclusion
Mastering keyframe interpolation is crucial for creating realistic and engaging animations, and Adobe After Effects is a leading tool for this purpose. By understanding how keyframe interpolation works, you can enhance your motion graphics, making animations smoother and more dynamic.
Besides keyframe interpolation, there's also frame interpolation, which smooths out videos by adding extra frames. Wondershare Filmora offers this feature, automatically creating these frames to ensure smooth transitions. It's great for slow-motion effects and fast-moving scenes.
Filmora's AI Frame Interpolation tool, along with its support for many video formats and its affordability, offers a practical and budget-friendly option for high-quality video editing.


