Are you someone who just began using OBS, either for live streaming or recording content like gaming? If so, let us introduce you Audio Ducking in OBS. You must know how tricky it can be to balance game audio and your commentary. If it’s too loud, the viewers can’t hear you. If it’s too quiet, the viewers might miss some important details.
Before you think about completely muting the game’s sound, Audio Ducking can be your solution to this challenge. It automatically lowers the game audio whenever you speak, so you can have balanced audio to your streaming or video without having to adjust the volume every time. Isn’t that great?
To learn more about Audio Ducking in OBS, you can continue reading our guide below.
In this article
Part 1. Audio Ducking in OBS
As the name suggests, "audio ducking" involves lowering or "ducking" the volume of one audio source when another, typically more important, audio source is active. In OBS, this feature is useful for balancing different audio elements in your stream or recording, such as reducing background music volume when you speak.
Who Can Benefit from Audio Ducking?
- Podcasters: Podcasters can use audio ducking to ensure their voice remains clear despite background music or sound effects. For instance, a podcaster creating atmospheric horror content can include eerie background sounds without those sounds overpowering their narration.
- Gamers: Gamers who stream their gameplay can benefit from audio ducking by lowering the game audio when they speak, making their commentary more discernible to viewers without completely removing the game sounds.
- Live Event Hosts: Whether hosting a webinar, virtual meeting, or live event, audio ducking allows for a professional sound experience by ensuring that any background music or ambient sounds do not distract from the main speaker’s voice.
Automatically lower the volume of one track to make another track clearer when you're recording voiceovers.

Part 2. Easy Alternatives to OBS Audio Ducking for Live Stream Recording
Before we get into OBS’s built-in audio ducking, you need to understand that OBS only works as a live streaming and recording software. Its primary function is to capture and broadcast or record video and audio from various sources. It isn’t sufficient for your post-production tasks such as advanced video editing.
If you need to use audio ducking to enhance and refine your audio, you will need another video editing software with an audio ducking feature. A top recommendation for this job is Wondershare Filmora. Filmora Audio Ducking feature allows you to adjust and edit your audio tracks after recording. With Filmora, you can:
- Fine-Tune Audio Levels: Adjust the ducking effect to ensure that background audio is properly balanced with your voice.
- Edit Audio Post-Recording: Make detailed adjustments and corrections to audio levels after your live stream or recording session.
- Apply Additional Audio Effects: Use Filmora’s suite of audio tools to add effects, improve clarity, and ensure a polished final mix.
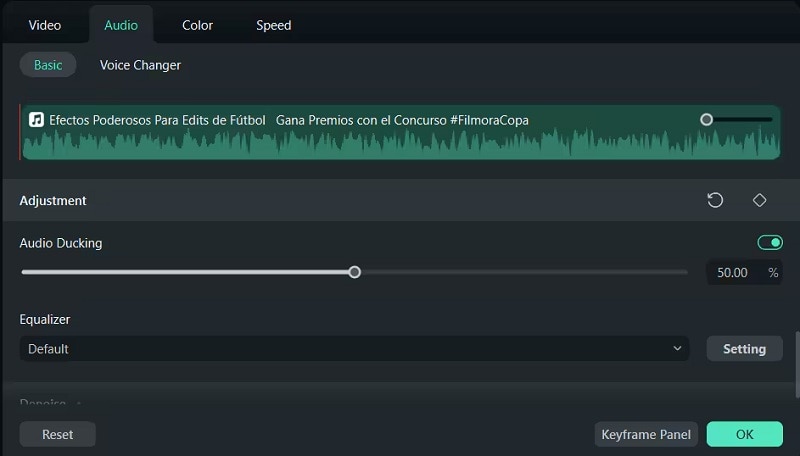
Using Filmora Audio Ducking is also straightforward and simple. You don’t need to deal with complex configurations to achieve professional-quality results. The feature uses a simple scale from 1 to 100 to help you find the perfect balance in your audio mix.
To get started, ensure you have the latest version of Filmora installed on your Windows PC or Mac. Then, follow these steps to adjust your audio levels in no time using the audio ducking feature.
How to use Filmora Audio Ducking
Step 1: Access the Audio Ducking feature in Filmora.
After importing your video and adding it to the timeline, you can access the Audio Ducking feature in Filmora using one of the following methods:
- Via Property Panel: Double-click the clip where you want to enhance voice clarity. Go to Audio > Basic and open the Adjustment menu. You will find the Audio Ducking setting there.
- Via Context Menu: Right-click on the video or audio clip and select Adjust Audio. The Audio Ducking setting will be available on the menu.
- Via Tools Menu: Select the video or audio clip, then click on Tools > Audio > Adjust Audio.

Then, enable Audio Ducking by turning on the toggle switch.
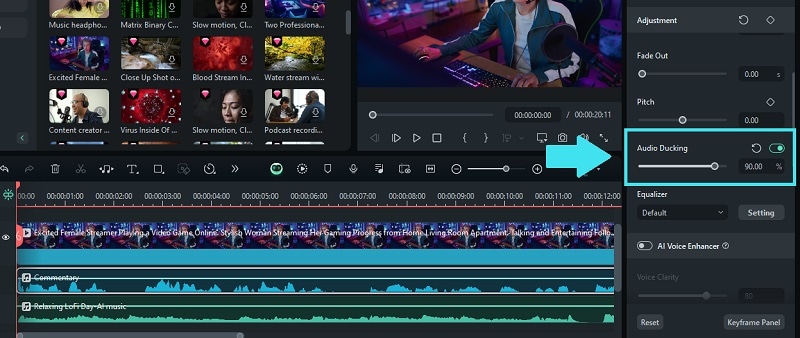
Step 2: Set the Audio Ducking.
Now, adjust the ducking level. The default ducking value is set to 50%. You can adjust this value to determine how much the background audio is reduced when the primary audio (like your voice) is active. Drag the slider to increase or decrease the ducking effect.
How to Improve the Voice Clarity
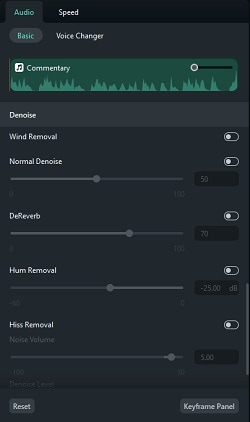
To improve and even enhance the clarity of your voice, you can use additional audio editing features in Filmora. For instance, use the AI Voice Enhancer and adjust the Voice Clarity level to achieve clearer and more defined audio.
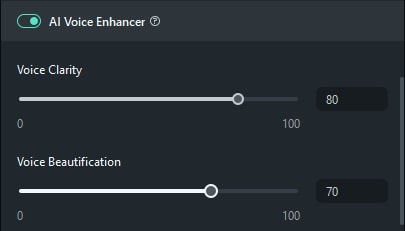
If there is background noise, you can apply Filmora’s AI-powered Denoise feature. Open the Denoise menu in the same tab and adjust the settings according to the type of noise you're dealing with, such as hum, hiss, wind, or other disturbances.
Part 3. How to Setup and Use Audio Ducking in OBS
Back to our discussion about audio ducking in OBS, setting up this feature is actually quite simple. You’ll just need to apply a Compressor filter to the audio source you want to manage. The challenge may lie in fine-tuning the settings for optimal results, but we will guide you through the process in the following steps.
Step 1: Add the Compressor Filter
Open OBS and select the audio source you want to manage, such as Background Music. Then, right-click on the audio source in the Mixer panel and choose ‘Filters’.
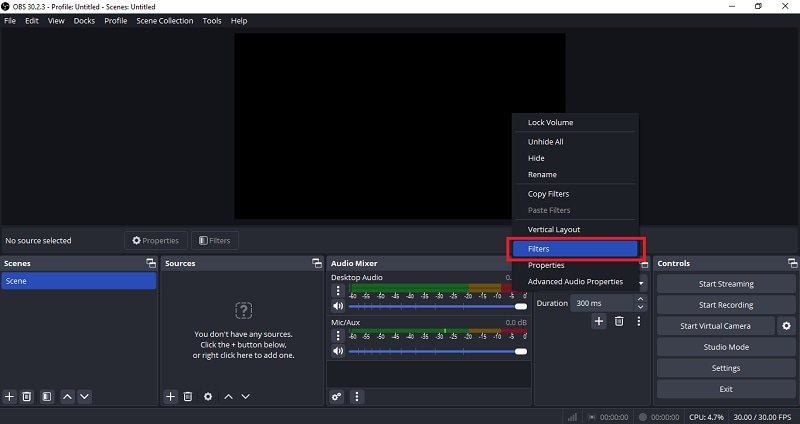
In the Filters window, click the ‘+’ button and select ‘Compressor’. Name the filter if you want and click ‘OK’.
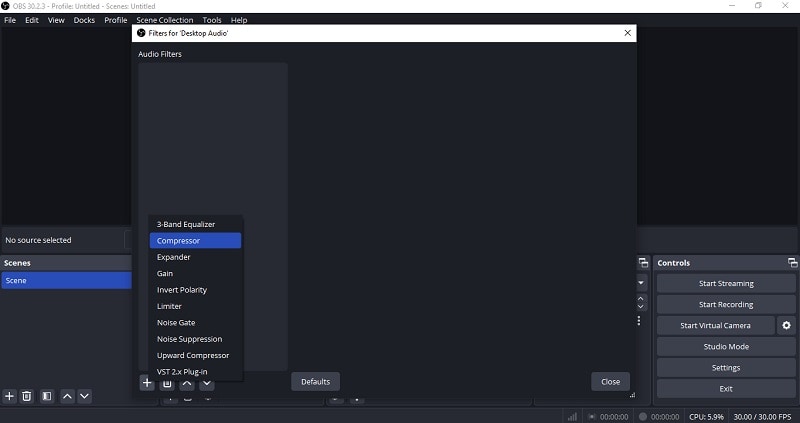
Step 2: Configure the Compressor Settings
Now you should see several configuration settings for audio ducking in OBS.
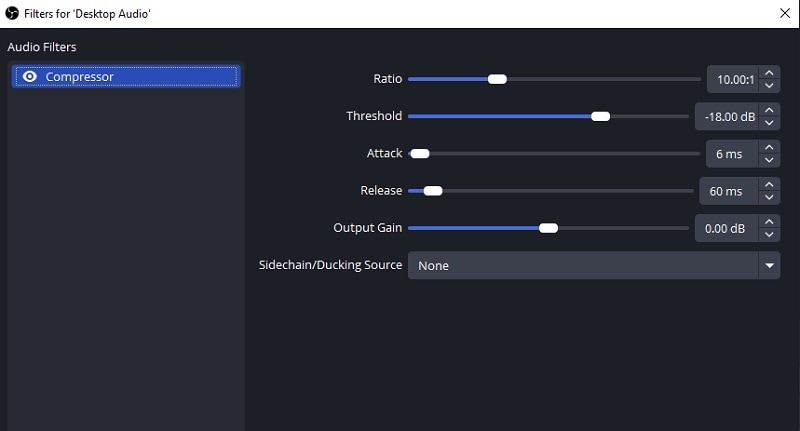
To help you understand them, we’ve provided a detailed breakdown of their functions:
- Ratio determines how much the volume is reduced. A higher ratio results in a more noticeable reduction when the primary audio source is active. To lower game audio considerably when you speak, you might set it to something strong like 32:1. Or, you can set it moderately at 7:1.
- Threshold defines the volume level at which compression starts. Set the threshold higher than any background noise so that only your voice triggers it. It should be lower than the dB value shown in the Audio Mixer when you speak normally.
- Attack controls how quickly the compressor starts to reduce the volume after the threshold is exceeded. You can set the "Attack" to 1 ms for a rapid reduction in the game audio when you speak. Pair this with a "Release" time of about 60ms to keep the game volume lowered briefly after you stop speaking.
- Release determines how quickly the volume returns to normal after the primary audio source stops. A longer release time helps create a smoother transition.
- Output Gain can be used to boost the volume back up after the Compressor reduces the volume. It helps ensure that the adjusted audio is still loud and clear compared to other sounds. You can set it to 0 dB.
- Sidechain/Ducking Source lets you use an external audio source to control the volume of another audio source. So, set your microphone as the "Sidechain/Ducking Source." When your mic picks up sound, it will trigger the compressor to lower the volume of the main audio output accordingly.
This is only a starting point for configuring audio ducking in OBS on Windows or Mac. Depending on your specific needs and the environment in which you're streaming or recording, you may need to run some tests and adjust it further based on your observations to get the balance just right.
Step 3: Save and Apply:
Once you’re satisfied with the settings, click ‘Close’ to apply the changes. The Compressor filter will now automatically adjust the background audio levels based on your main audio source.
Automatically lower the volume of one track to make another track clearer when you're recording voiceovers.

Part 4. How to Fix OBS Audio Ducking Not Working
If you find that OBS audio ducking isn't working as expected, there could be several issues at play. Based on common issues reported by users, we’ve identified some potential solutions to help you resolve the problem:
1. Compressor Not Applied Correctly
Check if the Compressor filter is added to the correct audio source in the Audio Mixer. Make sure it’s applied to the source you want to manage, such as the game audio or background music, not the microphone or other sources.
2. Imbalanced Levels Among Different Audio Sources in the Mixer
When this issue happens, you can check the levels of all audio sources in the Audio Mixer. Make sure that the levels are balanced and that no single source is overpowering others, which could affect the ducking effect.
3. OBS Didn’t Capture Desktop Audio
Try to navigate to Settings > Audio within OBS and ensure that the Desktop Audio device is configured to the correct output device. Then, check that the Desktop Audio source is active in the Audio Mixer section and that its volume level is appropriately set.
Conclusion
Audio ducking in OBS is an undoubtedly useful feature for anyone looking to achieve a well-balanced audio mix in their streams. By automatically lowering the volume of background audio when you speak, it ensures that your commentary remains clear without having to adjust the volume manually each time.
In case you need even more control over your video and audio recordings, there is also video editing software like Filmora that can help. Filmora also offers an Audio Ducking feature which allows you to fine-tune audio levels after recording, so you can adjust how much background audio is reduced during your commentary more easily.

