


 100% Security Verified | No Subscription Required | No Malware

“I’d like to learn more about frame interpolation in Premiere Pro. Can anyone tell me how to use it to interpolate frames? Also, I’d like to know if there’s a simpler alternative to Adobe Premiere frame interpolation. Thank you!”
Premiere Pro frame interpolation or time interpolation is an effective way to calculate the frames between two keyframes to create a smooth motion effect when altering the speed and duration of your video footage.
It has three frame interpolation modes – Optical Flow, Frame Blending, and Frame Sampling. Today, we’ll explain the difference between Optical Flow and Frame Blending to help you understand how Premiere Pro frame interpolation works and the best ways to use it.

In this article
What Are the Main Differences Between Optical Flow and Frame Blending?
Optical Flow is an excellent Premiere Pro frame interpolation mode you can tap into to create smooth and realistic slow-motion scenes and sequences. It helps you make your footage feel and look as natural and smooth as possible.
The Optical Flow feature in Adobe Premiere Pro allows you to transform stock videos or any footage that isn’t captured using a high frame rate camera. It analyzes the video frames of your content and generates new frames to simulate a higher frame rate, making the motion sequences in your footage appear smoother and more natural.
Though the Optical Flow feature can help you smooth out movement in your video clips, it can also create issues like image distortion, ghosting, or warping. In addition, it can also cause artifacts to appear in your footage.
Frame Blending is another Premiere Pro technique to enhance the visual fluidity of your video content in slow motion. This Premiere Pro time interpolation mode allows you to seamlessly blend multiple frames and create new frames to close the gaps between keyframes in your slow-motion footage.
By creating seamless transitions between frames, Frame Blending helps you generate a more fluid and seamless motion, preventing jumpy or choppy movement. Thanks to that, you can harness the power of Frame Blending in Premiere Pro to smooth out uneven areas in your content or create a motion blur effect.
Optical Flow is the best time interpolation method for footage with simple motion. On the other hand, Frame Blending is a better option for smoothing out videos with many motion changes.
Let’s sum up the differences between Optical Flow and Frame Blending:
- Optical Flow– top time interpolation method for video footage with simple motion;
- Frame Blending– the best option for polishing uneven areas in videos with varying frame rates.
Both methods have a few downsides to keep in mind:
- Extensive use of the Optical Flow mode can cause video distortion, ghosting, and artifacts;
- Overuse of Frame Blending can cause the video ghosting effect, creating a slight blur between the blended frames.
How Does Frame Interpolation in Premiere Pro Work?
Frame Interpolation in Premiere Pro is a function that enables the software to analyze and process frames in your video footage, allowing you to slow down or accelerate the movement in your clips beyond the available keyframes.

Put simply, you can slow down or stretch your footage by:
- Using Frame Sampling to duplicate frames;
- Enabling Frame Blending to create the crossfade effect in between real frames;
- Using Optical Flow to generate fresh frames between the existing keyframes artificially.
Thanks to these capabilities, frame or time interpolation can empower you to shorten a video clip to match a required time frame or add a slow-motion effect to slow down the movement in your footage.
How to Interpolate Frames in Premiere Pro
Below are the top two methods to use Premiere Pro to interpolate frames in your video footage.
Method 1: Use Time Interpolation
The first method lets you interpolate frames using the Time Interpolation modes in Premiere Pro. Here are the steps:
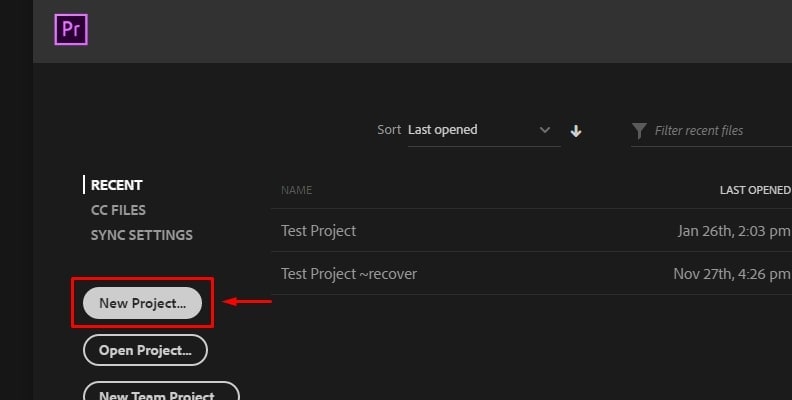
- Step 1: Launch Premiere Pro on your computer and select New Project;
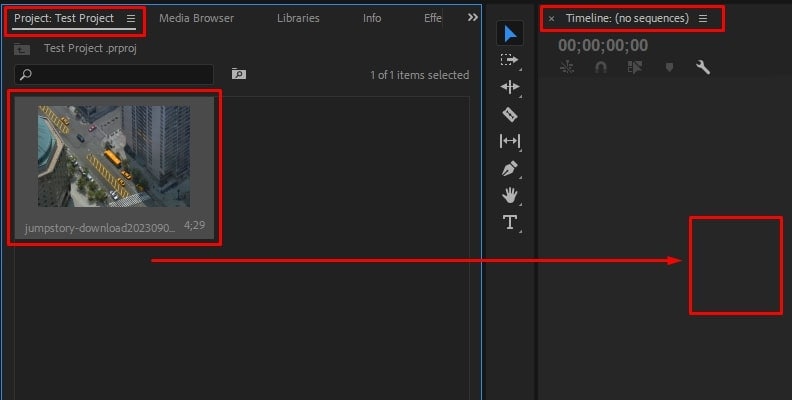
- Step 2: Navigate to the Project section, right-click anywhere in the area, and select Import to import your footage;

- Step 3: Drag your video clip to the timeline to create an editable video sequence;
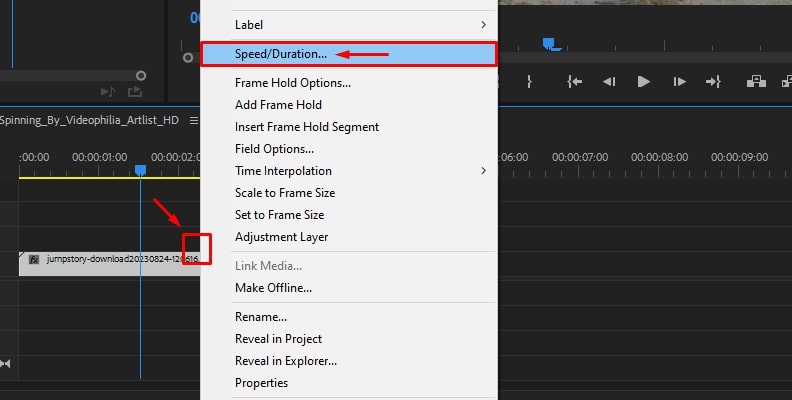
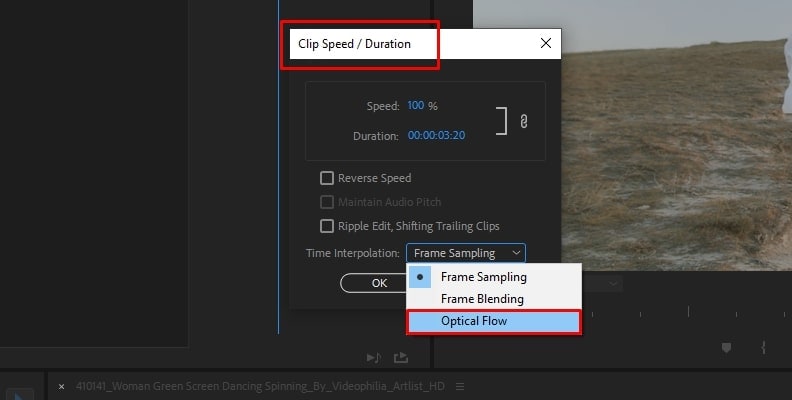
- Step 4: Right-click on the clip in the timeline and select Speed/Duration;
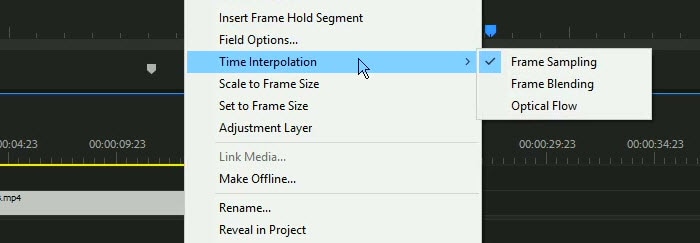
- Step 5: Navigate to the Time Interpolation section and select Optical Flow from the menu;
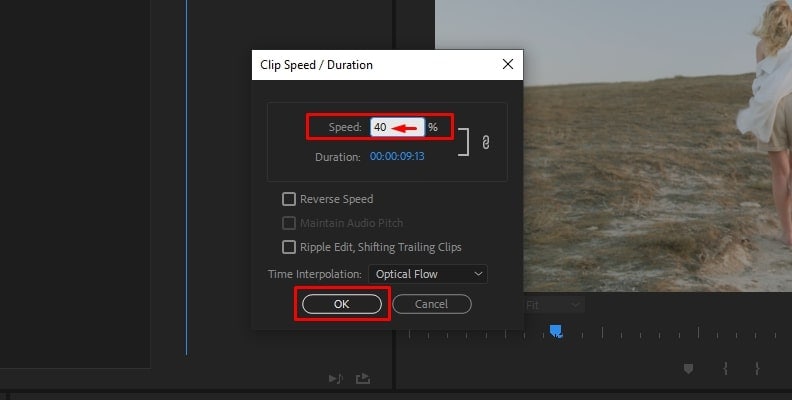
- Step 6: Next, go to the Speed section, set the video playback speed percentage value, and click OK;
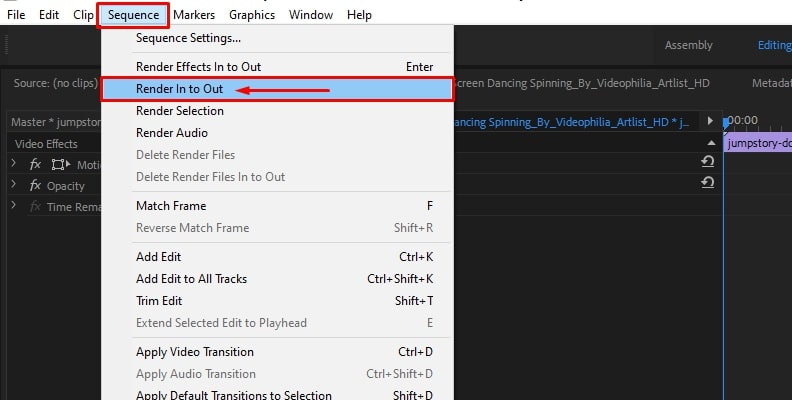
- Step 7: After that, navigate to Sequence > Render In to Out to render the edited video sequence and apply your new effects;
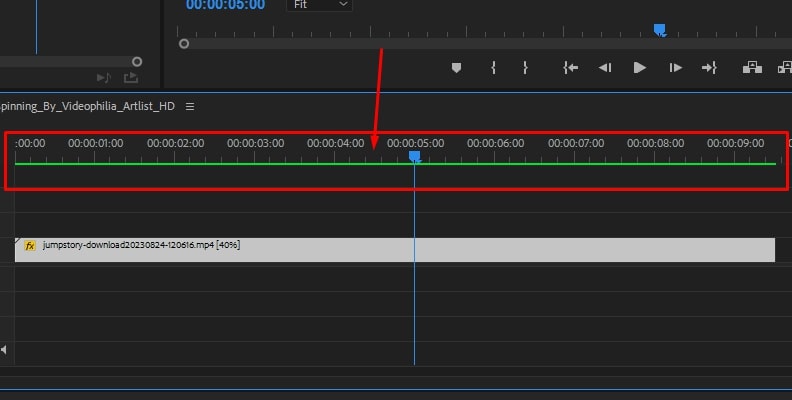
- Step 8: You should see the red line turning green once the rendering process is complete.
Method 2: Use the BCC Optical Flow Effect
The BCC Optical Flow is a third-party plug-in that you can enable in Premiere Pro to enhance your video footage by adding smooth, slow-motion effects. If the built-in Optical Flow doesn’t produce the desired effect, you can use BCC Optical Flow instead.
Install the Boris FX Continuum pack and follow the steps below to use the BCC Optical Flow effect:
- Step 1: Launch Premiere Pro, import your video, and drag it to the timeline;
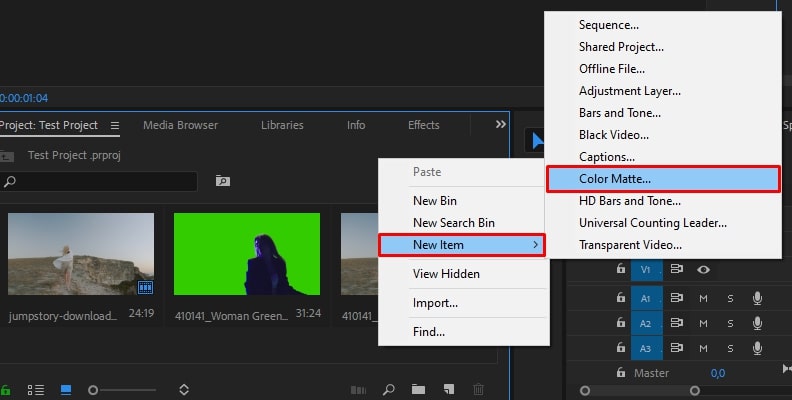
- Step 2: Navigate to Project > New Item > Color Matte;
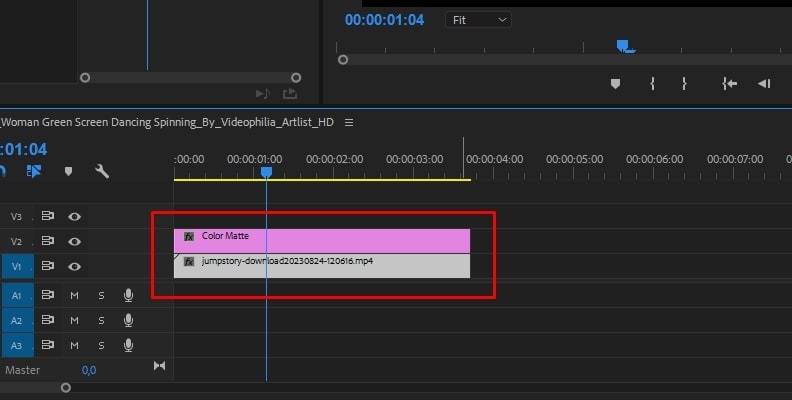
- Step 3: Place the solid on the video track above your video in the timeline;
- Step 4: Trim the clip so that both videos have the same length;
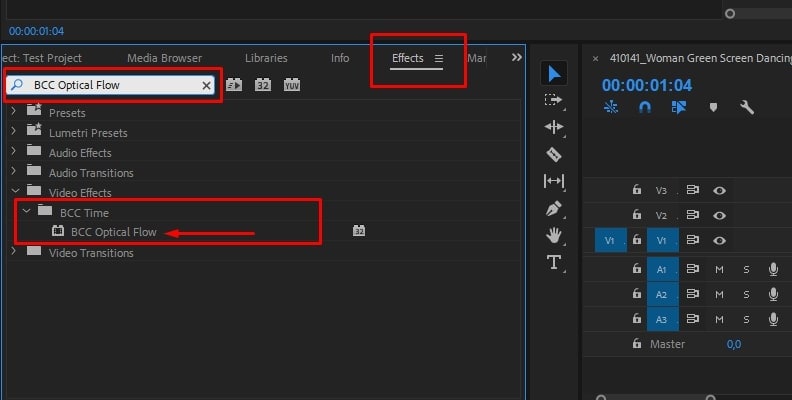
- Step 5: Go to the Effects section and type BCC Optical Flow in the search bar;
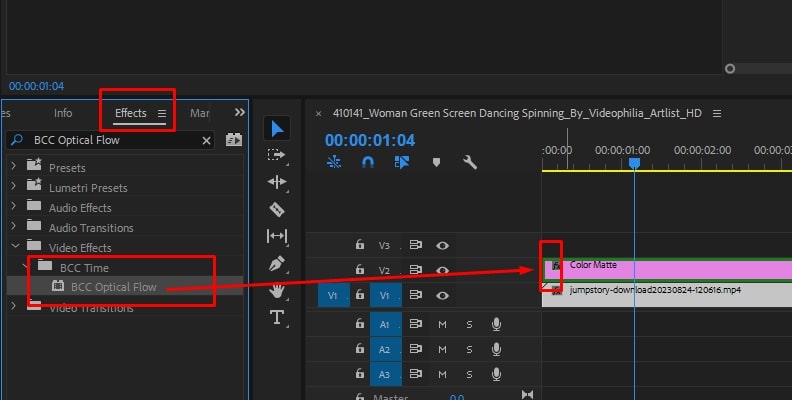
- Step 6: Drag the effect over the solid matte above the original clip;
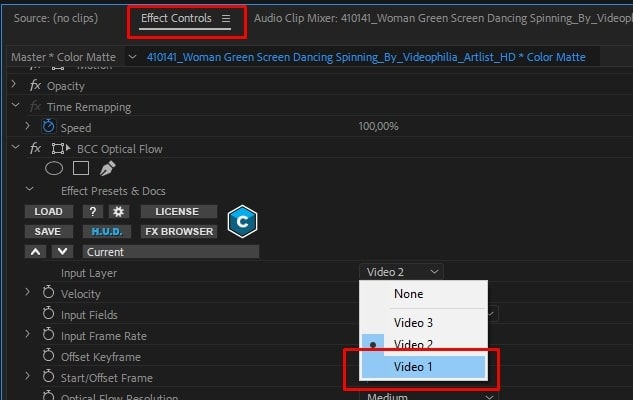
- Step 7: Navigate to Effect Control > Input Layer;
- Step 8: Select the video track with the original video in the timeline;
- Step 9: Set the velocity and click OK to apply the BCC Optical Flow effect.
Enhance Video Smoothness with a Better Alternative: Wondershare Filmora
Premiere Pro has long been an industry standard in the dynamic landscape of video editing. However, its cluttered interface, confusing navigation, and tough-to-use features require a steep learning curve and a decent dose of tech-savvy knowledge.
Wondershare Filmora, on the other hand, is the most recommended alternative to Premiere Pro as it can address all the abovementioned downsides. Filmora is a user-friendly, all-encompassing video recorder and editor with more advanced AI-powered Frame Interpolation capabilities compared to Premiere Pro.
Filmora uses optimized AI algorithms to power its frame interpolation functionality. It gives you more advanced options to create smooth videos with seamless transitions, optimal frame rates, top video resolution, and enhanced visuals.
Here are the advantages of using AI frame interpolation in Filmora:
- Optimize your videos and create slow motion effects with three powerful AI frame interpolation modes (Optical Flow, Frame Blending, and Frame Sampling);
- Interpolate individual video frames in your footage with AI while maintaining video quality;
- Use the power of AI to enhance the optical flow of your video content;
- Determine the best frame rate for your videos;
- Enhance your footage with seamless frame generation to transcend low-frame limitations;
- Resize your video clip before or after AI interpolation;
- Export video footage in lossless quality and preferred format.
In addition to AI Frame Interpolation, what other features make Filmora stand out?
- User-friendly interface– compared to Premiere Pro, Filmora’s interface is more intuitive, allowing new users to master its editing capabilities quickly and easily.
- Balance between quality and efficiency– Filmora perfectly balances quality and efficiency by giving you access to various creative assets, audio/video effects, and AI-enabled features, allowing you to produce top-grade video content without the steep learning curve.
- Extensive selection of built-in effects– while both Filmora and Premiere Pro offer a vast collection of effects, Filmora takes the lead with its endless collection of titles, transitions, and immersive audio/video effects, allowing you to save time and effort.
- Simple learning curve– thanks to its intuitive and streamlined interface, Filmora is perfect for everyone new to video editing. In addition, Filmora comes with plenty of helpful tutorials to lead you through the video editing process.
- Faster rendering speed– Filmora offers lighting-fast rendering speeds, ultra-swift processing times, and real-time editing.
- Cost-effectiveness – Filmora’s one-time purchase model and affordable subscription make it a more cost-effective alternative to Premiere Pro.
In addition to immensely powerful AI frame interpolation, Filmora offers an extensive selection of high-end, AI-enabled video editing features, all conveniently packed in an easy-to-use software tool with transparent features and streamlined navigation.
As you can see, Filmora is the more cost-effective, accessible, and lighter option compared to Premiere Pro. Now, let’s see how to use Filmora to interpolate frames.
How to Interpolate Frames in Filmora
Download and install Filmora on your computer (Windows or Mac), then follow the steps below to interpolate frames in your video footage to maintain video quality and ensure the smoothest optical flow.
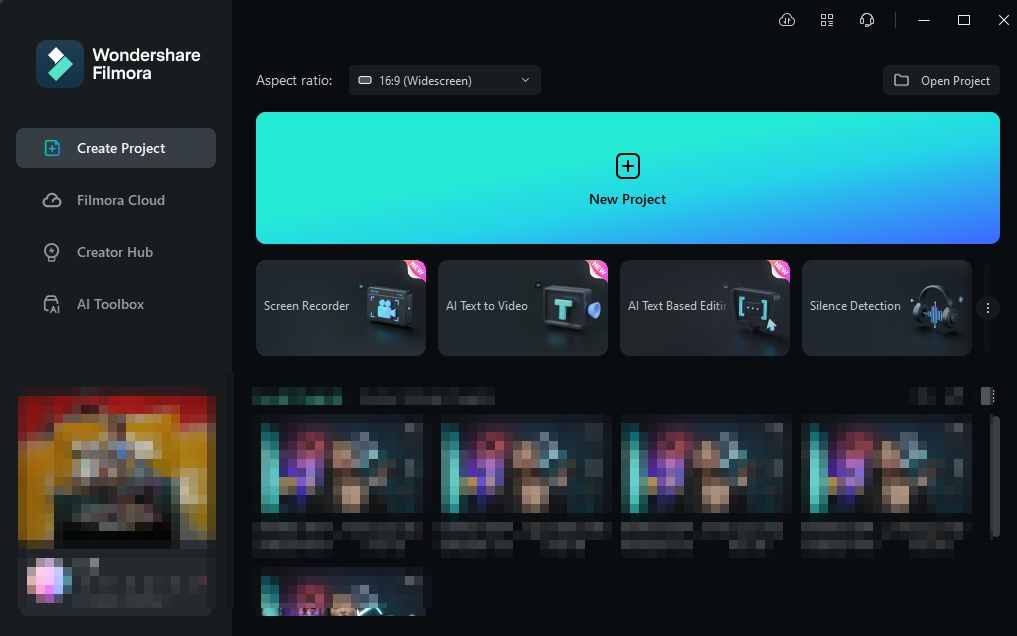
Step 1: Launch Filmora and navigate to Create Project > New Project;
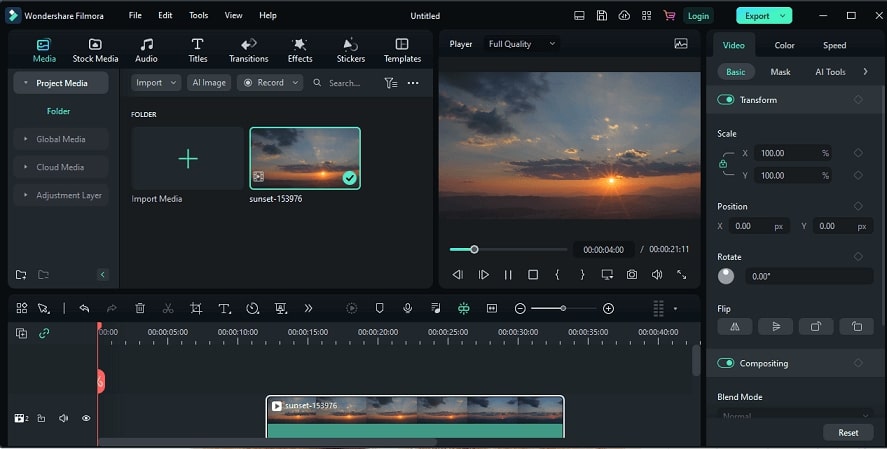
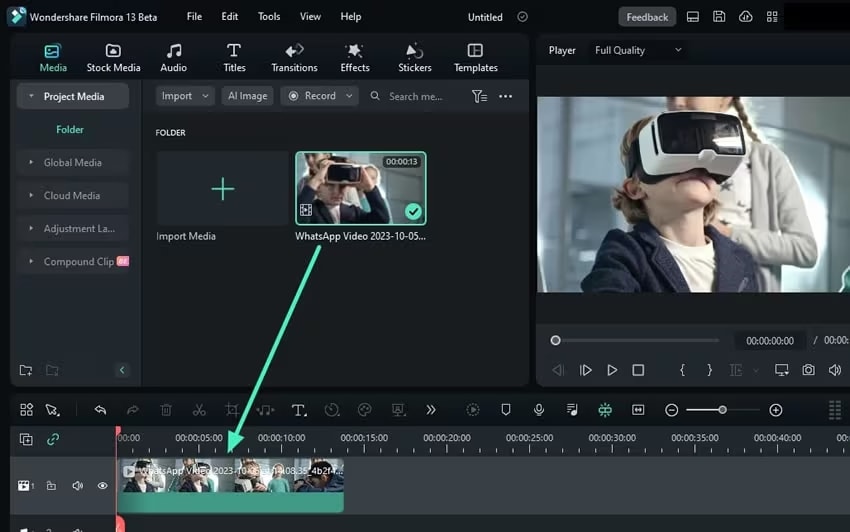
Step 2: Import your footage and drag it to the timeline;
Step 3: Click the clip in the timeline to open the Editor panel;
Step 4: Navigate to Speed > Uniform Speed > AI Frame Interpolation > Optical Flow;
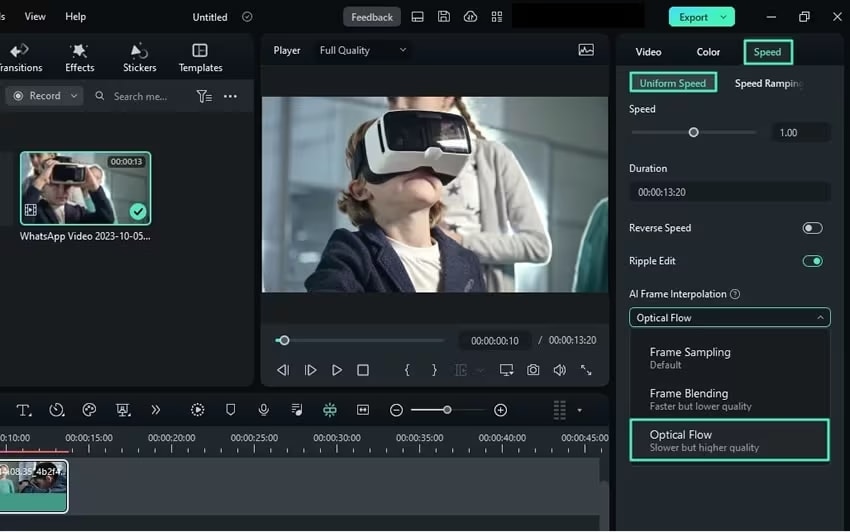
Step 5: Select Render Preview in the timeline toolbar to preview changes;
Step 6: If you’re satisfied with the results, click Export.

As you can see, Filmora offers a much simpler approach to frame interpolation to help you smooth out your footage seamlessly.
Conclusion
This article outlined how frame interpolation works in Premiere Pro and gave you a detailed comparison between different time interpolation modes. In addition, we’ve discussed the steps to apply the Optical Flow and BCC Optical Flow effects to your footage in Premiere Pro.
In addition, we compared Wondershare Filmora to Premiere Pro to give you actionable insights into the best alternative to frame interpolation in the latter. In our opinion, Filmora’s AI Frame Interpolation is a more effective option compared to Premiere Pro Time Interpolation modes.
In addition, Filmora uses the power of AI to apply optimized frame interpolation to the imported video footage in the timeline, giving you much better results than Premiere Pro.
