
Blender has long been a favorite among animators to create stunning animations, and one of its notable features is the ability to animate character lip sync. Lip sync in Blender is an important process for making animated characters speak in a natural way. Without it, your characters might come across as stiff or out of sync with their dialogue.
Those who have just begun using Blender might feel overwhelmed by the complex interface and numerous settings involved in the software. For this reason, we’ll help you grasp the key steps to achieve effective lip sync in Blender and provide recommendations if you need a quick solution to localize your content.

In this article
Part 1 How To Make Lip Sync Effect in Blender
Lip sync is the process of matching the mouth shape of your character with the spoken words in your audio track. To make your character lip sync effectively in Blender, you'll need to create various facial expressions and mouth positions that correspond with different phonemes and sounds.
There are two main methods for achieving lip sync in Blender: automatic lip sync and manual lip sync. Auto lip-sync in Blender involves using add-ons that analyze your audio and generate corresponding mouth shapes and animations. Manual lip sync, on the other hand, requires you to adjust and synchronize each mouth position with the dialogue manually.
Method 1: Auto Lip Sync
For the first method, we are going to show you how to do auto lip-sync in Blender. This method helps you set up your character and produce a lip sync animation more easily, so you can focus more on the creative aspects of your project rather than getting bogged down in manual adjustments.
The add-on you need to use for doing auto lip sync in Blender is Rhubarb Lip Sync. Before you begin, make sure to download the add-on first and follow the steps below.
- Step 1: Install the Rhubarb Lip Sync add-on
Open Blender and go to Edit > Preferences. Click on the Add-ons tab and then Install. Next, navigate to the downloaded Rhubarb Lip Sync .zip file and click Install Add-on. Enable the add-on by checking the box next to it in the Add-ons list.

- Step 2: Prepare Your Audio File
Go to the Video Sequence Editor (VSE) and add your audio track by selecting Add > Sound. Locate your audio file and click Add Sound Strip.
- Step 3: Set Up Your Character:
Create a character model with a rig that includes facial controls for mouth shapes (phonemes) and expressions. Ensure that the character has shape keys or bone-driven controls for the different mouth positions.

Then, play back your animation to see the lip sync in action. If your face appear stiff, you can add bones to the jaw to enhance movement and create more fluid, natural expressions. Go to the Item menu and select Face.

This step-by-step guide is the simplified version of the full process for creating lip sync effects in Blender. If you need more details about how to do it, you can refer to the video below.
Method 2: Manual Lip Sync
The second method for creating character lip sync in Blender involves setting it up manually. Whether you are working on 2D or 3D animations, this approach gives you more control and allows for precise adjustments, so you can match each mouth movement closely to the dialogue.

For manual lip sync in Blender, you'll first need to prepare by rigging your model. Then, the process includes several key steps:
- Creating Mouth Poses: Design a variety of mouth poses that correspond to different phonemes, which will serve as your asset library for lip-syncing.
- Adding Poses to an Asset Library: Store your mouth poses in an asset library for easy access during the animation process.
- Setting Up an Animation Action: Create a new animation action specifically for lip sync. This will help you manage mouth movements separately from other animations.
- Keyframing Mouth Poses: Keyframe the mouth poses to match the dialogue.
- Using the NLA Editor: Finally, you can use the Non-Linear Animation (NLA) editor to combine your dialogue with body animation, creating a seamless integration of mouth movements and overall character actions.
Watch this good video explanation about how to do manual lip sync in Blender. It walks you through the entire process step-by-step, from rigging your character to keyframing mouth poses.
Part 2 Filmora's AI Lip Sync: Create Your Video Translation
While lip sync in Blender is great for making your animated characters talk naturally, those who want to make the characters speak in multiple languages would need the Wondershare Filmora AI Lip Sync feature.
With support for over 20 languages, this tool can translate the audio and automatically lip-sync the characters' mouth movements to match the translated speech. It’s an efficient solution for creators who want to localize their content in different languages without spending hours manually adjusting lip movements again.

Key Features of Filmora’s AI Lip Sync Feature
- Filmora's AI technology lets you automatically sync mouth movements with voiceovers in just a few minutes.
- Generate natural-sounding voiceovers in multiple languages with perfectly synced lip movements
- Add and adjust subtitles for precision, with the option to download and edit them to suit your needs
- Leverage Filmora's AI Translation with over 90% accuracy for seamless multilingual content creation
- Transform speech with AI lip sync magic.
- Accents vanish, authenticity stays with synced lips.
- Dub in any language, lips follow suit flawlessly.


Step-by-Step Guide on AI Lip Sync Effects in Filmora
- Step 1: Install the latest version of Filmora
Make sure you have the latest version of Filmora installed. You can update or download it from the official website and follow the installation instructions.
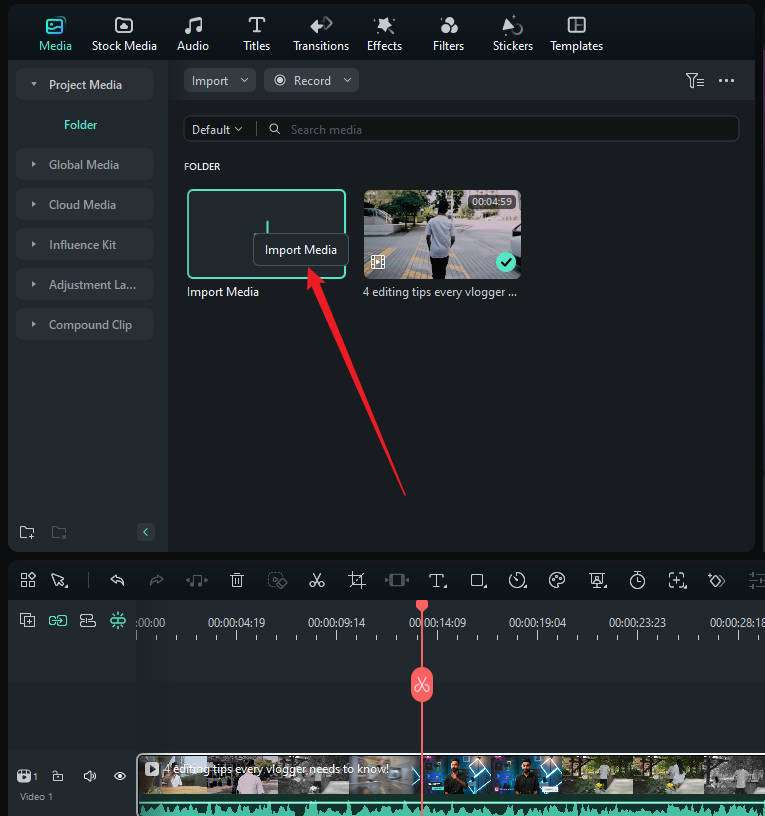
- Step 2: Create a New Project and Import Your Video
In the Filmora startup window, click on "New Project." Then, add or import your video to the editing workspace.
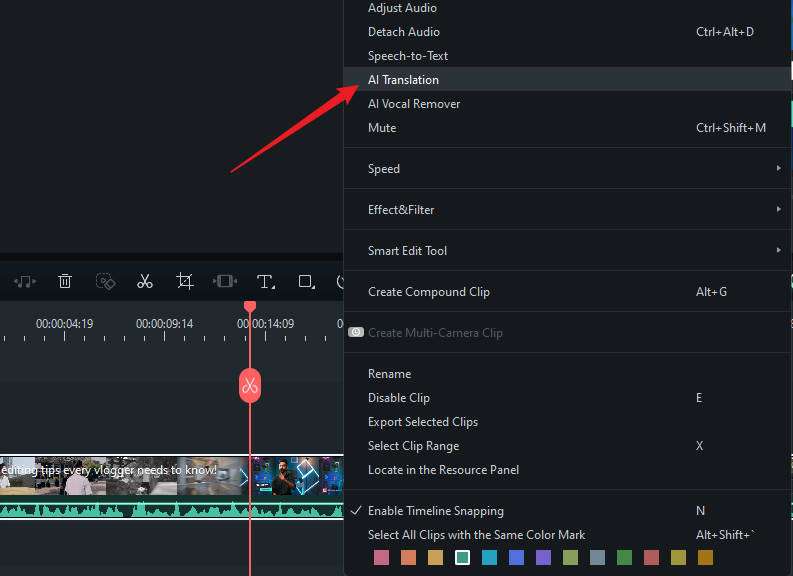
- Step 3: Enable AI Lip sync
Next, right-click on the video and select "AI Translation."
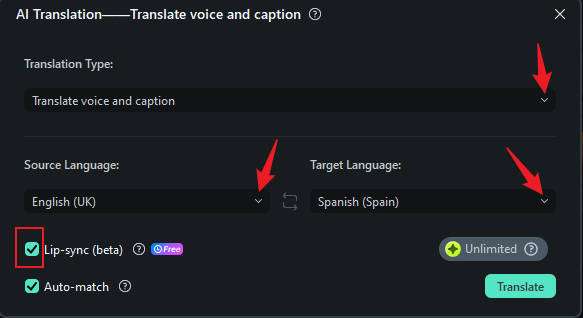
In the AI Translation window, choose the translation type as "Voice and Text." Select your source and target languages, and to enable lip sync, check the "AI Lip Sync" option.
- Step 4: Edit and Customize the Subtitle
After a few minutes, you will see the results in the Project Media. There will be a separate video with lip synchronization in the new language and the corresponding subtitles.
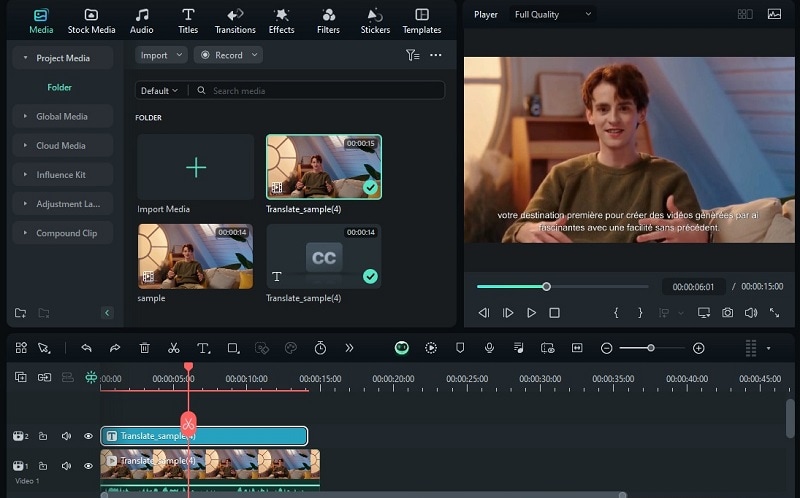
To edit the subtitle, you can double-click the subtitle track on the timeline and make adjustments as needed.

Benefits of Using Filmora’AI Lip Sync Feature
Given the growing need for multilingual content, Filmora's AI lip sync feature has many benefits. In animation, it can save you a lot of time by eliminating the need to manually adjust lip movements for each language version.
For other sectors, Filmora AI Lip Sync can also streamline video production for marketers, educators, and content creators who need to create multilingual content quickly. Additional details are provided in the table below.
| Group | Advantages | Examples of Use |
| Key Opinion Leaders (KOLs) | Translate and synchronize narrated videos to different languages. |
Creating video blogs in multiple languages. Promoting global brand campaigns on social media. |
| Corporate Employees |
Create training videos in multiple languages with synchronized lip movements. Facilitate smoother communication and training for multinational teams. |
Developing multilingual training modules. Creating onboarding videos for global teams. |
| Content Creators | Reach new audiences by localizing content. |
Localizing tutorial videos for diverse audiences. Producing multilingual entertainment content. |
| Educational Institutions |
Share educational resources with international partners and students. Provide educational videos in multiple languages. |
Creating multilingual educational videos. Collaborating on international research projects. |
| Marketing Teams |
Create advertisements in various languages for better market penetration. Improve the effectiveness of marketing campaigns by resonating with local audiences. |
Producing localized ad campaigns. Creating multilingual promotional videos. |
In addition to lip-syncing, Filmora can also assist you with dubbing and recording voiceovers for your video. You can easily replace the original audio or add new narration by recording directly within the platform in real time while the video plays back.

You can access this feature by selecting the Record Voice Over button at the top of the editing timeline. There’s also an option to mute the project, so you can replace the existing audio without any distractions.
Part 3 A Side-by-Side Comparison of Lip Sync: Blender vs. Filmora
If you are still getting confused about the differences between Blender and Filmora for lip sync, we’ve made this comparison to help clarify their features and usability.
| Blender | Filmora | |
| Ideal for | Lip synchronization for animated characters | Quickly produce localized content |
| Learning Curve | Steep; requires time to learn the interface and tools | Beginner-friendly; easier for beginners to grasp |
| Detailed Setup | Requires extensive setup for character rigging and lip sync | Automated setup with AI support for lip sync |
| Customizability | Highly customizable and supports various add-ons | Provides options for customizing subtitles |
| Pros | Powerful features for detailed animation; free and open-source | Fast AI lip sync, supports multiple languages, intuitive |
| Cons | Complex interface, time-consuming for beginners | Less control over detailed animations, no manual adjustments available for the lip sync |
To sum up, Blender lip sync is for creating realistic and expressive character animations by synchronizing mouth movements with audio dialogue. Meanwhile, AI lip sync in Filmora helps to automatically generate lip movements for different languages, making it easier for creators to localize their content without having to manually adjust animations for each language.
Part 4 The Impact of Lip Sync Technology on Video Production
By now, you should understand how lip sync technology has made a big difference in video production, be it animations or live-action content. If you’re incorporating lip sync technology into your projects, you’ll find that it enhances several aspects of your video production:
- Better Viewer Experience: When a character’s mouth moves in sync with their speech, it makes the scene feel more realistic and engaging, helping viewers connect better with the story.
- Improved Accessibility:For viewers who use subtitles or closed captions, accurate lip sync makes it easier to follow along, making content more accessible to everyone.
- Enhanced User Interaction: In interactive media like video games or virtual reality, good lip sync makes characters feel more lifelike and responsive, which improves the overall user experience.
- Faster Production:Modern lip sync tools can speed up the animation process, allowing creators to achieve realistic dialogue more quickly and focus on other important aspects of their projects.

Overall, lip sync technology can significantly improve the quality and effectiveness of video production. For creators, it means more efficient workflows and higher-quality results. For viewers, it translates to a more immersive experience.
Part 5 Challenges in Using AI Lip Sync Technology
While AI lip sync technology can make editing much easier, it's important to be aware of some challenges and risks involved. These concerns include:
- Quality Control
Although automation can speed up the process, it’s crucial to keep a human eye on the work to ensure accuracy. Over-relying on AI might lead to mistakes that can affect how well the lip sync matches the dialogue, potentially harming the viewer experience.
- Ethical Concerns
Using AI for lip syncing can raise issues about authenticity and misuse, like creating deepfakes. Content creators need to handle these ethical questions carefully to maintain their credibility and trust with their audience.
- Data Privacy
AI lip sync technology often requires processing large amounts of data, including sensitive information. This raises concerns about how data is collected, stored, and used.
- Limited Context Understanding
AI might struggle to interpret the emotional nuances or contextual subtleties of speech. This can result in less natural lip sync, as the technology may not fully capture the character’s intended emotions or intonations.
- Technical Limitations
AI tools may have difficulty processing certain types of audio, such as background noise or overlapping dialogue. This can lead to inaccuracies in the lip sync if the technology struggles to clearly distinguish and match the spoken words.
Part 6 How To Ensure Lip Sync Animations Look More Realistic?
Realism has always been the main concern in the lip sync process. Given the complexity involved, how can you ensure that your lip sync animations look realistic? To achieve natural and convincing lip sync, there are actually several tips you can follow to optimize your results.

- Study Real-Life References: Observe real people speaking to understand how their lips, jaw, and facial muscles move with different sounds and emotions. This will help you replicate these natural movements in your animations.
- Fine-Tune with Frame-by-Frame Adjustments:Review your animation on a frame-by-frame basis to ensure precise synchronization with the audio. Smooth out transitions between different phonemes.
- Use Keyframes Effectively: Focus on keyframes that capture the most visible or expressive mouth shapes. This ensures that the major changes in speech are well-represented.
- Add Facial Expressions:Integrate additional facial expressions, such as eyebrow movements and head tilts, to enhance the realism of the character’s speech and emotion. It’s a simple gesture but can create depth and nuance in the animation.
Conclusion
There are two main methods for achieving lip sync in Blender: the automatic approach, which uses add-ons like Rhubarb Lip Sync, and the manual method. Both techniques have their pros and cons, making them suitable for different types of projects and skill levels.
On the other hand, if you need to localize your content with natural lip synchronization, what you need is Filmora AI Lip Sync. This feature simplifies the localization process, allowing creators to easily synchronize mouth movements with translated audio in multiple languages.
