
 100% Security Verified | No Subscription Required | No Malware

Instagram is one of the largest social media platforms in the world, gathering over 1.6 billion users. It's an ideal network for mixing business and entertainment, giving you the best of both worlds.
Whether using the platform to share your life adventures with your friends or promote your business, you need attractive photos to showcase your content in the best light possible.
Although the Instagram platform offers some built-in editing features and filters, that alone won't be enough to perfectly polish your Instagram photos. That's where an Instagram Photo Editor comes into the picture.
Today, we'll discuss the five best photo editing apps for Instagram. Let's dive in.
In this article
Best Smartphone Photo Editing Apps for Instagram
So, what is a smartphone Instagram photo editor exactly? It's a mobile photo editing app that offers multiple editing tools, features, and filters to make your Instagram pics more visually appealing, helping you transform your everyday photos into shareable works of art for your social media profiles and accounts.
You can tap into these editing tools to add text to your photos, apply immersive transitions, add or remove background music, replace the photo background, transform images into videos and stories, and much more.
Here's our comparison table with the five best photo editing apps for Instagram. Learn more about their compatibility, rating, and Instagram photo editing capabilities.
| Instagram Photo Editors | Compatibility | User Rating | Pick Reason |
| Filmora | Android and iOS | 4.8 | Best Instagram photo and video editing app with AI-powered features |
| VSCO | Android and iOS | 4.7 | Best image editing app with presets, templates, and advanced HSL controls. |
| Snapseed | Android and iOS | 4.1 | An Instagram photo editing app with RAW compatibility. |
| Afterlight | Android and iOS | 4.7 | Timeline editing with color adjustment and film-quality filters. |
| Lightroom | Android and iOS | 4.8 | The best Instagram photo editing app with deep post-shot editing and content-aware object removal. |
Now, let's delve deeper into these tools to explore their Instagram photo editing capabilities, pros, and cons and help you make an informed decision.
1. Filmora Mobile
Filmora for Mobile Filmora for Mobile Filmora for Mobile Filmora for Mobile Filmora for Mobile
Edit Videos on Your Mobile Phone with 1-Click!
- • Powerful Brand New AI Features.
- • User-friendly video editing for beginners.
- • Full-featured video editing for professionals.


Wondershare Filmora is one of the best mobile apps for editing Instagram videos and perfecting your social media visual content. It is also a versatile IG photo editor with various editing features, ranging from basic, advanced, and AI-powered editing features. You can harness the power of Filmora AI photo editing and enhancement algorithms to unleash your Instagram creativity and let your photos shine.
The app works on Android and iOS devices and supports various photo formats. Moreover, you can make your Instagram photos more attractive with Filmora filters. The mobile app allows you to Instagram-specific photo effects, including motion elements, overlays, filters, and text.
Key features
- AI image to video generator: generate videos from static images with various templates, such as AI kissing, AI run away, AI hugging, and more.
- Various filters: enhance the visual quality of Instagram photos or videos with various filters.
- Color adjustment: adjust HSL, exposure, contrast, saturation, vibrance, and black level according to your preference.
- Image masks: create masks with preset shapes like circles, liners, mirrors, rectangles, rounded hearts, and stars.
- Smart Cutout: Remove the image background intelligently and replace the sky with images.
- AI remover: remove unwanted objects from images with magic features.
2. VSCO

The VSCO Instagram photo editing app offers you multiple preset filters that you can use for free. An upgrade to a premium account gives you access to over 200 effects and filters, including sophisticated and advanced editing features.
Thanks to that, you can use the full Instagram photo editing potential of VSCO to enhance your social media visuals by adjusting various photo parameters and settings, from fade, grain, and saturation to contrast, exposure, lighting, sharpness, temperature, etc.
In addition, the app's simplified user interface empowers you to create your personalized Instagram photo editing workflow by saving your preferred selection of editing features. You can refine your Instagram photos with a few taps. If you like enhancing your Instagram photos with cinematic effects, VSCO is the top photo editing app you should check out.
3. Snapseed

Developed by Google, Snapseed is a mobile IG photo editor with a robust toolkit of Instagram image editing tools and features that you can conveniently use to enhance your photos on the go.
For example, the Details feature layers in texture to enhance the surface structure of your photo. On the other hand, the Brush tool allows you to adjust and modify color settings and parameters, such as warmth, brightness, exposure, and saturation.
The app packs quite a punch in the editing features and photo filters department. You get all the goodies, including vintage filters, HDR Scape, lens blur, face enhancement, and contrast adjustments. In addition, Snapseed also lets you create videos from photos.
4. AfterLight Photo Editor

Afterlight offers access to a rich filter library swarming with customizable filters designed by professional photographers.
You can enhance your Instagram visuals using gradient overlays, curves, and selective colors, making the Afterlight mobile app a versatile option for editing your images on the go. The free app version gives you access to basic editing features, tools, and filters.
5. Lightroom

Adobe Lightroom Mobile is a fantastic, feature-packed, cloud-based Instagram photo editing mobile app for Android and iOS that helps you streamline the process of editing and enhancing your pics on your phone.
The app has a fantastic advanced camera feature, allowing you to capture photos in Raw format. You can perform deep post-shot edits on your footage, such as adjusting white balance, correcting exposure, modifying saturation, etc.
Advanced editing features include adaptive presets for skies and portraits, auto removal of objects and people, and content-aware object/subject isolation. Lightroom should be your go-to Instagram editing app if you prefer using presets as filters.
The app's smart Highlight feature also empowers you to quickly and easily edit your photo's subject and background with a single tap.
Tips for Editing Your Instagram Photos More Attractive
Instagram is one of the most popular social media networks on the web with a massive community of almost two billion users. It's the perfect platform to capture and share your best moments, memories, adventures, and experiences quickly and easily.


Below, we'll share the best Instagram photo editing tips to help you make your photos more attractive and shareable.
Apply Effects or Filters
To enhance the visual quality of your Instagram photos, applying the correct effects or filters is an important factor. With the above apps we provided, everyone offers various filters and effects. If you may also want to edit instagram videos, you can try to use Wondershare Filmora.
Make Color Adjustments
Color adjustments help you polish your photos before posting them as stories and posts. You can adjust the sliders to modify the photo's temperature, color intensity, shadows, brightness, and more.
Bonus: How to Make Your Static Instagram Image Animated
Filmora Mobile Instagram Photo Editor is the perfect tool for transforming your photos into Instagram videos. You can convert a picture into a video by utilizing Filmora's image-to-video feature with simple steps:
- Download Filmora, install it, and launch it on your device.
Filmora for Mobile Filmora for Mobile Filmora for Mobile Filmora for Mobile Filmora for Mobile
Edit Videos on Your Mobile Phone with 1-Click!
- • Powerful Brand New AI Features.
- • User-friendly video editing for beginners.
- • Full-featured video editing for professionals.
4,085,556 people have downloaded it - From the welcome menu, select the Image to Video option.
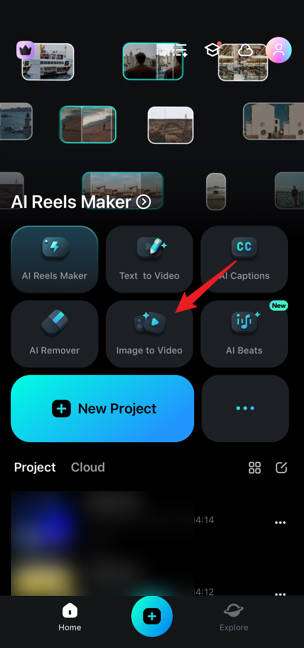
- Select one of the many available templates. You can choose Run Away, AI kissing, AI hugging, or type in the prompts.

- Tap the Upload button, then select the image you wish to animate. The Generate option will appear. Tap on that and wait for the result. When you are done, click the Save button.

Conclusion
This article outlined the best Instagram photo editor apps. Wondershare Filmora takes the lead as the ultimate Instagram photo editor for iOS and Android users. It allows users access to a vast collection of AI-powered photo editing and enhancement features, tools, filters, presets, templates, and effects.
Let's download the app and take Instagram photos to the next level.
