Planning an event and looking for a creative way to make it unforgettable? Learning how to create a Snapchat filter for an event is a fantastic solution! Personalized Snapchat filters let you add a personal touch while engaging your guests in a memorable, shareable experience.
So, how do you get started? Learning how to create a filter on Snapchat for an event might sound complicated, but it's simpler than you think. This guide will walk you through step-by-step instructions and tips for capturing the best moments. Let's dive in and transform your event into something extraordinary!
In this article
Part 1. How to Create a Snapchat Filter for an Event
Learning how to create a Snapchat filter for an event can make your occasion memorable. Many people create a Snapchat filter for weddings, birthday parties, or corporate gatherings. You can use two primary methods to create these filters: Snapchat's Geofilter feature and Lens Studio.

Method 1: Using Snapchat Geofilter
One[b] of the most popular ways to learn how to create a Snapchat filter for an event is by using Snapchat's Geofilter feature. It's a location-based overlay that users can apply to their snaps within a designated area and time frame.
To create a Snapchat filter using this feature, design the overlay on another tool before submitting it to Snapchat. Ensure your design follows Snapchat's submission guidelines, such as correct dimensions and file size. Please note that the accessibility of Snapchat Geofilters can differ depending on your location.
Watch the tutorial below to learn how to submit a Snapchat Community Geofilter:
Method 2: Using Snapchat Lens Studio
If you're looking for something more interactive, Lens Studio is the perfect option. For example, you can use this method to design a personalized lens by learning how to make a Snapchat filter for your wedding. This tool lets you design 3D effects, animations, and interactive filters. It offers augmented reality (AR) lenses that guests can interact with.
Watch the tutorial below to learn how to use Lens Studio:
Part 2. Other Solutions to Create Snapchat Filters for Events
While Snapchat Geofilters and Lens Studio are a popular choice for creating custom filters, they have limitations. For instance, the approval process for Snapchat submissions can take time. It might not be ideal if you're on a tight deadline or planning a last-minute event.
If you're planning a special occasion like a wedding and want to add a romantic and unique touch to your videos, there's another option. You can use a video editor like Wondershare Filmora to edit videos with Snapchat-style filter effects. With Filmora, you can customize your videos using filters, animations, and effects designed for your event.

Here's a step-by-step guide on how to make a Snapchat filter for weddings using Filmora:
Step 1 Launch Filmora and Create a New Project
Start by opening the latest version of Filmora on your computer. From the main menu, click Create Project, New Project. Make sure to set the Aspect Ratio to 9:16 for vertical videos, as this format is ideal for Snapchat.

Step 2 Import Your Media Files
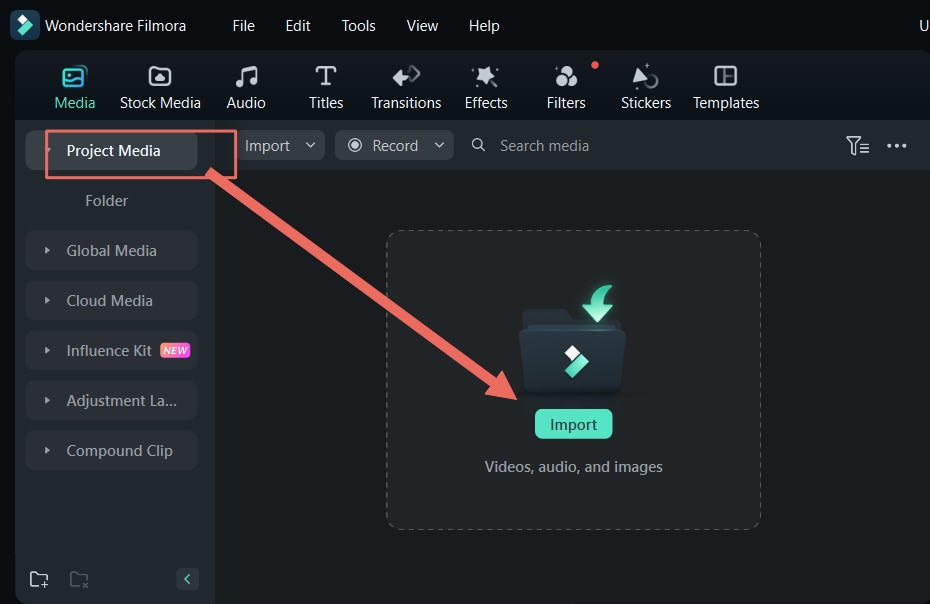
Go to Media, Project Media, Import to upload all the files you plan to edit for your video. Select your images and videos, and they'll appear in the media library.

Step 3 Adjust Videos Using Auto Reframe (Optional)
If your video isn't already in a vertical format, you can use the Auto Reframe feature to adjust it. Click on the uploaded video clip and choose the Auto Reframe option.

In the Auto Reframe window, set the Aspect Ratio to 9:16 to align it with Snapchat's vertical format. You can also modify the Motion Speed of the video. Click Analyze and let Filmora transform the video into vertical mode. Once completed, click Add to Timeline to continue editing the video.

Step 4 Add and Edit Text
Go to the Titles tab and select the text styles that you prefer. Then, drag and drop it to the timeline. Edit the text by going to Text, Basic on the editing panel.

Step 5 Add Stickers to the Video
Click on the Stickers tab at the top of the screen and explore the available options. Once you find a sticker you like, download it and drag it onto the timeline. Use the preview panel to adjust its position.

Step 6 Add Background Music
You can also add background music to your video. Go to Audio, Music and type the music you want to add. Preview the music by clicking on each audio. If you've found the music that you'd like, drag and drop it into the timeline.

Step 7 Export Your Finished Video
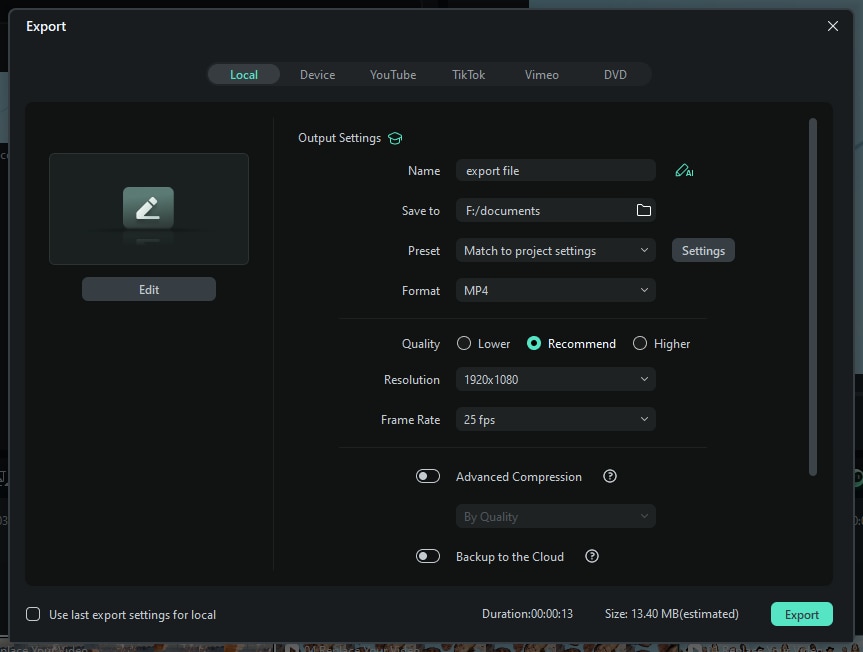
When you're satisfied with your edits, click the Export button. In the export window, select the Local tab and configure the settings to your preference. Tap Export to save the video to your device.

With these steps on how to create a Snapchat wedding filter, you can edit your video that captures the essence of your event.
Bonus: Compile and Show the Best Moments from Your Event
Once your custom Snapchat filter is live, and guests start using it, you can create a compilation video to capture the event's highlights. Using Filmora makes this process simple and efficient, especially with its pre-designed templates and easy editing tools.
By compiling your event footage, you're not only creating a beautiful keepsake. But, you also showcase the success of learning how to create a Snapchat filter for an event. It's the perfect way to make your memories last!
With Filmora, you can effortlessly compile and showcase the best moments from your event. Select your favorite clips, arrange them on a timeline, and add transitions, music, and effects to create a seamless and memorable highlight reel. Whether it's the emotional vows, the fun dance floor moments, or the intimate speeches, you can beautifully edit and present the most special parts of your event in a captivating video.
Conclusion
Learning how to create a Snapchat filter for an event is a simple yet powerful way to make your occasion unforgettable. From Geofilters to Lens Studio, the tools are accessible and versatile. They help you create filters that perfectly match your event's theme and style.
You can also edit a video with Snapchat-style filter effects for a special day like a wedding using Filmora. With its easy-to-use editing features, you can edit videos that capture the memory of your event. Start creating your custom filters now and let your guests share the magic!


 100% Security Verified | No Subscription Required | No Malware

