

 TL;DR:
To effectively enhance photo quality in Photoshop without destroying original details, strictly sequence your workflow by upscaling the resolution first with AI tools, correcting colors second, and applying targeted edge sharpening last on non-destructive duplicate layers.
● The Generative Upscale feature provides 2x or 4x AI enlargement using models like Firefly, but its output is currently restricted to a maximum of 4,096 pixels on the long edge and may cause detailed textures to appear synthetic.
● For precise manual refinement, convert working layers into Smart Objects to allow reversible edits, and apply the High Pass filter set to the Overlay blend mode to isolate and sharpen only fine edges rather than the entire image.
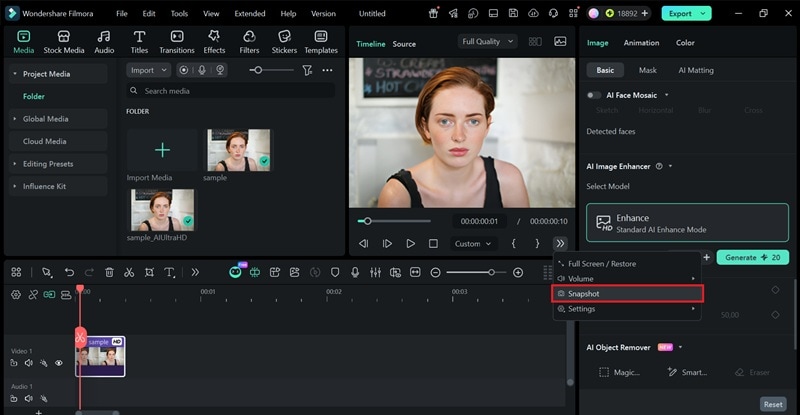
● Wondershare Filmora provides a fully automated AI Image Enhancer alternative supporting up to 4K resolution, making it best for content creators needing rapid fixes for slightly blurry photos, though it is not recommended for extremely damaged files or complex text.
Ask AI for a summary
 ChatGPT
 Perplexity
 Gemini
 Claude
 Grok
Grok
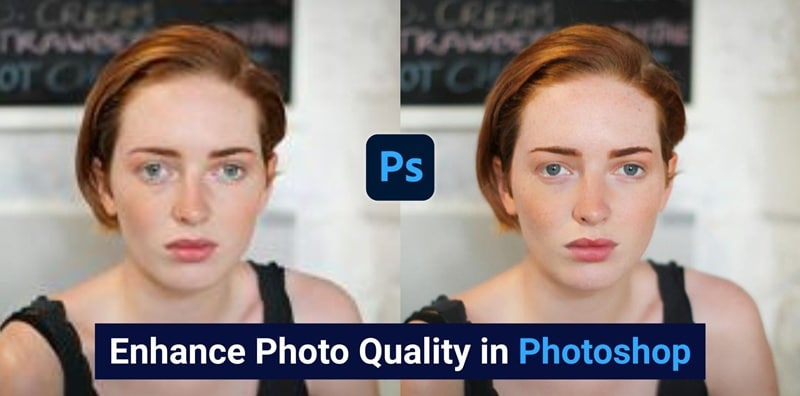
If you're wondering how to enhance photo quality in Photoshop, there are built-in AI tools, sharpening techniques, and smart adjustments that can make your image clearer, sharper, and more detailed.
These features allow you to increase image quality in Photoshop by intelligently filling in missing pixels and smoothing out rough edges. Keep reading because some methods take just one click, while others give you much more control depending on your image.
Part 1. Quick Ways to Boost Photo Quality in Photoshop (Step-by-Step)
If you want results fast, Photoshop's AI tools can handle a lot of heavy lifting. They work for low-resolution images, compressed files, or old photos that need restoring. This approach includes:
- Using Generative Upscale to increase resolution while rebuilding lost details.
- Using Neural Filters to enhance faces, reduce noise, and restore overall image quality.
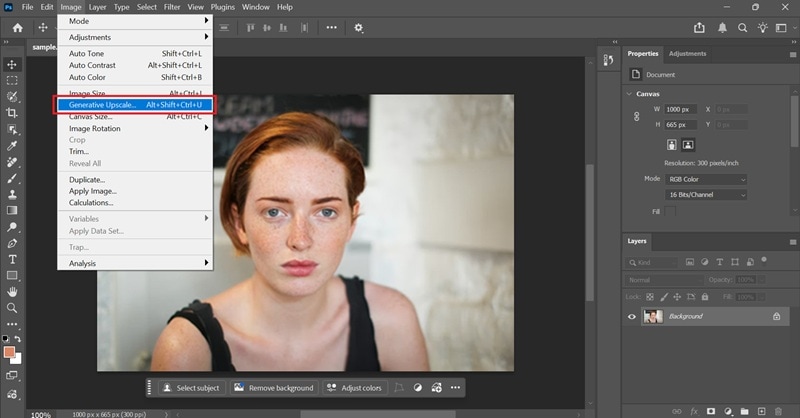
Method 1: Increase Your Image Quality with Generative Upscale
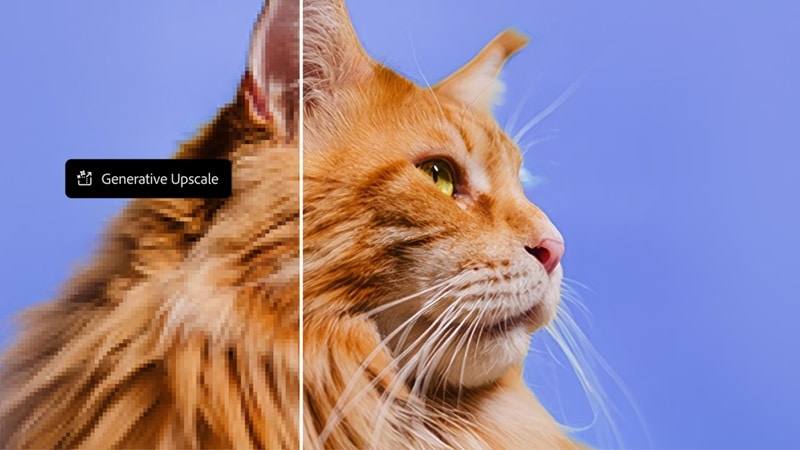
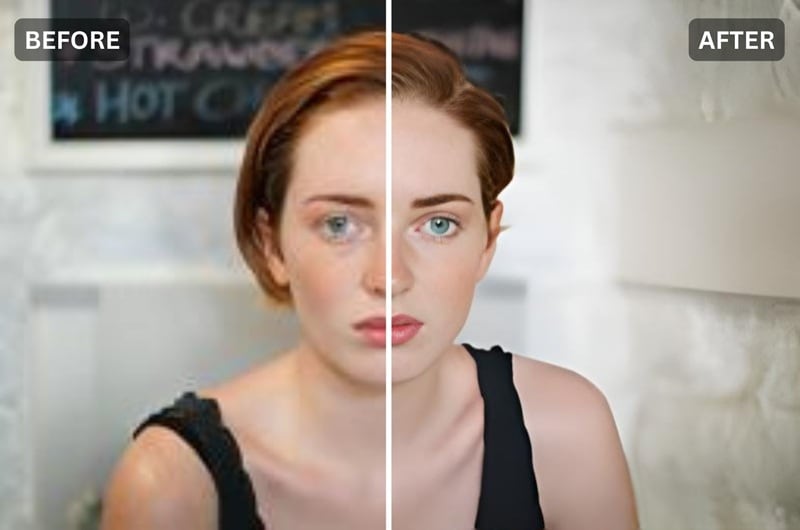
Generative Upscale is the fastest way to increase image quality in Photoshop. It's a new image enhancement feature that can enlarge a low-resolution or low-detail image by generating new detail using AI. To start enhancing with Generative Upscale, we'll demonstrate using Photoshop 2025 in our tutorial below.
How to enhance an image in Photoshop:

- Firefly Upscaler: Restores low-resolution images (up to 6144 × 6144 px)
- Topaz Gigapixel: Preserves existing detail (requires a premium subscription; up to 56 megapixels)
- Topaz Bloom: Adds new detail, best for AI-generated images (requires a premium subscription; up to 9 megapixels).
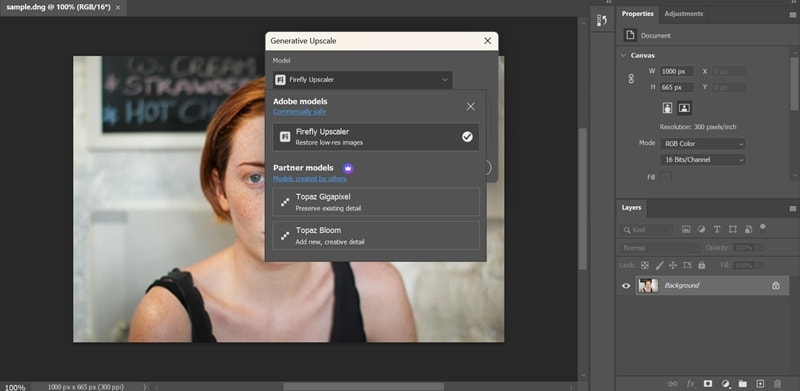
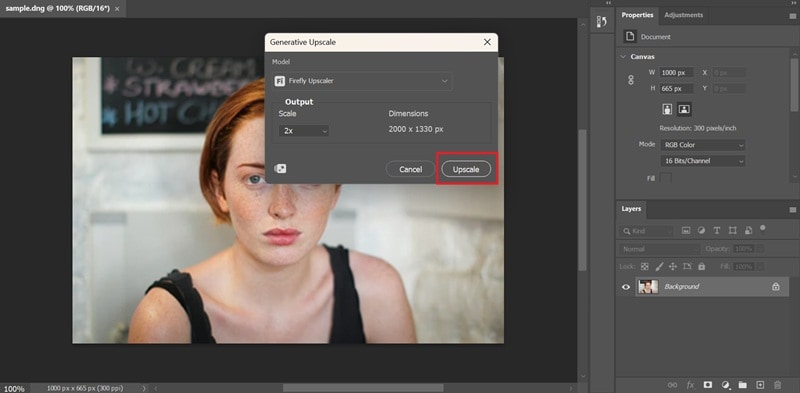
Note: The current maximum output is 4,096 pixels on the long edge, which can restrict very large enlargements. In some cases, AI-generated pixels can look “plastic” or “synthetic,” particularly on detailed textures like feathers or hair.
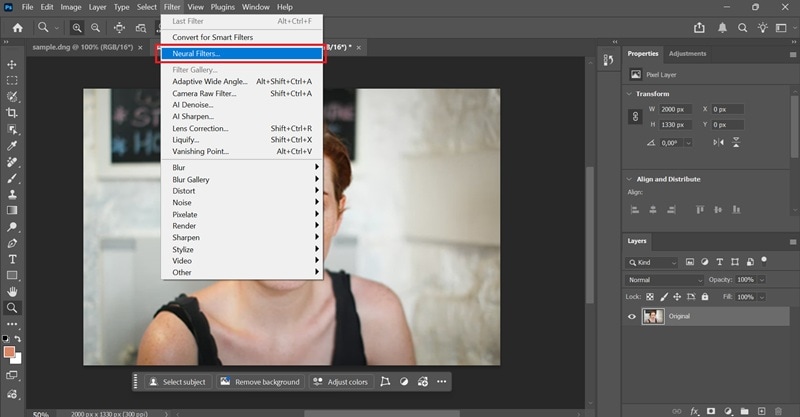
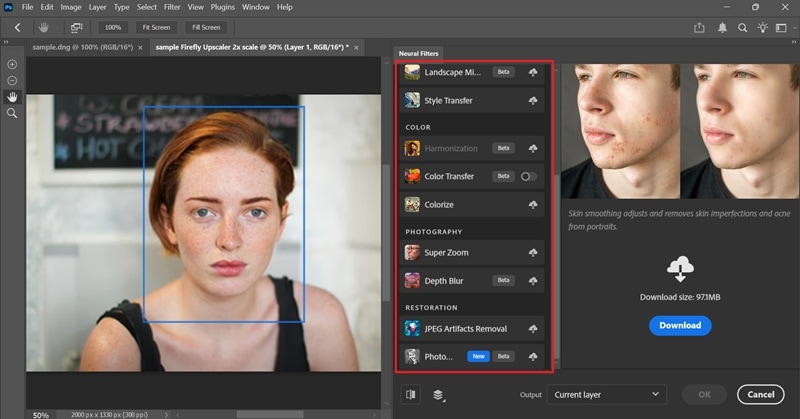
Method 2: One-Click Improvements Using Neural Filters
If you want to enhance a photo in Photoshop without manual tweaking, use Neural Filters. They are AI-powered tools for quick fixes like restoring faces and removing artifacts.
How to increase photo quality in Photoshop
- Super Zoom: Zooms in and crops an image while letting Photoshop add detail to compensate for the resolution loss
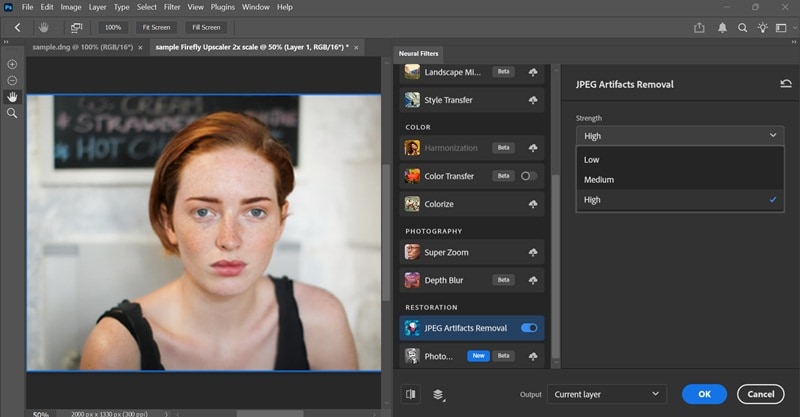
- JPEG Artifacts Removal: Removes blocky artifacts resulting from JPEG compression
- Photo Restoration: Uses an AI-trained model to restore old or damaged photographs
Part 2. Traditional Tools That Still Matter
If your image just needs a little contrast boost, a bit of sharpening, or some noise cleaned up, you can use these tools in Photoshop to help you enhance your photo:
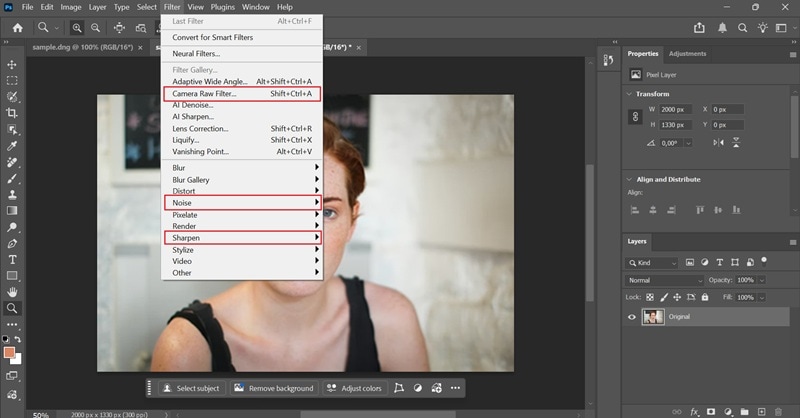
- Camera Raw Filter (Filter > Camera Raw Filter): Controls exposure, clarity, texture, and sharpness. Best starting point for any image.
- Smart Sharpen (Filter > Sharpen > Smart Sharpen): Enhances edges and detail without making the image look unnatural.
- Reduce Noise (Filter > Noise > Reduce Noise): Removes grain and compression artifacts from low-quality images.
- Curves & Levels (Layer > New Adjustment Layer > Curves/Levels): Adjust contrast and tones to make images look sharper and more defined.
Part 3. Common Mistakes That Ruin Image Quality
Knowing how to enhance image quality in Photoshop also means knowing when to stop. Even with the right tools, these mistakes can make things worse:
1. Over-sharpening everything: Overusing noise reduction makes people look like mannequins. Start with a low setting and slowly increase it while checking the image to keep some natural skin texture.

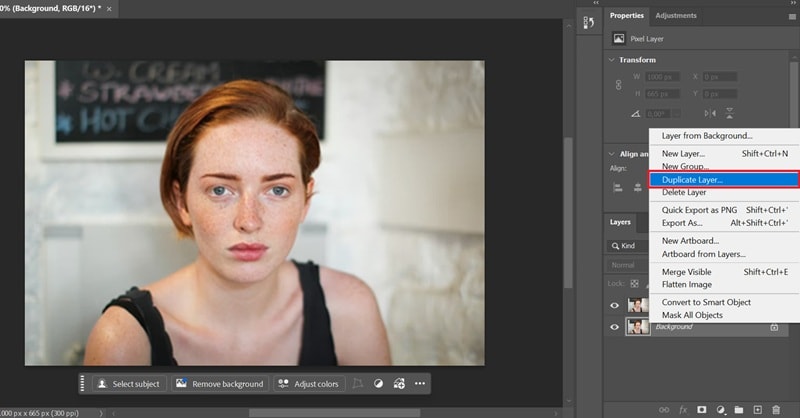
2. Editing on the original layer: Always work on a duplicate layer instead of editing the original image. When something goes wrong, you can still revert, adjust, or delete the edit without affecting the original image.
3. Over-Saturating: Boosting quality isn't just about color. Making colors too "neon" actually hides the fine details you're trying to save. Keep the color balanced and natural instead of overly vivid ones.

Part 4. Smart Tips to Improve Picture Quality in Photoshop Faster
Want better results without wasting time? Follow these quick tips to enhance an image in Photoshop like a pro editor:
- Zoom to 100% before you call it done. Photoshop's default fit-to-screen view often hides problems, like halos, noise, and soft patches. Press Ctrl+1 (Cmd+1 on Mac) to view the image at actual pixel size before exporting anything.
- Use Smart Objects before filtering. Right-click your layer and "Convert to Smart Object," so you can adjust settings later instead of starting over. Just double-click the filter in the Layers panel to tweak it anytime.
- Use the High Pass filter for precise edge sharpening. Duplicate your layer, go to Filter > Other > High Pass. Then set that layer's blend mode to Overlay. It targets only the edges and fine detail.
- Work in stages. Upscale the resolution first, fix the colors second, and do the final sharpening last. It will help you keep better control over the overall quality.
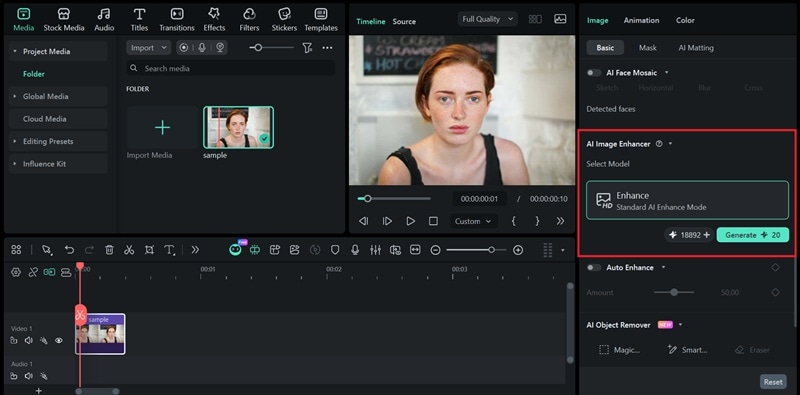
Part 5. Looking for a Faster Fix? Try Wondershare Filmora
Photoshop is not the only tool that can improve photo quality. If you find it too complex or time-consuming, Wondershare Filmora offers a simpler way to enhance images using AI.
Filmora's AI Image Enhancer feature improves clarity, restores details, and reduces noise automatically. It also applies extra refinement to faces and blends the result naturally back into the image. You don't need to adjust anything manually, and it works efficiently for images up to 4K resolution.
How to Enhance Photo Quality in Filmora

- Sharper Visuals, Less Effort: Improves clarity in blurry images and makes them look more defined with just one click.
- Better Detail Where It Matters: Enhances textures, edges, and facial features without heavy editing.
- Cleaner Image Output: Reduces grain and compression artifacts for a more natural result.
- Makes Low-Quality Images Usable Again: Helps turn old or compressed images into assets you can actually use.
Note that this tool works best on photos that are just a little bit blurry or low-res. It might struggle with super complex details (like tiny text) or images that are extremely damaged.
- Content creators who need a sharp YouTube thumbnail or Instagram cover fast.
- Marketing Professionals who want to polish up product photos for a quick ad without a full photoshoot.
- Anyone who's trying to make an old, grainy family photo look a bit clearer before sharing it online.
Conclusion
You've learned how to improve photo quality in Photoshop, depending on what your image actually needs. AI-powered tools like Generative Upscale and Neural Filters work best for low-resolution or compressed files. Even if your image just needs a minor cleanup, traditional tools like Camera Raw, Smart Sharpen, or Curves can handle it with more control and precision.
If Photoshop feels like too much for a quick fix, Filmora's AI Image Enhancer gets the job done fast. It's best for photos that are slightly blurry or low-res, since it works automatically without any manual adjustments.
FAQs About Enhancing Image Quality in Photoshop
-
What's the best way to improve picture quality in Photoshop for portraits?
Start with Camera Raw to fix exposure and clarity, then use the Neural Filters panel and enable Photo Restoration if the image is old or damaged. For sharpening, Smart Sharpen works better than Unsharp Mask on faces because it gives you more control over how edges are handled. Keep noise reduction moderate so skin texture doesn't disappear completely.
-
Is it better to sharpen or upscale first?
It's better to upscale first, then sharpen. When you sharpen a low-resolution image before upscaling, those sharpened edges get stretched and distorted during the enlargement process, which can make things look worse. Upscaling first gives you more pixels to work with, so it will be more precise and natural when it comes to sharpening your image.
-
What is the best file format for high-quality editing?
When enhancing photo quality in Photoshop, it's better if you work in PSD or TIFF while editing. Both formats are lossless, meaning no quality is lost every time you save. JPEG compresses the file each time you save it, which gradually degrades quality over multiple edits. But when you're done editing, export to JPEG (for web use) or TIFF (for print), depending on where the image is going.
