

Motion blur is essential for cinematic, natural-looking movement in fast action video. This comprehensive guide shows you exactly how to add motion blur in DaVinci Resolve for both the Free (using Fusion nodes) and Studio versions. Learn the best settings to fix artifacts, and discover a simple, one-click alternative with Filmora for faster results.
Part 1: What is DaVinci Resolve?
DaVinci Resolve is a professional video editing software trusted by filmmakers, editors, and content creators. It's most famous for its color grading tools, but you can also use it to do basic to advanced video editing, audio post-production, visual effects, motion graphics, and more.
How DaVinci Resolve Works
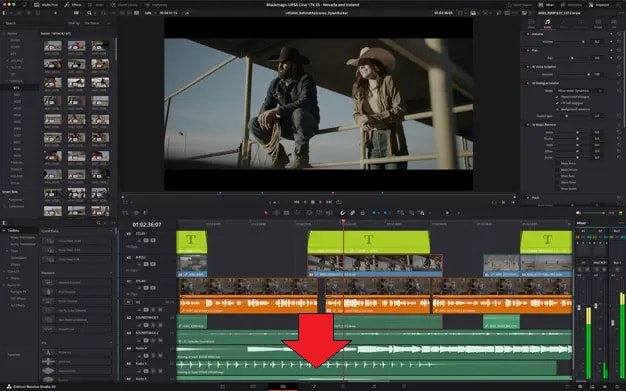
If you look at the bottom of the interface, DaVinci Resolve is organized into pages, with each page focused on a different stage of editing:
- Edit page: where you cut and arrange clips.
- Color page: used for grading and detailed image adjustments.
- Fusion page: provides tools for visual effects and compositing.
- Fairlight page: handles audio mixing.
- Deliver page: prepares your video for export.
Understanding this structure is important because DaVinci Resolve motion blur can be added in more than one way. Once you're familiar with this layout, it becomes much easier to follow the right steps and avoid getting lost in the process.
Part 2: How to Add Motion Blur to Videos in DaVinci Resolve?
You can add motion blur in DaVinci Resolve in different ways:
- The free version relies on Fusion nodes or simple blur tricks. Nodes act like building blocks that control specific effects or adjustments. You can connect them in different ways to create the results you want in one sequence.
- DaVinci Resolve Studio, on the other hand, includes a dedicated Motion Blur effect. This method is faster, since you don't need to manually build it through nodes.
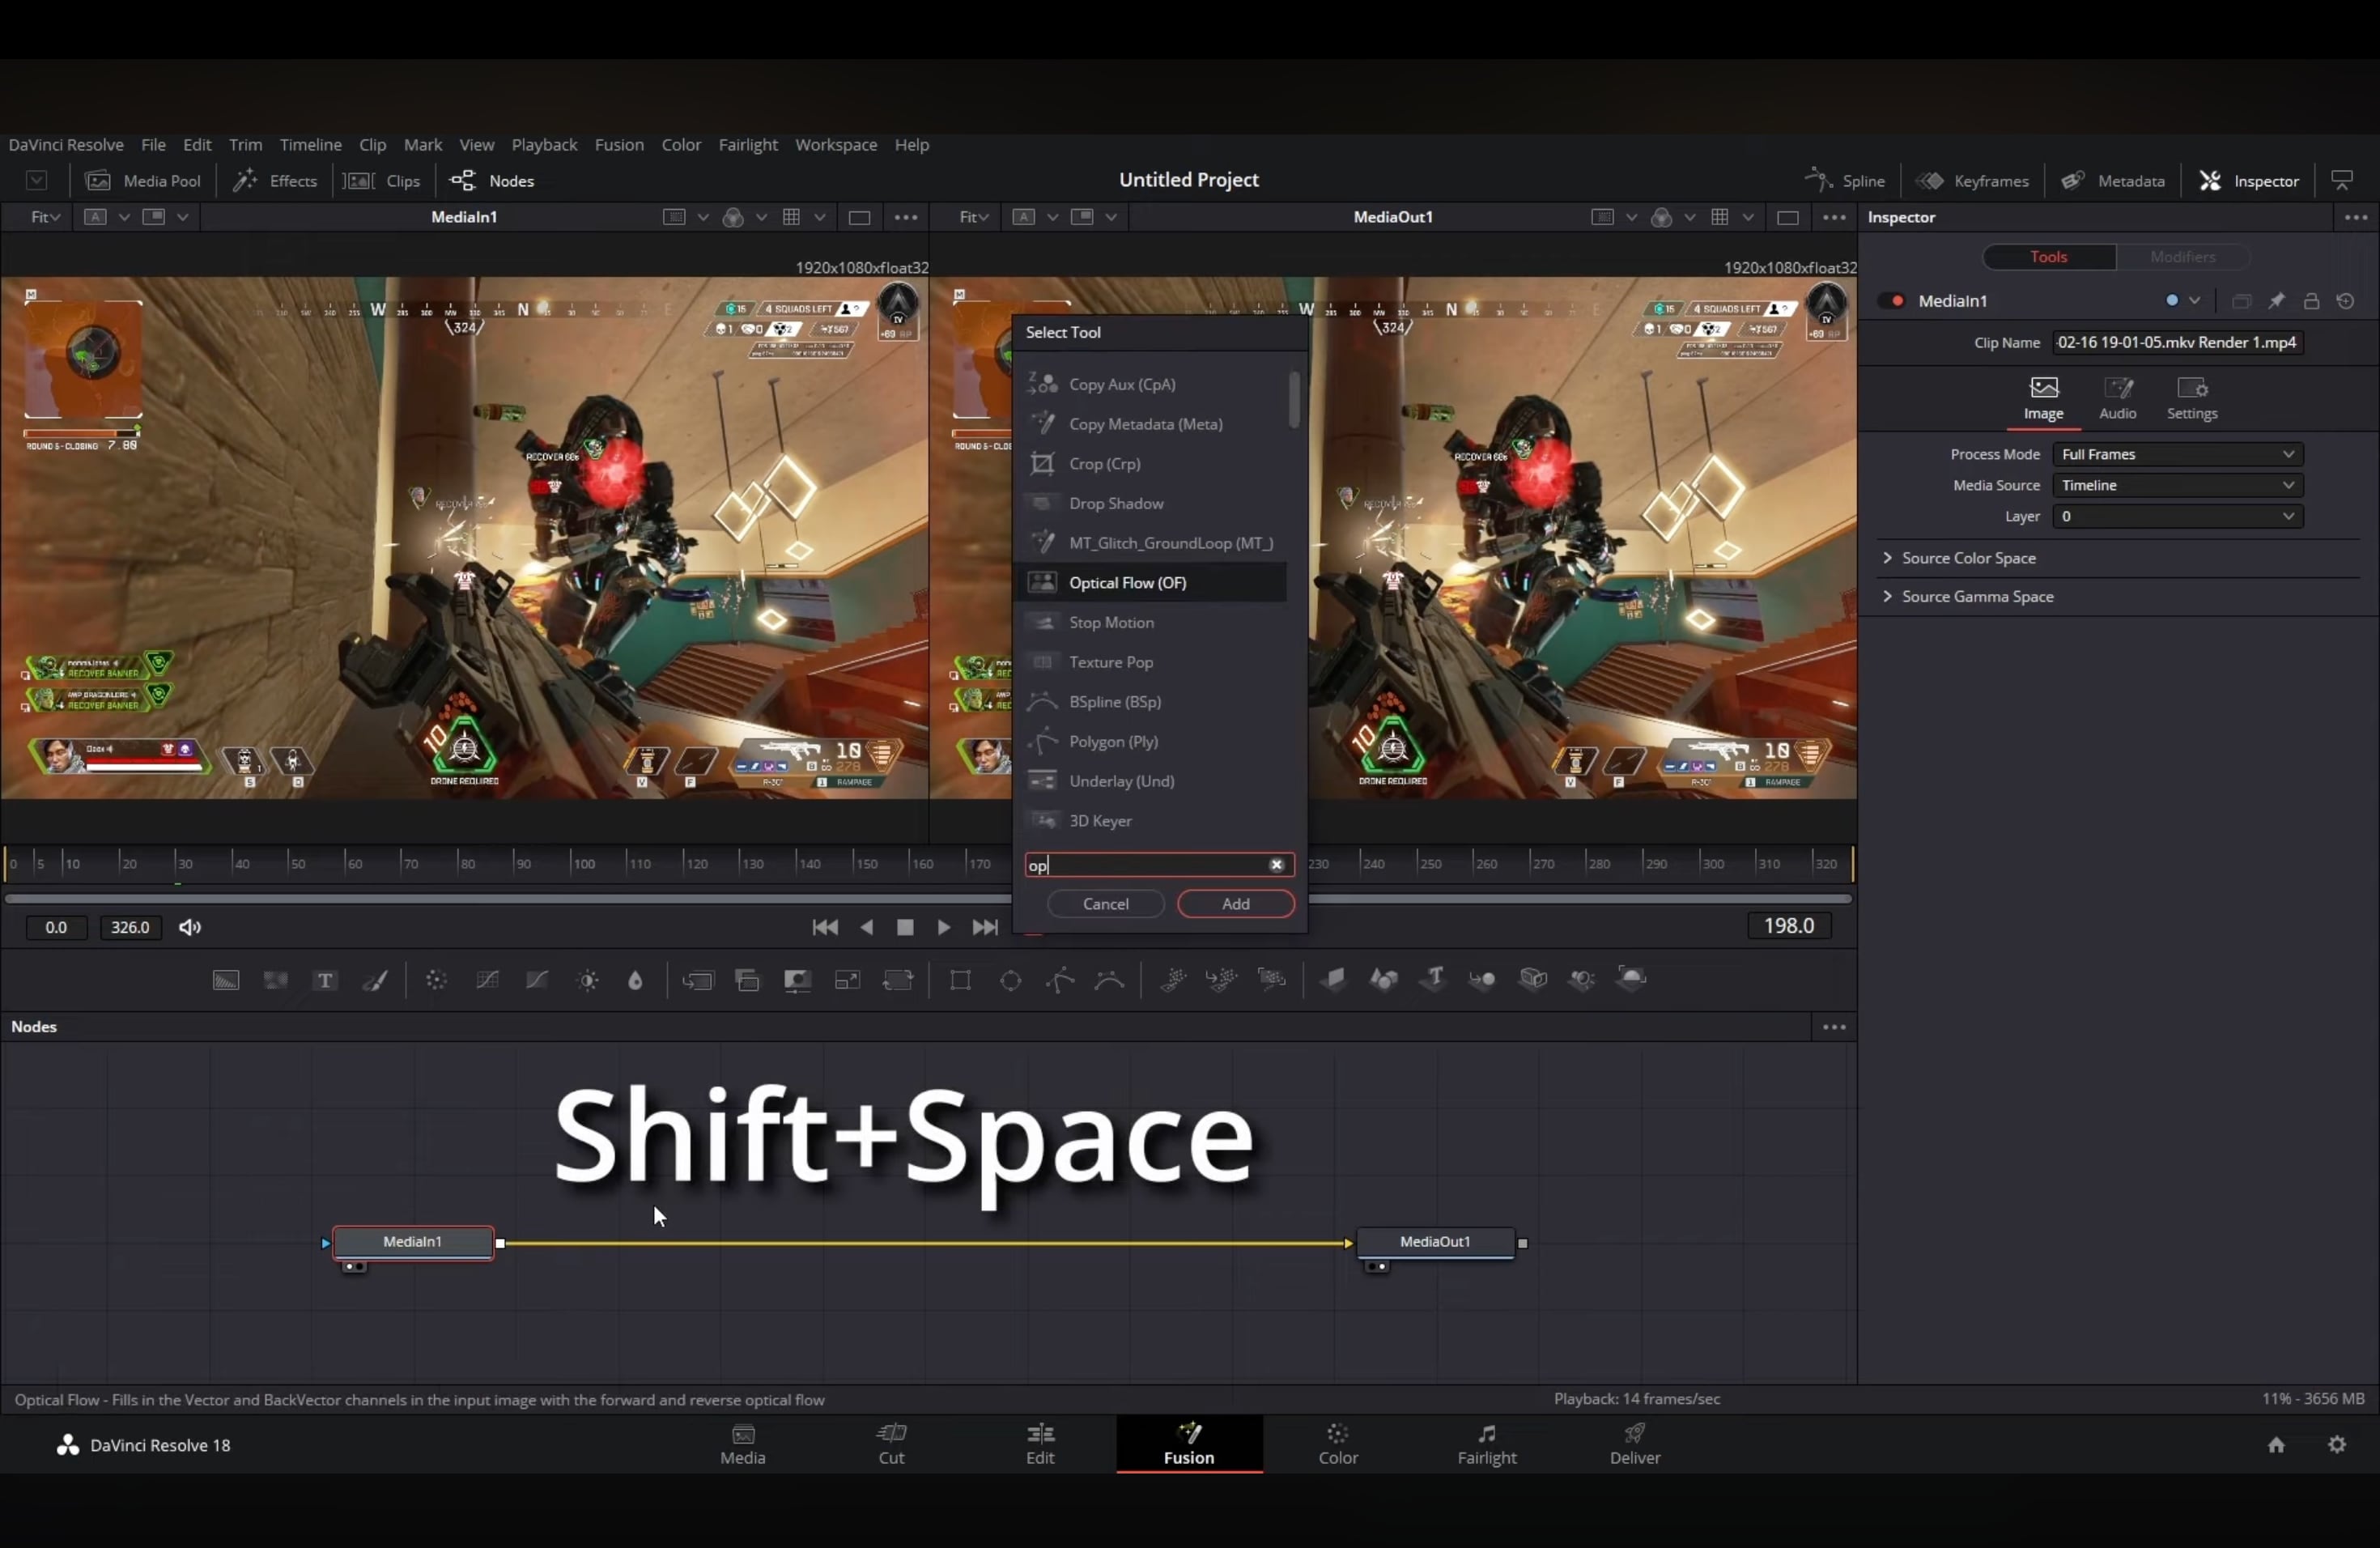
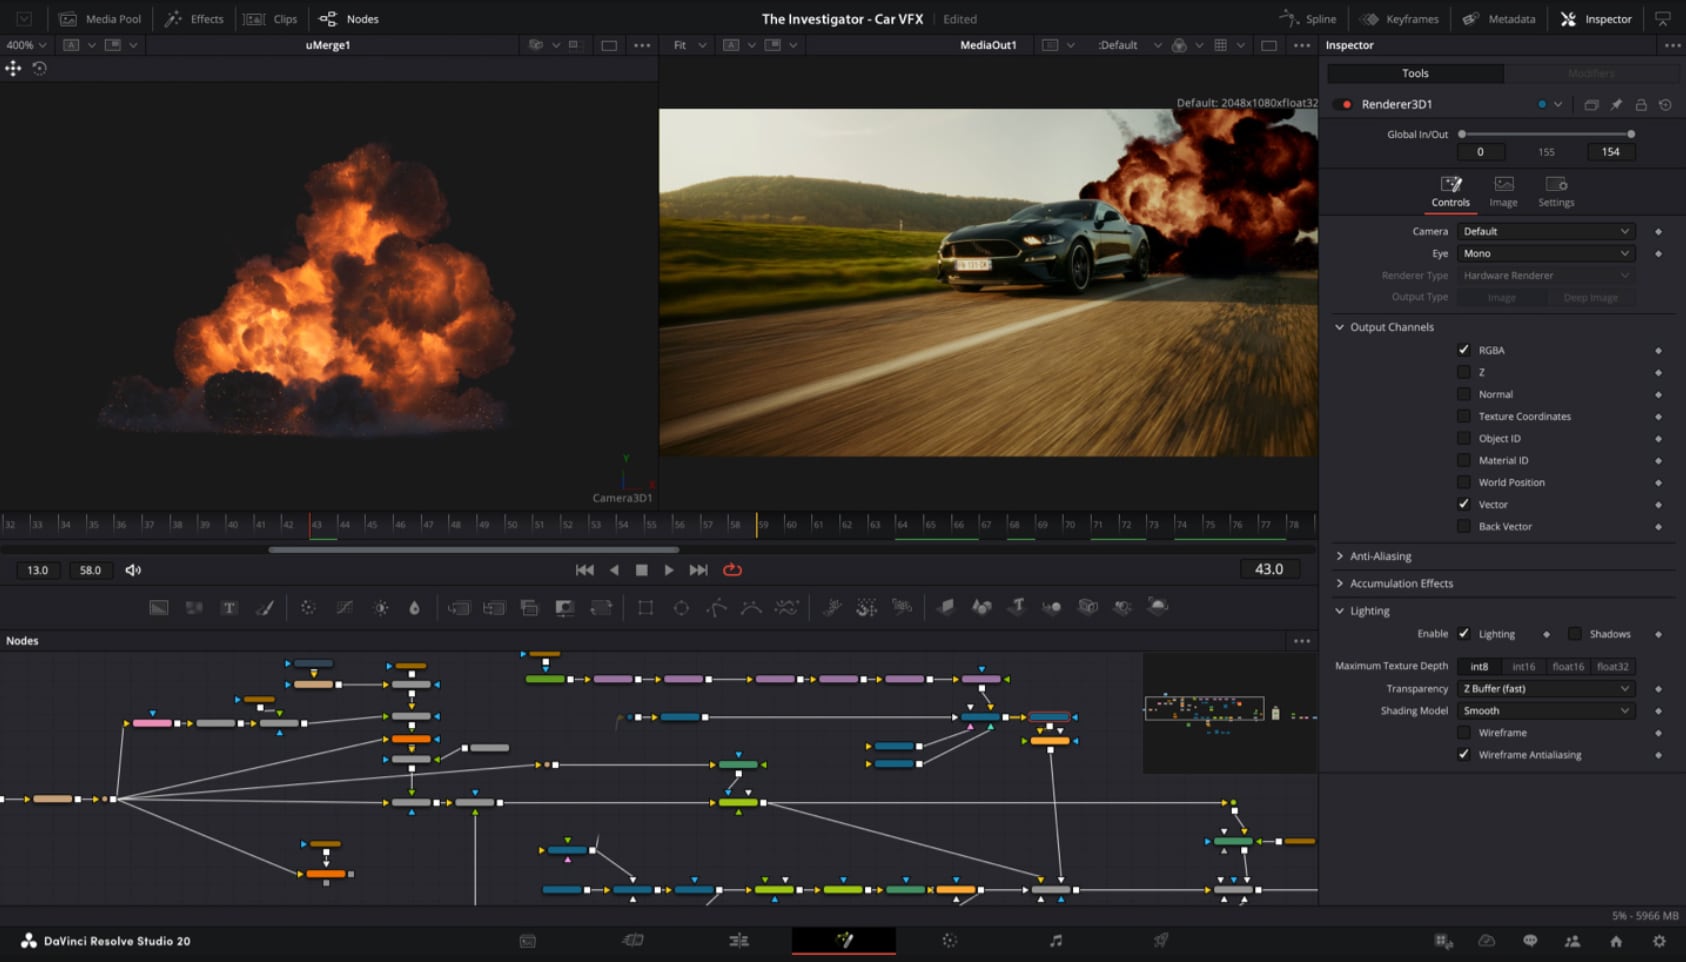
Free Method: Fusion Optical Flow + Vector Motion Blur
In the free version, the most reliable way to add motion blur is through the Fusion page. This method uses Optical Flow to analyze movement and Vector Motion Blur to apply the blur effect.
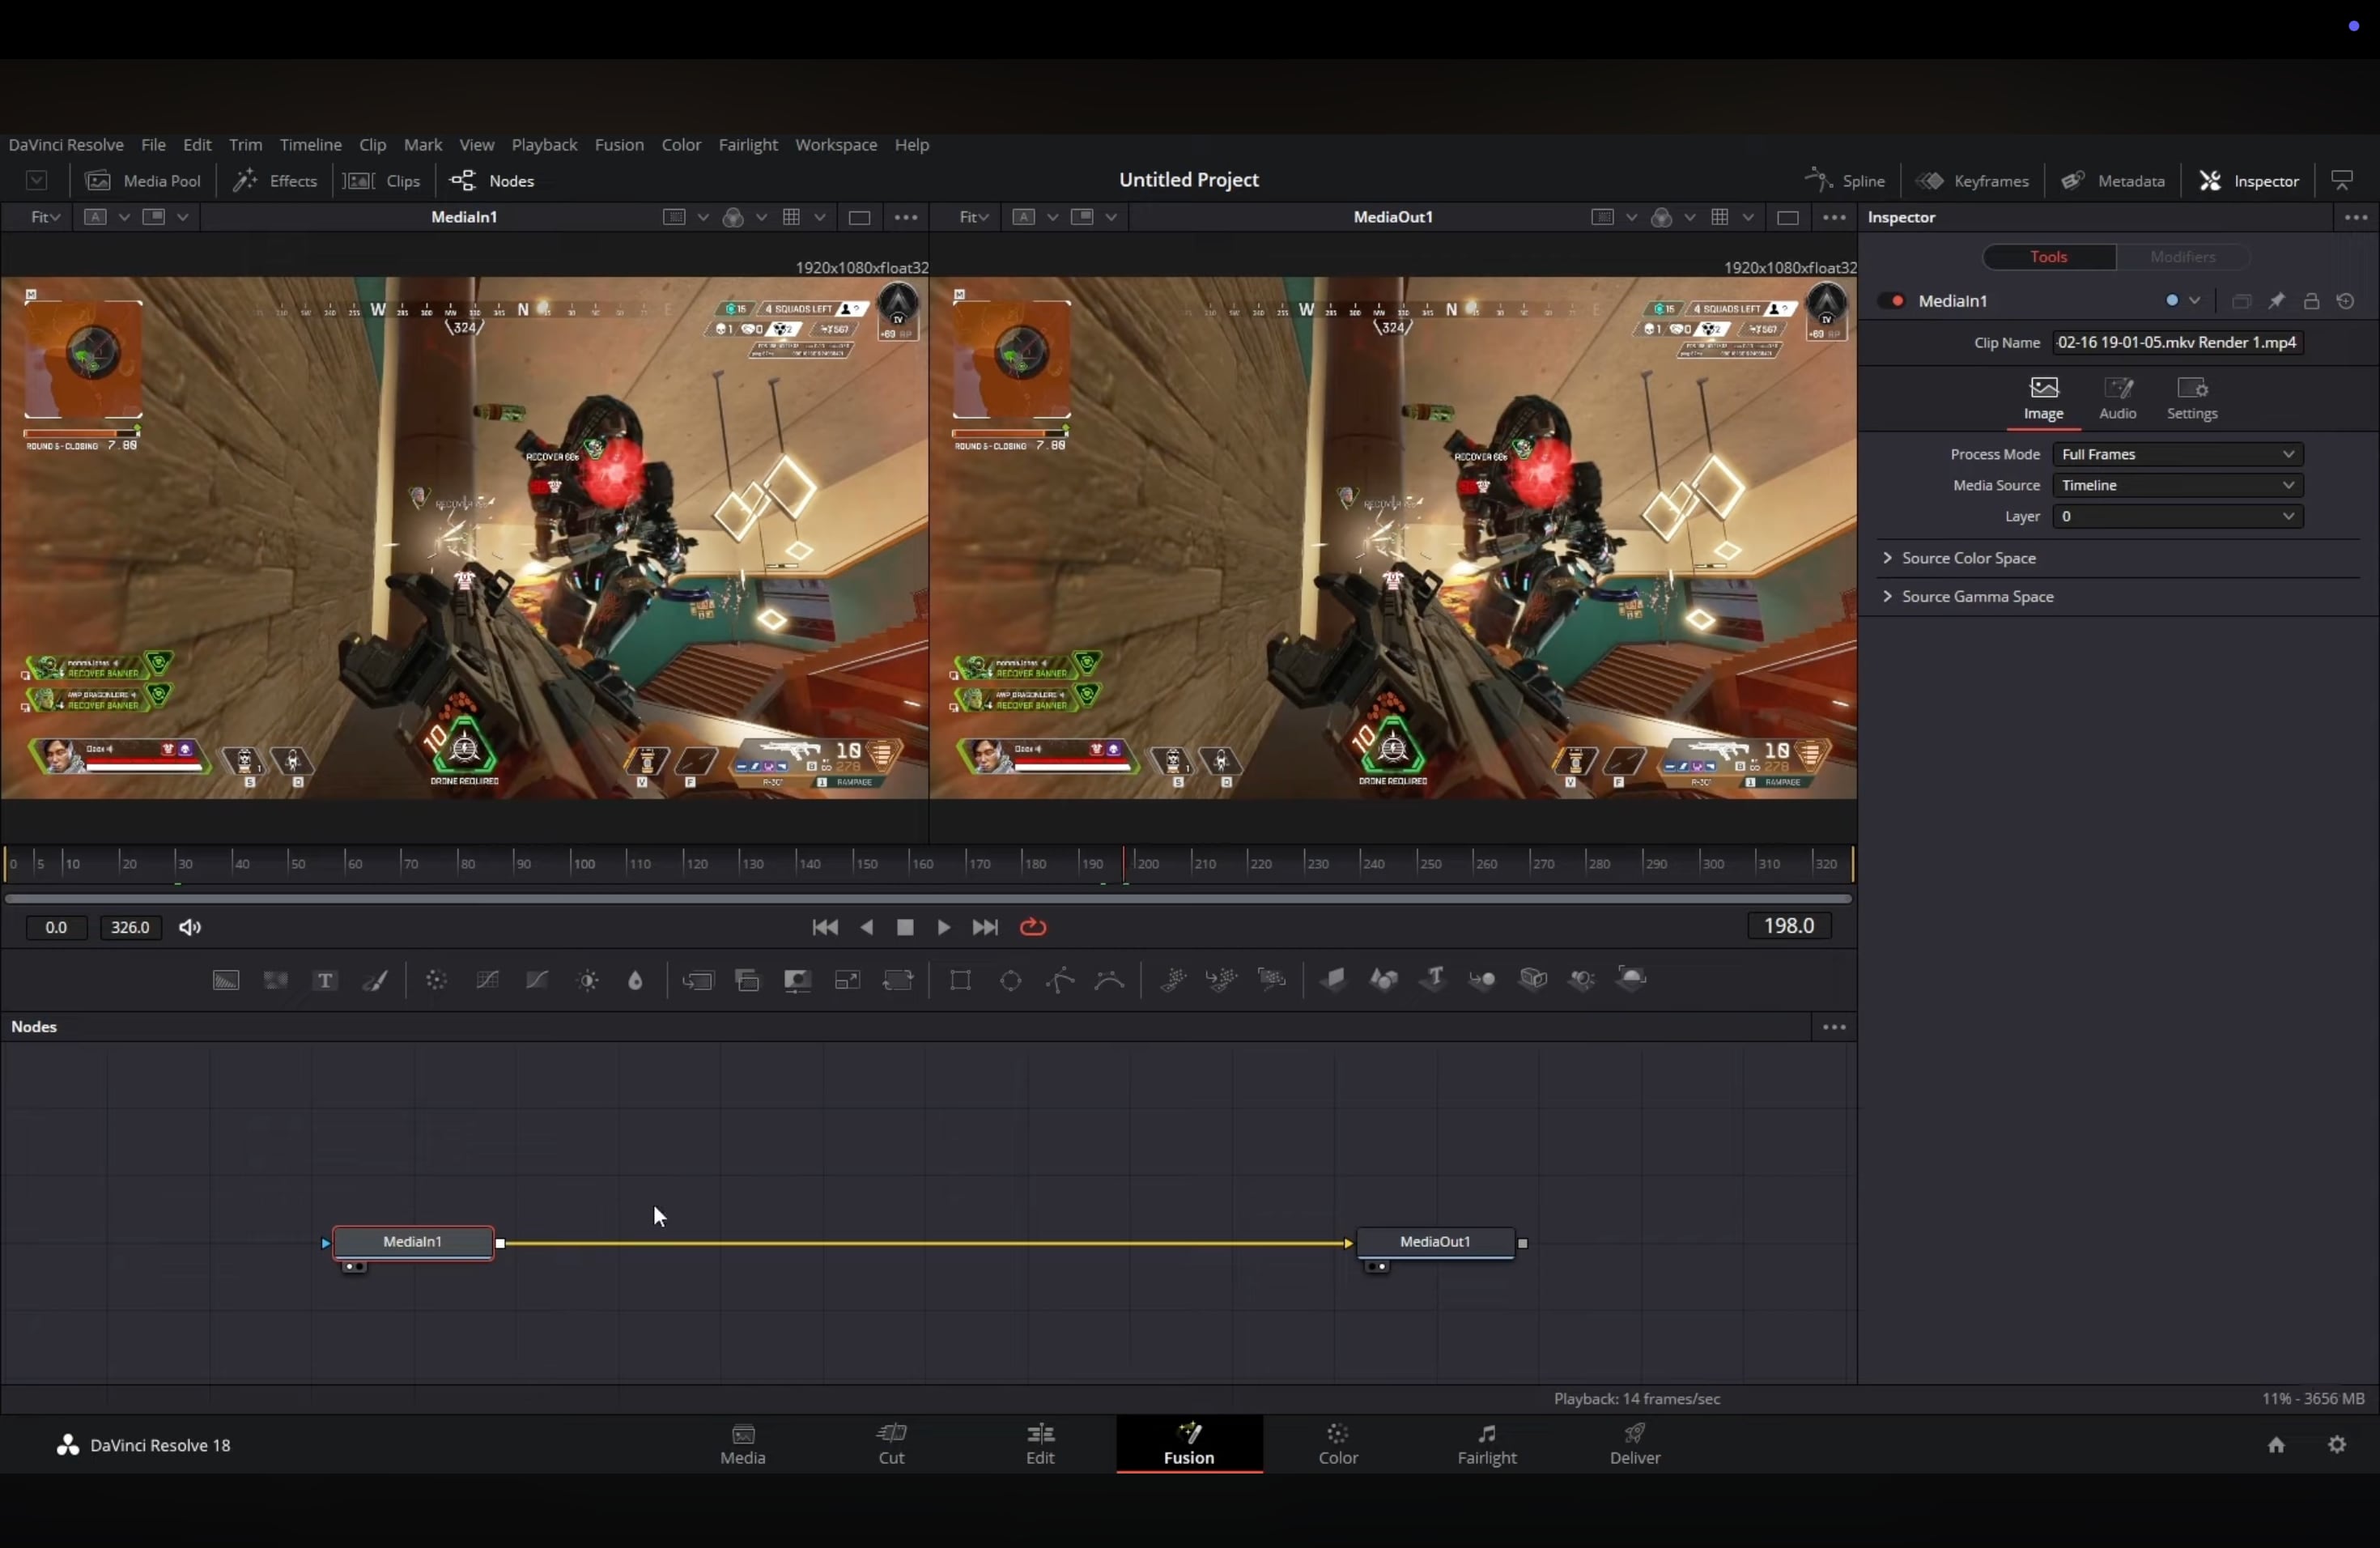
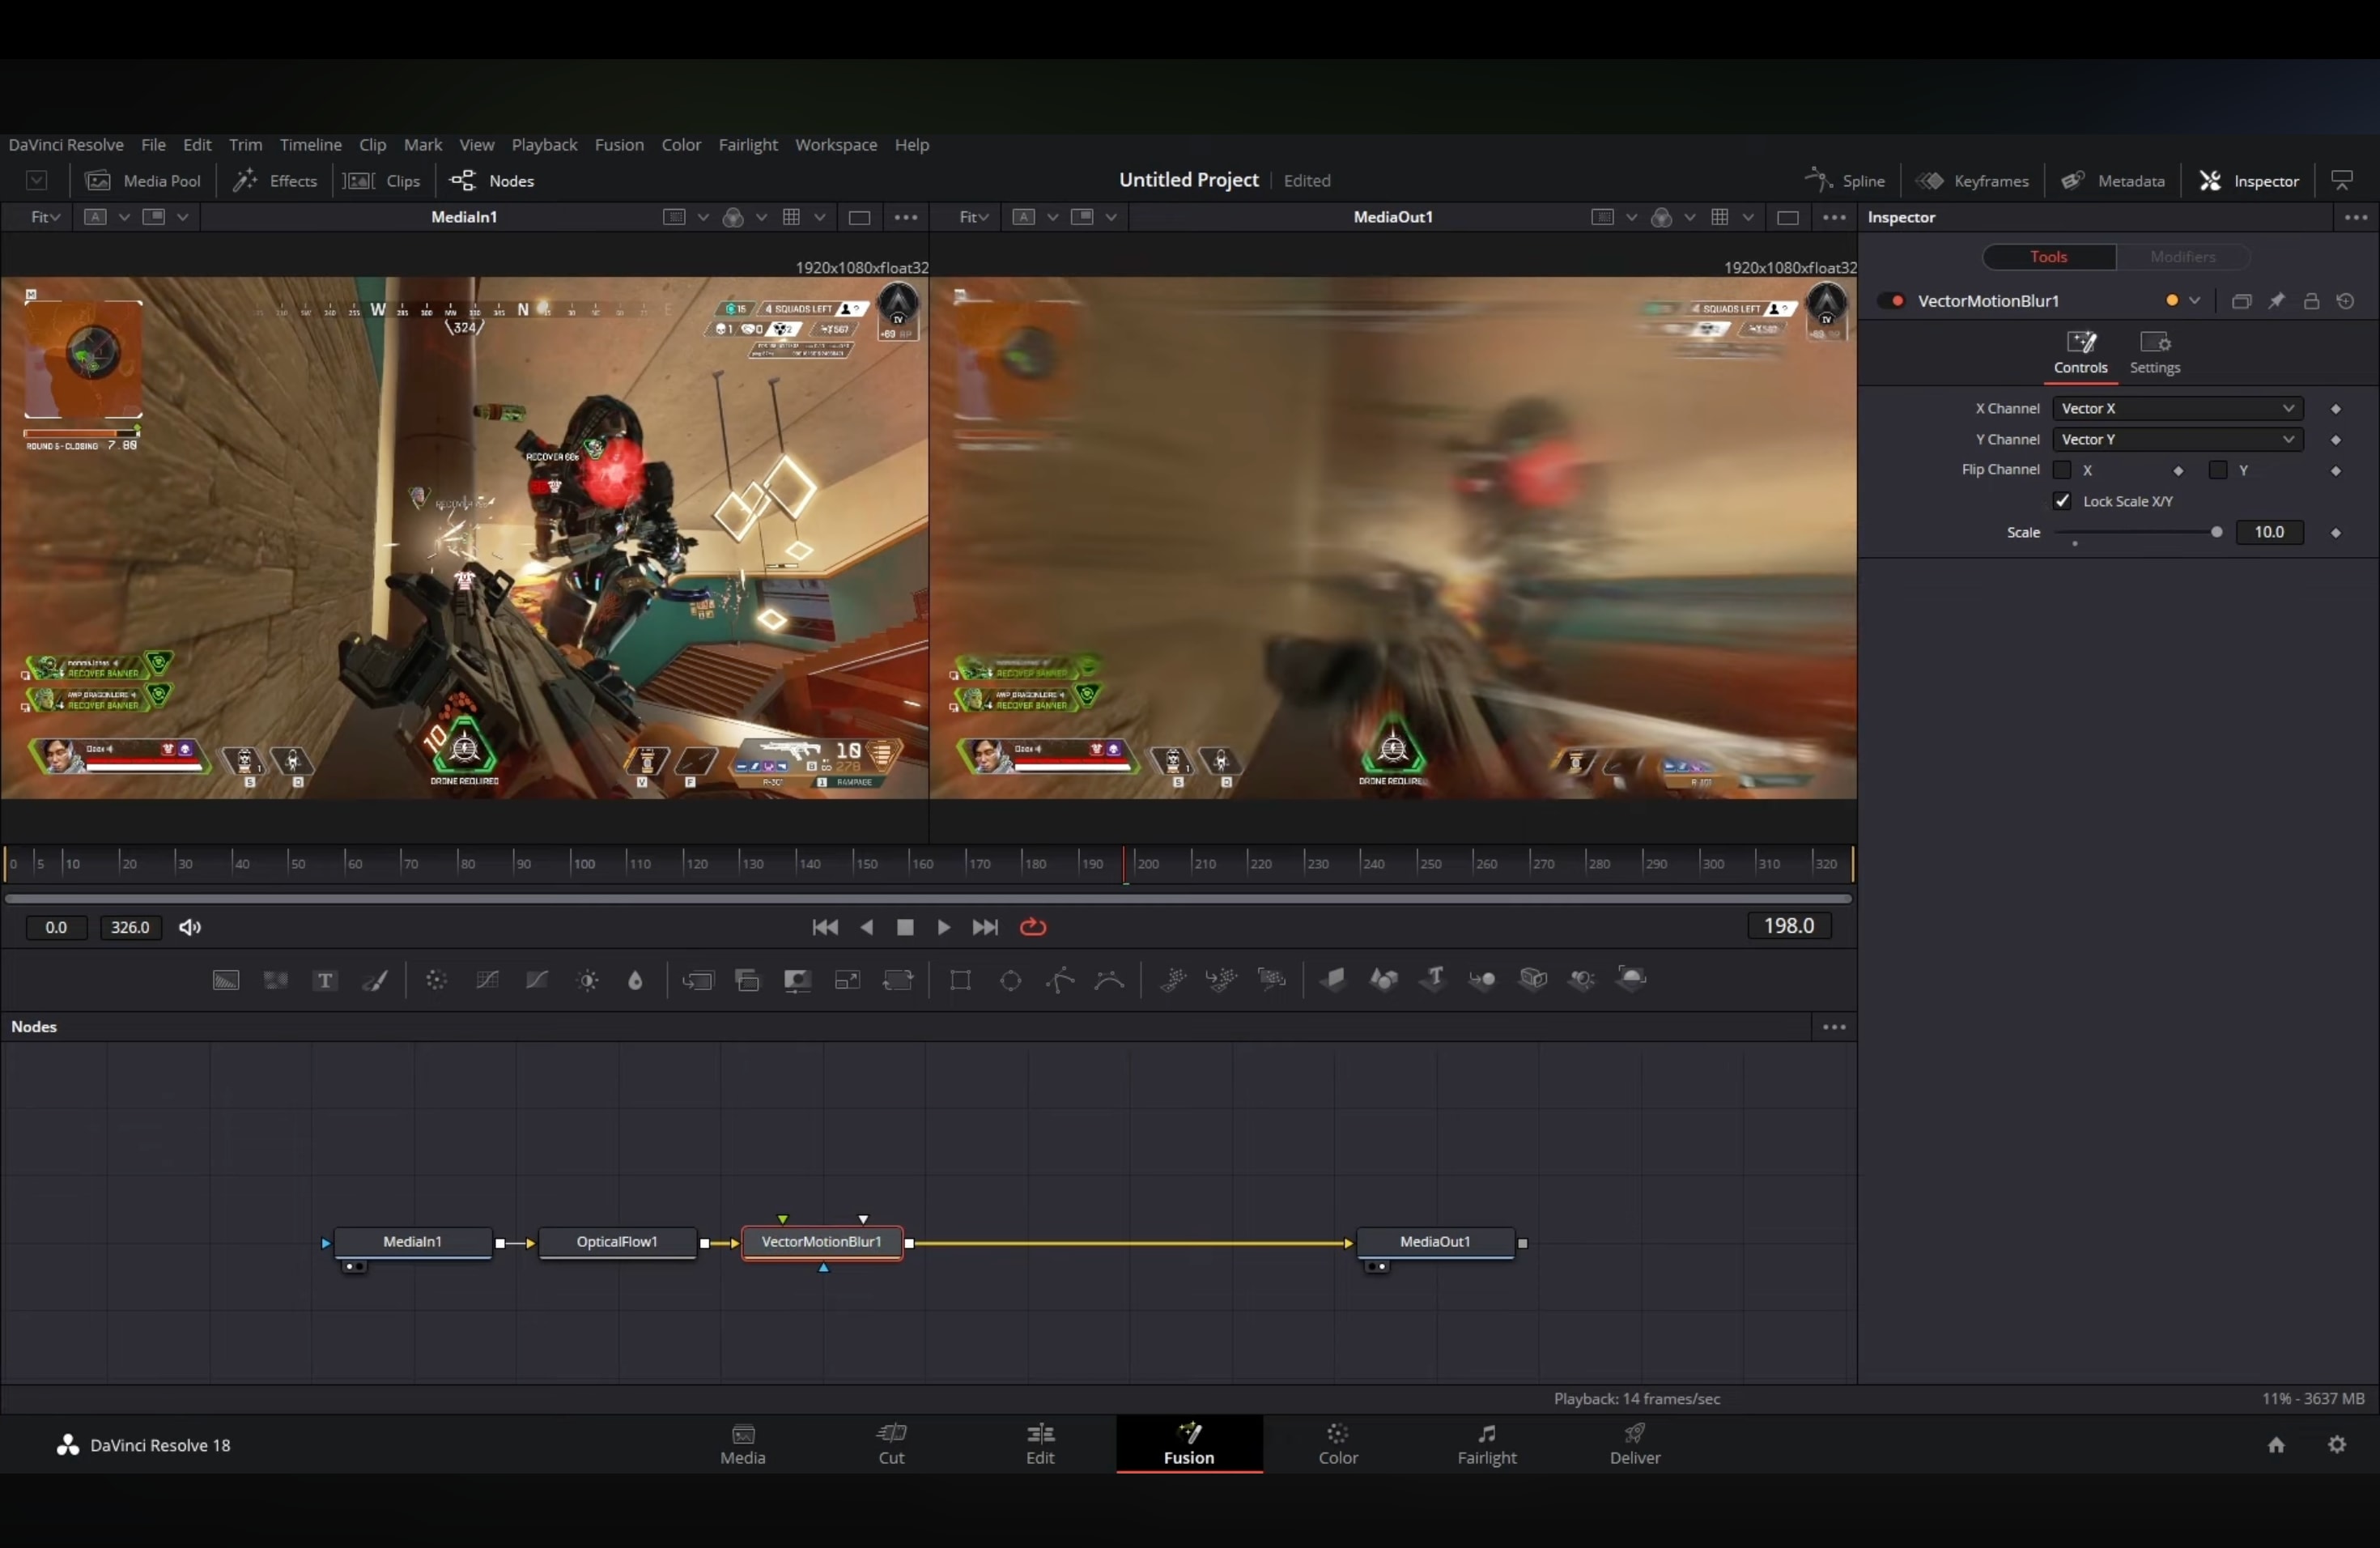
Note: This Fusion workflow is the best option for motion blur in DaVinci Resolve Free, even though it takes extra steps. And because this method requires more processing, it is best used after you complete most of your editing.
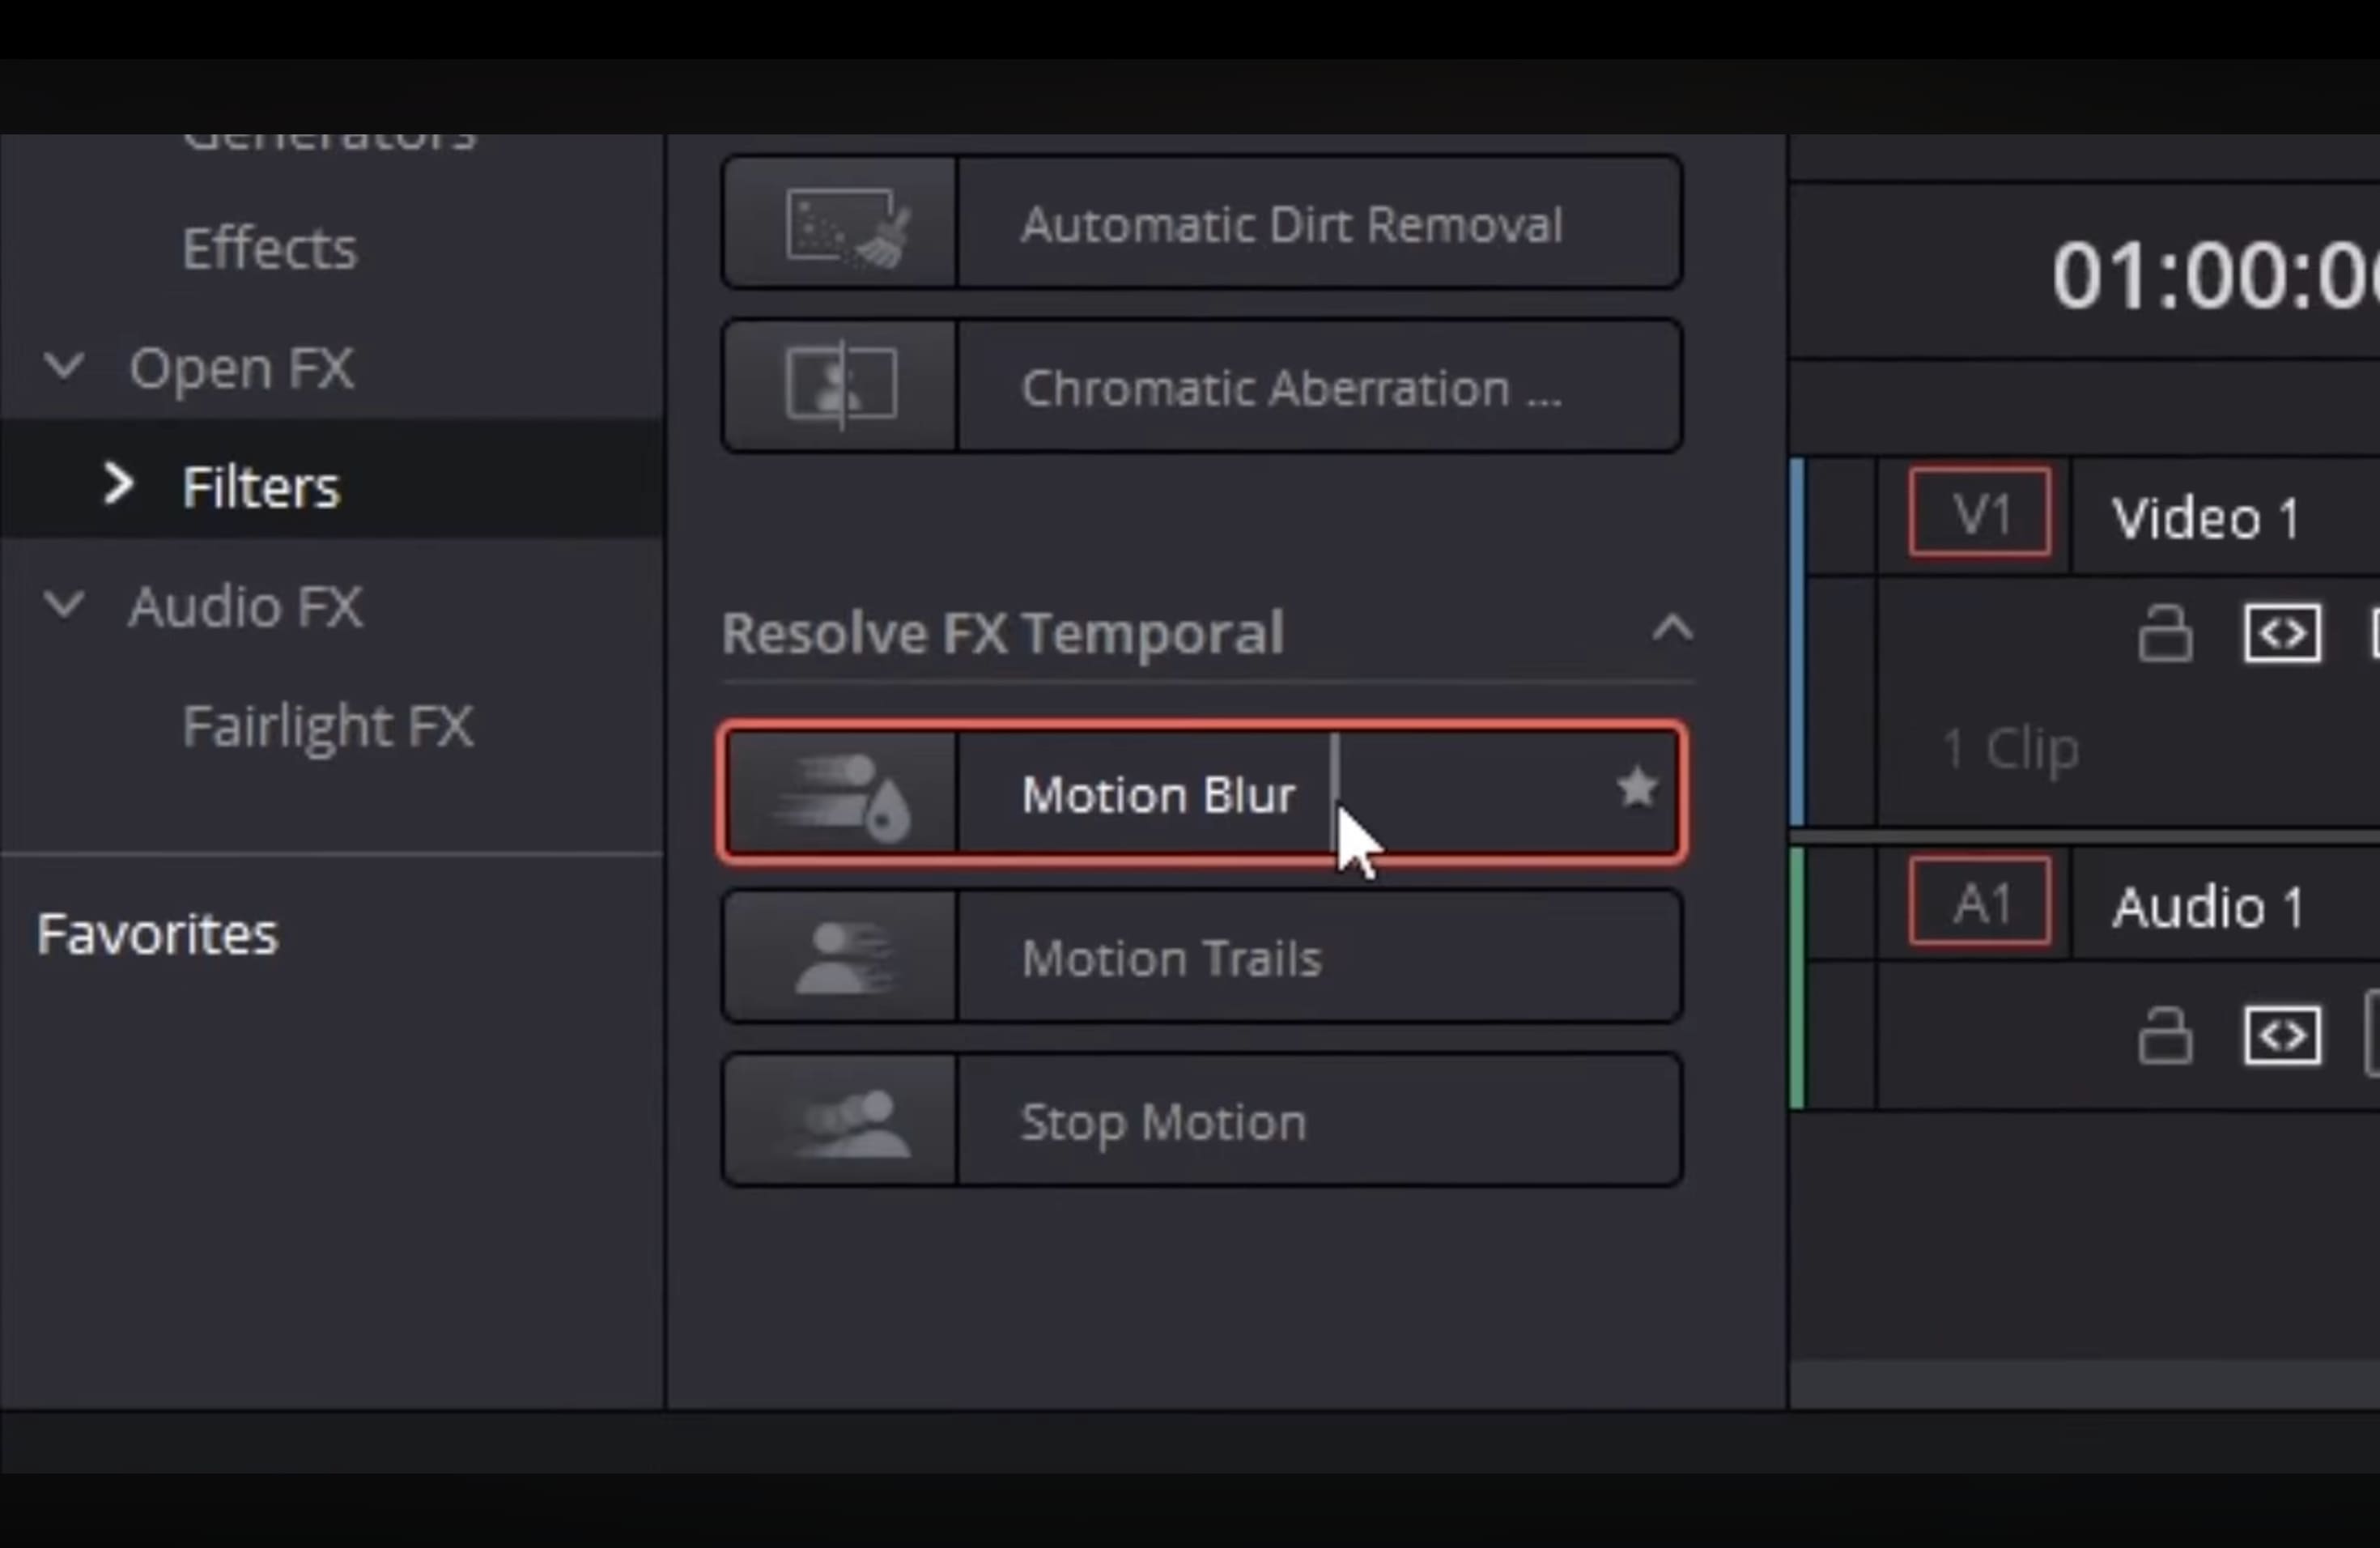
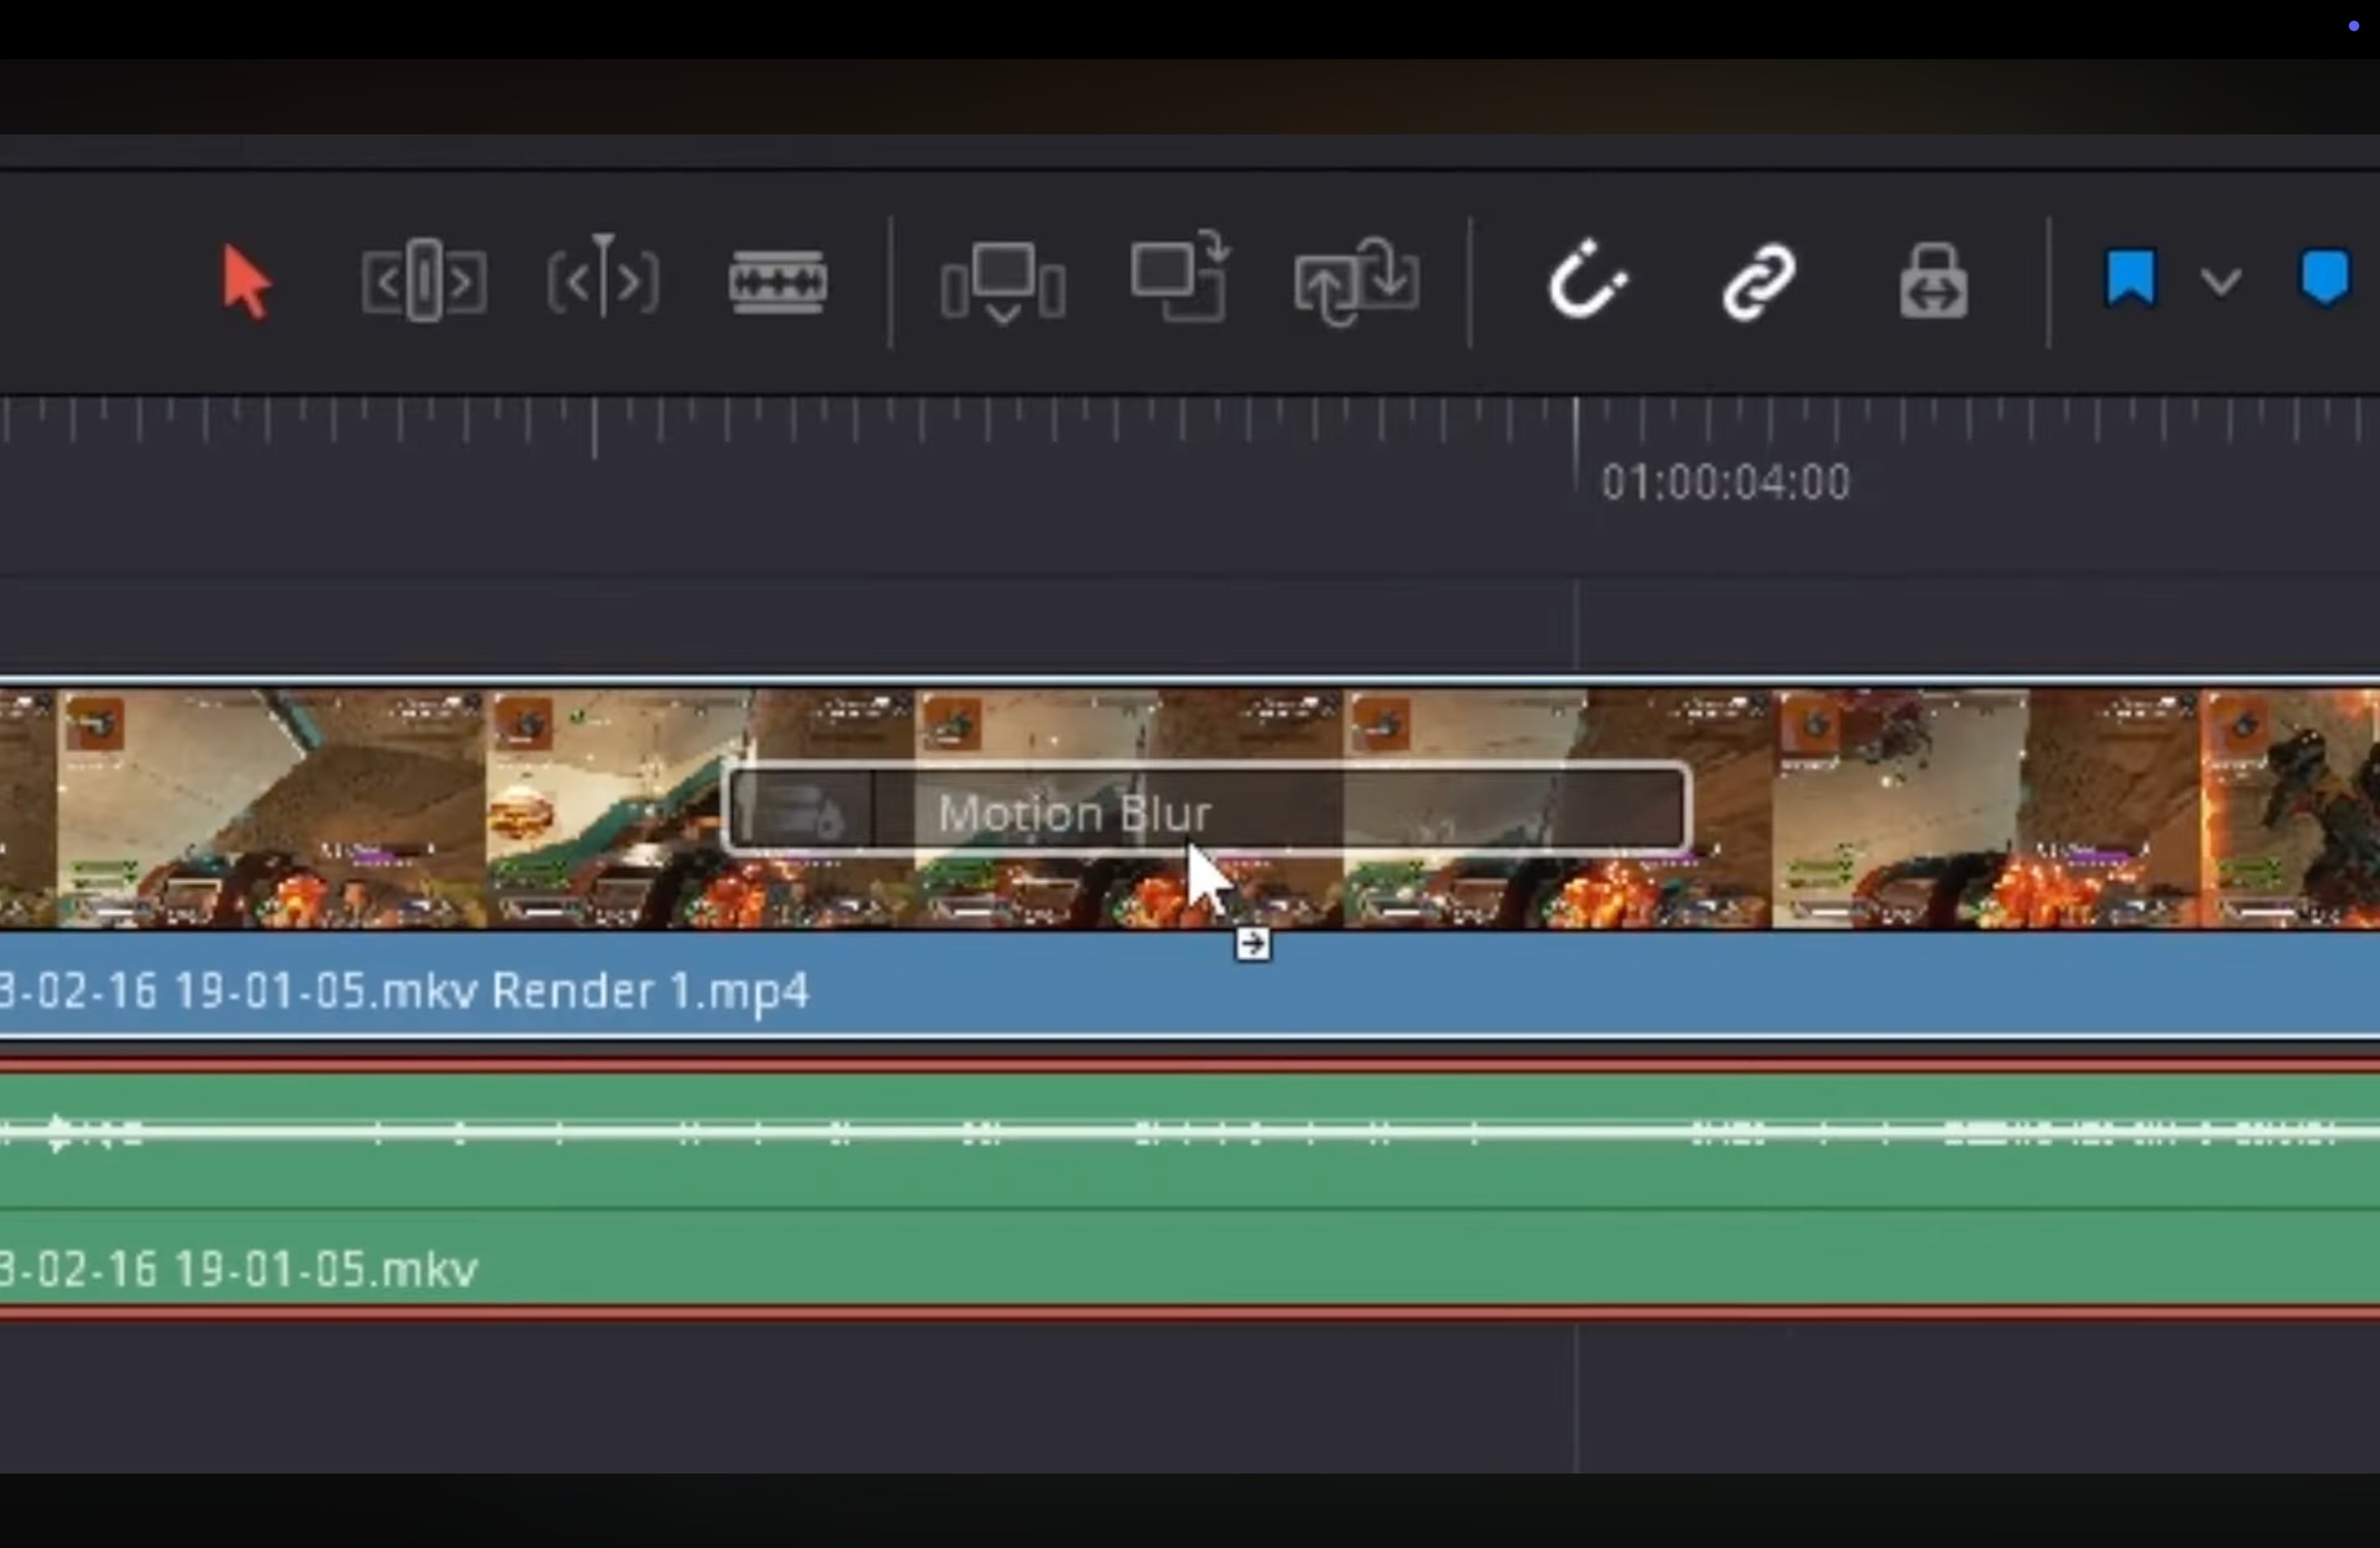
Studio Method: Resolve FX Motion Blur on the Edit/Color Page
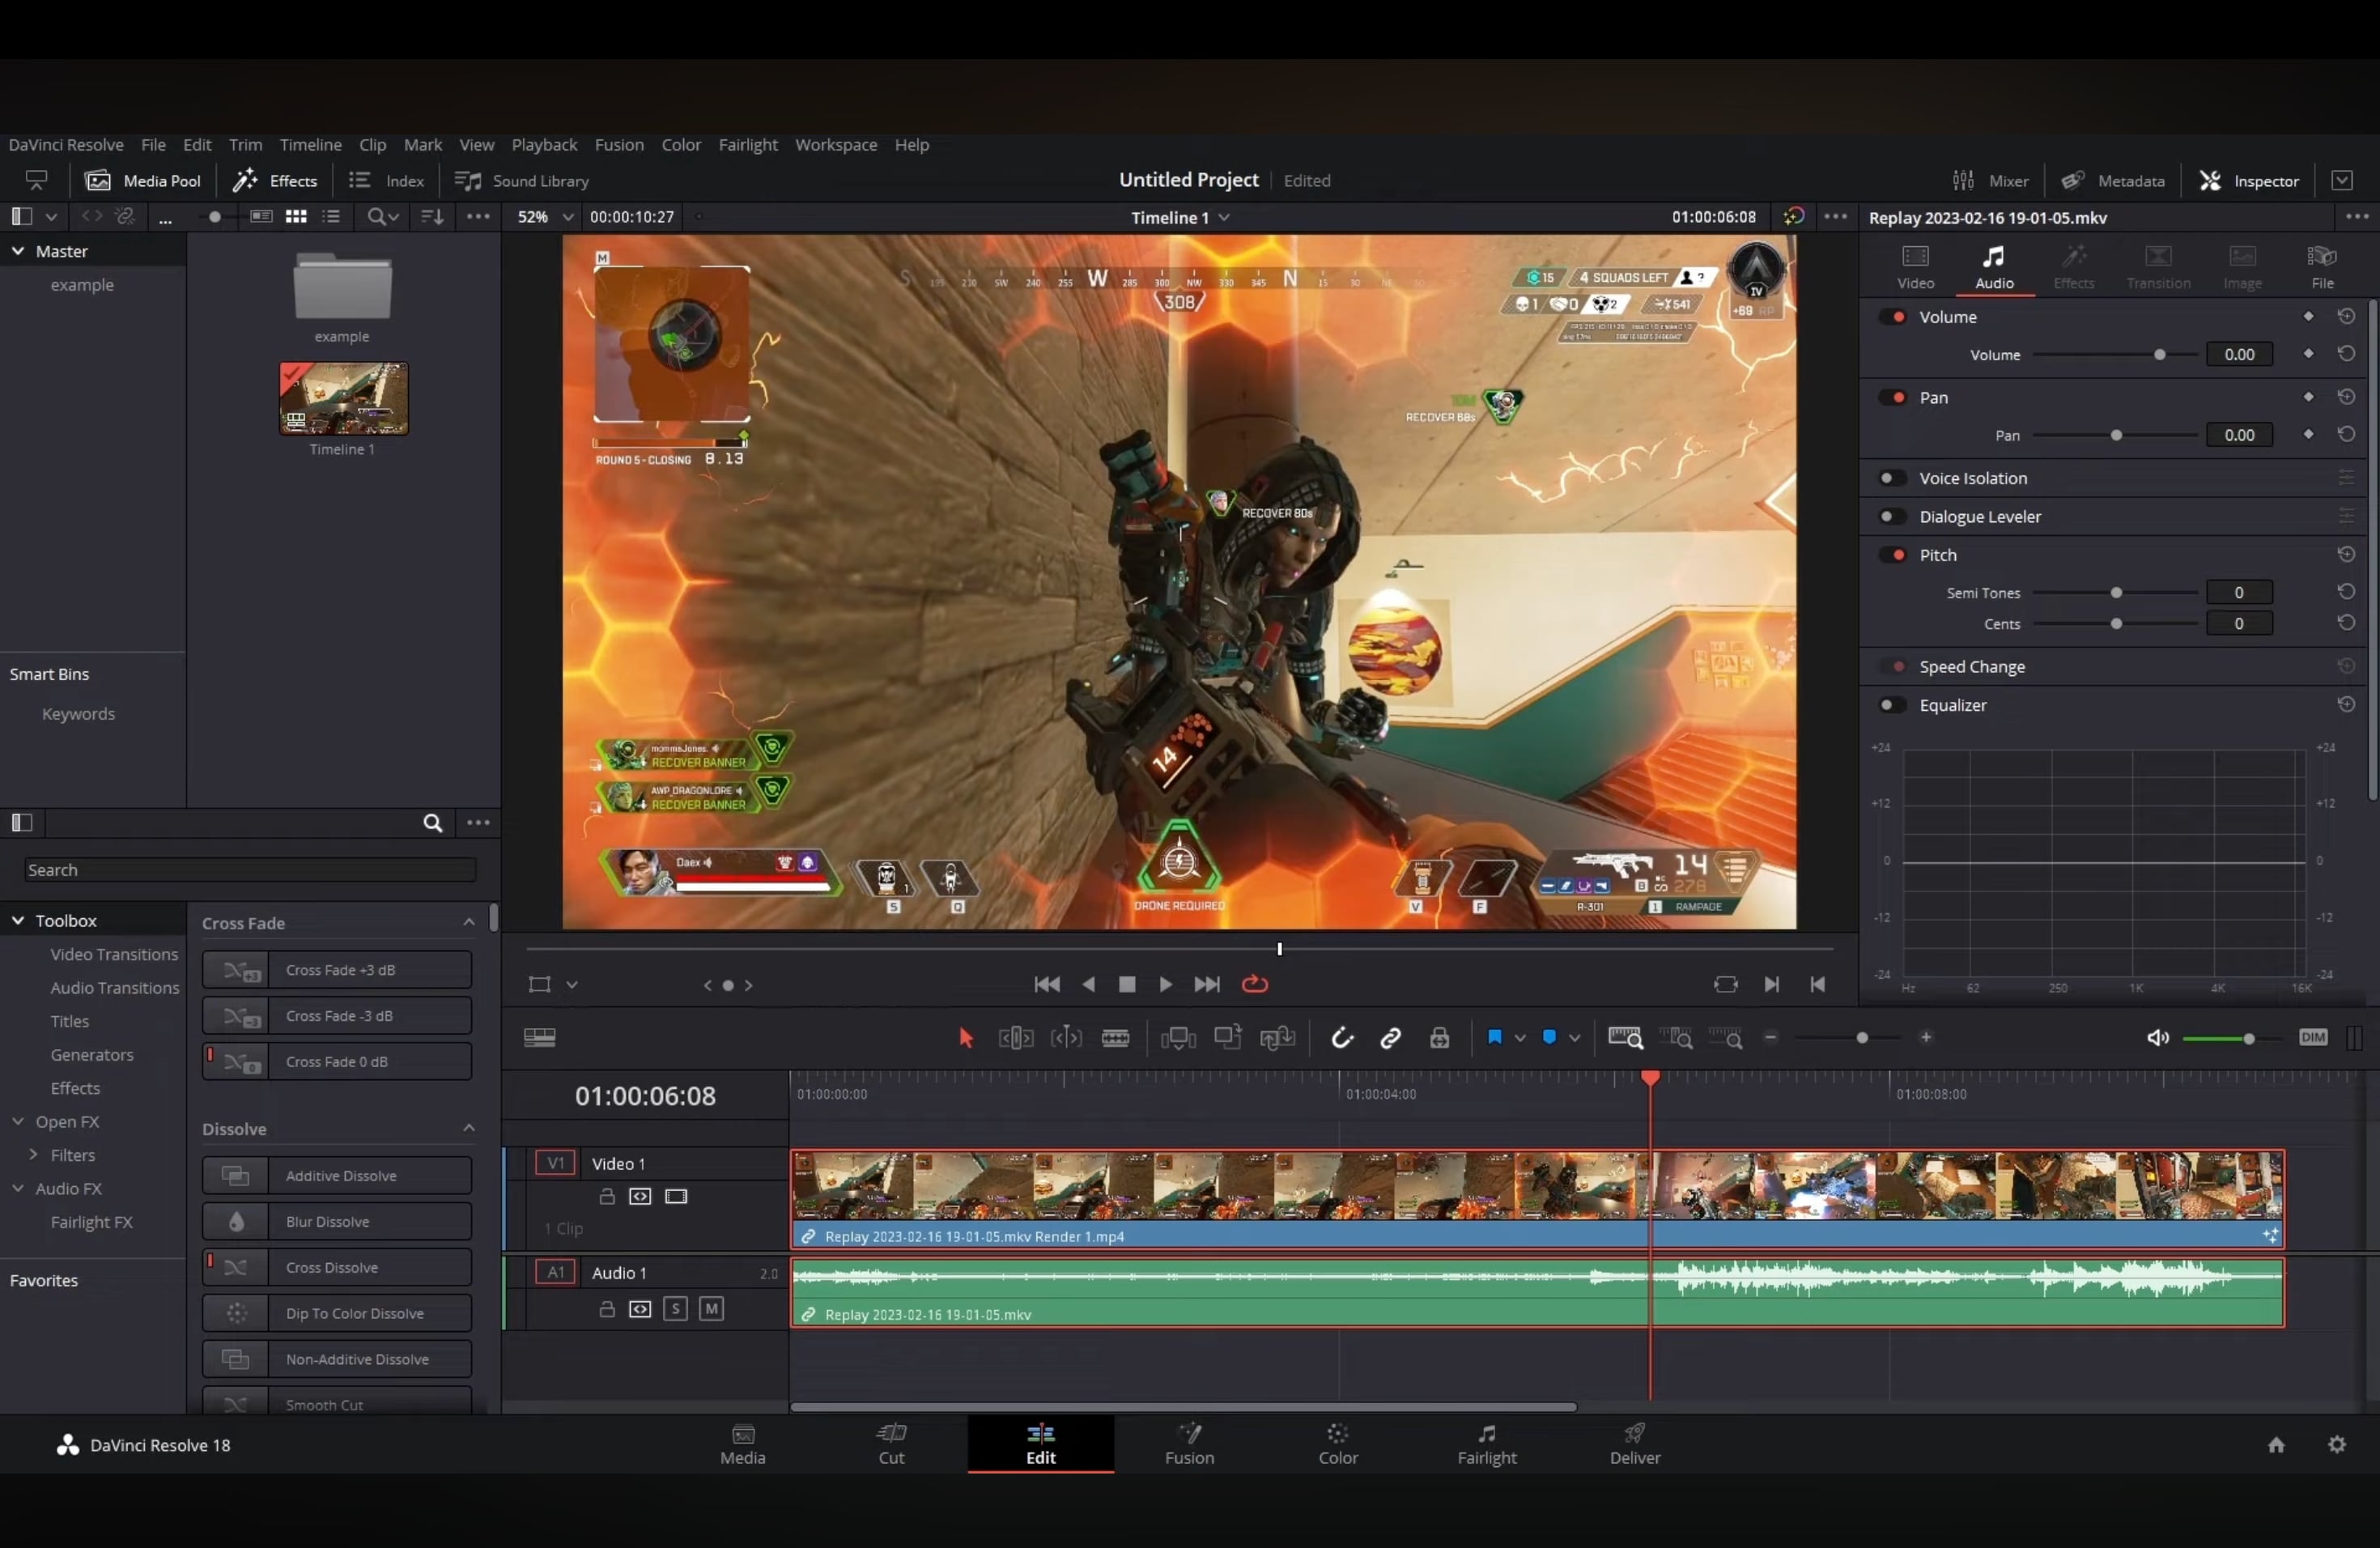
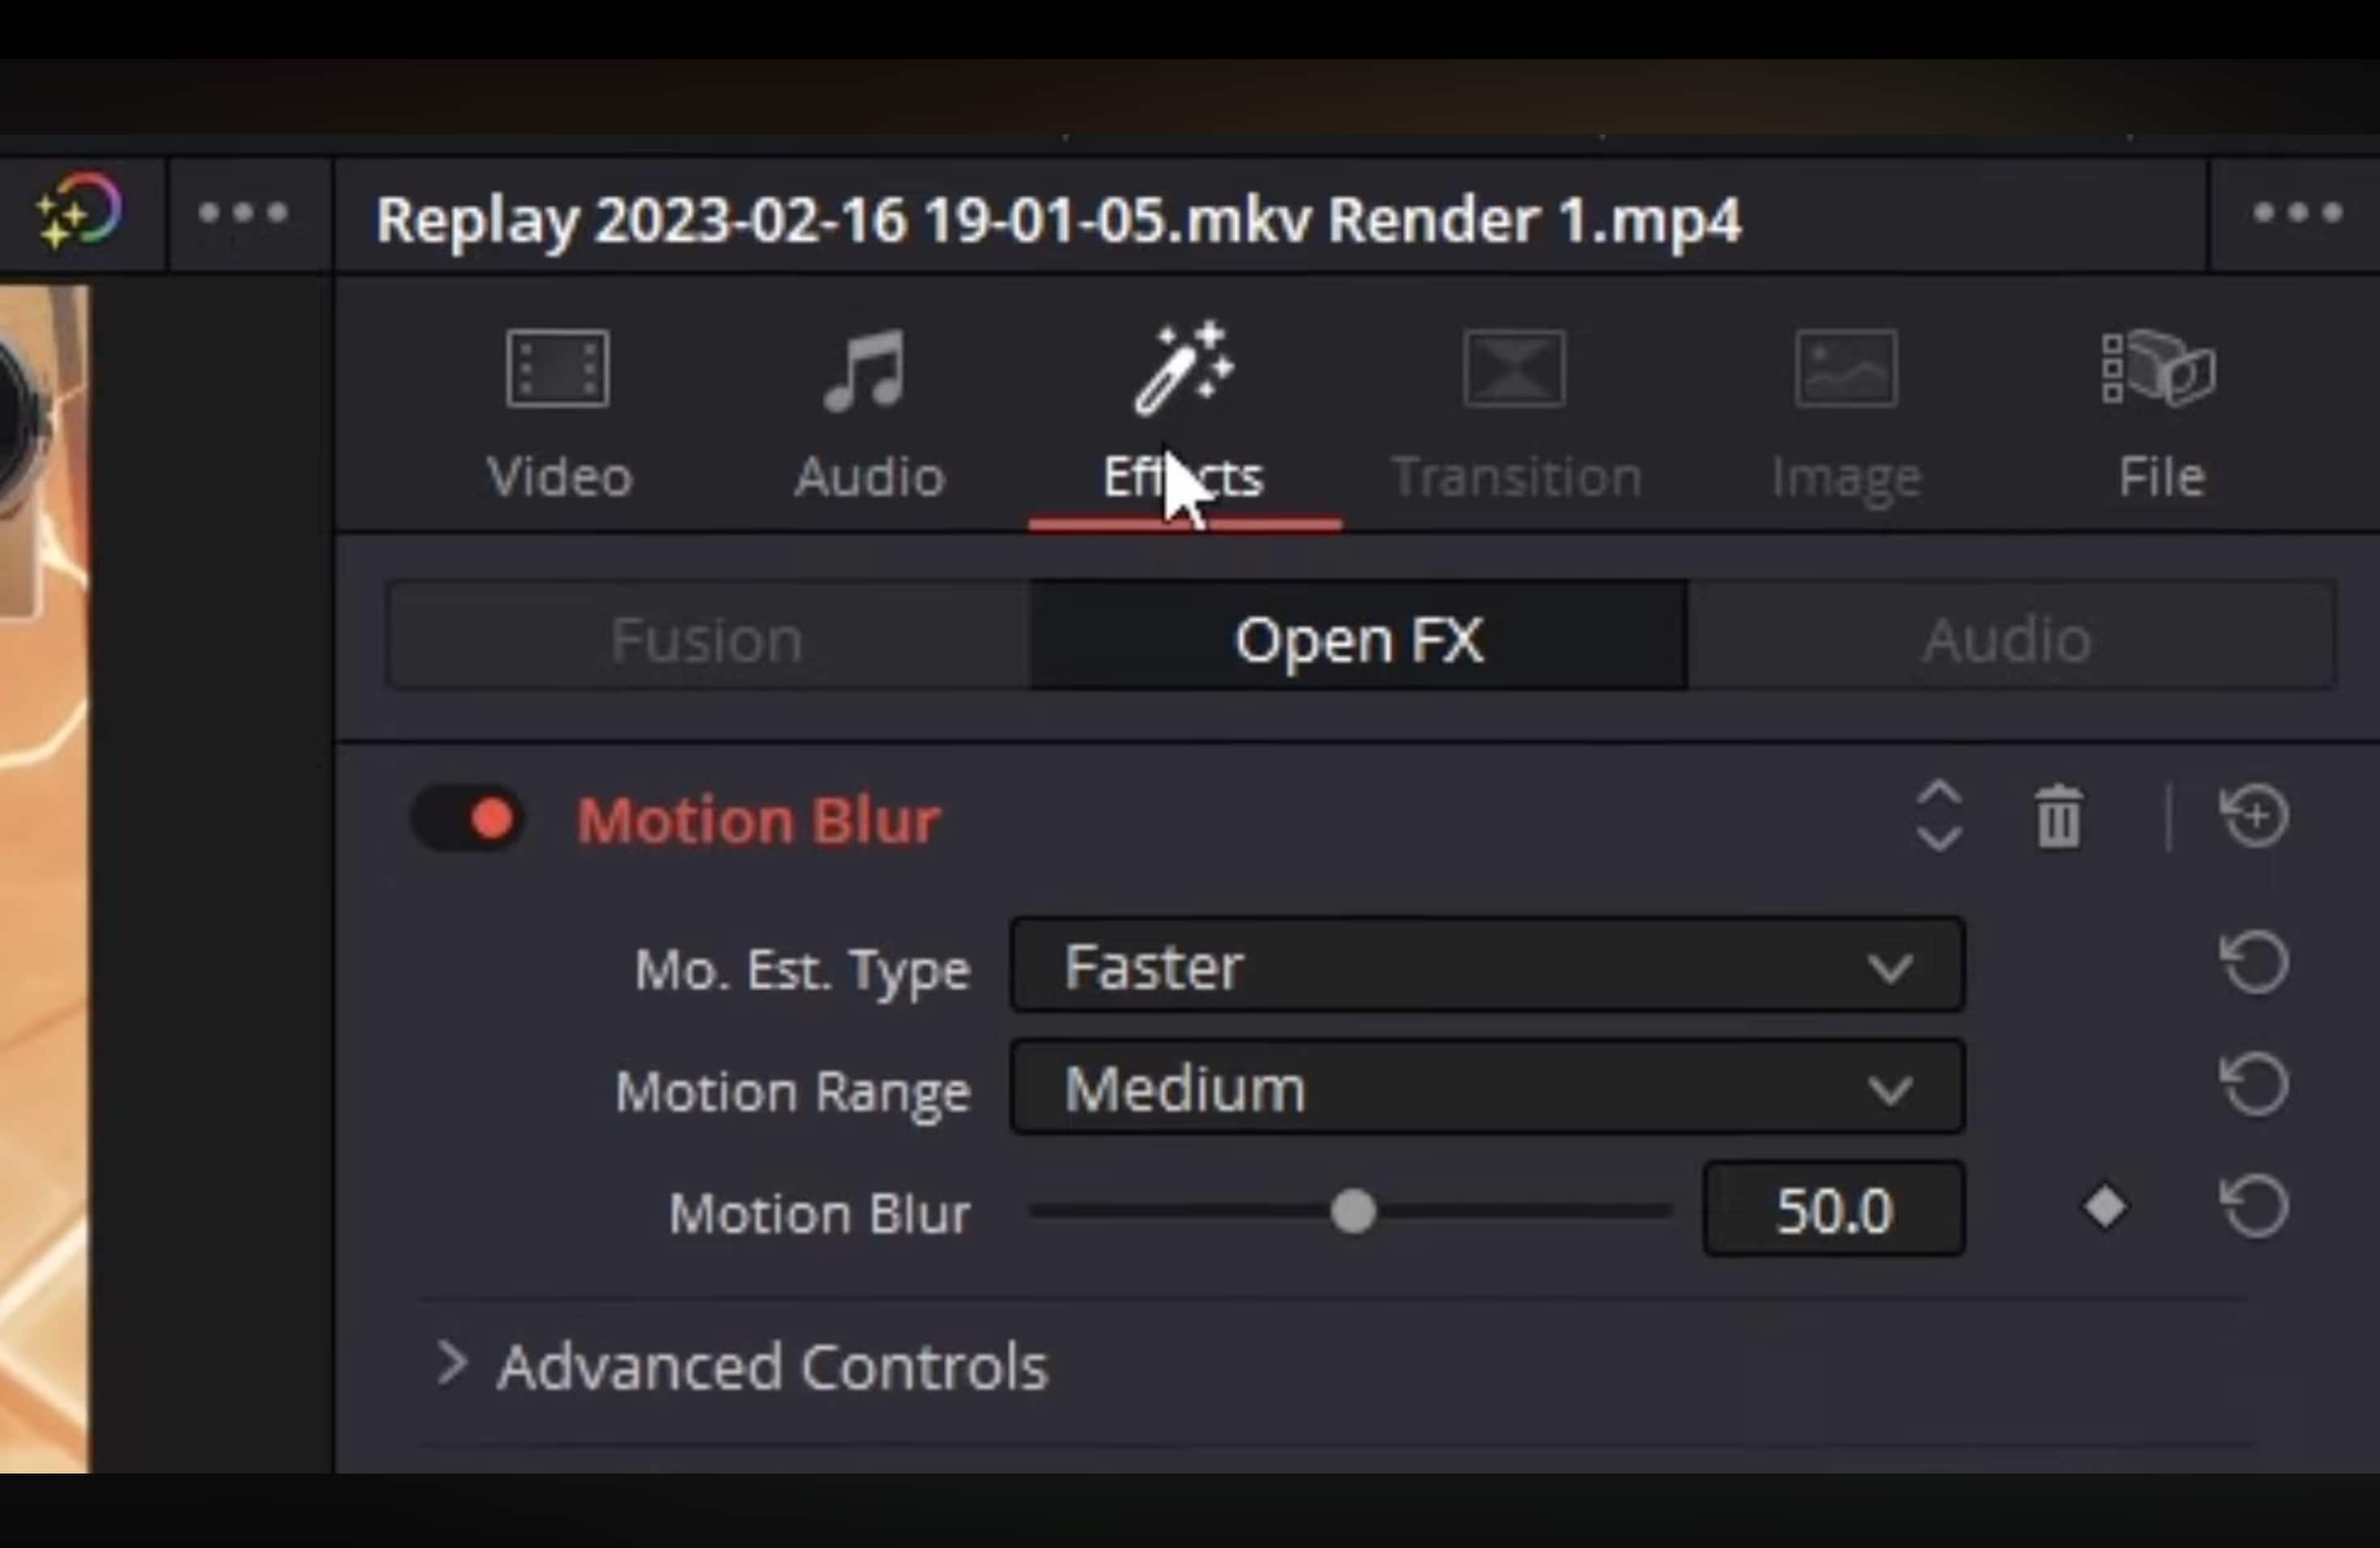
DaVinci Resolve Studio also simplifies the process with a dedicated Motion Blur effect. Instead of creating nodes, you can apply it directly in the Edit or Color page. This version uses GPU acceleration, which makes it both faster and easier to customize.
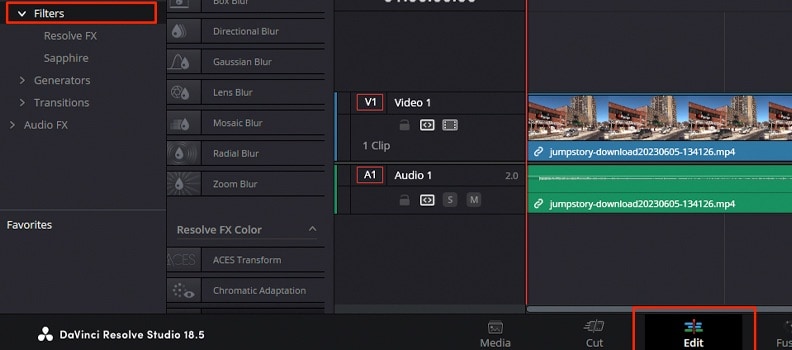
Edit Page Alternatives (Free): Directional/Transform Blur Tricks
If you want a simpler option of motion blur in DaVinci Resolve Free without using Fusion, you can try the blur effects available on the Edit page. While these do not create true motion blur, they can help soften fast movement and make clips look smoother.
By knowing these three methods, you can decide how to add motion blur in DaVinci Resolve based on your version and project needs. In the next part, we will go over the best settings to fine-tune the effect and how to fix common artifacts.
Part 3: Best Settings & Artifact Fixes for Motion Blur in DaVinci Resolve
When you add motion blur in DaVinci Resolve, the final look depends on how you adjust the settings. Both the Fusion method and the Studio Motion Blur effect offer parameters that control strength, quality, and how the blur interacts with edges. Using the right setup will help you avoid common problems such as ghosting, artifacts, or an unnatural blur.
1. Shutter Angle
Shutter angle determines how strong the motion blur appears, similar to the shutter speed on a camera. A 180-degree shutter angle is a standard choice for natural movement, but you can raise it for more intense blur or lower it for sharper action. In DaVinci Resolve motion blur settings, adjusting the shutter angle is often the first step to achieving a cinematic look.
2. Samples
Samples control how many frames are used to calculate the blur. A higher sample count produces smoother results but requires more processing power.
In DaVinci Resolve Free with Fusion, increasing samples improves the quality of Vector Motion Blur, while in Studio, the Motion Blur FX offers sliders for quality and detail. For most edits, a medium value gives a good balance between smooth blur and system performance.
3. Edges and Artifacts
One of the most common issues with motion blur in DaVinci Resolve is the appearance of artifacts along edges, especially when using Optical Flow. These can look like ghosting or distorted outlines.
To reduce this, start by lowering the blur scale slightly, then refine the mask if you are protecting overlays or UI elements. In Studio, adjusting the Motion Blur settings in the Inspector often minimizes these problems.
Recommended Setup
For a balanced motion blur effect in DaVinci Resolve, use a shutter angle around 180 degrees, set samples to a medium range (not too low, not maxed out), and carefully check edges for artifacts. Apply the effect at the final stage of your workflow to keep editing performance smooth.
Part 4: Filmora Alternative: One-Click Motion Blur & Tracking
While DaVinci Resolve can produce strong motion blur results, the workflow may feel too technical for users who want a faster and more accessible editing process. In many cases, motion blur in DaVinci Resolve requires Fusion nodes, Studio-only tools, or multiple manual adjustments. If you want a simpler alternative, Wondershare Filmora now offers a built-in Motion Blur feature that makes it much easier to enhance motion in video.
Instead of relying on complex setups, Filmora lets you turn on AI Motion Blur with a simple toggle. It can automatically apply motion blur to fast-moving elements in your footage, helping reduce rigid or choppy visuals while making motion look smoother, more natural, and more cinematic. This is especially useful for action scenes, panning shots, zooms, rotations, gameplay clips, and other fast-paced footage.
Why Filmora is a Great Alternative for Motion Blur (Easy & Fast)
- Built-in AI Motion Blur: Turn on the feature directly in Filmora without building node chains or navigating complex professional workflows.
- Automatic motion enhancement: AI Motion Blur automatically applies blur to fast-moving elements, helping footage look smoother and more visually natural.
- Flexible adjustment options: You can fine-tune Range, Intensity, and Direction to create subtle, dynamic, or cinematic motion styles.
- Beginner-friendly workflow: Default settings already deliver visible improvements, so even new users can get polished results quickly.
- Better for fast editing needs: Filmora is a practical choice for creators who want motion blur without slowing down their workflow with advanced compositing steps.
Motion Blur in DaVinci Resolve vs Filmora
| Feature/Aspect | DaVinci Resolve | Filmora |
| Methods | Fusion nodes (Free), advanced tools and manual adjustment workflows | Built-in AI Motion Blur with simple toggle-based workflow |
| Ease of Use | More technical and better suited to experienced editors | Beginner-friendly and fast to apply |
| Customization | Detailed professional control depending on workflow | Adjustable Range, Intensity, and Direction |
| Speed | Can require more setup and processing time | Faster setup for everyday editing and short-form content |
| Best For | Complex edits, advanced post-production, cinematic workflows | Quick edits, smoother motion enhancement, and accessible everyday video creation |
Conclusion
Adding motion blur in DaVinci Resolve can make your videos look more cinematic and professional. With the free version, you can build the effect in Fusion using Optical Flow and Vector Motion Blur. Meanwhile, DaVinci Resolve Studio gives you a faster option with the dedicated Motion Blur effect. Free users also have simple alternatives like Directional Blur, although the results are less precise.
If you want a quicker workflow, Filmora is a strong alternative. It offers one-click motion blur with built-in motion tracking, real-time preview, and optimized performance. Both DaVinci Resolve motion blur and Filmora have their strengths, depending on your editing needs.
Frequently Asked Questions
-
Why is my motion blur not working?
Motion blur in DaVinci Resolve may not work correctly if Optical Flow is not enabled in Fusion or if the Motion Blur FX is not applied on the Edit or Color page in Studio. Check that the nodes or effects are connected properly and adjust the settings like Scale or Shutter Angle for visible results. -
What's the difference between motion blur on the Edit page versus the Fusion page?
On the Edit page, motion blur is applied through Resolve FX Motion Blur in Studio or simple blur effects in the free version. On the Fusion page, you can build the effect using Optical Flow and Vector Motion Blur, which gives more control but is harder to set up. -
How can I keyframe motion blur?
You can keyframe motion blur in DaVinci Resolve by animating the Scale parameter of the Vector Motion Blur node in Fusion or by keyframing the strength slider of the Motion Blur FX in Studio. This allows you to increase or reduce blur dynamically based on movement in your clip. -
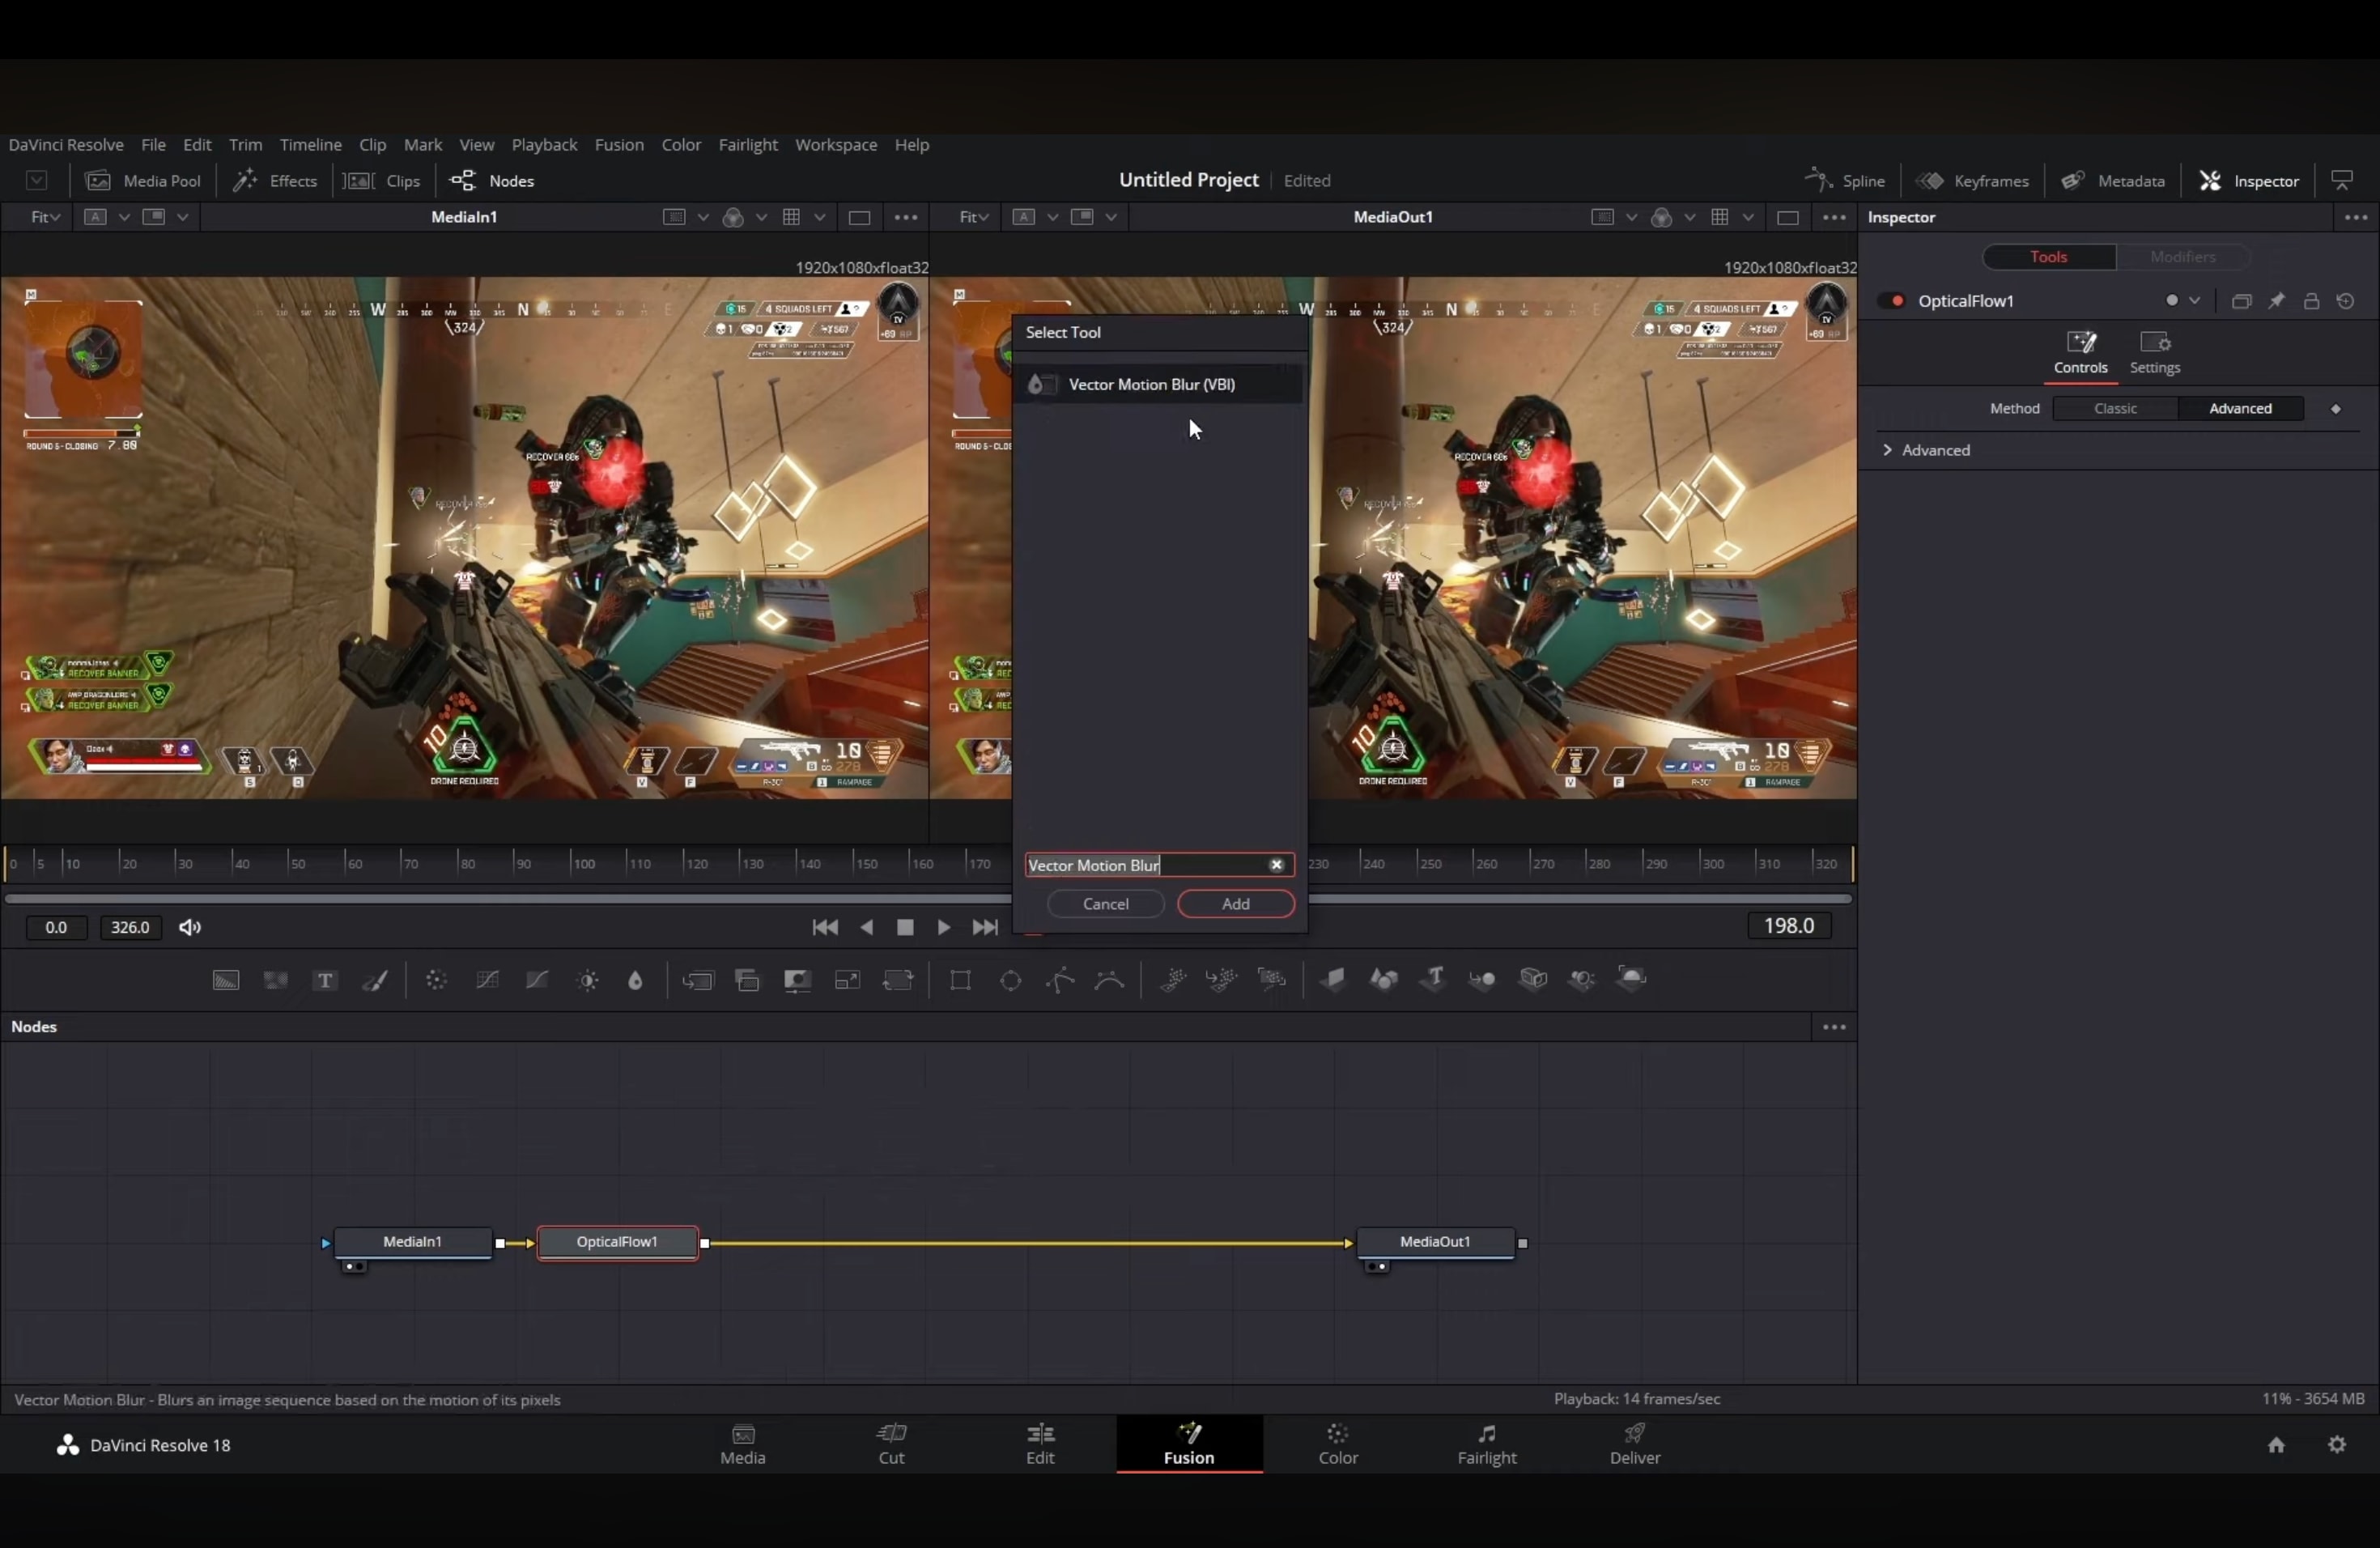
What is the difference between "Optical Flow" and "Vector Motion Blur"?
Optical Flow analyzes frame movement and generates motion vectors, while Vector Motion Blur uses those vectors to create the blur effect. Optical Flow prepares the data, and Vector Motion Blur applies the final look. Together, they provide smoother and more realistic motion blur in DaVinci Resolve Free.
