

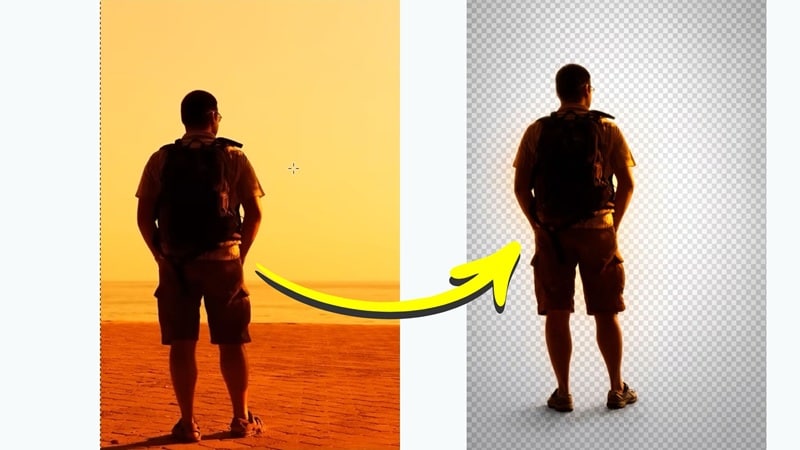
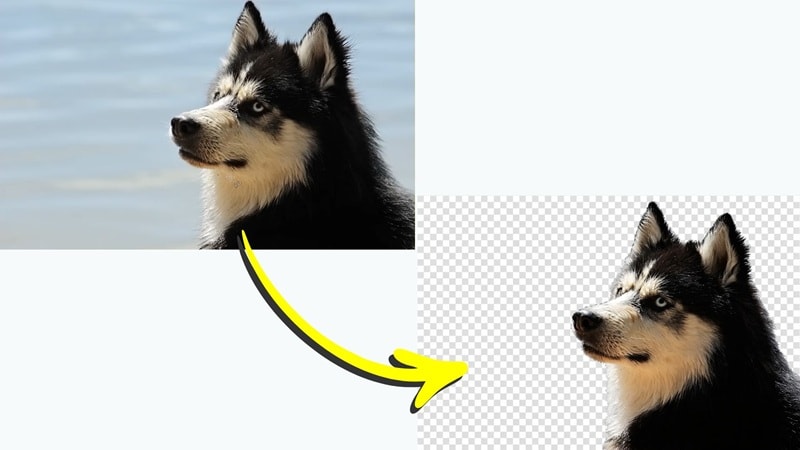
GIMP is a very well-known photo editor because it's open-source and surprisingly advanced. That's why many people use it for all kinds of edits, including learning how to make a background transparent on GIMP for photos, logos, or thumbnails.
The problem is, if you've never touched GIMP before (or never even heard of it), figuring out how to delete a background in GIMP isn't exactly beginner-friendly. Too many tools, too many steps, and not enough clear explanations.
That's why this guide is here. We'll walk you through simple, practical methods that actually work, without overcomplicating things. By the end, you'll know exactly how to remove a background in GIMP with confidence.
Part 1. Method 1: Remove Background with Fuzzy Select (Best for Beginners)
GIMP actually gives you a few different ways to remove a background, so the method you use can depend on the kind of image you're working with. We'll get into all of them, but let's start with the Fuzzy Select tool, since it's hands down the quickest way to learn how to remove background in GIMP, especially if you're just starting out.
That said, this method won't work well on every photo. Usually, when colors are consistent and edges are clean, this method works the best. That includes;
- Photos with two background colors that are very similar in tone, like light blue and sky blue.
- Flat design graphics such as icons, stickers, or simple vector illustrations.
- Screenshots from apps or websites that have a plain interface background.
- Product photos taken on a smooth studio backdrop with almost no shadows.
Steps to Remove Background Using Fuzzy Select
Without further ado, let's start with the tutorial. There's a helpful video from Logos by Nick on YouTube that walks through this method clearly, so the steps below follow that same idea. Just follow the guide below and you'll see how to remove the background GIMP in just a few clicks.
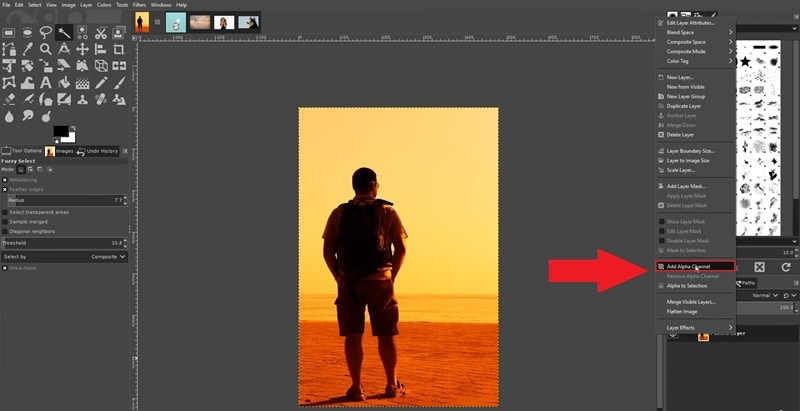
Step 1. Open Your Image and Add an Alpha Channel
- Launch GIMP and upload your image.
- Go to the Layers panel, and right click your image layer.
- Click Add Alpha Channel.
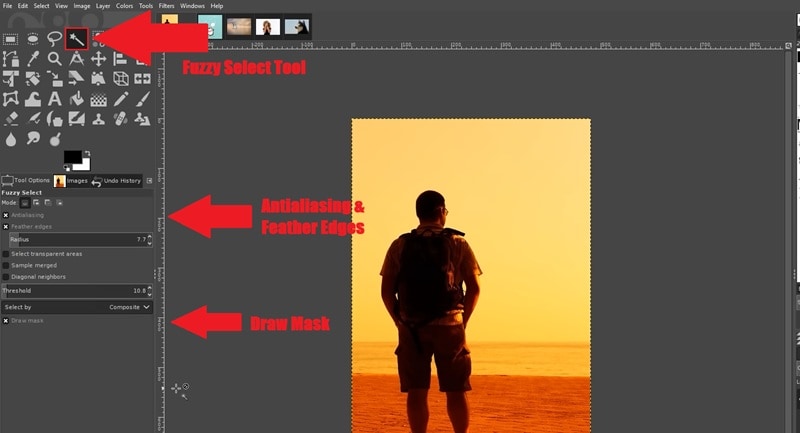
Step 2. Select the Fuzzy Select Tool
- Choose the Fuzzy Select Tool from the toolbox.
- In Tool Options, enable: Anti aliasing, Feather edges, and Draw mask.
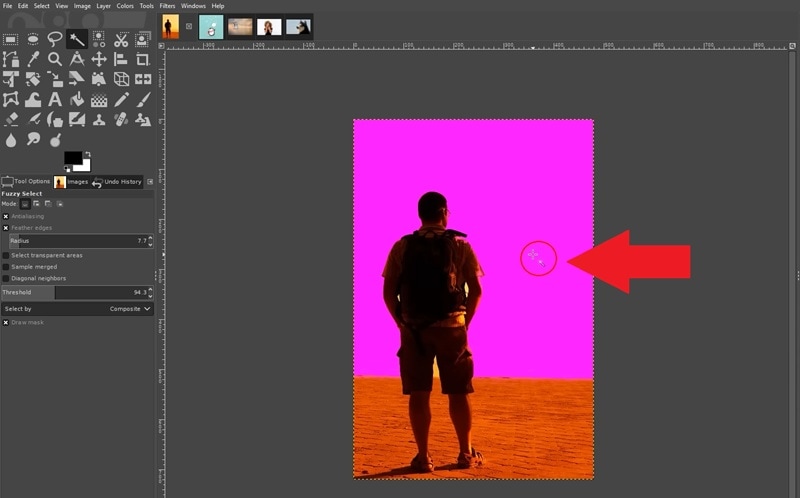
Step 3. Select the Background and Adjust the Threshold
- Click and hold on the background area you want to remove.
- A colored overlay will appear to show the selection.
- Drag the mouse downward and upward to increase or reduce the selection area.
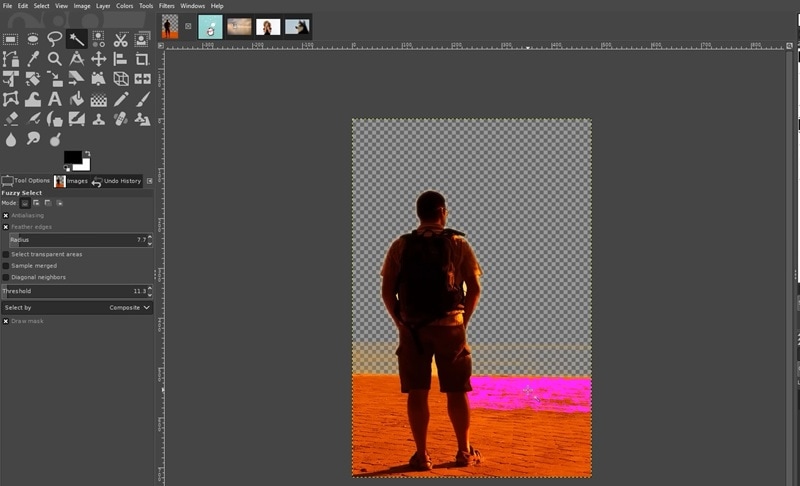
Step 4. Delete the Background
- When the background is properly selected, release the mouse.
- Press Delete on your keyboard, and the selected area becomes transparent.
- If needed, select other background areas and delete again until the background is fully removed.
Part 2. Method 2: Foreground Select Tool (Best for Hair & Complex Edges)
Another way to learn how to erase a background in GIMP is by using the Foreground Select Tool. This method is helpful when the background is harder to separate, and the edges of your subject are not clean.
For example, maybe your photo has messy hair, fur, soft shadows, or small details around the subject. In cases like that, the Fuzzy Select tool usually struggles to grab the right areas. The Foreground Select Tool gives you more control so you can tell GIMP exactly which part of the image should stay and which part should go.
It's especially useful for:
- Portrait photography where hair is all over the place.
- Pet photos with fur going in every direction.
- Fashion shots with lots of fabric detail.
- Product images with intricate or textured edges.
Steps to Remove Background with Foreground Select Tool
In the same video from Logos by Nick, he also shows how to use GIMP to remove the background from an image using the Foreground Select Tool. Follow the steps below to learn how to use this method:
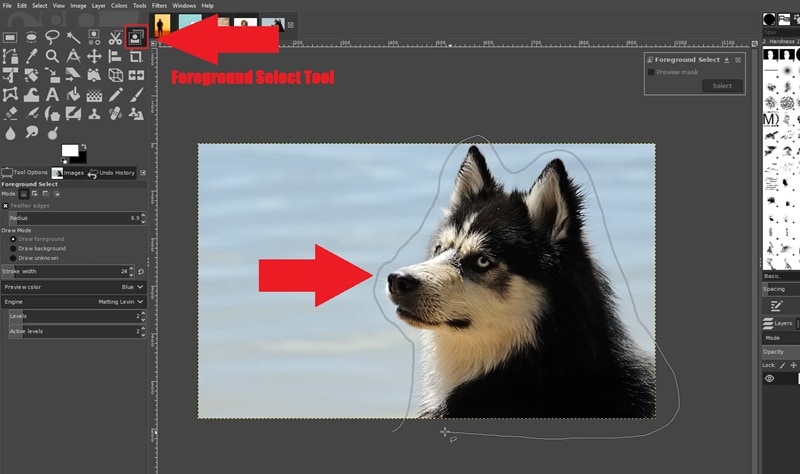
Step 1. Select the Foreground Select Tool and Draw a Rough Outline
- Go to the toolbox and choose the Foreground Select Tool.
- Click and draw a rough outline around your subject.
- Bring the line back to the starting point to close the outline.
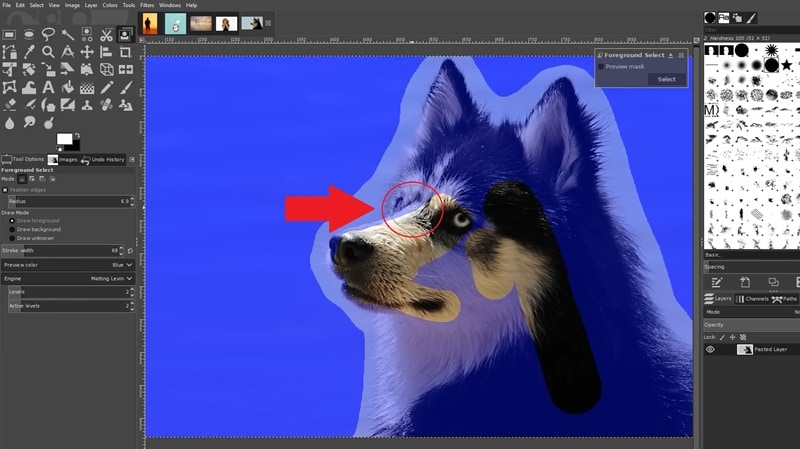
Step 2. Paint Over the Subject
- Press Enter on your keyboard, and the background will turn dark blue.
- Use the brush that appears to paint over your subject.
- Cover the main areas like the head and body, and avoid painting too close to the edges.
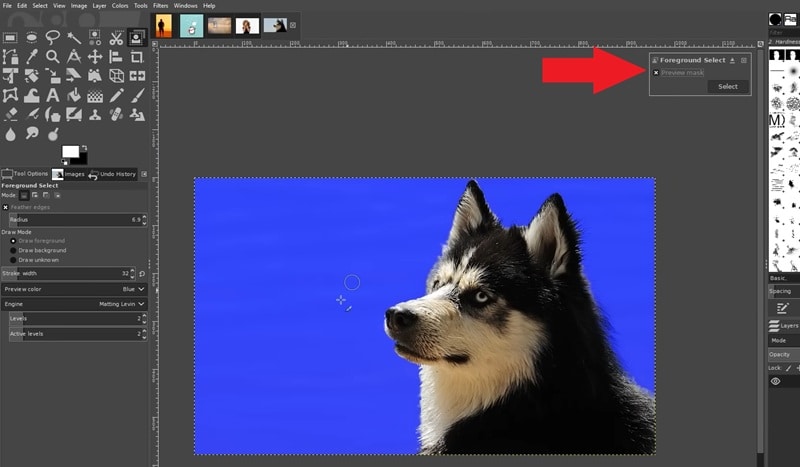
Step 3. Check the Preview
- Toggle the Preview mask option to see how the selection looks.
- Continue brushing if parts of the subject are missing.
- When you are satisfied, press Enter to turn the result into an active selection.
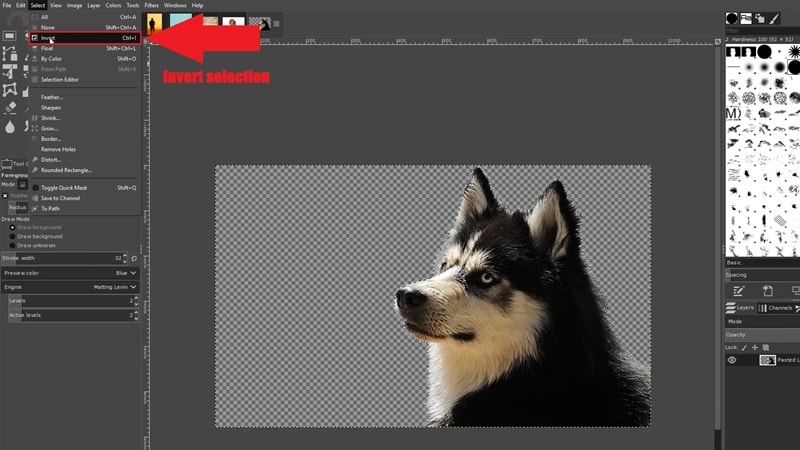
Step 4. Invert the Selection and Delete the Background
- Go to Select > Invert.
- Press Delete on your keyboard.
- The background will be removed and replaced with transparency.
Part 3. Method 3: Remove Background with the Bucket Fill Tool (For Very Simple Backgrounds)
The last method we want to show when learning how to remove background in GIMP uses the Bucket Fill Tool. And honestly, this might be the easiest method out of all three methods we taught you.
The catch though, is that it only works on images where the background is one solid flat color, nothing fancy, no gradients, no textures. So, it's a bit more limited in that sense.
However, if your image fits that description, this is probably the quickest way to get it done. It works perfectly for things like:
- Product photos on a white or solid-color background.
- Logos sitting on a flat-colored canvas.
- Portraits taken in front of a clean studio backdrop.
- Screenshots or digital graphics with simple, uniform backgrounds.
Steps to Remove Background Using the Bucket Fill Tool
For this method, we'll follow a different video guide, this time from Guide Hub on YouTube. The steps are pretty straightforward, so just follow along and you'll have your background removed in no time.
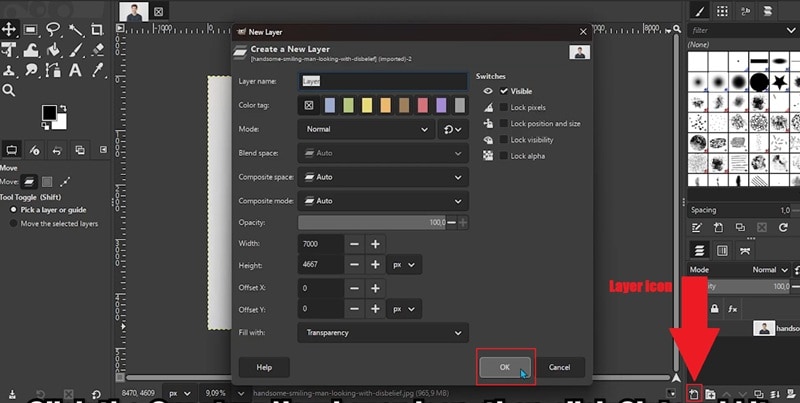
Step 1. Upload Your Image and Create a New Layer
- Open GIMP and import the photo you want to edit.
- Go to the Layers panel and click the Create a New Layer icon.
- Click OK to add the empty layer.
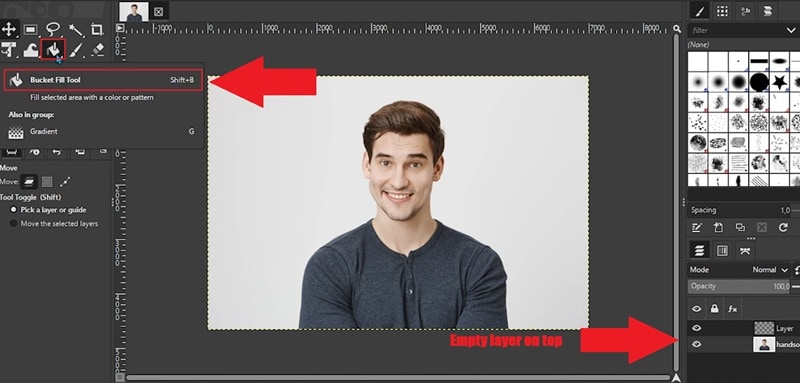
Step 2. Choose the Bucket Fill Tool
- Make sure the empty layer is positioned above the photo layer in the Layers panel.
- Click the photo layer underneath the empty layer.
- Go to the toolbar, and select the Bucket Fill Tool.
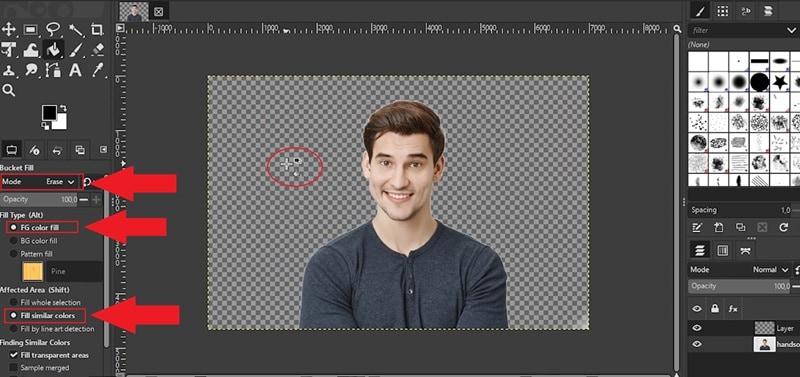
Step 3. Adjust the Tool Settings and Delete the Background
- Set Mode to Erase.
- Change Fill Type to FG Color Fill.
- Set Affected Area to Fill Similar Colors.
- Then, delete the background by clicking the background of the photo with the Bucket Fill Tool.
Part 4. Want It Even Easier? Remove Background in One Click with Filmora
After seeing all the different methods on how to make an image transparent on GIMP, you can tell from the results that it is definitely possible. And honestly, it's genuinely impressive for a free tool. That said, there's still a learning curve. Even the fastest method still requires you to understand alpha channels, tool settings, threshold tweaking, and manual cleanup.
Thankfully, there's a much simpler option: Wondershare Filmora. It is an AI-powered editor that approaches background removal from a different angle. Instead of relying on manual selections, it uses AI to detect subjects and remove backgrounds automatically. Let's explore more to see why this might be a much better solution than GIMP for learning how to make background transparent.
Why Use Filmora to Remove Background
True One-Click AI Portrait Cutout
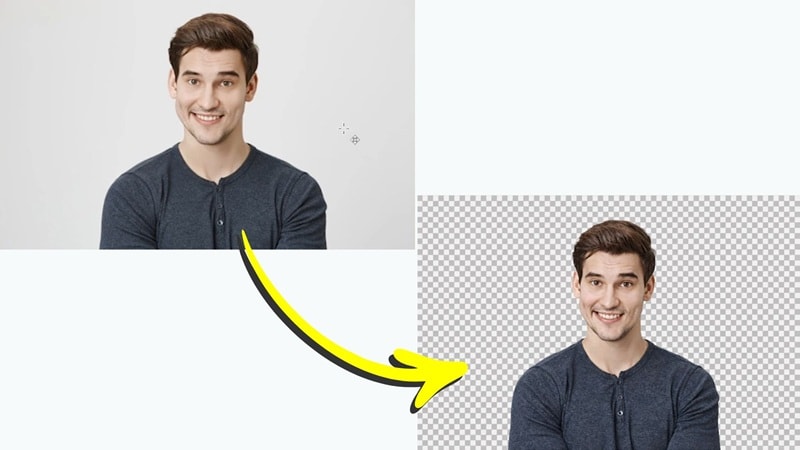
Filmora's AI Portrait Cutout can detect people in a clip or image almost instantly. Once applied, it separates the subject from the background while keeping small details like hair strands, clothing edges, and natural outlines. The result often looks clean without needing much manual correction.
AI Smart Cutout for Objects
If you need to remove something other than a person, Filmora includes AI Smart Cutout. With this tool, you simply paint roughly over the object you want to keep. The AI then analyzes the edges and refines the selection automatically. It saves a lot of time compared to manually tracing shapes in traditional editors.
Remove Background from Video, Not Just Images
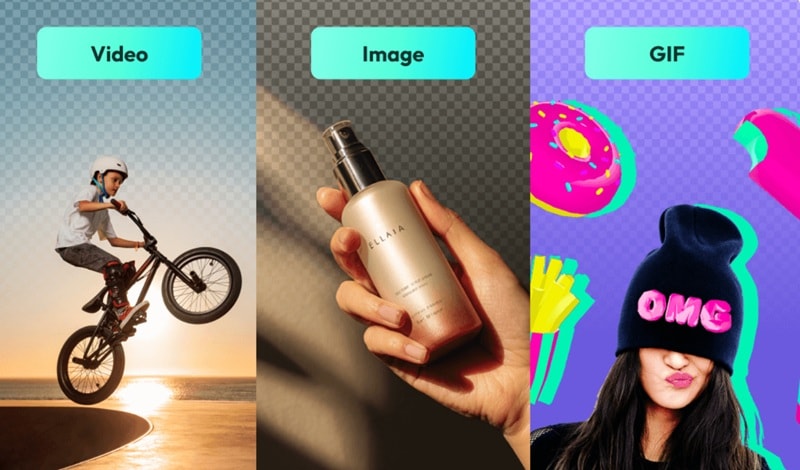
One major difference is that Filmora can remove backgrounds from videos, GIFs, and images. GIMP works well for photo editing, but it is not designed for video workflows. Filmora handles both in the same timeline, which is useful for social media clips, YouTube videos, or short animations.
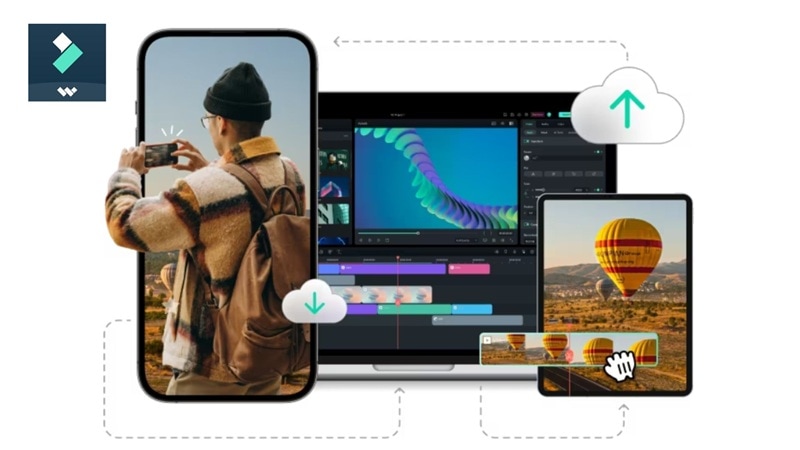
Desktop and Mobile Flexibility
Filmora runs on Windows, macOS, Android, and iOS, so you are not limited to a desktop setup. You can remove a background from a clip on your laptop, then continue editing the same project on your phone. That flexibility makes it convenient when you need quick edits on the go.
How to Remove Background with in Filmora
Removing a background in Filmora is honestly much quicker than doing it manually in many photo editors. You do not need to trace edges or carefully select the background, and that includes all kinds of photos, from simple backgrounds to complex cases with lots of hair.
Follow these simple steps to remove background in Filmora using AI Portrait Cutout.
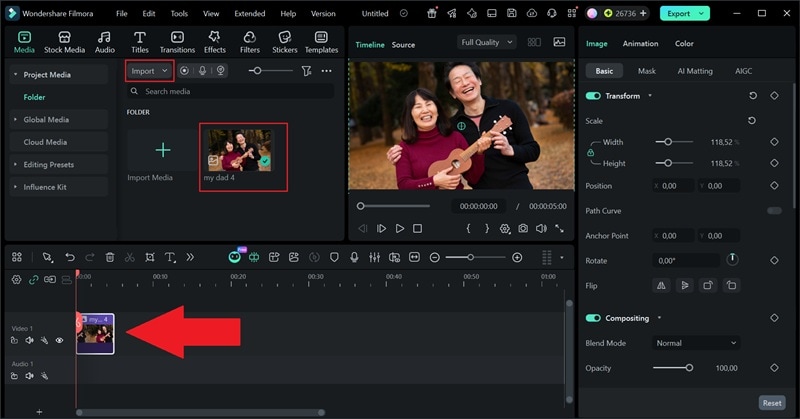
Step 1. Open Filmora and Import Your Photo
- Open Filmora on your device and click New Project.
- In the main interface, click Import to upload your photo.
- Drag it to the editing timeline below.
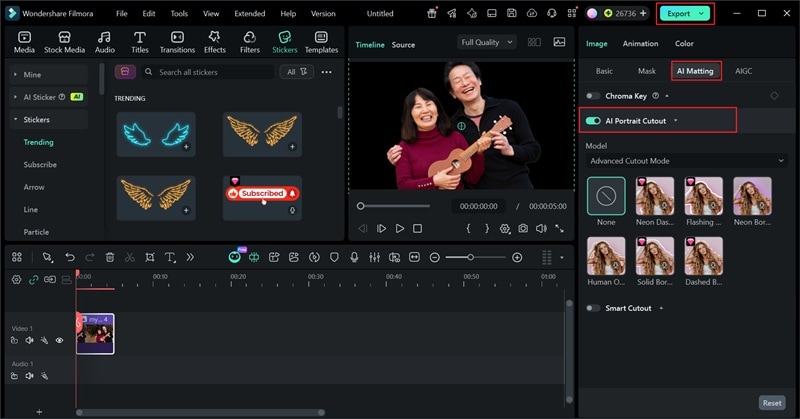
Step 2. Enable the AI Portrait Cutout Feature
- Select AI Matting from the property panel on the right.
- Turn on the AI Portrait Cutout feature.
- Feel free to add a new background, insert stickers, and more.
- Click Export to save it to your device.
GIMP vs Filmora: Background Removal Comparison
So, after learning how to get rid of a background in GIMP and FIlmora, it's clear that both tools are totally capable. However, they're built for different workflows and different types of users. Here's a side-by-side look to help you figure out which one fits your situation best:
| Category | GIMP | Filmora |
| Removal Method | Multiple steps; alpha channel, tool selection, manual tweaks | One-click AI does the heavy lifting for you |
| Learning Curve | Moderate, requires some practice | Minimal, works right out of the box |
| Fine Edge Quality | Good, but manual effort required | Excellent, AI preserves hair & fine details |
| File Support | Mainly images (PNG, JPG, etc.) | Images, video files, and GIFs |
| Platform | Windows, macOS, Linux | Windows, macOS, Android, iOS |
| Cost | Completely free and open-source | Free plan available; Pro unlocks all features |
| Speed | 5 - 15+ minutes depending on complexity | Seconds, AI handles it automatically |
| Best For | Simple solid-color or flat backgrounds | Hair, fur, complex edges, videos, GIFs |
|
Show More
Show Less
|
||
Conclusion
In this guide, we covered three methods for how to remove background in GIMP using the Fuzzy Select Tool, Foreground Select Tool, and Bucket Fill Tool. Each method works in different situations, so the best one depends on the type of image you have. Still, learning how to erase a background in GIMP can take some time since most steps require manual work.
If you want something faster, Wondershare Filmora is a good option. Its AI Portrait Cutout can remove backgrounds automatically in just a few clicks. On top of that, Filmora is not limited to photos. It can also remove backgrounds from videos and GIFs, while giving you a full editing timeline to add effects, new backgrounds, or other creative elements in the same project.
FAQs About Removing Background in GIMP
-
Why is the Delete key not making my background transparent in GIMP?
You probably haven't added an alpha channel yet. Go to Layer > Transparency > Add Alpha Channel before deleting anything and that should fix it right away. -
How do I fix white edges after removing the background?
Go to Colors > Color to Alpha and set it to white. If that's not enough, zoom in and use the Eraser at a low opacity to brush away whatever's left around the edges. -
Can GIMP automatically remove backgrounds like Photoshop?
Not really. GIMP doesn't have a true one-click removal feature. If that's what you need, Filmora's AI Portrait Cutout is a much better option since it handles everything automatically. -
What file format keeps transparency after background removal?
Always save as PNG. JPEG doesn't support transparency, so your background will just come back as white. PNG keeps everything intact.
