

 TL;DR:
Adobe has relocated the HSL settings into the Color Mixer panel across Lightroom Classic and CC, where photographers can precisely adjust individual colors, while Wondershare Filmora provides a faster alternative tailored for video grading.
● Always fix basic exposure and white balance before applying HSL adjustments, keeping slider movements minimal to prevent unnatural shifts like orange skin tones or green skies.
● Use the Targeted Adjustment Tool within the Lightroom Color Mixer to click and drag directly on specific image areas, allowing you to isolate and correct complex elements like skin tones without affecting background colors.
● Choose Lightroom for deep manual photo color control across desktop and mobile platforms, or use Wondershare Filmora on Windows and macOS if you need a click-based HSL Color Picker to instantly target mixed lighting in videos without guessing slider values.
Ask AI for a summary
 ChatGPT
 Perplexity
 Gemini
 Claude
 Grok
Grok
Adobe Lightroom is a powerful editor for professional color grading. One of its most essential features is the HSL in Lightroom (Hue, Saturation, and Luminance). Mastering the Lightroom HSL panel allows you to fine-tune specific tones without affecting the entire image. This guide will show you how to use HSL color Lightroom tools to achieve cinematic results or try a more intuitive workflow.
With the HSL panel Lightroom users rely on, you can fine-tune tones, fix weird color casts, and make your shots look more natural or more cinematic. The problem is, HSL color Lightroom tools aren't as easy as they look at first. That's why this guide breaks everything down step by step to help you actually master it.
Part 1. How to Find the HSL Panel in Lightroom Classic and CC
On Desktop, Adobe Lightroom comes in two main versions. If you download the software to your computer, that version is called Lightroom Classic. If you use it in a browser or through the cloud app, that version is called Lightroom CC.
Both give you access to the HSL color panel in Lightroom, but Adobe moved things around and renamed it into "Color Mixer", which is why so many people think the HSL panel is missing.
Lightroom Classic
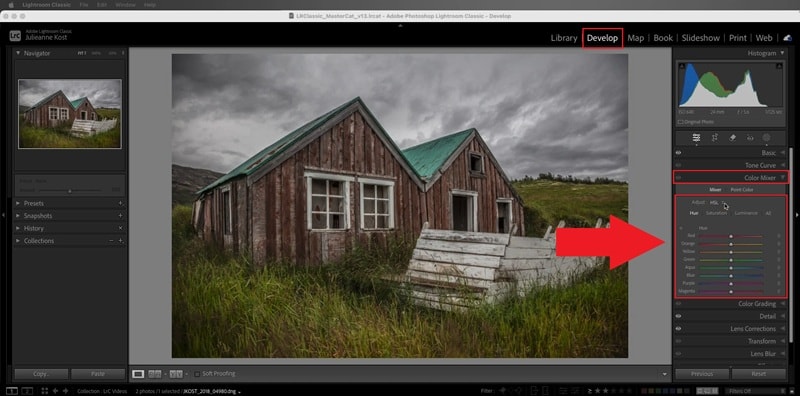
To access the HSL panel in Lightroom Classic, follow these steps:
- Open any photo and head to the Develop tab.
- On the right side, scroll down until you see the Color Mixer panel.
- Click it, and you will find the HSL panel there.
If you want a deeper walkthrough, Adobe expert Julieanne Kost has a solid tutorial on YouTube. It's worth checking out if you want to see how the tools work in real editing sessions.
Lightroom CC
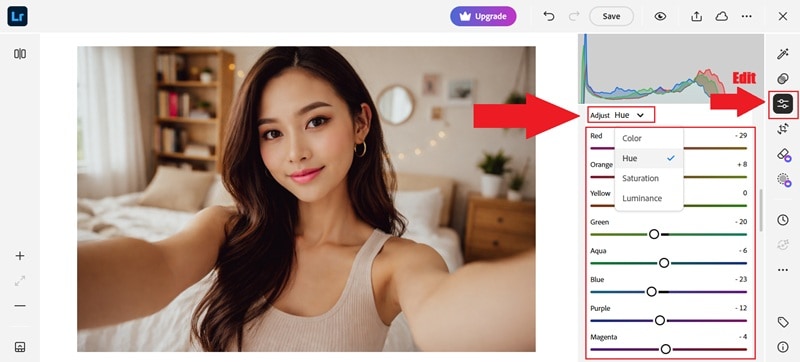
If you are using Lightroom in a browser, things look a little different. Follow the steps below to locate it:
- Open your photo, click Edit.
- Then, scroll down until you find the Color Mixer.
- Click Adjust, and choose to edit Hue, Saturation, or Luminance.
This is what Adobe now calls the HSL color panel Lightroom users used to know.
HSL Panel vs Color Panel: What's the Real Difference?
When you open the Lightroom HSL panel, you will usually see it sitting right next to the Color panel. At first glance, it feels confusing because the Color panel also lets you adjust hue, saturation, and luminance.
So, it's normal to wonder why Adobe even bothered keeping two views for the same thing. To see the difference, see the table guide below:
| Feature | HSL Panel | Color Panel |
| Layout Style | Sliders for each color channel | Color circles for each channel |
| Best For | Precise and technical adjustments | Visual and intuitive edits |
| Color Control | Feels more detailed and controlled | Feels simpler and quicker |
| Editing Speed | Slower for rough edits | Faster for quick color tweaks |
| Learning Curve | Better once you know what each does | Easier for beginners |
|
Show More
Show Less
|
||
Part 2. Breaking Down HSL Color in Lightroom: Hue, Saturation, and Luminance
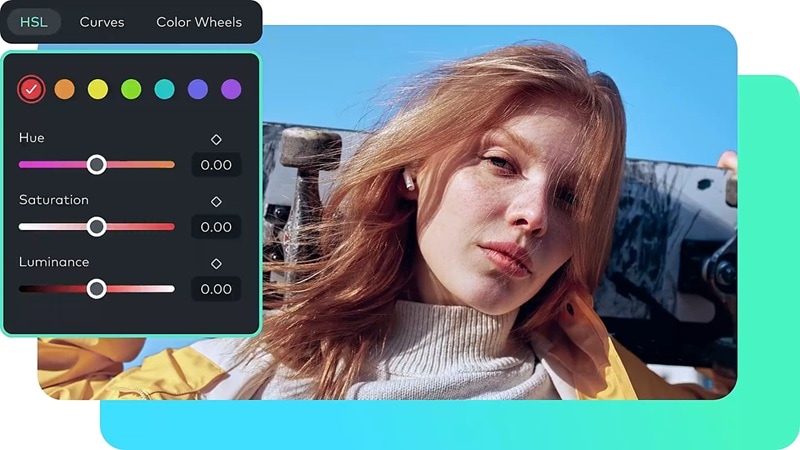
As we mentioned, the HSL panel Lightroom users rely on is built around three things: Hue, Saturation, and Luminance. Each one does a different job, and once you get how they work together, color grading starts to feel way less random. Let's break them down!
Hue: Bending Colors Without Breaking Them
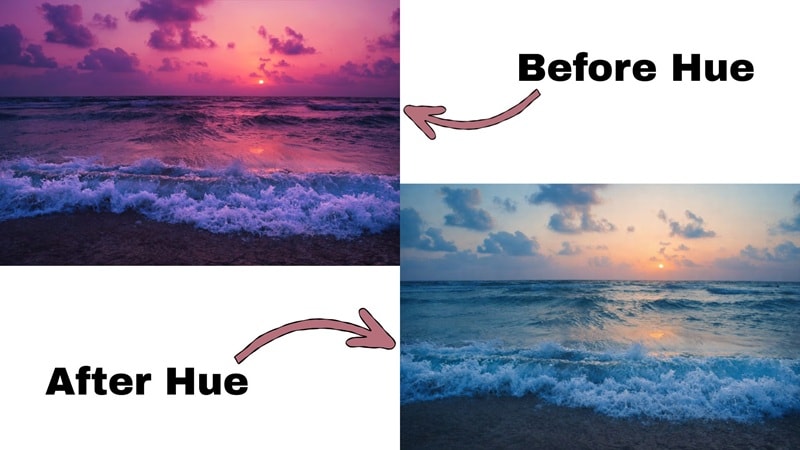
Hue is all about changing what a color actually looks like. It does not make colors brighter or stronger. It shifts one color into another. So when you move the Hue slider, you are telling Lightroom to push that color toward a new tone.
A few real-world examples:
- If your grass looks too neon, you can move the Green Hue slider toward yellow to make it look more natural.
- If your sky feels too purple, sliding the Blue Hue a bit toward teal can clean it up.
- If skin looks too pink, nudging the Red or Orange Hue can warm it up and make faces look healthier.
Saturation: Turning Color Volume Up or Down
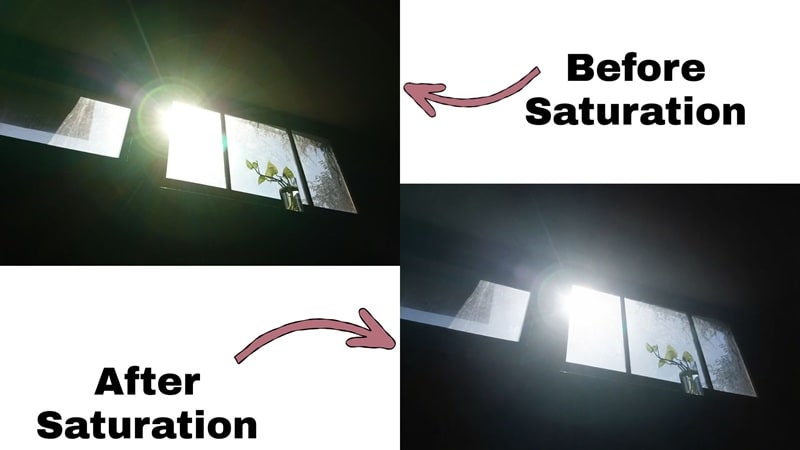
Meanwhile, Saturation in the HSL color Lightroom tools is all about how strong each color looks. It does not change the color itself; it just decides whether that color feels bold or muted. What makes the HSL panel Lightroom so useful is that you can control saturation for each color channel instead of cranking up the whole photo and hoping for the best.
A few real-world examples:
- If skin looks too intense or sunburned, lowering the Orange saturation can calm it down fast.
- If your sky feels flat, boosting the Blue saturation can give it more life without touching the rest of the image.
- If sunlight looks too harsh or yellow, pulling down the Yellow saturation can make the whole scene feel softer and more natural.
Luminance: Brightness Control for Each Color
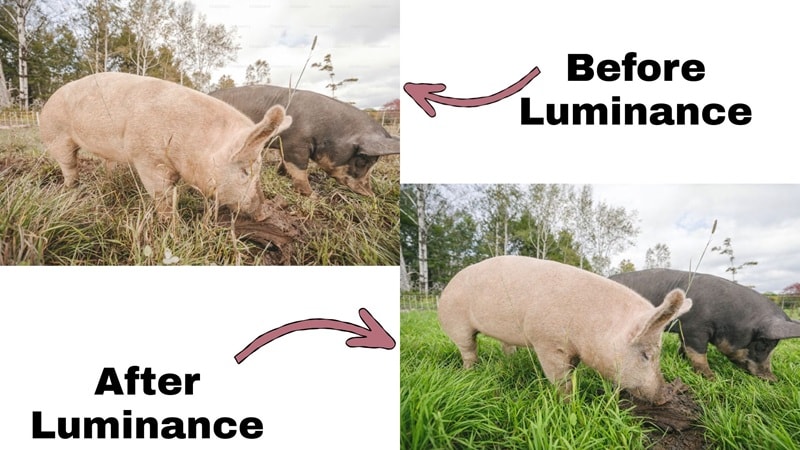
Lastly, Luminance in the HSL color Lightroom tools is all about how bright or dark each color looks. It does not change the color itself, and it does not mess with the whole photo as the Exposure slider does. Instead, the HSL panel in Lightroom lets you brighten or darken just one color at a time, which gives you way more control.
A few real-world examples:
- If a face looks dull or flat, raising the Orange luminance can make skin look brighter and healthier.
- If the sky feels washed out, lowering the Blue luminance can bring back that deep, rich sky look.
- If grass or trees look muddy, raising the Green luminance can clean them up and make them feel fresher.
Part 3. How to Use HSL Lightroom Mobile for On-the-Go Editing
For those who don't know, Adobe Lightroom is actually also available on Android and iOS. So, if you are out shooting, traveling, or just scrolling through your camera roll and want to clean up your colors right away, HSL Lightroom mobile has your back.
The mobile app still gives you solid color tools, and yes, it fully supports the HSL color panel too. If you want to open the HSL panel in Lightroom on mobile, and start tweaking your colors, just follow the easy steps below and you will be editing in no time.
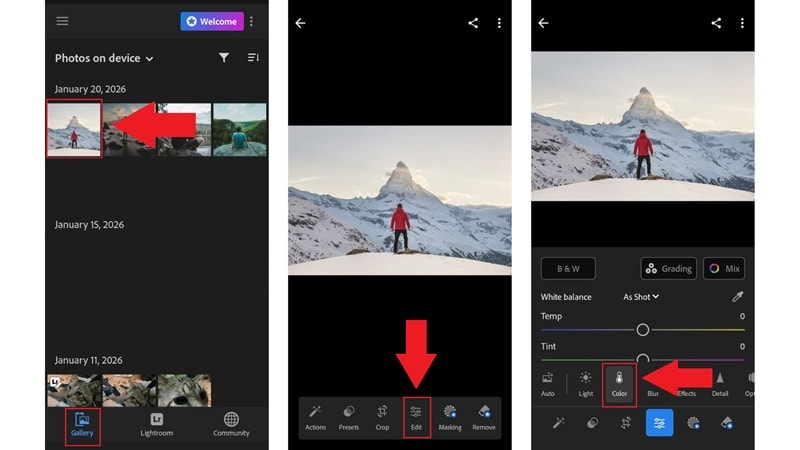
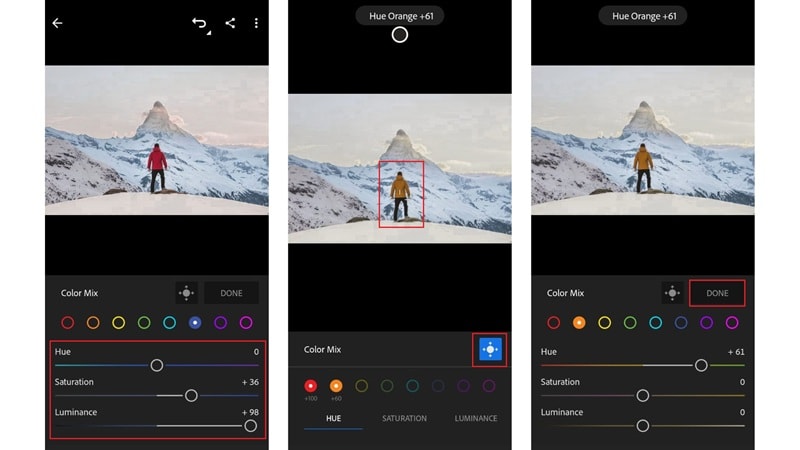
- Open Lightroom Mobile and tap the "Gallery" to pick the photo.
- Tap "Edit" and tap "Color" to open the color tools.
- Tap "Mix" to bring up the HSL panel.
- Tap one of the color circles like Red, Orange, Yellow, or Blue in the HSL panel.
- Use the sliders to adjust "Hue", "Saturation", and "Luminance" for that color.
- Move the sliders slowly and watch how the photo changes in real time.
Pro Tip: Target Adjustment Tool
- Tap the target icon to turn on the targeted adjustment tool.
- Tap on the area of the photo you want to change and drag left or right.
- Tap "Done" to save your edits.
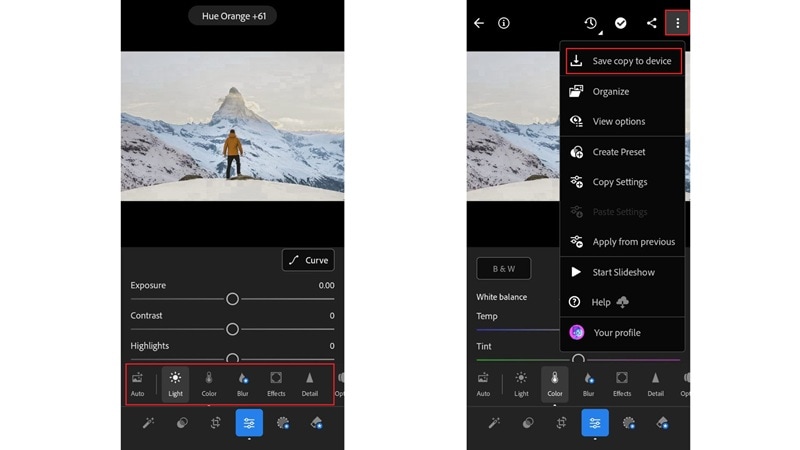
You can fine tune the photo using other Lightroom tools like Light, Contrast, and White Balance. To export the edited photo to your phone, tap the three-dot icon in the top right corner and select "Save copy to device".
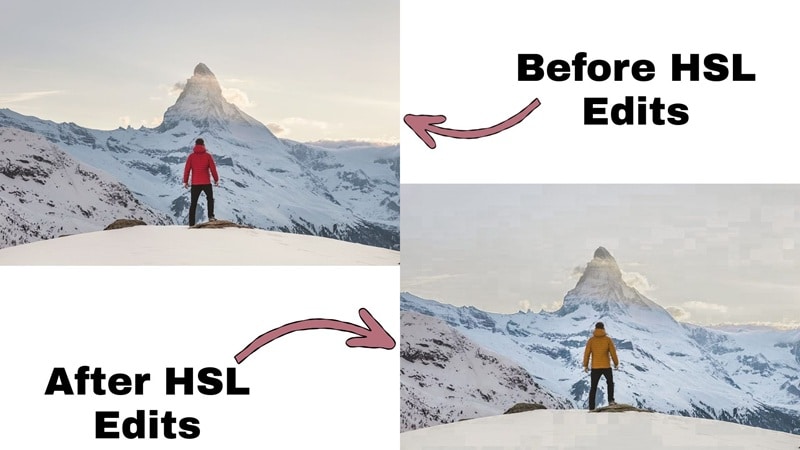
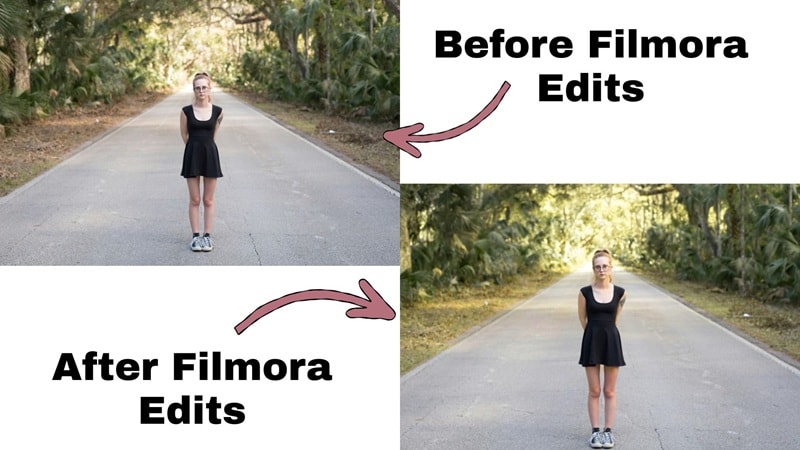
Now, take a look at the before-and-after to see the difference.
Part 4. Advanced Techniques for HSL Panel Lightroom Classic
Now that you know how the HSL panel in Lightroom works and what each slider does, it's time to learn a few more advanced tricks. In fact, you already picked up one of them in the last section without even noticing. We are talking about the targeted adjustment tool. It is the tool that lets you click right on your photo and adjust colors from there.
This time, let's focus on how to use it in the HSL panel of Lightroom Classic. The desktop version gives you more control and makes this tool feel even more useful when you are fixing things like skin tones, skies, or uneven colors.
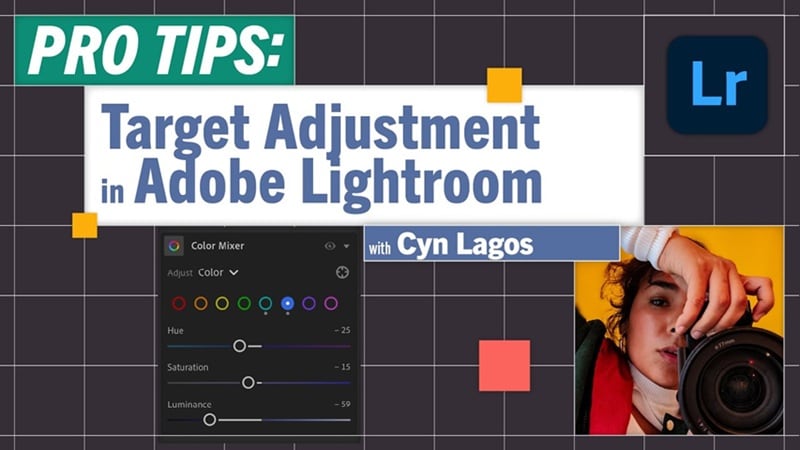
How to Use the Targeted Adjustment Tool in Lightroom Classic
Adobe actually has a long livestream on Adobe Live that goes deep into how to get the most out of this feature. It is uploaded on YouTube, and is great if you want the full breakdown. But for now, let's keep it simple and walk through the basics so you can start using it right away.
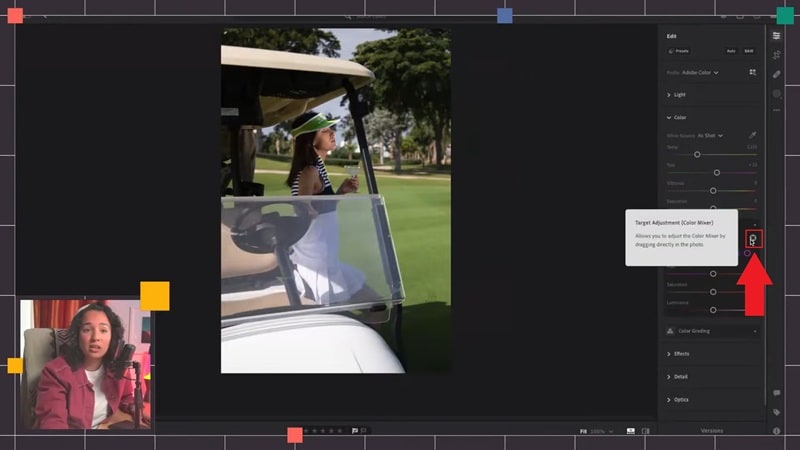
- Go to the "Color Mixer" panel.
- Click the little target icon.
Once it is on, you can click directly on your photo to adjust colors.
Choose which control you want to adjust inside the Color Mixer: "Hue", "Saturation", or "Luminance". Then, click on the exact spot in the photo you want to change.
For example, you can click the grass if you want to change greens.
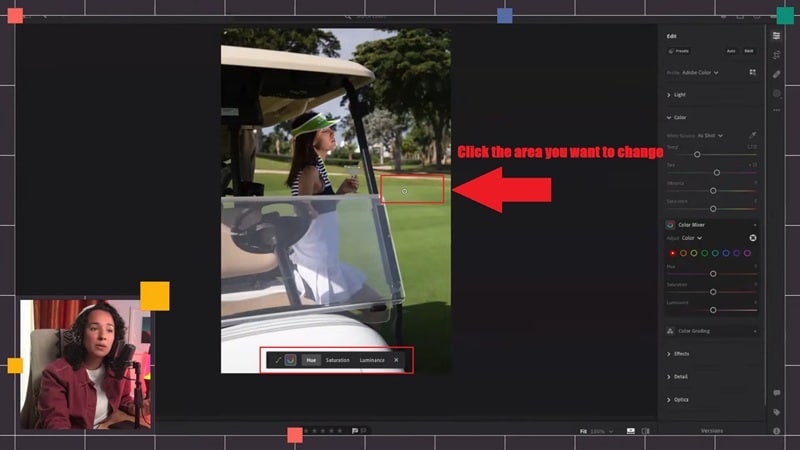
Drag left or right while holding your click. If it looks too strong, undo or drag back a bit. If you want, click a slightly different spot and drag again to refine.

And there you go! The big takeaway of this method is that the Targeted Adjustment Tool saves time, cuts down on guesswork, and gives you more control when using the HSL color panel in Lightroom.
Pro Tip: Handle Skin Tones Without Affecting the Background
The targeted adjustment tool is also one of the easiest ways to fix skin tones without messing up the background. Instead of guessing sliders in the HSL color panel in Lightroom, just click right on the model's face.
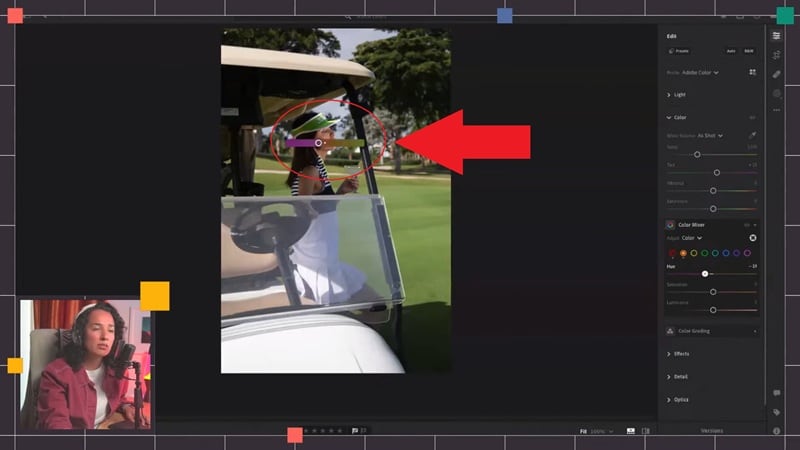
Once the tool is on, click the skin and drag left or right. Lightroom will adjust the right colors for you. You can warm up a face, tone down redness, or brighten skin without changing the sky or clothes.
Part 5. Next-Level Efficiency: HSL Eyedropper vs. Traditional Sliders
Now that you have ever worked inside the HSL color panel Lightroom, you already know the struggle. Some colors are just annoying to fix, especially when they sit between two channels like teal skies or yellow green grass. You end up guessing which slider controls what, undoing changes, and trying again.
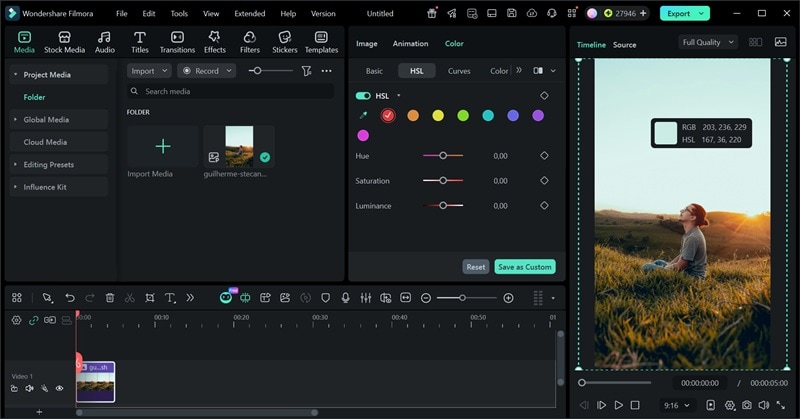
Thankfully, there is a smoother solution by Wondershare Filmora. In the latest Filmora update, they added an HSL Color Picker tool that works like an eyedropper. Instead of guessing sliders, you just click the exact color you want to change right in the preview.
Once you pick a color, Filmora knows which HSL values to adjust for you. You can then tweak Hue, Saturation, and Luminance with way more confidence because you are starting from the right color instead of hunting for it.
Why Color Picking Beats Slider Guessing
This is why Filmora's eyedropper feels like such a relief. Compared to guessing sliders in the HSL color panel in Lightroom, it just makes way more sense. You stop fighting the tools and start getting results faster.
Here is what makes it so much better in real use:
- Faster Workflow: You click the color you want to fix, and you are already halfway there. No more jumping between sliders trying to figure out which one controls what.
- Accurate Color Targeting: You are working with the exact color from the preview, not a guess. This makes small tweaks feel way more predictable and easier to control.
- Ideal for Complex Scenes: When a scene has mixed lighting or tricky tones, slider guessing gets messy fast. Color picking handles those situations way better and saves a lot of time.
Part 6. Why Filmora is a Great Alternative for HSL Video Color Grading
While the HSL panel in Lightroom is powerful, it can be time-consuming. For creators who want professional results faster, the Wondershare Filmora HSL Color Picker offers a more visual "click-and-edit" approach, especially for video color grading.
Another really nice thing about the latest Filmora update is how much cleaner the color panel feels now. If you have ever felt like the HSL panel in Lightroom setup is a bit too much, you are not alone. Lightroom can feel technical fast, with all the panels, sliders, and tabs you have to jump between just to fix one color.
Filmora feels different in a good way. Most of what you need is right there on the screen, and a lot of it works by clicking straight on what you see in the preview. You do not have to hunt for sliders or guess which panel to open next. It just feels more natural.
This matters even more when you are working on videos. You are dealing with tons of frames and changing light, so speed really matters. With Filmora's simpler layout and the HSL Color Picker, you can fix colors faster and keep things looking consistent without overthinking every little tweak.
Summary Table: Lightroom HSL vs Filmora HSL
Whether you stick with the HSL color panel Lightroom gives you or try Filmora's signature eyedropper for HSL, it really comes down to how you like to work. To make the difference clearer, here is a quick side-by-side look at what each one does best. This should help you see which one fits your editing style better.
| Feature | Lightroom HSL | Filmora HSL |
| HSL Sliders | Full manual sliders for each color | Full sliders with a cleaner visual layout |
| Precision Tool | Targeted Adjustment Tool | HSL Color Picker Eyedropper |
| Ease of Use | Feels technical and slider heavy | Feels simple and click based |
| Platform | Windows, macOS, Android, iOS, Online | Windows, macOS |
| Best For | Photo color grading and fine-tuning | Video color grading and fast color fixes |
| Speed of Workflow | Slower for complex colors | Faster with direct color picking |
| Handling Mixed Colors | Requires slider guessing | Picks the exact color instantly |
| Video Editing Support | Limited video tools | Built for full video editing |
| Ideal User | Photographers who like deep manual control | Creators who want fast and easy color edits |
|
Show More
Show Less
|
||
Conclusion
The HSL color panel in Lightroom gives you a ton of control over your colors once you know how it works. So, we broke down how to master HSL in Lightroom. It is a powerful tool, but the whole slider guessing game can feel a bit heavy.
If you want a simpler way to handle HSL style color grading, Wondershare Filmora is a solid option. Its new HSL Color Picker tool works like an eyedropper, so you can click a color directly and adjust it without the guesswork. It feels faster, more visual, and way easier to work with, especially for video projects where speed really matters.
FAQs
-
Why is my HSL panelin Lightroom missing?
Adobe now shows HSL inside the Color Mixer tab in both Lightroom CC and Lightroom Classic. So, if you cannot find anything labeled HSL in Lightroom, it is just a layout change, not a feature removal. -
How do I reset HSL color Lightroom settings?
The quickest way is to double-click any slider in the HSL color Lightroom panel and it snaps back to zero. If you want to reset everything at once, you can also reset the whole photo or copy settings from an unedited version. -
Why do my colors look weird after HSL edits?
This usually happens when the Hue or Saturation sliders get pushed too far. HSL in Lightroom works best with small moves, not big jumps. If skin turns orange or skies go green, dial things back a little and fix white balance first before touching HSL. -
Should I use HSL before or after basic edits?
HSL works best after you fix exposure and white balance. Once the photo looks balanced overall, the HSL panel Lightroom tools help you fine tune specific colors without breaking the rest of the image. -
Does HSL Lightroom mobile work the same as desktop?
The tools work the same under the hood, but the layout looks simpler on mobile. HSL Lightroom mobile still lets you adjust Hue, Saturation, and Luminance for each color, just in a touch friendly way that feels faster on a phone.
