

When you’re editing video, that often takes you to wherever the unwanted sounds were: the ambient chatter or hum, or perhaps someone else’s dialogue in the background.
For this, you may need to learn how to separate audio from video in DaVinci Resolve. It’s what gives you full control over each element of your project. Once the audio is detached, it becomes its own track. You will get to edit it more easily without messing up the video timeline.
The aim of this guide is to show you exactly how to separate audio from video in DaVinci Resolve using the fastest methods. You'll learn the Right-Click, Linked Selection, and Extract methods, plus advanced troubleshooting tips. We also introduce Filmora, an easier, AI-powered alternative for effortless audio control.
Part 1: How to Unlink Audio and Video in DaVinci Resolve: Step-by-Step Guide
Unwanted audio can lower video quality. DaVinci Resolve offers clear tools to fix it. This guide shows step-by-step ways to unlink audio and video in DaVinci Resolve quickly.
Method 1. Right-Click-Unlink via "Link Clips"
- Drag the clip from the Media Pool to the timeline. Confirm video and audio show as a linked pair.
- Check the chain icon. If it’s missing, link the parts first.
- In the timeline, right-click the clip. In the menu at the bottom, deselect Link Clips.
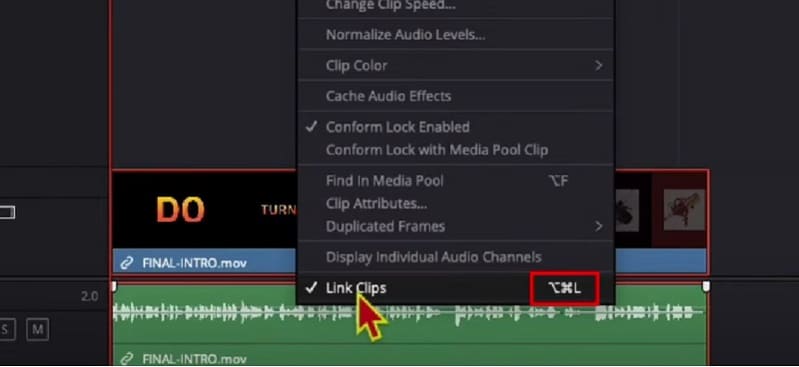
You can now move or delete audio independently. That is how to unlink audio from video in DaVinci Resolve.
Method 2. Toolbar: Chain-Icon (Linked Selection)
- Look above the timeline for the toolbar.
- Find the chain-link icon; it’s the Linked Selection toggle.
- Click the icon to turn Linked Selection off.
- Click the video or the audio; each selects on its own now.
- Move, trim, or adjust either track without changing the other.
- Timing stays aligned unless you shift a track manually.
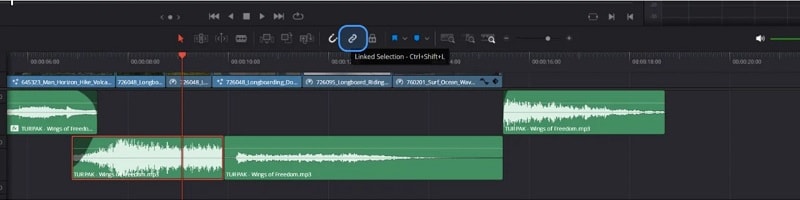
This toggle is the quickest path to learning how to unlink audio in Davinci Resolve.
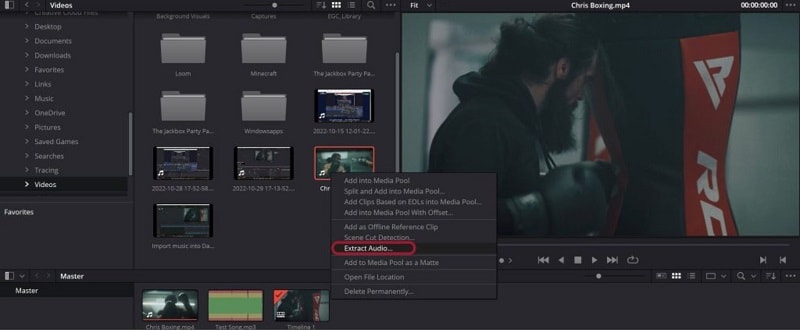
Method 3. Extract Audio to WAV (Media Pool)
- Navigate to the Media Pool at the bottom of DaVinci Resolve under the Media tab.
- At the top-left side, you will find video file you need to process.
- Right-click the clip.
- Choose Extract Audio from the menu.
- DaVinci Resolve will then create a new WAV file with just the audio from this clip.
Part 2: Advanced Unlinking Tips & Tricks
Basic unlinking works well, but real editing often requires more. Here’s how to go beyond simple detaching.
2.1 Using Linked Selection to Unlink Multiple Clips
Working with several clips at once? A shortcut makes it simple:
- First, select all the clips you need.
- Next, press Ctrl + Shift + L (Win) or CMD + Shift + L (Mac)
- Linking switches on or off right away.
This gives instant control over editing. It’s a major time-saver when you often need to unlink audio and video in DaVinci Resolve.
2.2 Troubleshooting: Why can't I Unlink My Audio and Video?
- Ensure the clip isn't grouped — grouping can mimic linking but behaves differently.
- Confirm the timeline isn’t locked (look for a lock icon blocking edits).
- If the chain-link icon is greyed out, it may indicate that a compound or grouped clip is selected instead of a standard one.
Part 3: Filmora: The Easiest Alternative to Separate Audio with AI Vocal Remover
When separating audio feels complex in DaVinci Resolve, Wondershare Filmora offers a smoother alternative. Its interface is straightforward, so you can extract or detach sound without facing a steep learning curve.
Both the desktop and mobile versions provide clean workflows supported by extra audio tools like Audio Denoise, Speech Enhancement, and Audio Ducking.
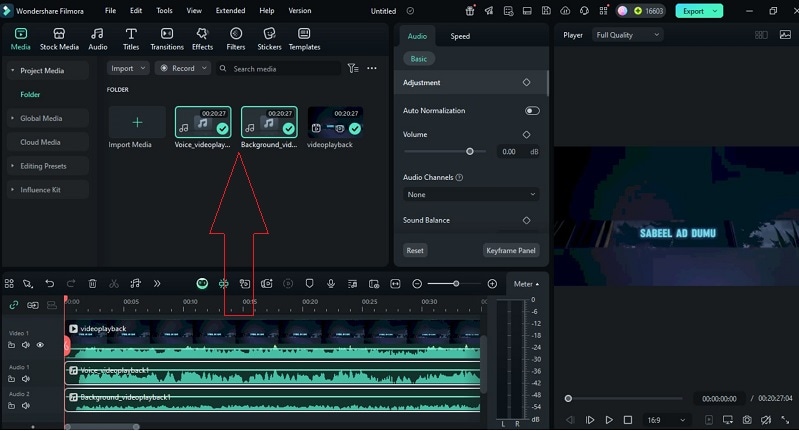
Detailed Audio Extraction in Filmora
The desktop version is designed for those who need control and flexibility. It not only detaches sound but also improves clarity through AI-powered tools.
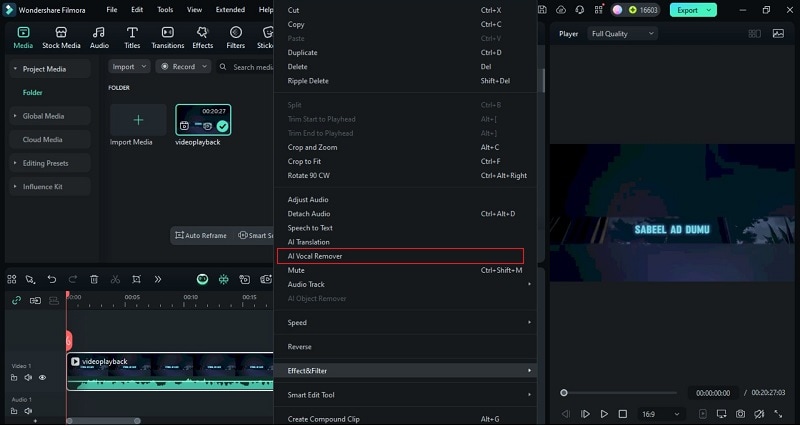
Method 1: AI Vocal Remover (One-Click Solution)
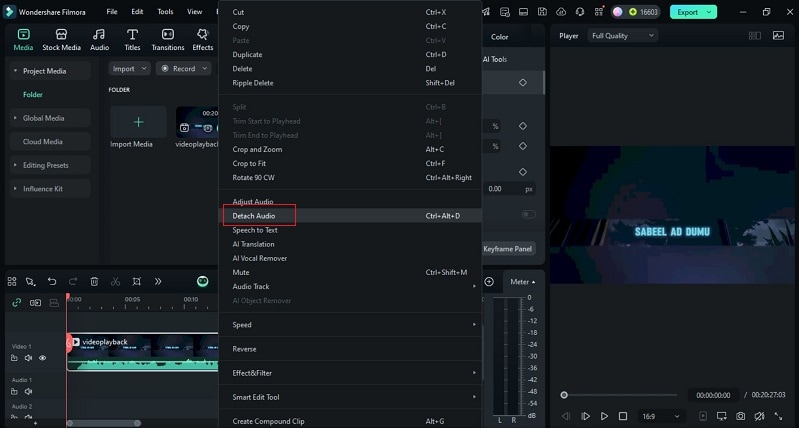
Method 2: Detach Audio
DaVinci Resolve vs. Filmora: Unlinking Audio Comparison
Both tools let you manage sound, but the process differs. Here, DaVinci Resolve's detach audio is compared with Filmora’s one-click methods for clarity and efficiency.
Conclusion
Mastering how to separate audio from video in DaVinci Resolve gives editors more freedom over their stories. This guide covered right-click unlinking, toolbar toggles, WAV extraction, and advanced tricks for smoother control. We also explored why unlinking can fail and how to fix it.
Filmora was introduced as a simpler option, offering one-click detaching and AI tools that save time without complexity. For many, the choice comes down to depth versus speed. Both editors deliver results, but the right workflow depends on how you prefer to unlink audio and video in DaVinci Resolve or beyond.
Frequently Asked Questions
-
Is it possible to unlink audio from video in DaVinci Resolve while keeping the original quality intact?
Yes. When you detach or extract audio, the program only separates tracks for editing. The source files stay unchanged, so quality remains intact. -
How does using Detach Audio differ from using Extract Audio?
Detach Audio splits the sound from the video on the timeline. Extract Audio saves a new audio file in the Media Pool. Detach is temporary, while extract is a full copy. -
What steps do I follow to remove audio entirely from a video clip in DaVinci Resolve?
First, unlink audio and video in DaVinci Resolve. Then highlight the audio track and press Delete. The video remains, but the sound is removed. -
Can you separate audio from video on mobile?
For mobile users, Filmora allows you to adjust loudness, fade effects, and remove noise directly from your phone. To do it, import the video clip you want to edit. Then, tap the clip and choose Extract Audio from the toolbar.
