
 100% Security Verified | No Subscription Required | No Malware

Many players enjoy recreating characters from their favorite games, and Minecraft is one of them. Afterward, they share it online on their created fan page to get feedback and get opportunities to collaborate with others and turn the image to Minecraft pixel art.
However, turning your imagination into game art isn't as simple as it seems. To make the process easier for you, this article discusses the ways to turn your favorite characters from the game Minecraft into pixel art. So, give it a read and get started with the creation process to showcase your skills.
In this article

Part 1. What is Pixel Art Minecraft? How to Apply the AI Minecraft Pixel Filter?
It is a form of digital art where players use blocks as "pixels" to create detailed images. Mostly, you can create pixel art on a flat horizontal surface in the game. Each block represents a single color, and when you place them together correctly, they make a larger picture. The results are similar to how pixels form images on a screen, ranging from a smiley face to detailed recreations of video game characters.
Pixel Art in Minecraft is popular because it's a fun way to bring your favorite scenes to life. You can use the pixel art generator from image Minecraft to make the process easier by picking the file first. Then, you can select an online or offline tool to convert your media file into pixel art.
To turn your image into pixel art through an online tool, you can use the Pixel-Art AI tool and apply the pixelate effect. However, to achieve results through an offline tool, you can upload your media file to Wondershare Filmora and get results in seconds, and export your creation to your desktop.
Part 2. How to Apply Minecraft Pixel Art on Filmora [Desktop + Mobile]
Creating pixel art in Minecraft for videos is challenging since there are only a limited number of block types and colors. Therefore, finding the perfect match for skin tones is challenging, and recreating smooth edges is also a difficult task. Tools like Wondershare Filmora generate pixel art Minecraft, making details like eyes and facial features easier to create.
Notably, the tool does not offer only one method for generating pixel art Minecraft. Users can try different ways to achieve the effect accurately using Wondershare Filmora. By applying the pixel effect from the available results, you can achieve results in seconds without needing to waste your time.
Method 1. Make Pixel Art Minecraft Using the Image to Video Conversion
As discussed, Filmora provides you with different ways for creating pixel art Minecraft. The tool offers a dedicated image-to-video feature that contains the pixel landscape effect. Users can utilize it to upload their image and turn it into pixel art. Here is a detailed guide that you can use for creating pixel art Minecraft using Filmora:
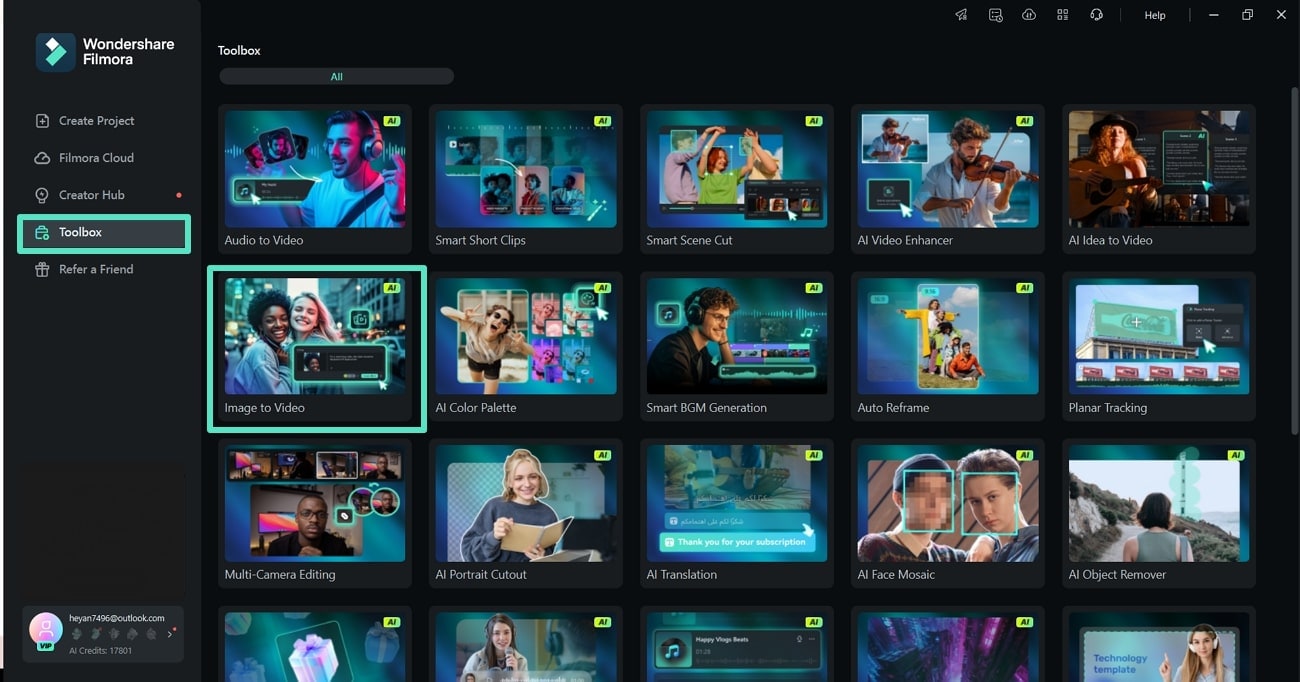
- Step 1. Use the Toolbox to Access Image to Video. Begin by using the "Toolbox" option on the left side of Filmora's homepage and select the "Image to Video" option。
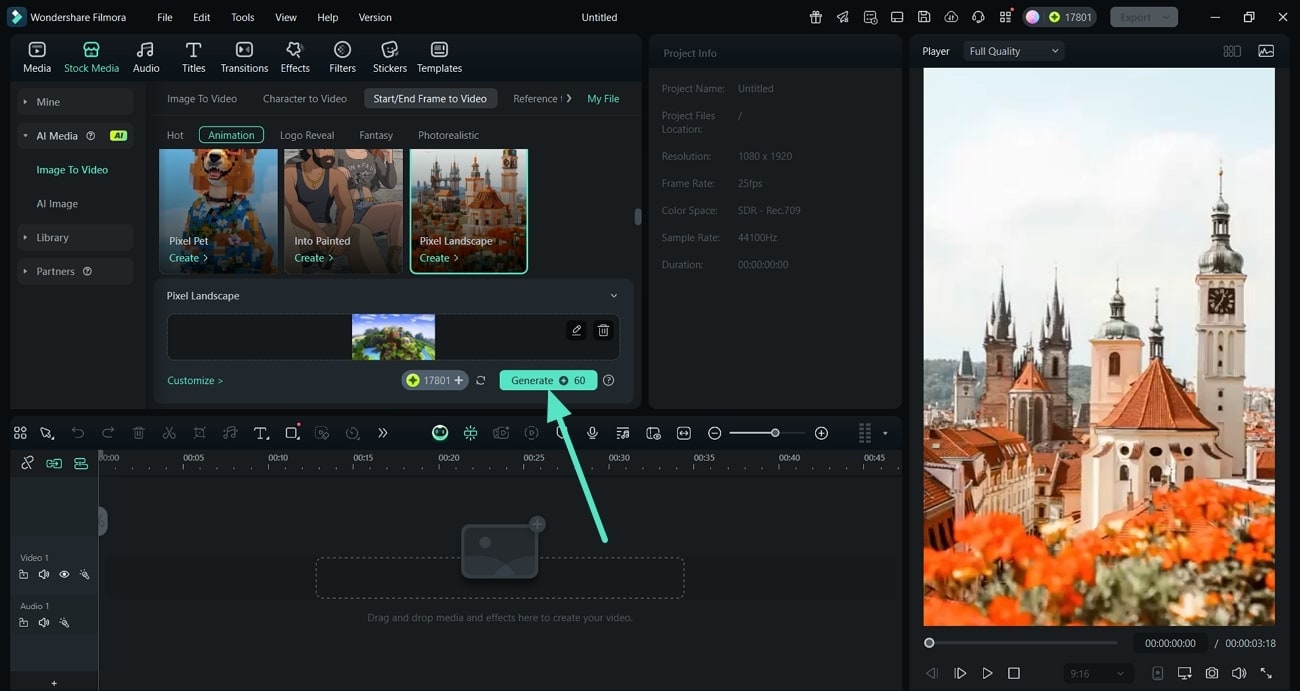
- Step 2. Access the Image to Video Feature to Pick a Template. Next, use the "Image to Video" feature from the left side of the screen to access different templates. In the "Start/End Frame to Video" section, hit the "Create" button on the Pixel Landscape template. Afterward, use the "+" icon below to import or drag your file to turn it into pixel art。

- Step 3. Choose the Size of Your Image and Submit. When your image uploads, select the desired portion that you want to turn into pixel art. Then, use the "Submit" option below to start the pixel art creation process。

- Step 4. Hit the Generate Button on the Pixel Landscape. When the image appears, click the "Generate" button below so Filmora can start converting your added image into pixel art。
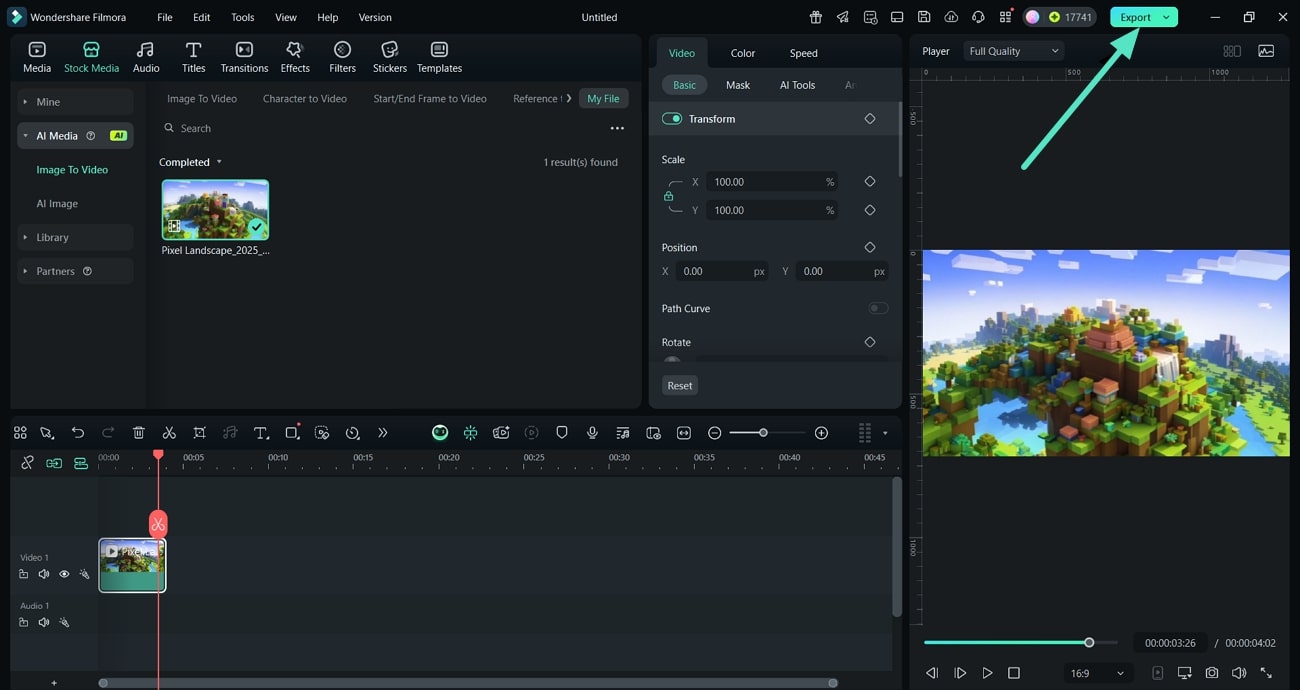
- Step 5. Drag the Generated Image Below and Export. Finally, when the tool generates a pixelated image, drag it onto the editing timeline below. Select the "Export" button from the top-right corner of the screen to save the created pixel art to your device。
 secure download

Method 2. Create Pixel Art by Applying Effects
In Filmora, you can turn your videos into pixel art by applying the available effects. The tool provides results in seconds by selecting a pixel effect and adding it to your video. It contains different kinds of effects that offer a specific kind of pixelation for turning a picture into Minecraft pixel art according to your different requirements.
Creating Pixel Art by Applying Effects On Filmora Desktop
The following are the easy steps that you must follow to create pixel art by applying effects to your media files through Filmora desktop:
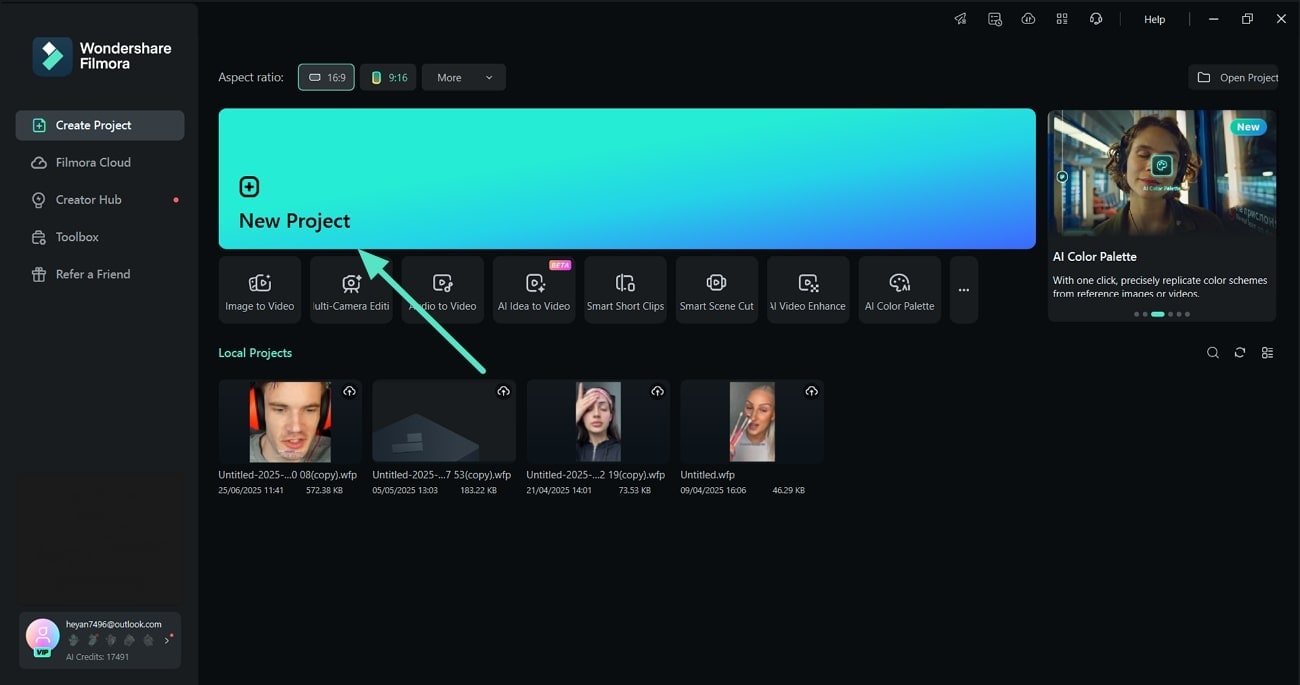
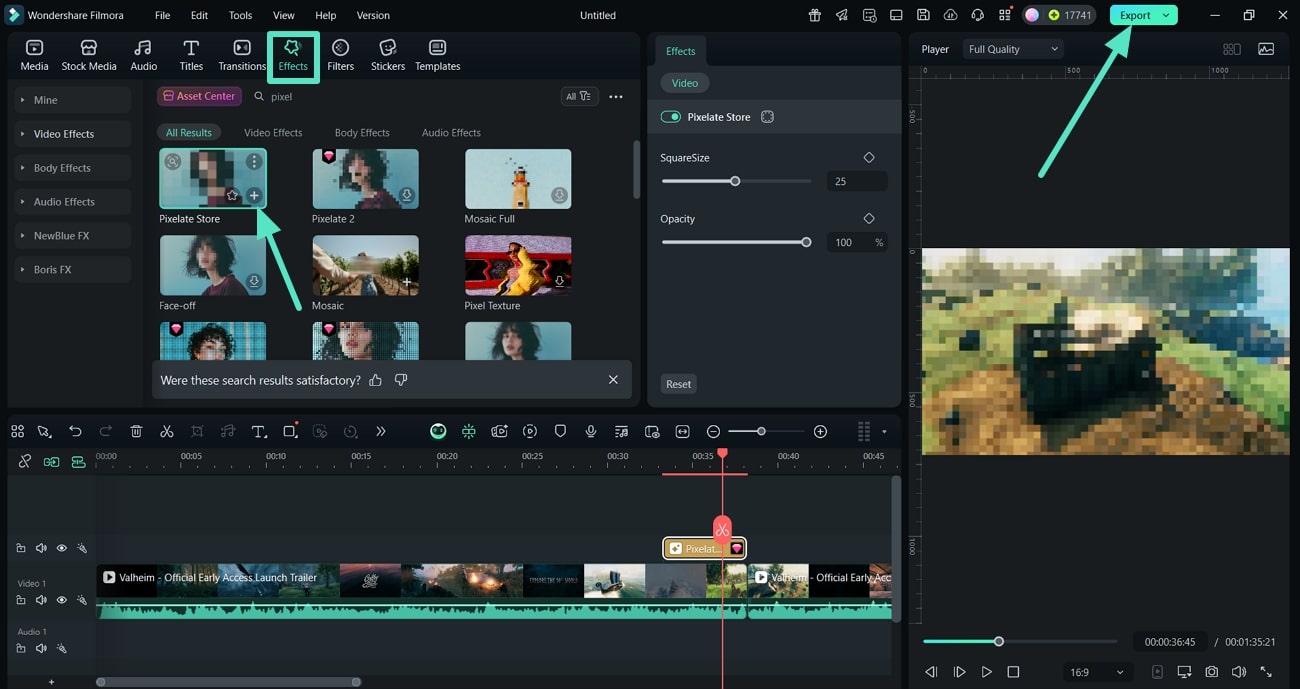
- Step 1. Click the New Project Option to Import. To initiate, use the "New Project" option from Filmora's homepage to import an image from the Minecraft game. Then, drag it onto the editing timeline below to start applying the effect。
- Step 2. Pick a Pixel Effect and Apply it Before Exporting. Next, use the "Effects" option from the above bar and type "Pixel" in the search bar. When the tool displays results, pick the "Pixelate Store" effect and use the "+" button on it to apply it to your Minecraft video. Finally, when you're satisfied with the result, use the "Export" option from the top-right corner to save your pixel art to your device。
secure download
Use the Effects for Pixelation Through the Filmora App
Now let's create pixel art in seconds by applying an effect using the Filmora App [Android/iOS] through your mobile:
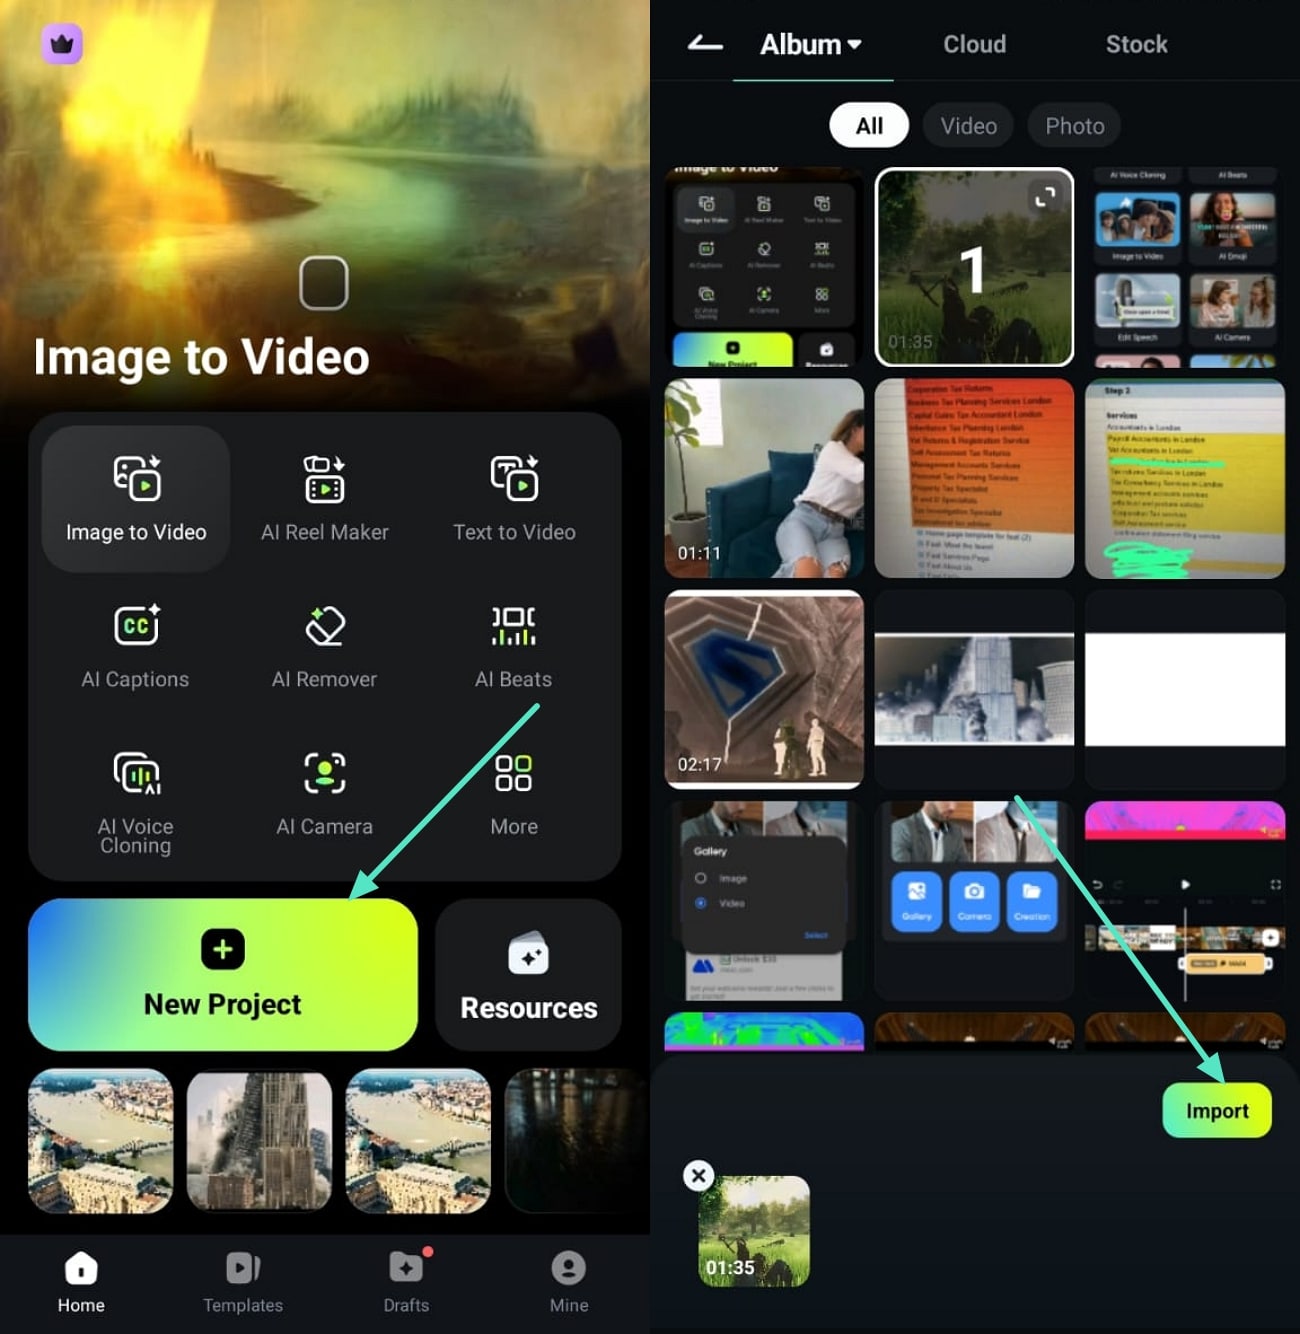
- Step 1. Create a New Project to Import a Clip For Pixelation. Start by using the "New Project" option from Filmora's homepage, go to the gallery, and hit the "Import" button after selecting a clip for pixelation。
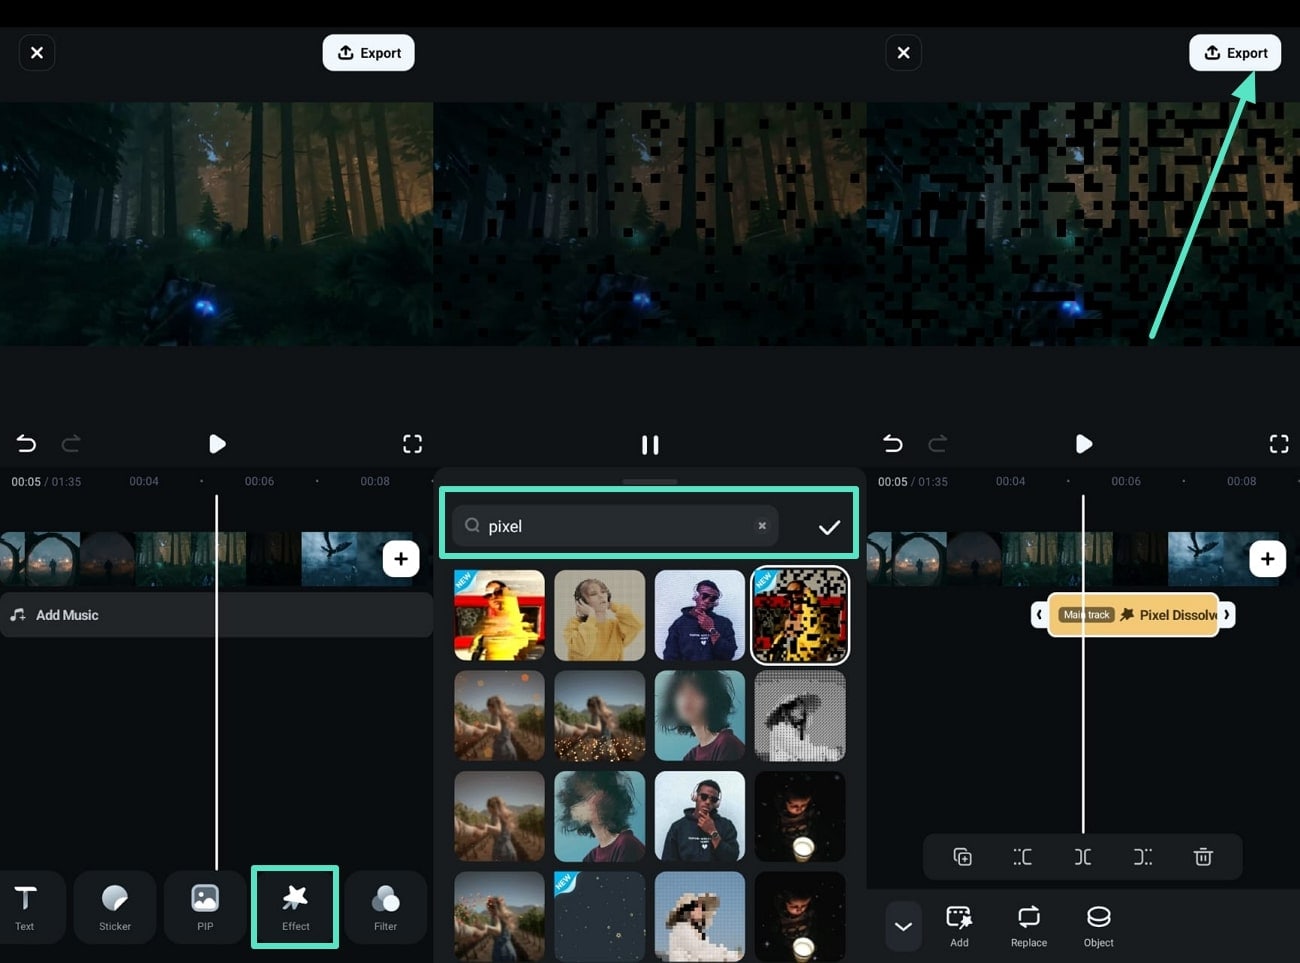
- Step 2. Search for the Pixel Effect and Apply. Next, use the "Effects" option from the bottom panel and type "Pixel" in the search bar. After selecting a pixelated effect, use the "Tick" button to apply it to the video. Finally, preview it and when it looks good, use the "Export" option from the top-right corner to save the pixel art to your gallery。
Method 3. Pixelate Your Videos Through Motion Tracking
Motion tracking is a simple method to pixelate your Minecraft video. Moreover, you can add a mosaic to your video and resize it to fit the whole clip. The tool also allows you to adjust the blur amount according to your requirements. In this Minecraft pixel art converter, a box appears after enabling it, and you can resize and position it over any object.
Make Pixel Art With Motion Tracking Through Filmora Desktop
The following is the method to make pixel art using the motion tracking method through Filmora desktop:
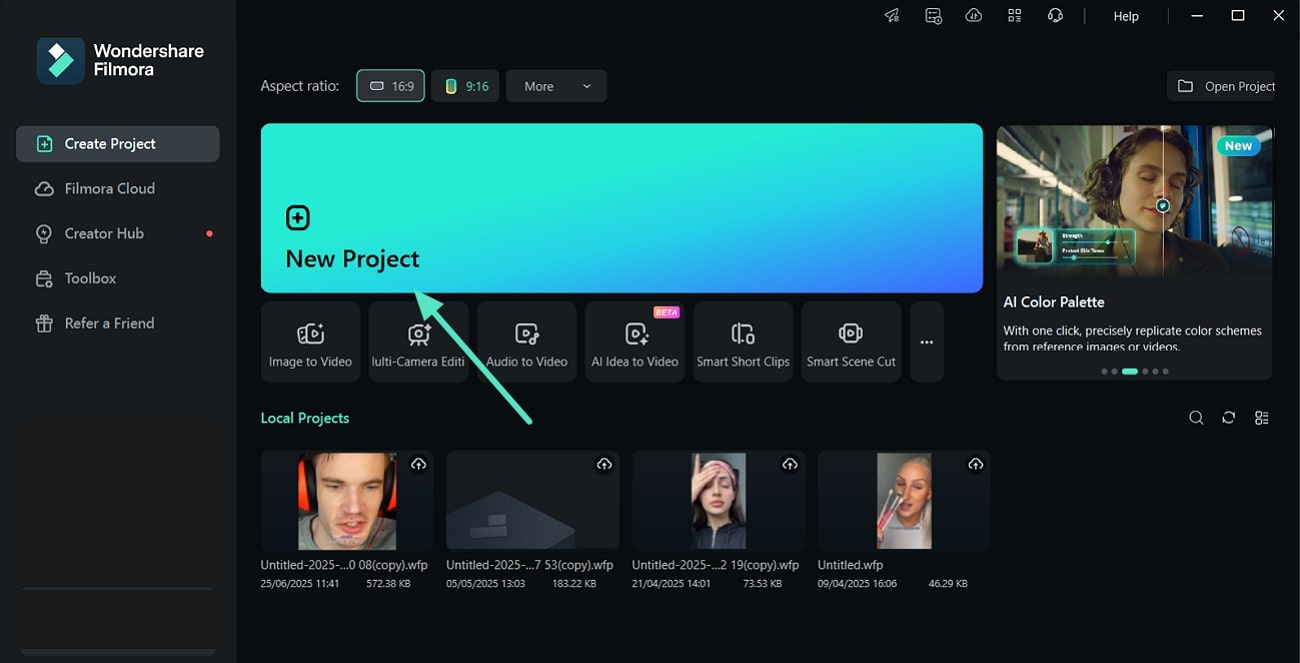
Step 1. Use the New Project Option for Adding a Media File. Start by using the "New Project" option from Filmora's homepage and import a clip. Afterward, drag it on the editing timeline below to start turning your file into pixel art.
-
- Step 2. Turn the Toggle On for Motion Tracking. Next, use the "Video" button to access the "AI Tools" for your uploaded Minecraft video. Turn the toggle on for "Motion Tracking" and click the "Start Tracking" button below so the tool can start detecting in your uploaded video。
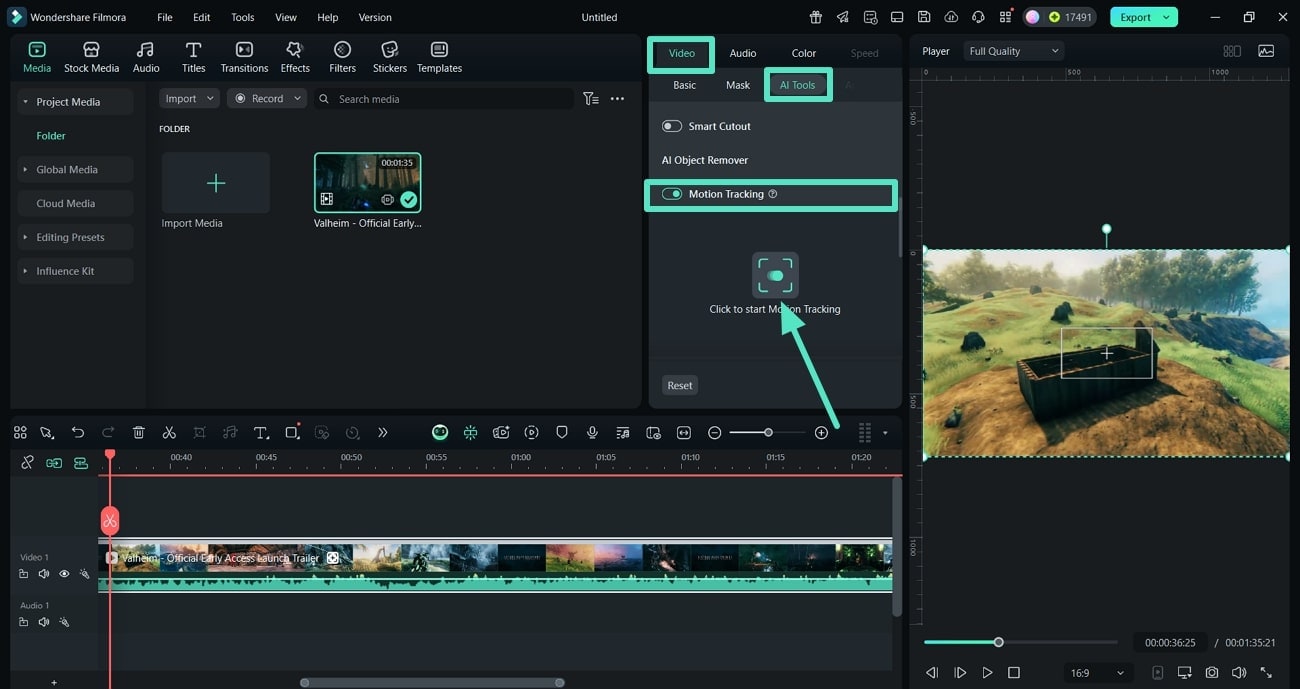
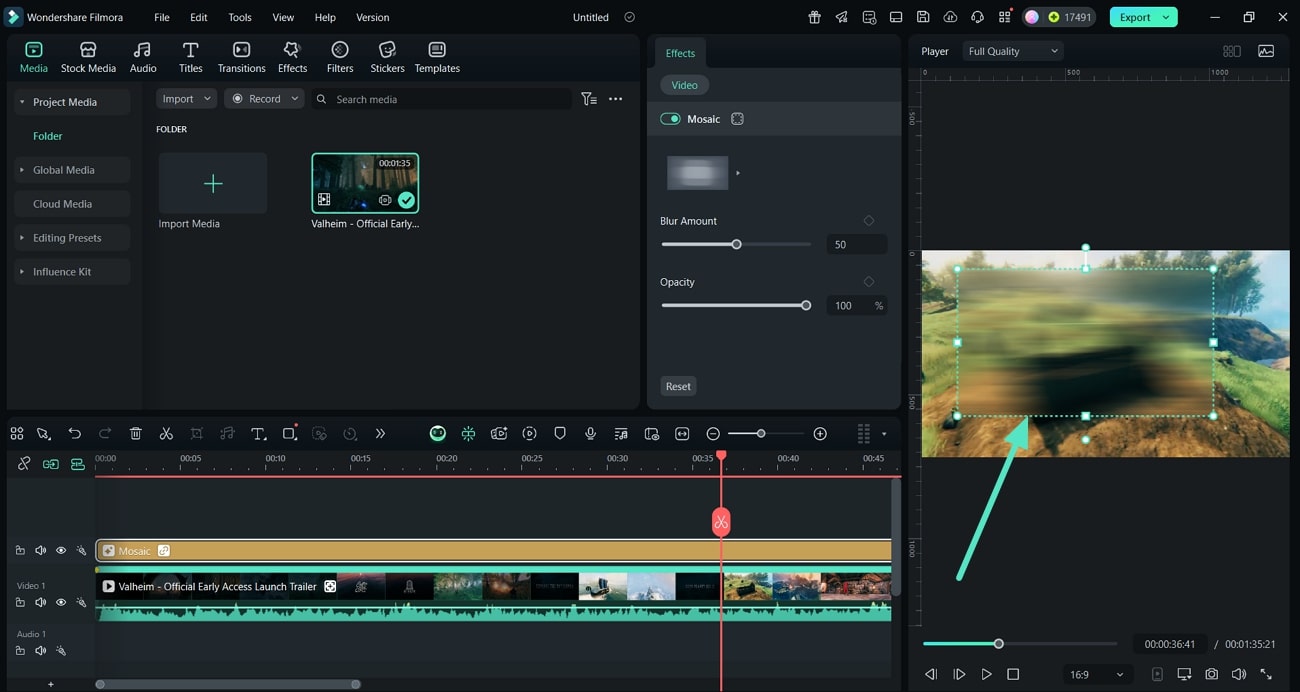
- Step 3. Expand the Link Element Tab to Add a Mosaic. Now, expand the "Link Element" tab to select the "Add a Mosaic" option and start pixelating your added Minecraft video。

- Step 4. Resize the Mosaic and Expand It to Fit the Video. Afterward, expand the added mosaic by resizing it to fit your uploaded Minecraft video。
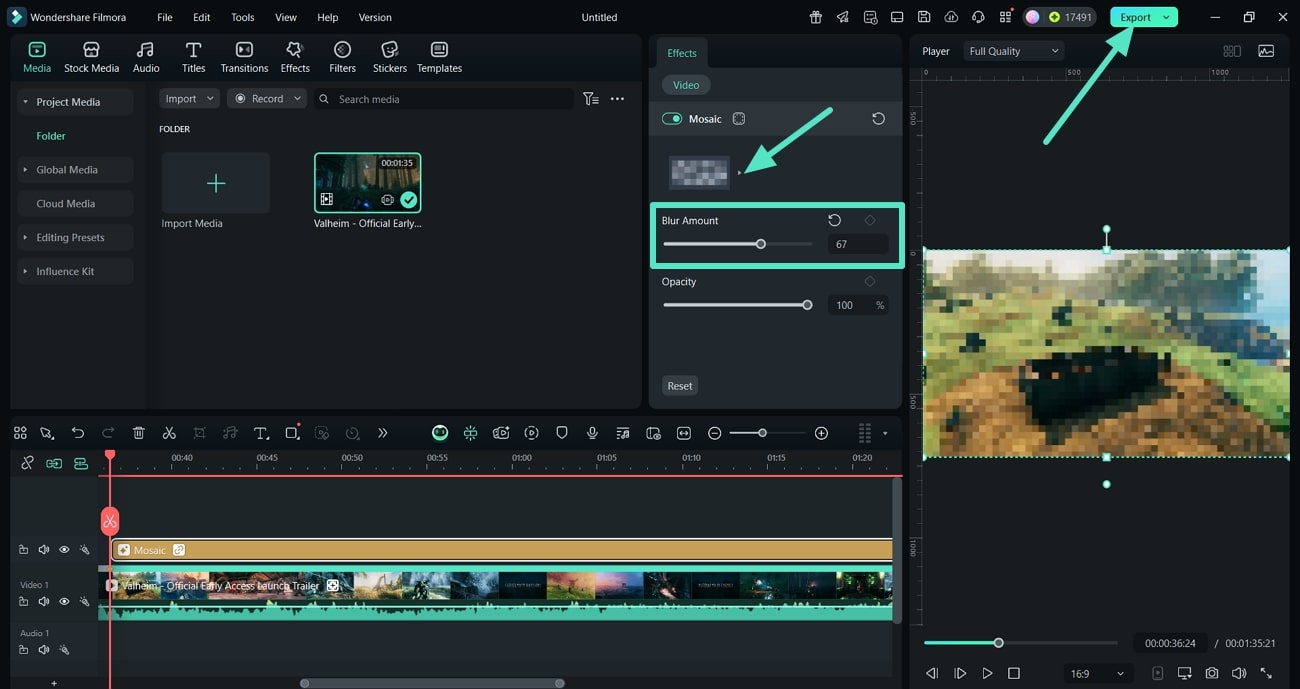
- Step 5. Pick the Pixel and Increase the Blur Before Exporting. Finally, click the "Arrow" to pick the pixel art from the available options and apply it to your video. Increase the "Blur Amount" by increasing its value through the bar, and then use the "Export" option from the top-right corner to save the Minecraft pixel art to your device。
secure download
Conclusion
To conclude, this article discussed methods to turn an image to Minecraft pixel art on your desktop and mobile. It mentions a tool, Wondershare Filmora, that you can use to turn your media files into pixel art in seconds without compromising quality. The tool offers various ways to turn your media files into pixel art, and the most popular is image-to-video conversion.
