
 100% Security Verified | No Subscription Required | No Malware


 ChatGPT
 Perplexity
 Gemini
 Claude
 Grok
Grok
Do you have a collection of photos from an event that you wish you could relive and share with loved ones? Why not turn those moments into a YouTube slideshow? This approach allows you to preserve your cherished memories and share them with people around the world.
So, if you're wondering how to make a slideshow on YouTube, you're in the right place! This guide will show everything you need to know, from selecting the right software to creating a slideshow video with music. Let's get started and transform your event photos into a YouTube slideshow!

In this article
Part 1. Turning Your Memories into Shareable Stories
Photos are a great way to save memories, but they're often scattered across phones, cameras, or computers. Knowing how to make a slideshow video helps you gather all your favorite moments into a professional story. Whether you want to create a YouTube slideshow for a wedding or a travel vlog, using the right YouTube slideshow creator is key.
By creating a slideshow video for those moments, you can add music, transitions, and effects to the video. Thus, you can relive those moments and make your photos even more special. Then, upload it to YouTube so your family and friends can also watch it, no matter where they are.
Events You Can Preserve with a YouTube Slideshow:
- Weddings: Celebrate the love and joy of your special day. Compile photos of the ceremony, reception, and special moments with friends and family.
- Birthdays and Anniversaries: Celebrate milestones with highlights of joy and laughter. Highlight fun and meaningful moments from celebrations such as blowing out cake candles.
- Holidays and New Year's Parties: Capture the fun and excitement of festive celebrations. Share the festive atmosphere with snapshots from your gatherings.
- Graduations and Achievements: Showcase proud moments of success and hard work.
- Family Reunions: Preserve those rare gatherings filled with love and connection.
- Travel and Adventures: Share highlights from your trips and experiences. Relive your exciting journeys and inspire others to explore.
Why Share on YouTube?
YouTube is one of the best platforms to share your slideshow videos. It's free to use, supports high-quality videos, and lets your friends and family watch your YouTube slideshows anytime they want.
Plus, YouTube allows easy sharing through links and has privacy settings to control who sees your content. Thus, you can share the video as a public celebration or a private family moment. YouTube makes it simple to connect with your loved ones.
Choosing the Best Slideshow Maker for YouTube
Did you know that YouTube doesn't have a built-in feature for creating slideshows in YouTube? You'll need third-party video editing software to make a slideshow video for YouTube. And choosing the right one can help you combine photos with music, transitions, and effects effortlessly.
What to Look for in a Slideshow Software
- Ease of Use: An intuitive interface suitable for both beginners and advanced users.
- Customizable Templates: Use software that has pre-designed templates to streamline the creation process.
- Transitions and Effects: Ensure it has options to add smooth transitions and creative effects to enhance your slideshow.
- Music Integration: The ability to add background music to make your slideshow more appealing.
Wondershare Filmora: A Perfect Choice
One of the best tools for making a youtube photo slideshow or video for YouTube with pictures and music is Wondershare Filmora. With its intuitive interface, Filmora acts as a powerful youtube slideshow creator that beginners can use.
 secure download

Key Features of Filmora:
- AI Color Palette:This feature allows you to match the colors across photos and clips for a consistent look. Plus, it can protect your skin tones, ensuring they look natural in the video.
- Preset Video Templates: Choose from a variety of pre-designed templates for your slideshow videos quickly. This feature can speed up the video editing process.
- AI Music Generator: Add copyright-free music to your YouTube slideshow with AI-generated tracks that fit the mood perfectly.
- Video Transitions and Effects: You can choose from creative transitions and visual effects to elevate your slideshow videos.
With Filmora, you can compile your event photos into a slideshow video. Then, it also lets you add music and video effects, making the video even more beautiful. In the next section, let's learn how to make a slideshow video for YouTube.
Step-by-Step: How to Create YouTube Slideshow Videos with Filmora
Now that you've chosen the software, let's create your YouTube slideshow video. Below is a step-by-step guide to making a slideshow video.
How to Make a YouTube Slideshow Video With YouTube Slideshow Maker
01of 07Import Your Photos and Media
Open Filmora and start a New Project. Once in the editing workspace, go to Media > Project Media > Import to import all the photos you want to include in your slideshow. Then, drag and drop them to the timeline.
Tip: You can also import video clips to mix photos and videos in your slideshow.

secure download
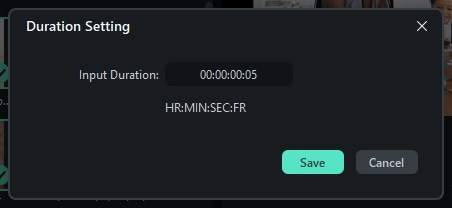
02of 07Adjust the Photo Duration
Each photo on the timeline will only have a short duration of less than 1 second. Thus, you need to adjust the duration of each photo to control how long it stays on screen. To do this, right-click on a photo in the timeline and select Duration from the menu to open the duration settings.
Then, slide the Input Duration to the duration you'd like and click Save. Do this step to all of the photos you put in the timeline.
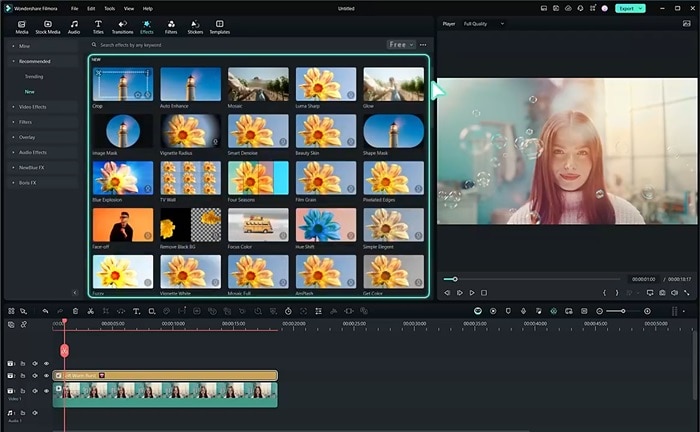
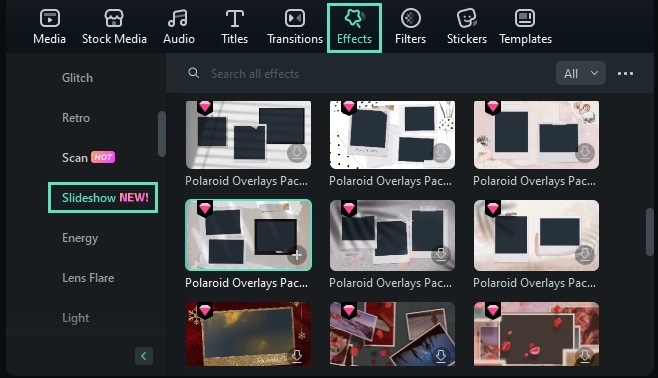
03of 07Add Slideshow Effects to Your Photos
To add slideshow effects to your video, go to Effects > Video Effects and search for the Slideshow option. Then, drag and drop the slideshow effect that matches your theme to each photo.
04of 07Enhance with Transitions
To make your slideshow smoother and more engaging, add transitions between photos. Go to Transitions > Transitions > Slides to explore transition options that work well for slideshow videos.
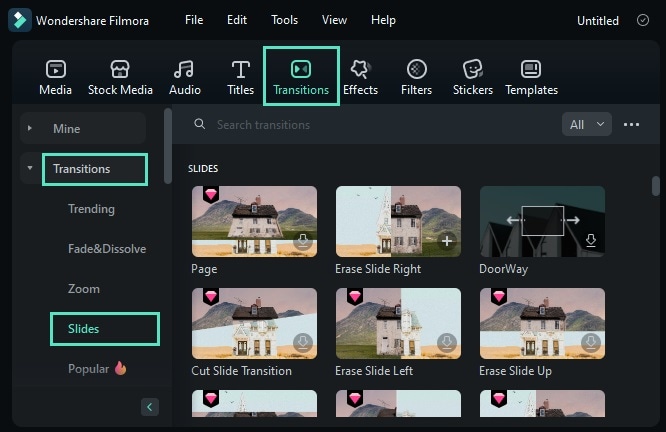
Then, drag it between two photos in the timeline.

Tip: You can also adjust the duration of the transitions. To do this, select the Duration option after right-clicking on the transition in the timeline.
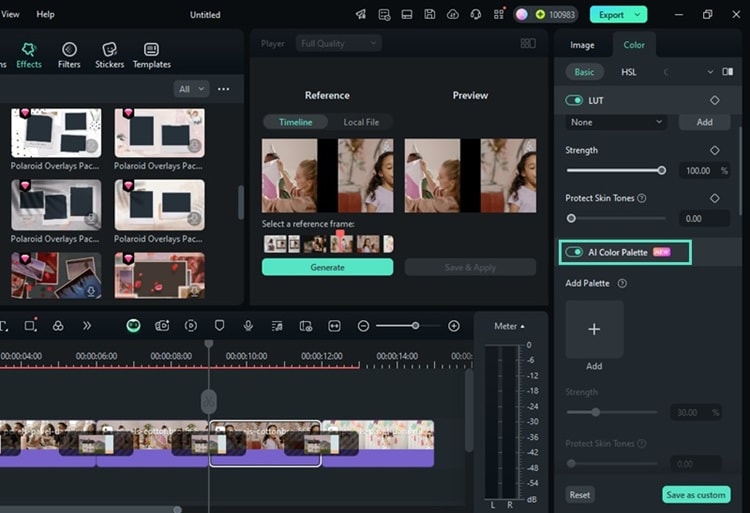
05of 07Use the AI Color Palette
Use the AI Color Palette feature to match colors across all images. Click on the photo you want to adjust on the timeline, it'll open the editing panel on the right side. Navigate to Color > Basic and enable the AI Color Palette.
In the AI Color Palette panel that shows in the preview window, you can select between:
- Timeline: Select this option if you want to reference the photo in the timeline.
- Local File: Import the file from your computer as the reference.
Then, click Generate to let AI use that option as the reference. Use the skin tone protection option to ensure natural tones in your photos. Click Save & Apply if you want to use the same color palette settings for the other photos.
Note: You need to manually enable the AI Color Palette feature for each photo in your video. Then, apply the color palette you saved to each photo.
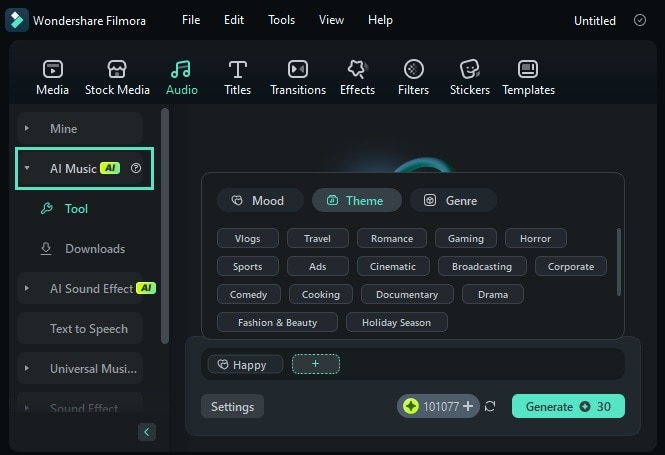
06of 07Add Music with the AI Music Generator
Use Filmora's AI Music Generator to create a copyright-free track that fits the mood of your slideshow. Go to Audio > AI Music and click the Plus icon to select your preferred Mood, Theme, and Genre.
Open the Settings menu to adjust the Tempo and Music Duration it'll generate. Then, tap on Generate. Once the result is out, you can download the track and drag it onto your timeline.
07of 07Preview and Finalize Your Slideshow
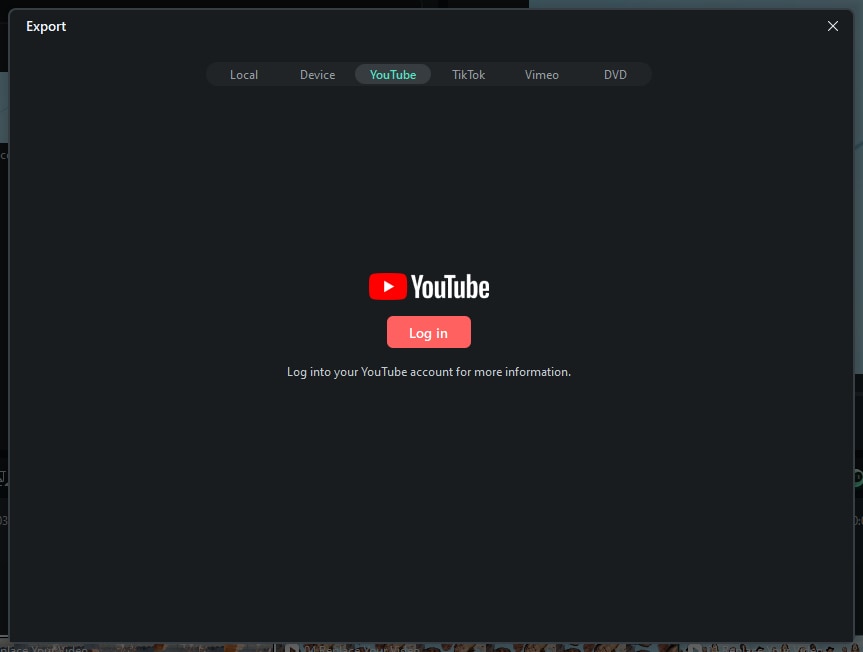
Take a moment to preview your slideshow and spot if there are any mistakes or areas that need improvement. If you are satisfied with the editing, click the Export button.
With Filmora, you can export the video directly to your YouTube channel. In the export window, select YouTube > Login and log in to your YouTube account. After that, click Allow to let Filmora access your account.
How to Make a YouTube Slideshow Video With Powerpoint
- Create Your Slideshow in PowerPoint: Open PowerPoint and design your slideshow with text, images, transitions, and animations.
- Add Music or Voiceover(Optional): Enhance your slideshow by inserting background music or a voice narration via the “Insert” tab and choosing “Audio.”
- Export as a Video: Go to File > Export > Create a Video, then choose your desired video resolution and slide timing options.
- Save the Video File: Click Create Video, name your file, select MPEG-4 (.mp4) format, and save it to your computer.
- Upload to YouTube: Log in to YouTube, click the Create (camera) icon, upload your video, and add a title, description, and thumbnail before publishing.
Conclusion
Creating a YouTube slideshow is a wonderful way to share your event photos and relive cherished memories. By using Wondershare Filmora, you can easily add music, transitions, and effects to the slideshows.
If you've been wondering how to make a youtube slideshow or youtube photo slideshow, now is the perfect time to try! Download Filmora and follow the steps in this guide to start creating your own video. Don't wait—transform your photos into a beautiful slideshow video for YouTube and share them with the world right now!
secure download
