
 100% Security Verified | No Subscription Required | No Malware

Ready to start earning from your YouTube channel? This ultimate guide will show you how to enable YouTube monetization by covering the latest requirements, the step-by-step application process, and effective strategies to qualify faster. You'll learn how to meet the eligibility criteria for the YouTube Partner Program (YPP) and activate your channel for ad revenue, memberships, and more. Let's get your channel ready to earn!
Table of Contents
Understanding YouTube Monetization Requirements and Rules
If you're wondering how to monetize a YouTube channel, it all starts with the YouTube Partner Program (YPP). This program allows creators to earn money through ads, channel memberships, Super Chats, and more. You must meet specific eligibility criteria and follow YouTube channel monetization policies to enable monetization on your channel.
Here's what you need to join the YouTube Partner Program:
- Your content must align with YouTube's monetization policies.
- Live in an eligible country, as the YouTube Partner Program is only available in select regions.
- Your channel must have no active Community Guidelines strikes.
- Your Google account must have enabled the 2-Step Verification.
- Have access to advanced features.
- Link an active AdSense account
- You must have an AdSense for YouTube account connected to your channel.
YouTube Monetization Requirements
After that, you must also meet specific YouTube monetization requirements, including:
- Have 1,000 subscribers on your channel.
- Get 4,000 watch hours in the past 12 months for long-form videos or 10 million Shorts views in the past 90 days.
Common Reasons Channels Fail Monetization
Many creators struggle with monetization due to:
- Low watch hours or subscribers – Not meeting the required thresholds.
- Reused or copyrighted content – Using unoriginal content can lead to rejection.
- Violating community guidelines – Content that breaks YouTube's policies can delay approval.
- Limited engagement – Low interaction signals weak content performance.
Meeting these YouTube monetization rules is essential to start earning, but there are ways to speed up the process. In the next section, we'll explore how to reach YouTube monetization requirements faster!
How to Reach YouTube Monetization Requirements Faster
Waiting to hit 4,000 watch hours or 10 million Shorts views can feel slow without the right strategy. If you're wondering how to enable YouTube monetization quickly, there are ways to reach eligibility faster and more efficiently. Here's how to grow your channel and meet the requirements sooner.

1. Focus on the Right Monetization Strategy
Choosing the right content approach is key to meeting YouTube's requirements faster. If you're wondering how to monetize your channel efficiently, consider these strategies:
- Long-form content → Aim for 4,000 watch hours in 12 months.
- Short-form content (YouTube Shorts) → Aim for 10 million Shorts views in 90 days.
- Hybrid approach → Use both long videos and Shorts for faster growth and engagement.
2. How to Reach 4,000 Watch Hours Faster (Long-Form Video Strategy)
If you're focusing on long-form content, follow these strategies to boost your watch hours:
- Create longer videos (8+ minutes): Create longer content, like 8 to 15 minutes to increase watch time per viewer.
- Post consistently: Aim for at least posting 1-2 videos per week to keep your audience engaged.
- Optimize video SEO: Optimize video SEO by using high-ranking keywords, compelling titles, and engaging thumbnails.
- Encourage binge-watching: Create playlists and link videos within your content to keep viewers watching your channel longer.
- Promote your videos: Share your YouTube video link on social media, blogs, and forums to increase watch time.
3. How to Get 10M Shorts Views in 90 Days (YouTube Shorts Strategy)
If you prefer to post YouTube Shorts, use these tactics to maximize views and qualify for monetization faster:
- Post multiple Shorts daily to increase visibility and engagement.
- Post viral content or challenges with trending sounds to attract more viewers.
- Keep videos between 10–30 seconds for better audience retention.
- Add strong hooks in the first few seconds to grab attention immediately.
- Promote Shorts on other platforms like Instagram Reels and TikTok to drive traffic.
Stay consistent to accelerate your channel's growth and meet the YouTube monetization requirements in less time. In the next section, we'll guide you through how to get monetized in YouTube once you meet the requirements.
Once you've met the criteria, the next crucial step is to learn how to enable monetization for your YouTube channel. This section provides a detailed walkthrough of the process.
Part 3. How to Enable YouTube Monetization for Your Channel
What's next after you've met the YouTube monetization requirements? It's time to enable monetization features on your channel! This process allows you to get revenue through ads, memberships, and more. In this section, you'll learn how to get your YouTube channel monetized.
Follow these steps to apply for the YouTube Partner Program (YPP):
01of 05Access the YouTube Studio Page
- Sign in to your YouTube account.
- At the top-right corner, go to your Profile Picture > select the YouTube Studio

02of 05Navigate to the Earn Section
- In the left-hand menu, click on Earn to view your monetization status and available options.
- If you're eligible to monetize your YouTube channel, you can select Apply Now to get started.

03of 05Review and Accept Partner Program Terms
Click Start to review and accept the YouTube Partner Program terms. This agreement is necessary to proceed with monetization.

04of 05Set Up an AdSense Account
Connect an AdSense Account by clicking Start to receive payments.

Choose between:
- "Yes, I have an existing AdSense for YouTube or AdSense account" If you already have an AdSense account.
- "No, I don't have an existing account" and follow the prompts to create and link a new AdSense account.
- Then, click Continue.

Once you've completed the above steps, YouTube will review your channel to ensure it complies with all policies and guidelines. They will send you a feedback email whether you're accepted or not within a month.

05of 05Enable Ads on Your Videos
Once, you're accepted, the Earn tab will be updated and show a text saying "You're a YouTube Partner."

Then, Turn On the ads you want to run on your videos:
- Watch Page Ads: Earn money from ads displayed on your videos and from YouTube Premium subscribers who watch your content on the Watch page.
- Shorts Feed Ads: Earn money from ads shown between Shorts, as well as from YouTube Premium subscribers who watch your Shorts on the Shorts page.
Note: To access additional monetization features like Channel Memberships, Supers (Super Chat, Super Stickers, Super Thanks), and BrandConnect, your channel must meet specific eligibility criteria. These features often require a larger audience and higher engagement to unlock.

By following these steps, you can enable monetization on your channel and start earning from your content. Remember to adhere to YouTube's policies and guidelines to maintain your monetization status.
Bonus: Boost Monetization Speed with Filmora's Smart Short Clips
Knowing how to start a monetized YouTube channel is important, but meeting the eligibility requirements for the YouTube Partner Program matters the most! If you want to qualify for monetization faster, try repurposing long-form videos into Shorts.
With Wondershare Filmora's Long Video to Short VideoSmart Short Clips feature, you can create high-quality Shorts from your existing videos. This approach helps you meet YouTube monetization requirements more efficiently without starting from scratch. By turning long-form content into Shorts, you can increase engagement and reach 10 million Shorts views in 90 days with less effort.
 secure download

What Is Filmora's Smart Short Clips?
Smart Short Clips is an AI-powered tool in Filmora. It can automatically extract key moments from your long videos and convert them into short, engaging clips. This feature is perfect for creating YouTube Shorts, Instagram Reels, and TikTok.
How to Use Filmora's Smart Short Clips
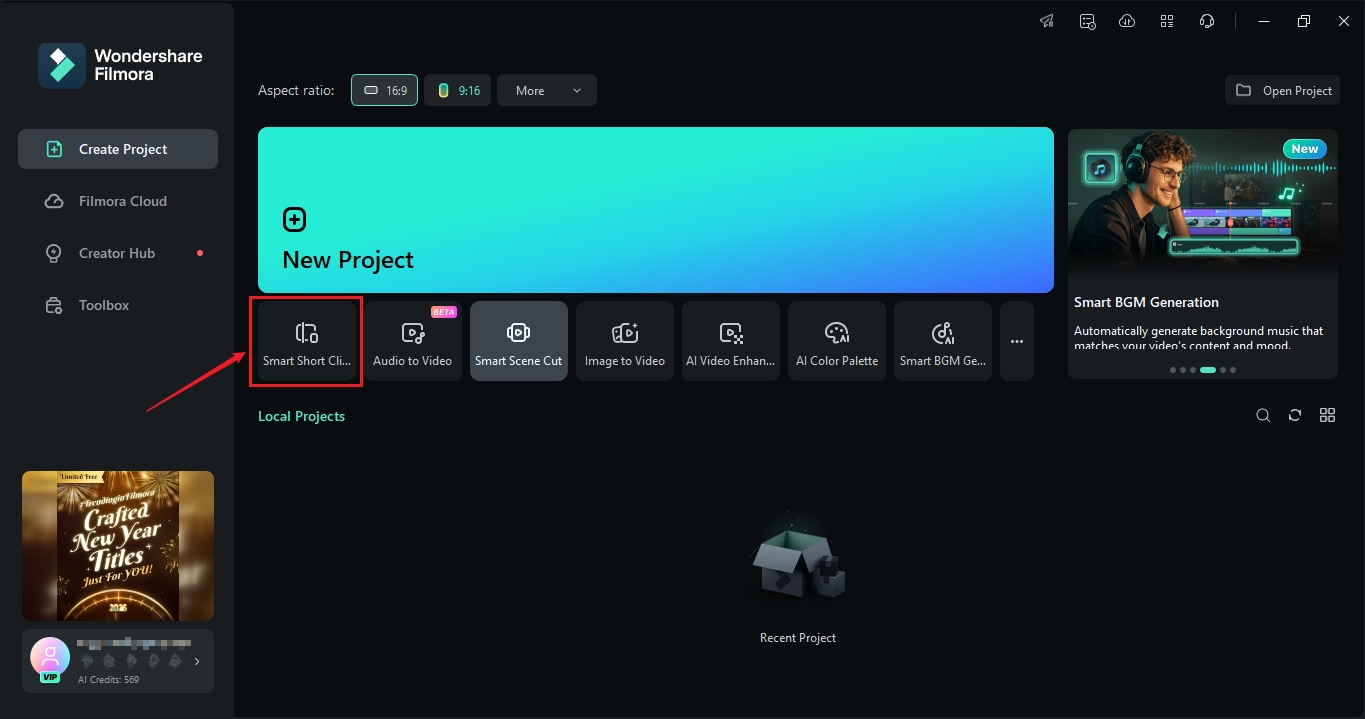
01of 05Open Filmora and Access Smart Short Clips
- Launch Filmora and ensure you have the latest version installed.
- Navigate to Create Project > select Smart Short Clips to start.
secure download
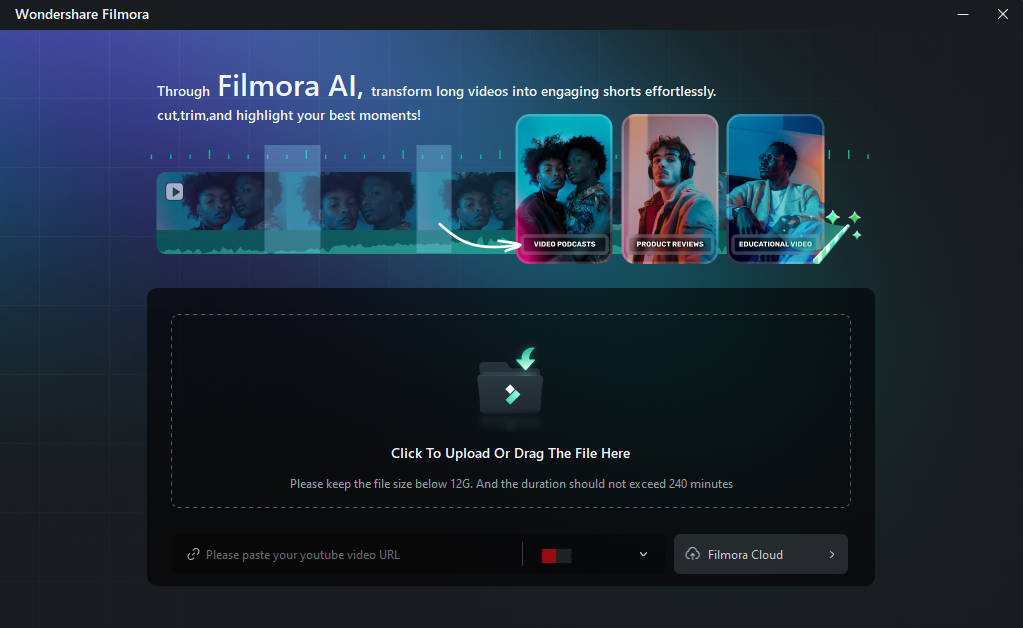
02of 05Import Your Video
Click the Folder icon or drag and drop your long-form video into Filmora.
Note: If repurposing your existing YouTube content, paste a YouTube link to directly import the video.
03of 05Adjust Video Settings
- Set the Language, Duration, and Theme for your Shorts.
- Click Advanced to adjust the Aspect Ratio and enable Smart BGM Generation for background music.
- Click Generate to process the video.

04of 05Edit and Enhance Your Clips
Filmora will generate short clips automatically based on the best moments.
- Preview and click Reset to regenerate if needed.
- Use AI Speech Enhancement to improve audio quality.
- Then, click Edit to fine-tune the clips.

Once you're in the editing workspace, you can edit the text and transition. You can also change the music and effects to add a personal touch to your video.

05of 05Export and Schedule Your Video
- Click Export to save your Shorts.
- Navigate to the Social Media tab > Select YouTube > Log in to your YouTube channel.

- Adjust the title, description, category, resolution, and other video settings.

- Enable Schedule to choose a date and time for automatic posting.
- Then, click Save and Export your video.

Conclusion
Meeting the YouTube monetization requirements is the first step toward earning revenue from your content. By growing your audience, increasing watch hours, and optimizing your videos, you can qualify for monetization and start generating income.
Understanding YouTube monetization rules is essential to maintaining your eligibility. Following YouTube's policies, creating original content, and staying active on the platform will help you keep your monetization status and maximize your earnings.
Now that you know how to monetize your YouTube channel, it's time to take action. Start applying these strategies today, stay consistent, and turn your passion into a profitable channel!
secure download
