If you've captured a video in vertical orientation but need it to fit a horizontal format, it can be a real challenge due to the differing sizes and aspect ratios. Converting a vertical video to a horizontal one involves more than just resizing—it often requires cropping, adjusting, and sometimes re-framing to make sure the content remains well-composed.
This time, we'll cover simple, step-by-step instructions for using mobile apps, desktop software, and online tools. You'll know how to make your vertical videos fit perfectly into a horizontal format, no matter what tools you're using.
In this article
Part 1. Why We Need to Make Vertical Video to Horizontal
As you may know, videos come in two orientations: vertical and horizontal. The vertical format (portrait) is ideal for mobile viewing and is widely used for vertical ads on social media platforms. It's perfect for apps like Instagram Stories, YouTube Shorts, TikTok, and Snapchat, where users consume content in a full-screen, immersive experience on their phones.
On the other hand, the horizontal format is better suited for landscape-oriented content. It's the go-to choice for most YouTube videos, films, presentations, and any content meant to be viewed on larger screens like TVs or monitors.

Therefore, the need to convert a vertical video (portrait) into a horizontal one usually arises when the content needs to be repurposed for platforms or situations where landscape orientation is more effective. For example, if you initially created a vertical video for Instagram Stories or TikTok, but now want to share it on YouTube or include it in a presentation, converting it to a horizontal format ensures it fits the viewing environment better.

Wondershare Filmora - Auto Resize Video
Part 2. How to Convert Vertical Video to Horizontal on Mac/Windows
To convert vertical video to horizontal on a desktop, you can use Wondershare Filmora. Available on both Windows and macOS, it's recommended for its Auto Reframe feature which is useful to keep the subject of your video centered within the new frame.
Have you ever had trouble with your subject getting cut out after changing the video orientation? Auto Reframe solves that problem. It automatically adjusts the framing so your subject stays in focus, even when you change the video's orientation.
Other than Auto Reframe, you can also still use the crop tool or change the aspect ratio to convert a vertical video to a horizontal one using Filmora on a computer.
How to use the Auto Reframe feature
Step 1: Start a New Project and Import Your Media
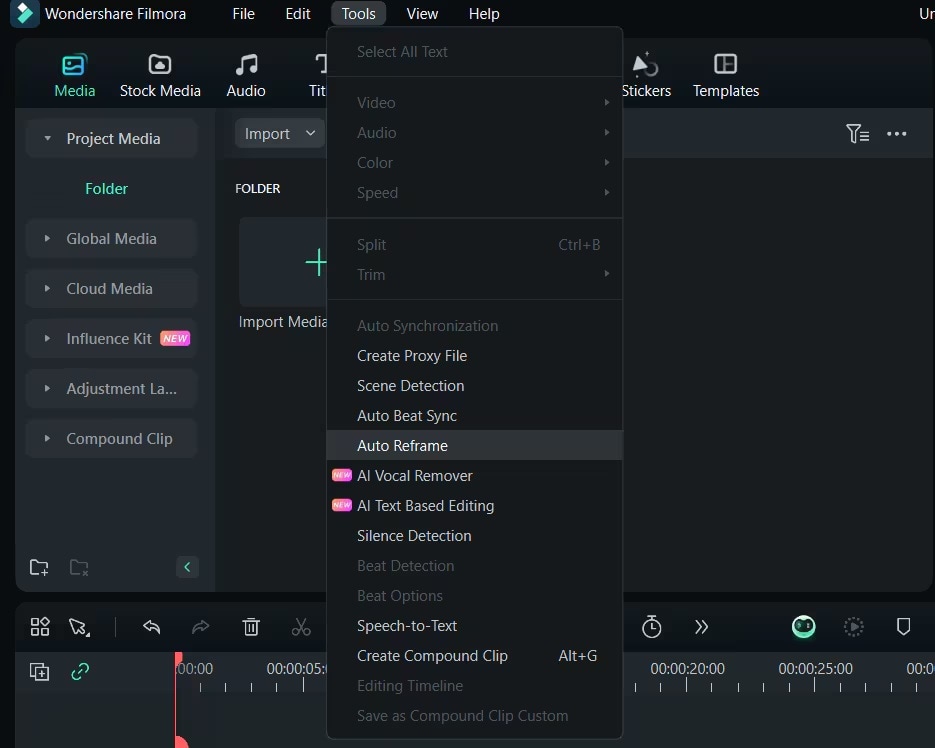
Begin by creating a new project and importing your video files. After importing, navigate to the Tools menu and select Auto Reframe. Alternatively, you can right-click on the video in your media library and choose Auto Reframe from the context menu.
Step 2: Choose the Aspect Ratio
In the Auto Reframe window, you'll find several aspect ratio options. Select the one that suits your desired horizontal format, such as it's square (1:1), standard (4:3), widescreen (16:9), or cinema (21:9).

Once you've made your selection, click the Analysis button. Filmora will then process the video to apply the chosen aspect ratio.
Step 3: Review and Fine-Tune
After the reframing is done, preview your video to see how it looks. If adjustments are necessary, you can pause the video and manually reposition the frame by dragging the framing box to your preferred area.
Part 2. How to Convert Vertical Video to Horizontal on iPhone and Android
If you prefer using your mobile device to convert a vertical video to a horizontal format, you can use Wondershare Filmora for mobile. Filmora is available on both iPhone and Android through the App Store and Google Play Store. The steps are similar across both platforms, so you don't need to worry about differences in the process.
To convert a vertical video to a horizontal one using Filmora on mobile, you can either adjust the aspect ratio or crop the video. The app supports a wide range of video formats, and its intuitive interface makes the process straightforward. With just a few taps, you can make the necessary adjustments and get your video ready.
Filmora for Mobile
Edit Videos on Your Mobile Phone with 1-Click!
- • Powerful Brand New AI Features.
- • User-friendly video editing for beginners.
- • Full-featured video editing for professional.
How to convert vertical video to horizontal by changing the aspect ratio
Step 1: Import Your Video
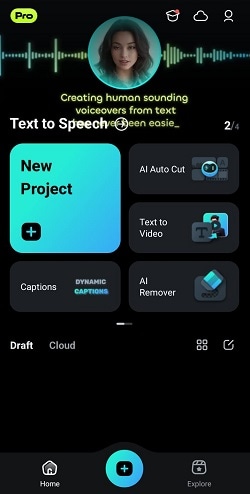
Open the Filmora app and select "New Project" to begin editing. Choose the video you wish to resize and tap "Import."
Step 2: Select the video scale
After adding your video, tap "Scale" and select the aspect ratio for a horizontal format, such as 16:9 (ideal for YouTube) or 5:4. Tap the checkmark button to save the changes.

Step 3: Adjust the video or add a background
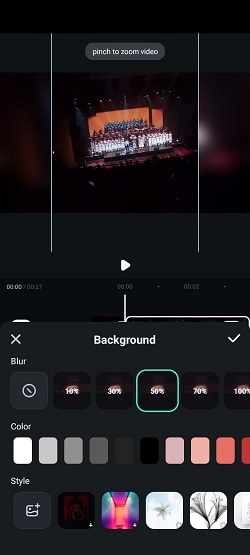
When converting a vertical video to a horizontal orientation, you may notice that the result often leaves black bars. To make the video fit the screen properly, you can pinch the video to reposition and resize it as needed.

Otherwise, you can enhance the appearance by changing or adding a background. Just go to the Background option and choose to either change the color, apply a blur effect, or add an image as the new background.
How to convert vertical video to horizontal by cropping
Step 1: Access the Crop tool
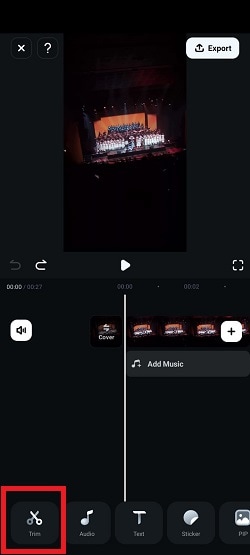
To crop your video, select your video on the timeline and tap on "Trim" > "Crop" option.
Step 2: Change the video aspect ratio
You will see five aspect ratio choices at the bottom: Original, 1:1, 4:5, 16:9, 9:16, and 5:4. Select a horizontal aspect ratio that suits your needs and adjust the cropping area.

If you want to manually adjust the crop area, you can choose "Original" and then adjust the rectangle as needed. Tap the checkmark button to save your changes.
Part 4. How to Convert Vertical Video to Horizontal Online
To convert a vertical video to a horizontal online, you'll find numerous tools available with a quick Google search. But for this tutorial, we'll use Typito due to its straightforward interface and easy-to-use video editing tools. You can use it to convert a vertical video to a horizontal online for free once you've signed in.
However, keep in mind that Typito may have limitations on video length (max. 5 mins) and video watermarks in its free version. Follow the steps below on how to use it.
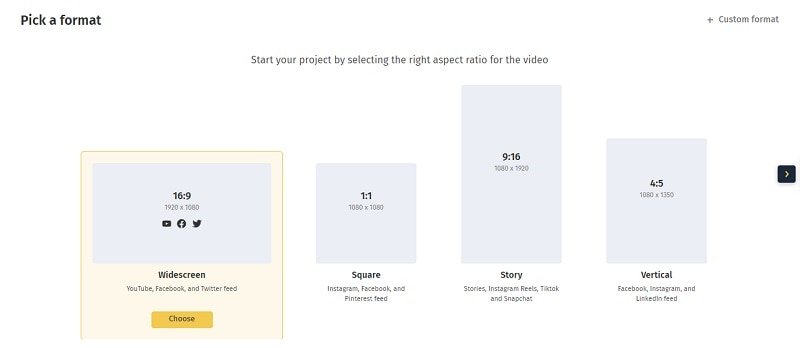
Step 1: Visit the Typito Website and Choose the Aspect Ratio
Go to the Typito vertical-to-horizontal video converter and select the desired horizontal aspect ratio for your video. You can choose the available wide-screen format (16:9) or select a Custom Format.
Step 2: Upload the Video You Want to Convert
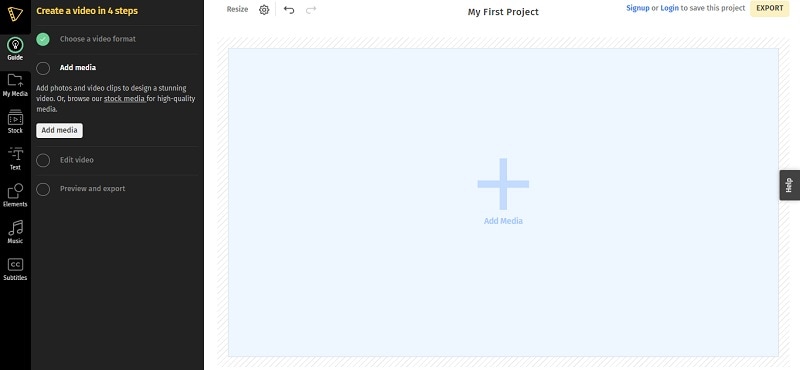
Upload the vertical video you want to convert by clicking on Add Media.
Step 3: Use the Crop Tool
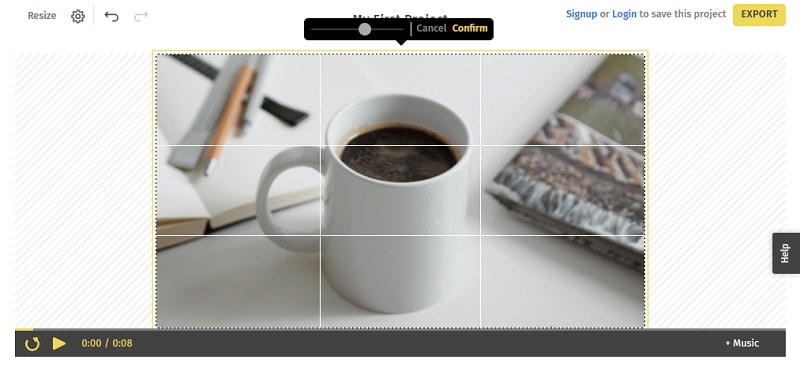
Select your video and click on the Crop tool to adjust the video frame.

Step 4: Reposition the Video Frame and Confirm
Drag the video frame to position it as needed and use the slider to zoom in or out. Once you're satisfied with the adjustments, click Confirm to save your changes.
Part 5. Other Ways to Convert Vertical Video to Horizontal
To give you more options, several other video editing software tools can also help you convert vertical video to horizontal format. Programs like Adobe Premiere Pro, iMovie, and CapCut are great alternatives if you already have access to them.
1. Convert Vertical Video to Horizontal with Premiere Pro
Step 1: Create a Horizontal Sequence
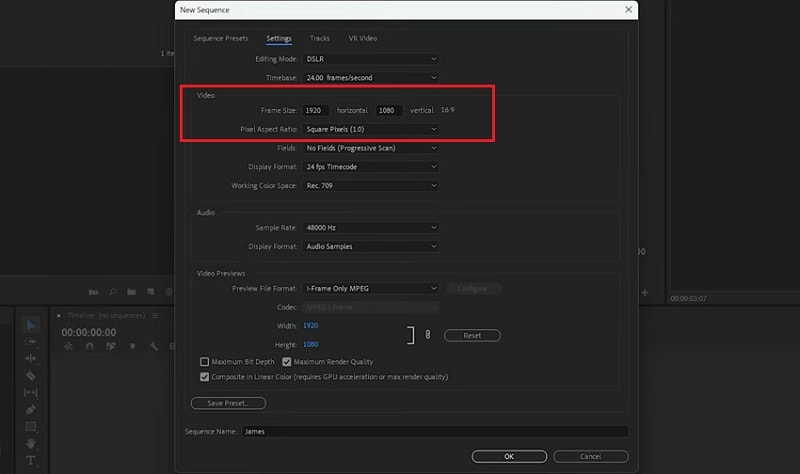
Right-click on the video clip in the Timeline and choose New Sequence from Clip. To change the sequence to horizontal, go to Sequence > Sequence Settings.
In the Sequence Settings window, change the Frame Size under Video. Set the horizontal size to 1920 pixels and the vertical size to 1080 pixels or 1280 pixels and 720 pixels (the horizontal size should be greater than the vertical one). Click OK to apply the changes.
Step 2: Adjust the Video Clip
To adjust your video further, select the video clip in the Timeline and go to the Effect Controls panel. Under Motion, you can adjust the Position and Scale to fit the video within the horizontal frame.
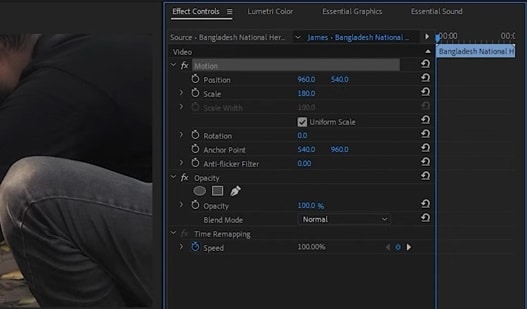
Alternatively, reduce the scale to show the entire vertical video with black bars on the sides. You can also use the Crop effect if you want to remove parts of the video.
2. Convert Vertical Video to Horizontal with iMovie
Due to iMovie for iOS being optimized for horizontal video, converting a vertical video to a horizontal format just requires you to create a new project and add your vertical video. iMovie will then automatically crop the video to fit the horizontal format.
However, this cropping may leave black bars on the sides. To address this, you can use pinch gestures to zoom in and adjust the video so that it fits the horizontal format better.
But if you are using iMovie on MacOS, you have more features available. After importing your video, you can use the Crop tool. Then, select "Crop to Fill" to adjust the video.
3. Convert Vertical Video to Horizontal with CapCut
Step 1: Import the Video
After creating a new project, import your video and add it to the timeline.
Step 2: Change the Aspect Ratio
Under the preview window, tap on the "Ratio" button. Then, choose the desired horizontal aspect ratio (e.g., 16:9) to adjust the video's dimensions. If needed, adjust how the video fits within the new horizontal frame.
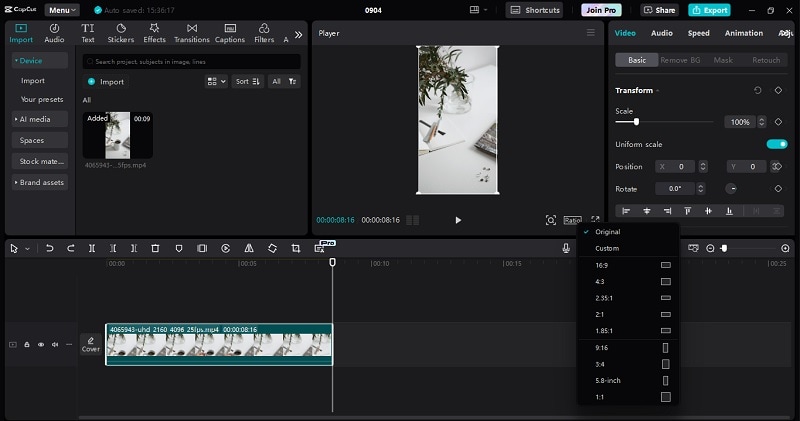
CapCut also has an Auto Reframe feature, but it's only available for the Pro users.
Conclusion
It can be a bummer when you suddenly need to convert a vertical video to a horizontal format, especially when you're pressed for time or unfamiliar with the tools. However, with the methods we've covered—whether on mobile, desktop, or online—you have a range of options to fit your needs and preferences.
From the convenience of mobile apps and powerful software like Wondershare Filmora to the simplicity of online tools, you can easily make your vertical videos look great in a horizontal format.


