Audio ducking in DaVinci Resolve is a useful but often overlooked feature that you might not know you need. Have you ever edited a video where the background music was too loud and made it hard to hear the dialogue? Instead of manually adjusting the volume levels each time, audio ducking can automatically lower the background music whenever dialogue or important sounds are present.
To get started with DaVinci Resolve audio ducking, we have prepared a step-by-step guide to help you set it up easily. You'll get to understand the process of configuring audio ducking in your project, from setting up your audio tracks to adjusting the necessary settings for optimal results.
In this article
Part 1. How Audio Ducking in DaVinci Resolve Works
Audio Ducking in DaVinci Resolve uses a sidechain compressor to automatically adjust volume levels so that the music tracks and speech are balanced properly. This feature helps prevent your narration or dialogue from being drowned out by background music, which is a common issue in many videos.
Here's how Audio Ducking works: When the subject starts speaking, the background music automatically gets quieter, making sure your audience hears the important parts clearly. Then, when the speaking stops, the music returns to its original volume. You'll often hear this effect in various media, including news, advertisements, and even movies or series.
If you simply lower the volume of the music track without using ducking, it can affect all audio channels, not just during speech. This can lead to inconsistent audio levels and may not provide the clean separation between dialogue and music that Audio Ducking achieves.
Automatically lower the volume of one track to make another track clearer when you're recording voiceovers.

Part 2. How to Use Audio Ducking in DaVinci Resolve
DaVinci Resolve's Audio Ducking feature is available in both the free and Studio versions. You can download the software from its official website. And since Audio ducking adjusts the volume of one track to make it lower relative to another track, you need to have at least two audio tracks on your timeline to use this feature.
Once everything is ready, you can follow the step-by-step guide below on how to use Audio Ducking in DaVinci Resolve:
Step 1: Import your audio tracks into the timeline.
You can place your narration or dialogue track on the A1 track, and your background music on A2.
Step 2: Select the background music track on the timeline
To start using audio ducking, locate the background music track on the timeline and select it.
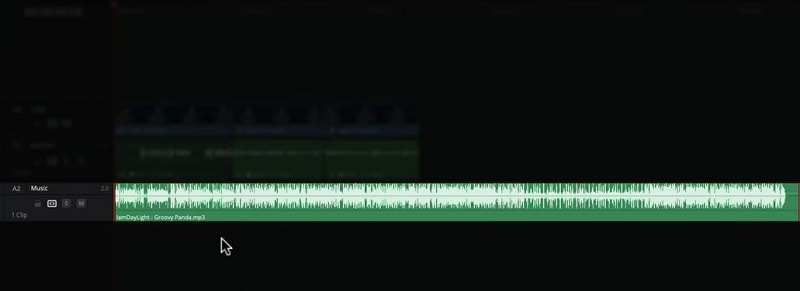
Step 3: Navigate to the Inspector Panel
Then, go to the upper right corner of your screen to find the Inspector tab. Click on it to open the Inspector panel.
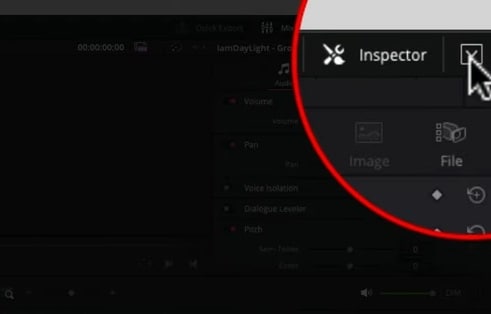
In the Inspector panel, ensure you are on the Audio panel, which contains the settings you need for audio ducking. Look for the Ducker option among the available controls.
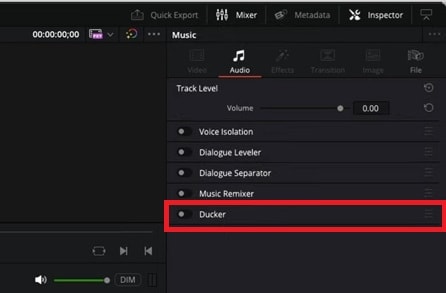
Step 4: Adjust Ducking Settings
To enable audio ducking, turn on the toggle next to the Ducker option. Then, you have two main controls for ducking:
- Source: This is the track that controls the ducking effect. For ducking, this should be your spoken track. By default, it is set to Audio 1, where your narration is located.
- Duck Level: This setting controls how much the volume of the background music will be reduced. The level is measured in decibels. For example, setting it to 10 dB will lower the music volume by 10 decibels. Adjust this by dragging the slider or entering a specific value in the box.
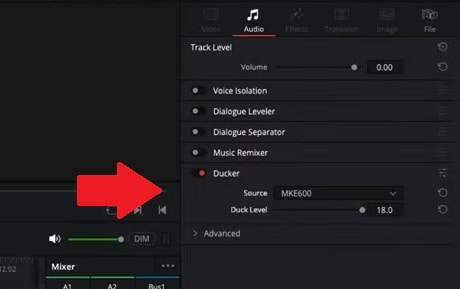
There is no one-size-fits-all setting for auto ducking in DaVinci Resolve. You need to experiment with different levels to find what works best for your project. Consider factors like the loudness of your narration and the background music.
https://www.youtube.com/watch?v=vpi94QYzkxM
If needed, use the Advanced dropdown beneath the Duck Level slider. Key parameters include:
- Lookahead: This feature lets DaVinci Resolve anticipate speech, allowing the music to begin ducking slightly before the speech starts for a smoother transition.
- Rise Time: This controls how quickly the volume decreases. A shorter rise time results in a faster reduction, while a longer rise time creates a more gradual decrease. Adjust this to ensure a natural-sounding effect without abrupt changes.
Automatically lower the volume of one track to make another track clearer when you're recording voiceovers.

Part 3. Best Software Alternative with Audio Ducking Feature
You can actually find the Audio Ducking feature in many video editing software. In addition to DaVinci Resolve, Wondershare Filmora is another excellent choice for this feature. In fact, Filmora makes using Audio Ducking simple and accessible.
Instead of dealing with complicated settings, the Filmora Audio Ducking feature lets you adjust the audio balance with a simple scale from 1 to 100. This scale allows you to easily adjust the audio levels and achieve the right balance between your dialogue and background music. Even if you are new to video editing, you can manage your audio effectively and still produce professional-quality results.
Filmora and DaVinci Resolve Audio Ducking Comparison
| Filmora | DaVinci Resolve | |
| Ease of Use | Simple and beginner-friendly | More advanced, requires some learning |
| Interface | Intuitive with drag-and-drop controls | Complex with more technical options |
| Manual Adjustment | Adjustable with a simple scale (1-100) | Offers more detailed, precise controls |
| Performance | Fast, efficient, and light on system resources | Demands higher system resources |
In terms of the learning curve, Fillmore provides an easier alternative to the DaVinci Resolve audio ducking feature. It's ideal for beginners or those looking for a quick, user-friendly solution as it gives intuitive controls without overwhelming the user with complex settings. Filmora gives enough functionality to create a balanced audio mix, perfect for casual projects, or social media content.
How to use Filmora Audio Ducking
Step 1: Access the Audio Ducking feature in Filmora.
Once you've imported your video and added it to the timeline, you can select the video or audio clip, and then click on Tools > Audio > Adjust Audio.
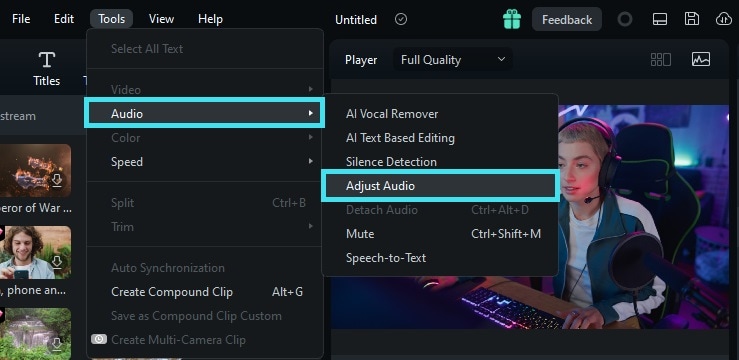
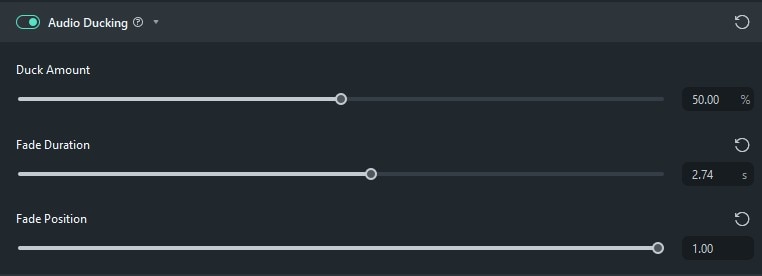
The Audio Adjustment settings will appear on the right of your screen. Locate the Audio Ducking option and enable the feature by switching on the toggle.
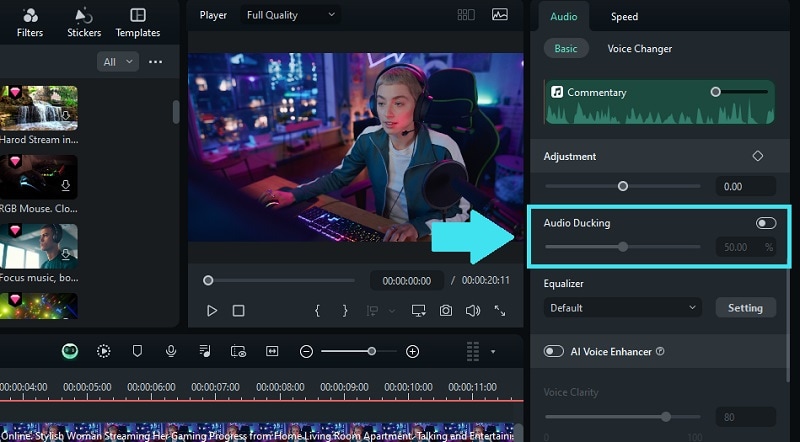
Step 2: Set the Audio Ducking.
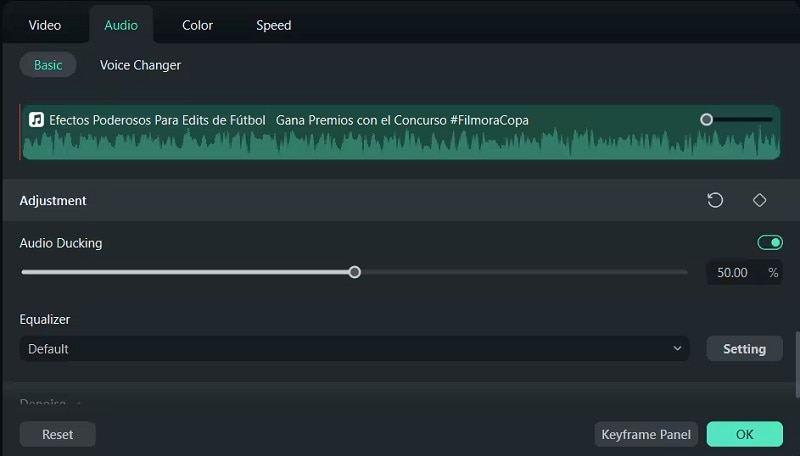
Once enabled, you can adjust how much the background audio is reduced when your primary audio, such as a voiceover, plays. The default value is set at 50%. You can modify the intensity by sliding the control to either increase or decrease the amount of audio ducking.
Part 4. Tips to Optimize Your Video Audio
You now know how important clear, well-balanced audio is to the overall quality of your video. To improve your video audio even further, you can follow some practical tips we have listed below:
- Use Filmora's voice enhancement feature to make your speech clearer and more understandable. This tool can help reduce muddiness and ensure that your voice stands out in the mix.
- Use Filmora's AI-powered Denoise tool to clean up unwanted background sounds. This feature helps remove hums, hisses, and other distracting noises to make your main audio crisp and clear.
- Adjust the EQ settings to enhance specific frequencies in your audio. Boost or cut certain frequencies to improve the overall sound quality and make your audio more pleasant to listen to.
- Apply audio compression to manage volume levels. Compression helps make softer sounds more audible and prevents louder sounds from being too harsh.
Conclusion
For someone who frequently deals with balancing dialogue and background music when editing video, mastering Audio Ducking in DaVinci Resolve can save time while significantly improving the audio mix. This technique allows you to automatically lower the volume of background music whenever dialogue or important audio elements are present.
There's even simpler software available, like Wondershare Filmora, which offers a more intuitive approach to audio ducking. With its straightforward settings, Filmora can provide an efficient alternative for those seeking a less complex solution.


