Have you ever watched a video where the sound was off and the audio didn’t match up with what was happening on the screen? Bet, it didn’t take long before you lost interest in the video.

Audio video sync involves aligning sound with the corresponding video so they are in sync, and play in harmony without any delays or mismatch. Whether you’re editing a professional video for distribution, or a short random video for social media, understanding how to properly sync audio and video is an essential skill to have as it:
- Creates a seamless viewing experience for your viewers.
- Produces a more cohesive and professional result
- Maintains viewers’ engagement
Knowing how to perfectly sync audio and video is necessary in editing dialogue-based videos like interviews, podcasts or music videos where the visuals often need to match the lyrics of the music. So, in this article, you will learn how to sync audio and video using a simple iOS-only tool—iMovie.
In this article
Part 1: iMovie: A Brief Overview
iMovie is a free video editing tool developed by Apple Inc. It was launched in 1999 and has grown to be a versatile tool that offers a wide range of video editing features to both newbie and professional editors.
Just like other video editors, iMovie allows you to trim your videos and make simple edits. However, this simple tool can be used to correct the disaster of unsynced videos. By uploading your audio and video clips on iMovie, you can manipulate them to create a perfect sync between footage and sound.
iMovie also has high resolution export options that slows you export your synced video in 4k—improving both video and audio quality. It has multiple device integration that allows you to transfer projects between your iPhone, iPad, and Mac, a streamlined design and an intuitive interface, that allows you to create video magic with just a few taps.

iMovie audio video sync is a very simple feature compared to those listed above. The software automatically aligns an audio with a video, whether you import them separately, or together in a file. Although this auto sync is usually enough, you can manually adjust the timing of audio/video by dragging either one across the timeline until you get your desired match.
Also, iMovie’s Detach audio feature allows you to separate the audio from a video clip. This is useful if you want to adjust the audio slightly to match the video better, or if you want to replace the original audio with a different one.
Part 2: How to Sync Audio and Video on iMovie

Follow these easy steps to sync audio and video on iMovie is pretty simple.
- Step 1: Upload the video and a prerecorded audio file you want to sync on iMovie. You can record your audio on your computer in AIFC format and then convert it to MP3 using Apple Music.

If you don’t have a prerecorded audio, you can extract the audio in your video by selecting your imported video and clicking Detach Audio.

- Step 2: Line up the two media files together on the timeline using the sound waves of the audio file as a reference. Adjust the audio until it matches the video perfectly.

This will give you a flawlessly synced audio and video. Be sure to reduce the volume of the original video so it doesn’t interfere with your synced audio.
Part 3: How to Handle Common Audio Video Sync Issues on iMovie
No matter how simple an editing process is, it is not surprising to make mistakes or encounter problems. When editing videos with iMovie, one of the most commonly faced problems is the case where iMovie audio and video are out of sync causing a delay between audio and video tracks.
Sometimes you may be faced with distorted or low-quality audio that makes it difficult for iMovie to sync audio and video. Other times, you may merely be finding it difficult to sync audio on iMovie because it was recorded independently from the video.

Here is how to solve these issues to achieve professional-level results.
- One way to solve the problem of audio lagging in iMovie audio video sync, is to match the frame rate of your video to your project settings. Check the frame rate of the original video you want to edit (24 fps, 30 fps, 60 fps…), and adjust the project settings. You can do this by selecting a matching resolution and frame rate before importing your video on iMovie.
If this doesn’t work, convert your video to a desired format or frame rate using third-party software, then re-import it into iMovie.
- Try reimporting the audio or video if the issue is due to a corrupted file. However, this will only work if the original files are not corrupted.
- Use the audio waveforms to manually adjust the sync. This helps iMovie synchronize audio and videobetter, as waveforms are a visual representation of the audio that allows you to see where sound peaks and falls. Drag the audio track along the timeline until the peaks in the waveform match the visual cues in the video.
Bonus Part: iMovie’s Audio Video Sync vs Filmora’s Auto Beat Sync
Wondershare Filmora’s Auto Beat Sync is specially designed for music-based projects. This tool analyzes the beat and rhythm of music tracks and aligns your video clips to match the beats of the music. It can be used for promotional videos, music videos, dance performances, etc., where the visual elements need to be in sync with the audio elements of the video. This tool takes audio video syncing to another level!
How to Use Filmora’s Auto Beat Sync
- Step 1: Download Filmora and Import the video files you want to sync on the Filmora dashboard.
- Step 2: Drag and drop the media files on the timeline.
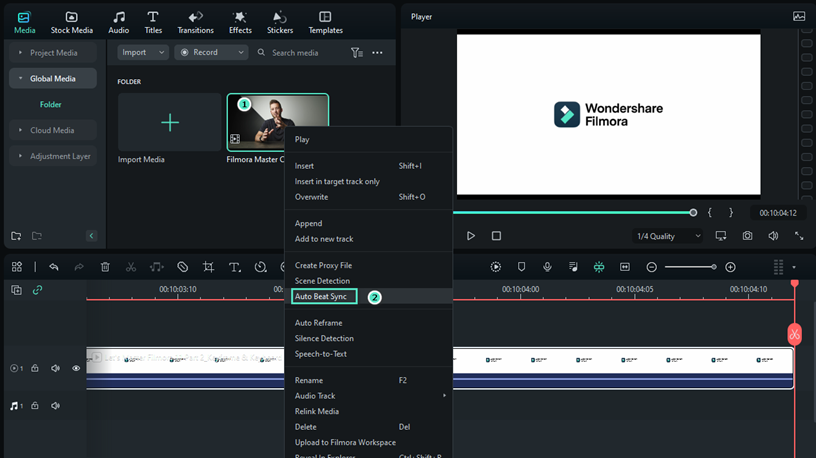
- Step 3: Activate the Audio Beat Sync function. There are two ways of doing this. Right-click on the media files, then select Auto Beat Sync from the list of functions.

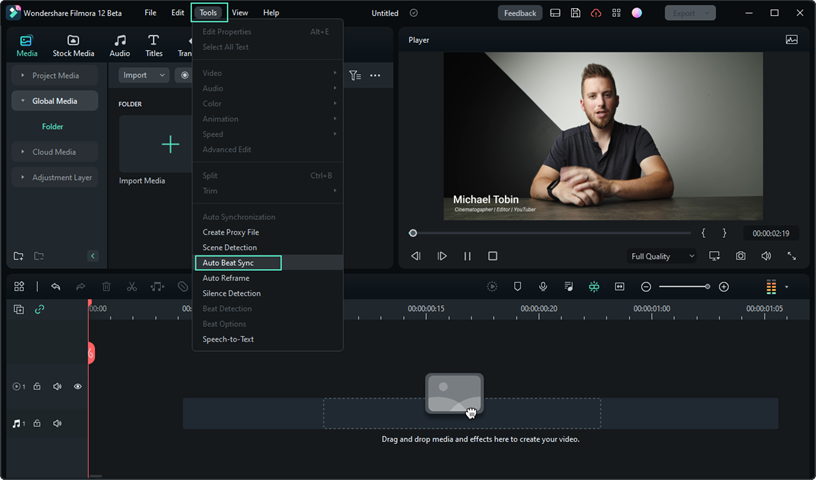
Or, click Tools>Auto Beat Sync in the navigation bar.

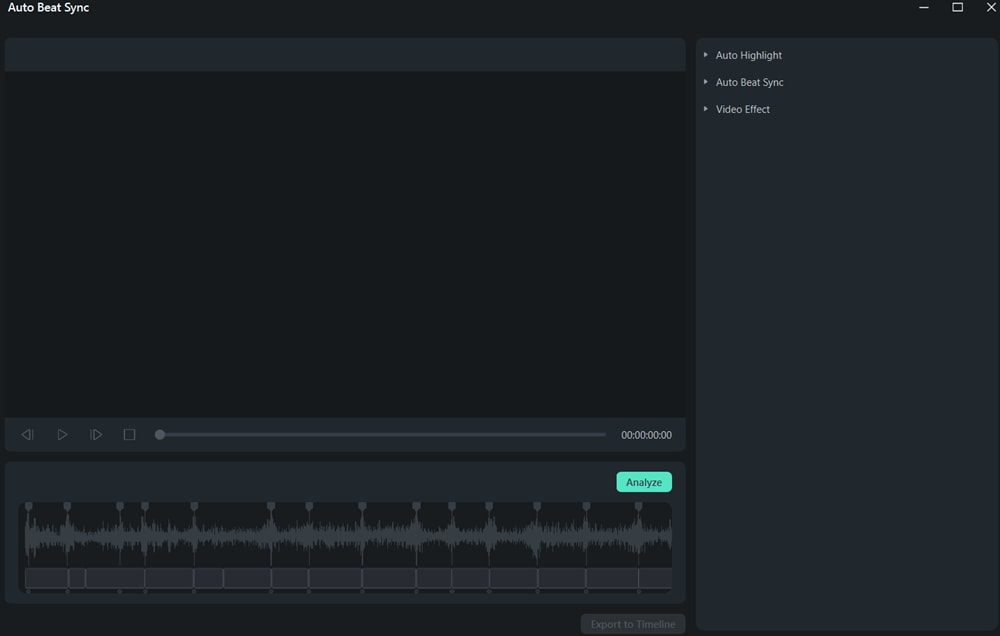
- Step 4: After activating the feature, you will notice an Auto Montage Panel to the right of your screen.

Click on Auto Highlight to add more video or audio clips, adjust the order, or delete imported clips on the timeline.
Click on Auto Beat Sync to import background music and set the music start time.
- Step 5: Once you’re satisfied with your settings, click on Analyze to analyze the beats of the background music (if any) and mix the video footage according to the beats of the background music.
Comparing iMovie’s Audio Video Sync to Filmora’s Auto Beat Sync
iMovie and Filmora are both video editing tools with distinct features and functionalities, especially when it comes to synchronizing audio and video files. These unique features are summarized in the table below.
| Feature | Filmora | iMovie |
| Functionality | Automatically syncs videos to beats of the audio (music) | Allows manual and automatic audio video sync |
| Usability | Better for rhythmic or music-based videos | Speech, interviews, and dialogue-filled videos |
| Advanced features | Capable of beat detection and syncing | Lacks advanced syncing abilities |
| Time effectiveness | Saves time by automatically syncing videos to music beats | Takes time for manual adjustments and settings |
| Pricing | Subscription-based | Free |
| Device compatibility | Android, Windows, & iOS | iOS (Mac, iPhone and iPad) |
Thus, iMovie is mostly recommended for video projects where precise control over the audio-video sync is crucial. It would also be cost-effective and convenient for users who prefer to work in the Apple ecosystem.
Conversely, Filmora is the better choice for editors who are looking for more than basic audio video syncing or those working on a tight schedule. The tool is the best fit for music-based projects and beat-based editing.
Conclusion
A video with audio that is out of sync can be frustrating or distracting to the viewer. With simple tools like iMovie audio video sync, you can easily match your video to your audio by following two straightforward steps. However, if you’re looking for more and do not mind stepping out of the Apple ecosystem, try Wondershare Filmora.


