

 ChatGPT
 Perplexity
 Gemini
 Claude
 Grok
Grok
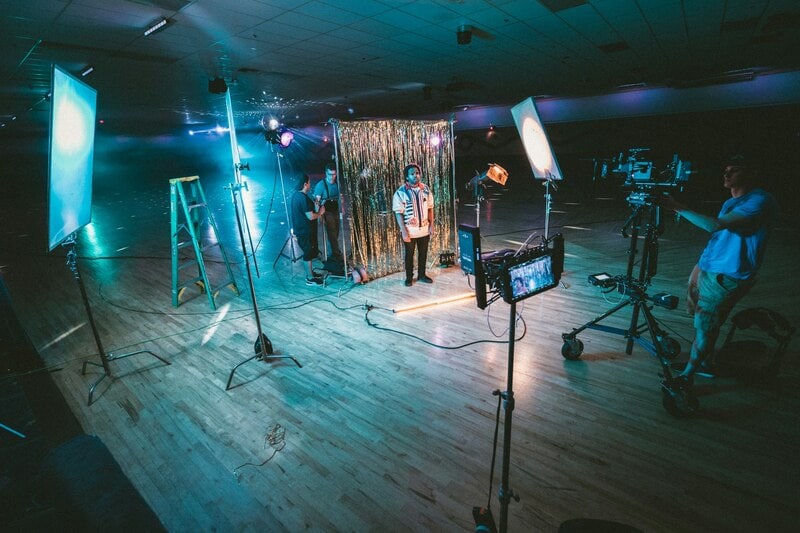
Are you looking to uplift the quality of your video production but unsure where to start? A multi camera technique might be the solution you need. Transitioning from a single-camera to a multi camera setup can enhance the quality and professionalism of your projects.
Using Adobe Premiere Pro for multicam editing is a choice in video production. With multicam, you can seamlessly switch between multiple camera angles, creating a more captivating viewing experience.
This guide will take you through the entire process, from planning and setup to the editing workflow. Let’s dive in and learn how to edit with multicam in Premiere Pro.
In this article
Part 1. Why Shift from Single to Multiple Camera?
Multicam editing involves synchronizing footage from multiple cameras. It allows you to switch between various angles in post-production and offer multiple perspectives. Meanwhile, shooting with a single camera angle often feels flat and monotonous. It also requires stopping and repositioning while shooting, risking you missing some moments.
Here are the key benefits of using a multi-camera setup:
- Increased Efficiency
With multicam editing, you can sync and organize clips with ease, reducing the need for manual alignment.
- Time Savings
View and cut between multiple angles in a single timeline, speeding up the editing process.
- Consistent Transitions
View and cut between multiple camera angles in a single timeline, ensuring smooth transitions between shots.
- Improved Visual Experience
Capturing multiple perspectives adds depth and variety, making your videos more engaging.
This approach is ideal for events requiring multiple perspectives, such as live performances, sports, interviews, and panel discussions. It not only elevates the visual quality but also provides creative control over audio, color, and effects. It allows you to quickly adjust between various angles, ensuring that no detail is missed.
Switching from a single camera to a multiple camera setup enhances both the visual quality and editing speed of your videos. This upgrade not only improves your workflow but also makes your projects look more professional. In the next section, let’s explore how to plan and set up your multiple camera shoots for maximum efficiency and quality.
Part 2. Planning and Setting Up Your Multi-Camera Setup
Transitioning from a single camera setup to multiple cameras requires careful planning to ensure a smooth and efficient shoot. In this section, we’ll cover the essential steps you need to take to prepare and execute a successful multi-camera production.
Preparing for the Transition
Start by evaluating your current single camera setup and identifying areas for improvement. Are there moments where a different angle would have added more depth to your scene? Consider the types of projects you work on and how multiple perspectives could elevate the quality of your videos.
List of the Additional Equipment You’ll Need:
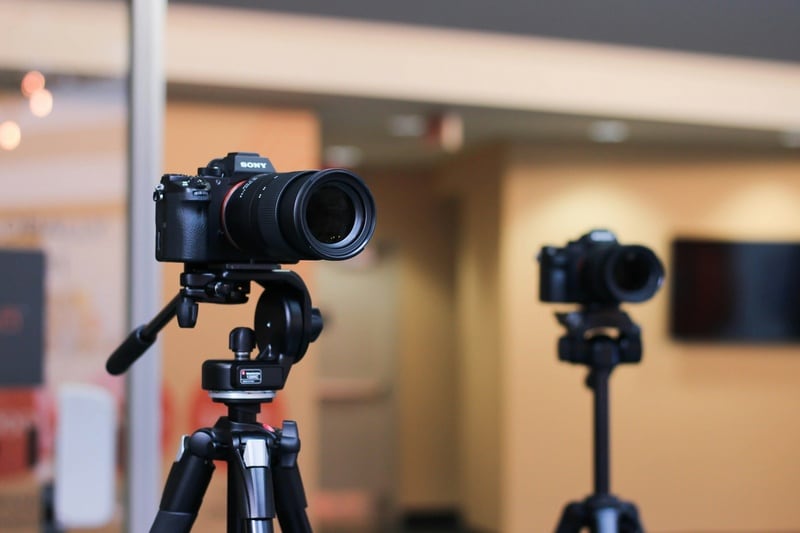
- Multiple cameras
The first thing is having more than one camera. You’ll need at least two cameras, though you can use as many as you’d like.
- Tripods or camera mounts
Use mounting equipment with fluid heads to help maintain stability for each camera setup.
- Audio equipment
High-quality audio is essential for multi-camera recording. Avoid relying on the camera’s built-in audio and instead use external mics.
- Video editing software that supports multicam editing
Ensure that your video editing software supports multicam editing. Adobe Premiere Pro or Wondershare Filmora are great options for this need.
Setting Up Your Multi-Camera Environment
Proper planning ensures that each camera captures complementary angles without interference. Here are some tips:
- Positioning your cameras
Plan camera angles strategically to cover all necessary perspectives. Ensure one camera focuses on wide shots, while others capture close-ups or different angles.
- Synchronizing audio and video
If using separate audio sources, ensure they’re synced correctly in post-production. Use clapperboards or sync tools in editing software to align footage seamlessly.
- Lighting and movement
Ensure all cameras work under the same lighting conditions. Plan how you’ll handle movement if your shoot requires camera repositioning during filming.
With a well-thought-out plan and setup, you’re ready to start shooting with confidence. This detailed preparation will save you time and effort during editing and produce a more professional result. In the next part, we’ll dive into how to do multicam editing in Adobe Premiere Pro for professional results.
Part 3. How to Edit Your Multi-Camera Video Project in Premiere Pro
Adobe Premiere Pro’s multicam editing feature simplifies the process of working with multiple camera angles. By setting up a multicam sequence, you can seamlessly switch between various perspectives. This section will guide you through editing and setting up a multi-camera sequence for your footage.
Here’s a step-by-step guide to create multicam sequences in Adobe Premiere Pro:
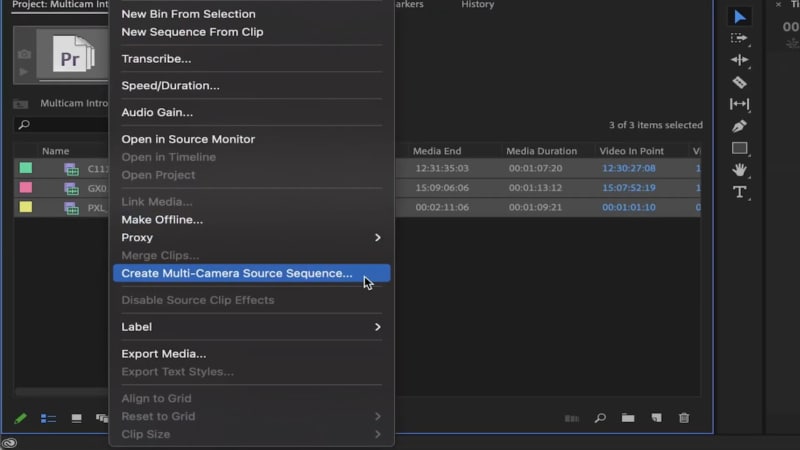
Begin by importing all your video and audio files into Premiere Pro. Go to the Media Browser, locate your files, and drag them into your project panel.
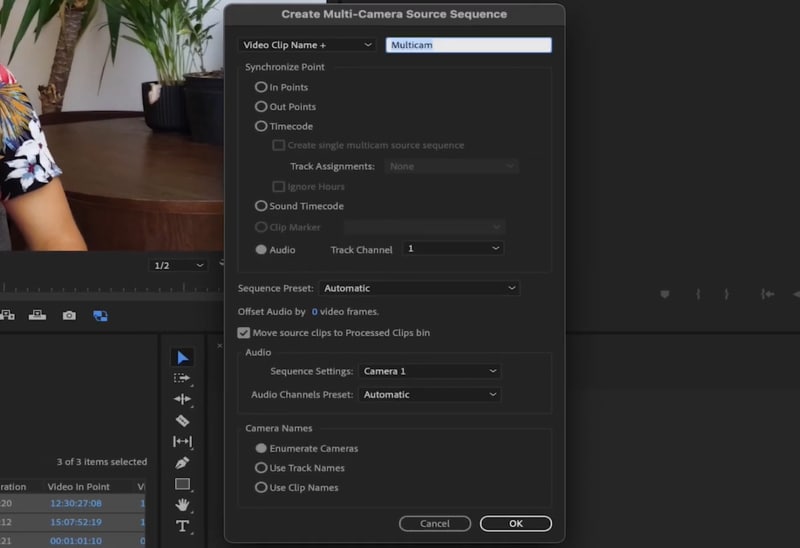
After selecting your clips, right-click and choose Create Multi-Camera Source Sequence.
In the pop-up window, you can configure the sequence name, synchronization point, sequence preset, and audio settings. Once configured, click OK to generate the multicam sequence.
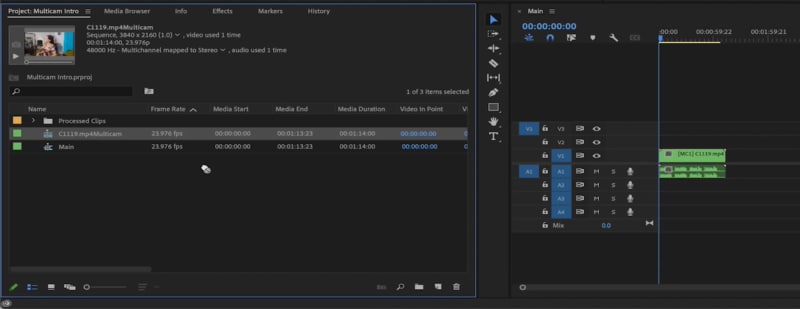
Right-click the newly created multi-camera source sequence in the bin and choose New Sequence From Clip. Select the appropriate audio mix format (stereo or multichannel) based on your project requirements.
Ensure that your sequence settings align with the specifications of your footage. If starting from an empty timeline, add the multicam clip to match the timeline settings.
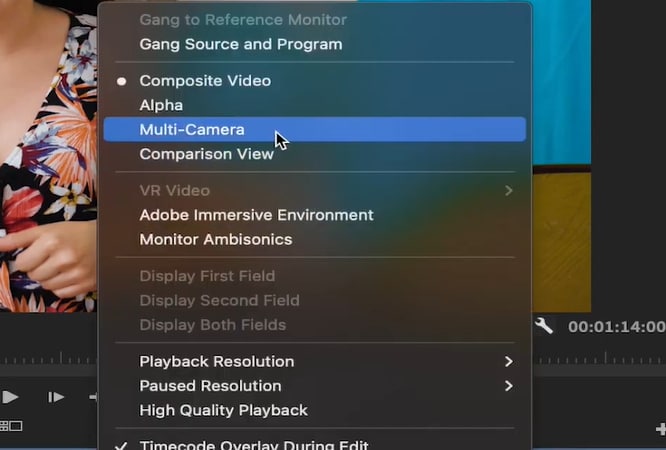
On the Program Monitor, click the Wrench icon and select Multi-Camera from the pop-up menu. This action will display a multi-camera view, showing all available camera angles for seamless switching during editing.
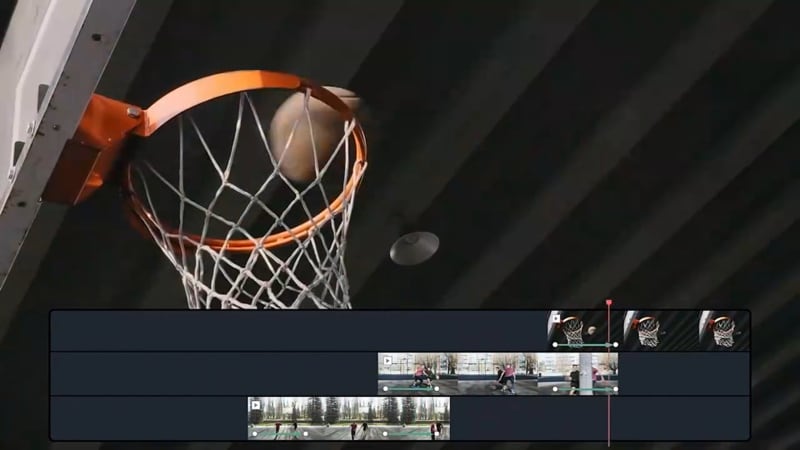
Click on the Spacebar or Play button to start playback. While the video plays, use the Number key on your keyboard (1, 2, 3, etc.) to switch between camera angles you want during playback. Premiere Pro will automatically create cuts at each camera switch. Then, you can fine-tune the edits afterward using standard tools.
This process streamlines the editing of multi-camera footage. It lets you switch between cameras, sync audio, and fine-tune your footage for a polished result. If you need more detail on the steps to create a multicam editing in Premiere Pro, you can visit this link.
Part 4. Easier Software for Creating Multicam Edit: Wondershare Filmora
Using Adobe Premiere Pro for multicam editing is ideal for professionals who need advanced control over multiple camera angles. However, the learning curve is steep and may be overwhelming for users with simpler needs. But, don’t worry! Wondershare Filmora offers a more beginner-friendly option for those who want to create multicam edits.
Although it’s easy to use, Filmora still packs a punch with its multicam editing capabilities. To get started, you’ll need to have multiple video clips, ideally with the same audio track or a common first scene for easier synchronization. From there, you can seamlessly switch between different camera angles. Here's how you can use Filmora for multicam editing:
Ensure you have the latest version of Filmora (V14) installed to access the most up-to-date multicam editing features. Open Filmora, start a new project, and import all the videos from the different cameras you plan to use for the multicam edit.
- Sync multiple cameras and allow quick angle switches
- Vast video/audio effects and creative assets.
- Powerful AI for effortless content creation.
- Intuitive, professional yet beginner-friendly.
- Works on Mac, Windows, iOS, and Android.


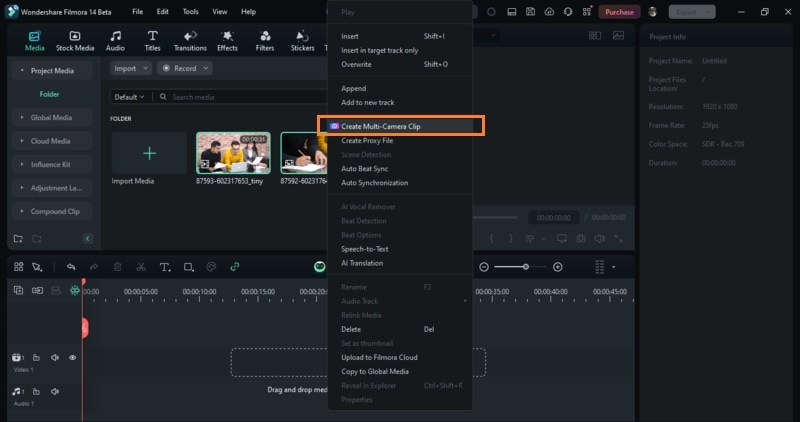
Once you’ve imported your clips, right-click on them and select Create Multi-Camera Clip from the menu.
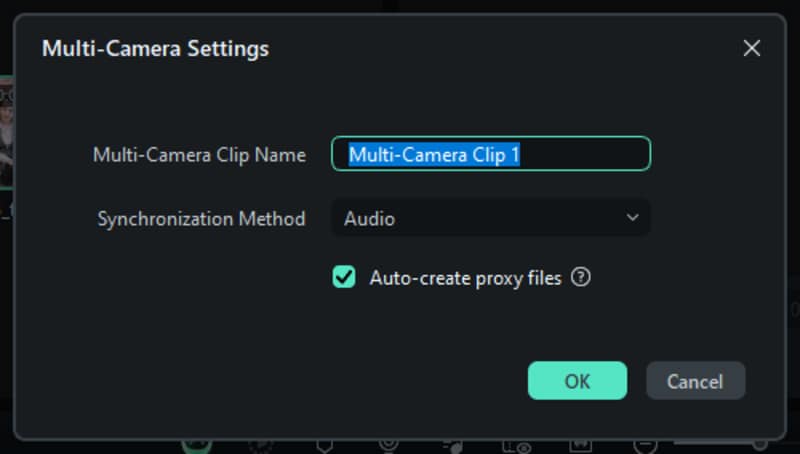
You’ll be prompted to name your multicam clip and select a synchronization method. For best results, choose Audio as the synchronization method. This selection allows Filmora to automatically align the clips based on their audio tracks. Click OK to create the multi-camera clip.
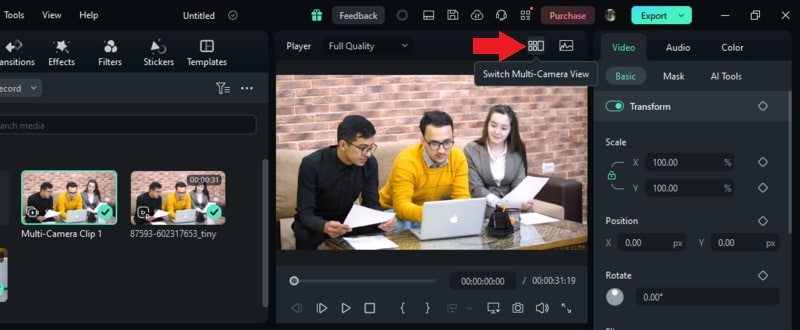
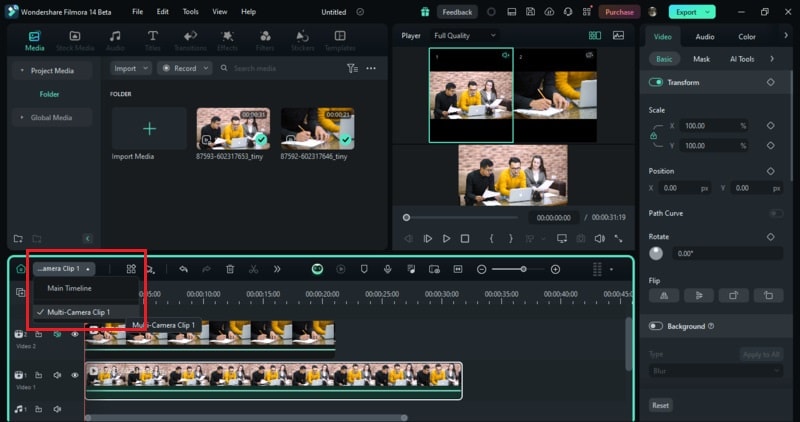
With your multi-camera clip ready, it’s time to edit. To enable multi-camera editing, click on the Switch Multi-Camera View option, located at the top of the preview window. This will allow you to see and switch between the different camera angles while editing.
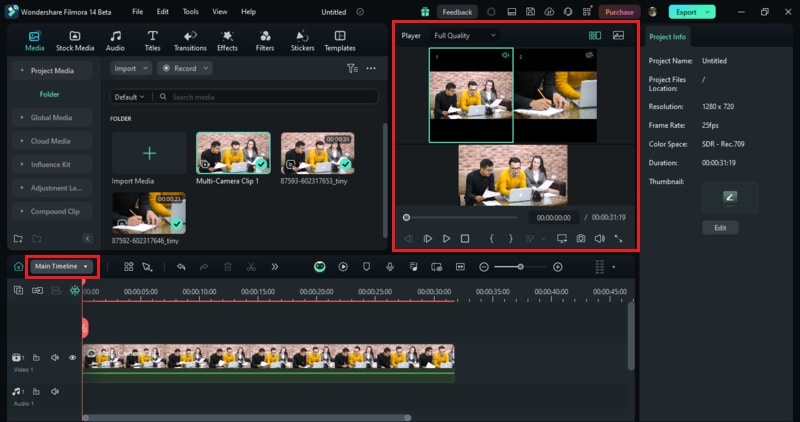
During playback, click on the various camera angles to switch between them in real time. This will automatically create cuts in the Main Timeline as you switch views.
If you want to make more detailed edits, switch to the multi-camera clip (in this case, it is Multi-Camera Clip 1) to apply adjustments like color correction, audio enhancements, or compound clips.
When you’re satisfied with your edits, simply click the Export button at the top right of your screen to save your finished video.
Part 5. Tips and Tricks for Efficient Multicam Editing
Doing multicam editing in Premiere Pro or Filmora can transform your video projects by offering diverse angles and perspectives. Let’s explore a few tips to get the most out of this technique and maintain consistency across multiple clips.
- Sync Audio and Video
Ensure precise alignment of audio and video using auto-sync features in Premiere Pro or Filmora. For manual syncing, use visual cues like clapperboards or sharp sounds.
- Plan Camera Angles
Position your cameras to capture varied perspectives—wide shots, close-ups, and reactions—to streamline your editing process.
- Add Smooth Transitions
Use transitions and effects to create seamless shifts between camera angles, enhancing the flow of your video.
- Troubleshoot Common Issues
Address unsynced audio by adjusting tracks manually. Resolve mixed frame rates by standardizing them. Avoid dropped frames by lowering playback resolution or using proxies.
Conclusion
Transforming your video projects with a multi-camera setup can dramatically enhance both the visual appeal and production quality. By mastering multicam editing in Premiere Pro or Wondershare Filmora, you can switch between multiple angles and perspectives to create engaging videos.
With multicam editing in Premiere Pro or Filmora, you’ll not only streamline your workflow but also elevate your content to a new level. So, try recording a video using a multicam, edit them using Premiere Pro or Filmora, and enhance the quality of your videos right now!
