If you're using After Effects, you have the option to synchronize mouth movements with audio tracks either manually or by utilizing third-party plugins for automated lip sync. Lip sync in After Effects is particularly useful for creating animated characters, explainer videos, and other multimedia content requiring realistic speech animation.
To elevate your projects, grasping the intricacies of lip sync in After Effects can greatly enhance the quality of your animations. Numerous online resources are available to assist you in this area. But to know which method is most effective for your needs, we will help you navigate through the options.
In this article
Part 1 Applications of Lip Sync Technique in Video Editing
Many editing software programs today include lip sync features that serve a range of purposes, from creating realistic lip sync animations to adjusting dialogue in different languages through translation. Two prominent examples of software that provide lip sync functionality are Adobe After Effects and Wondershare Filmora.
Lip sync in Adobe After Effects enables creators to produce lifelike animations by syncing a character's mouth movements to an audio track. This technique is widely used in animation projects and interactive media, which aims to make the characters speak convincingly in sync with the dialogue.

Meanwhile, there’s also a case where lip sync is also used for multilingual projects. Filmora offers AI-powered lip sync for translating videos into different languages. This function adjusts the character's mouth movements to match the translated dialogue, creating a more natural flow without needing to re-record or manually animate the video.
Part 2 Easy Ways To Master Lip Sync in After Effects
As mentioned previously, you can lip sync your characters either manually or by using an Auto Lip Sync plugin in After Effects. Manual lip syncing is ideal for projects that require a high level of precision and artistic expression. You can tailor mouth movements to match the emotional nuances of the dialogue.
Meanwhile, for a faster option, using After Effects lip sync plugins can significantly speed up the process. It is especially useful for larger projects or when working under tight deadlines. Depending on your needs and preferences, you can choose the method that works best for your animation project.
Method 1 Make lip sync effect in After Effects with plugins
One of the easiest After Effects lip sync plugins you can use is AEscripts auto lip sync. This tool automates the process of syncing mouth movements to audio so you can create realistic speech animations without the need for manual keyframing.
To get started, you can download this auto lip sync plugin After Effects on its official website. Once you have it installed, follow these steps.
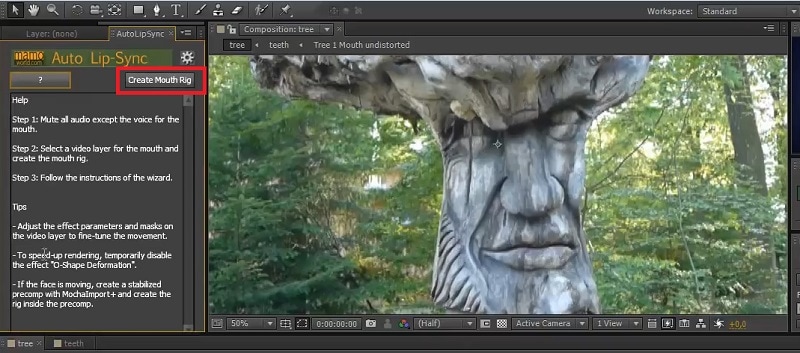
- Step 1: Begin by enabling the audio track containing the voiceover. Then, select the video layer and click "Create Mouth Rig."
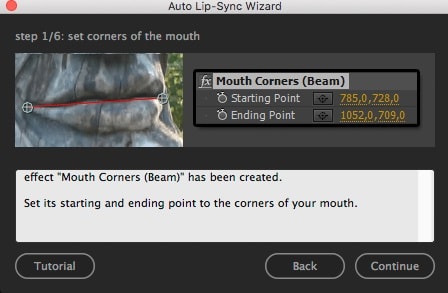
- Step 2: In the Auto Lip Sync Wizard, position the red line by dragging it to each corner of the mouth. Click "Continue."
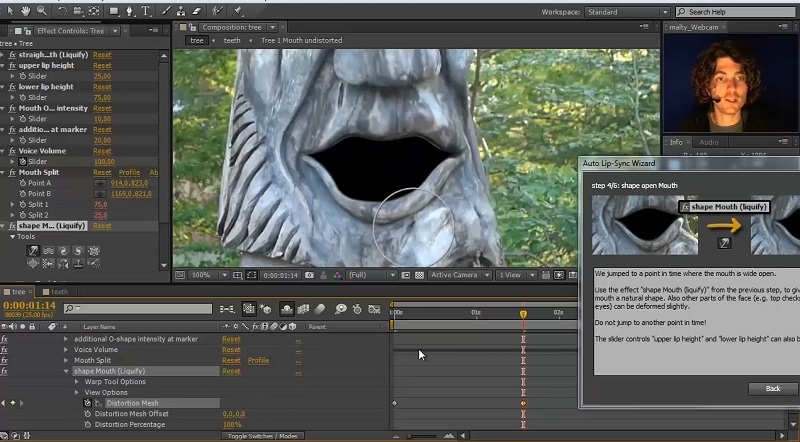
- Step 3: Use the Liquify tool to refine the mouth shape if it's not perfectly straight, then click "Continue."
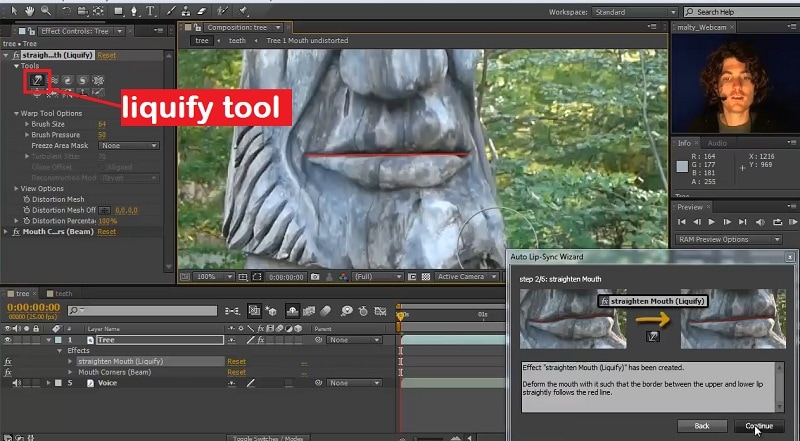
- Step 4: Adjust the closed mouth using the Liquify tool again. Make sure it looks natural before proceeding.
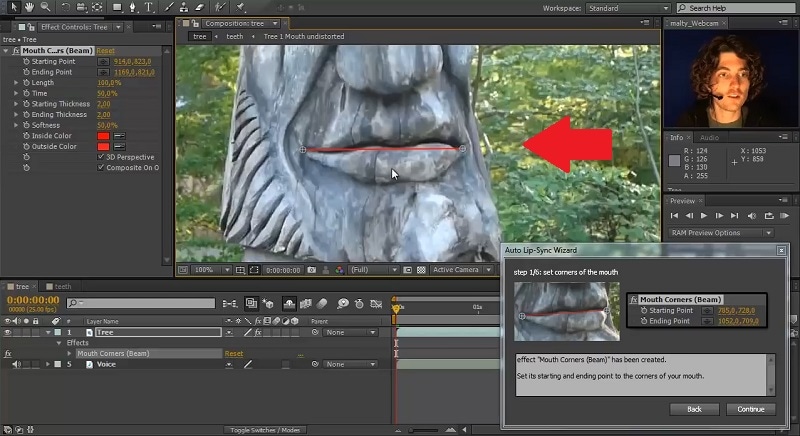
- Step 5: Fine-tune the mouth shape using the Liquify tool to make the lip movements appear more realistic, and continue through each step to complete the rigging.
For a full tutorial, watch the video here.
Method 2 Make Lip Sync Effect In After Effects Without Plugins
If you prefer to avoid plugins, you can still achieve effective lip sync in After Effects. By utilizing keyframing and the audio waveform, you can manually synchronize your characters' mouth movements with the audio you’ve uploaded.
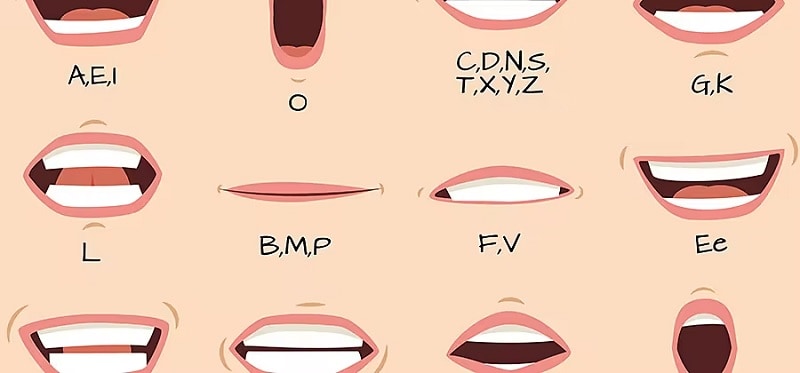
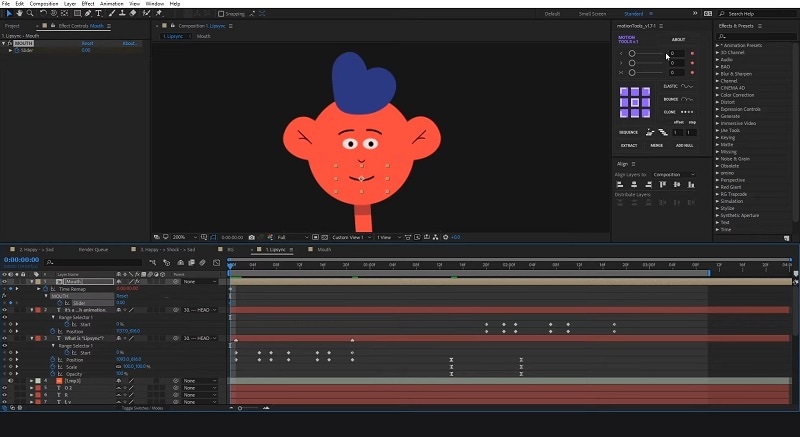
Start by importing your audio track into the timeline. Then, create a new composition and use the audio waveform to visualize the sound. Identify the phonemes (distinct mouth shapes that correspond to specific sounds) and set keyframes for your character's mouth at these points. You can check the detailed steps in the tutorial video below.
While this method requires more time and attention to detail, you can have greater control over the animation and can yield impressive results. With practice, you’ll be able to create realistic lip-sync in After Effects that enhances the overall quality of your projects!
Common Challenges When Lip Syncing Without Plugins in After Effect
Lip-syncing in After Effects can be rewarding, but it comes with its own set of challenges, especially when you’re not using any plugins. Here are some common issues you might encounter, along with practical solutions:
1. Timing Issues
If you are having trouble aligning mouth movements to the audio, you can use the audio waveform as a visual guide. Expand the audio layer to view the waveform and make markers at key points where phonemes occur.
2. Animation Consistency
To help you maintain a consistent animation style, especially when you lip-sync manually, You can use the same interpolation method for all mouth shapes (e.g., linear or ease in/out) to ensure a uniform transition. Also, save your frequently used animations as presets for quick access.
3. Complex Audio Segments
Since long or complex audio segments can make it overwhelming to sync accurately, try to break down the audio into smaller sections and tackle them one at a time. This approach makes it easier to focus on the details without getting overwhelmed.
Part 3 Filmora: How AI Can Help You with Lip Sync When Translating
Now that you’ve learned how to use After Effects to lip sync your character, it’s time to explore how you can use AI to further enhance this process, especially when translating your content. We all know how challenging lip syncing in After Effects can be, and the idea of manually reanimating each translation can be overwhelming. Thankfully, that’s no longer necessary.
There is an AI Lip Sync feature in Filmora that can streamline the translation of dialogue into different languages while ensuring that the mouth movements remain synchronized with the new audio. It eliminates the idea of manually reanimating each translation. It’s ideal for creators or animators who want to localize their content quickly without compromising quality.

Key features of Filmora’s AI lip sync feature
- Filmora’s AI capabilities enable quick automatic synchronization of mouth movements with new voiceovers in minutes.
- Create natural-sounding voiceovers in various languages that match lip movements perfectly.
- Easily add and refine subtitles for accuracy, with options to download and customize them as needed.
- Use Filmora’s AI Translation for multilingual content creation, boasting over 90% accuracy for a high-quality result.
- Transform speech with AI lip sync magic.
- Accents vanish, and authenticity stays with synced lips.
- Dub in any language, lips follow suit flawlessly.

Step-by-Step Guide on AI Lip Sync Effects in Filmora
- Step 1: Install Filmora's Latest Version
Ensure that your version of Filmora is up to date. You can either download the latest version or update your existing one by visiting the official website.
- Step 2: Start a New Project and Add Your Video
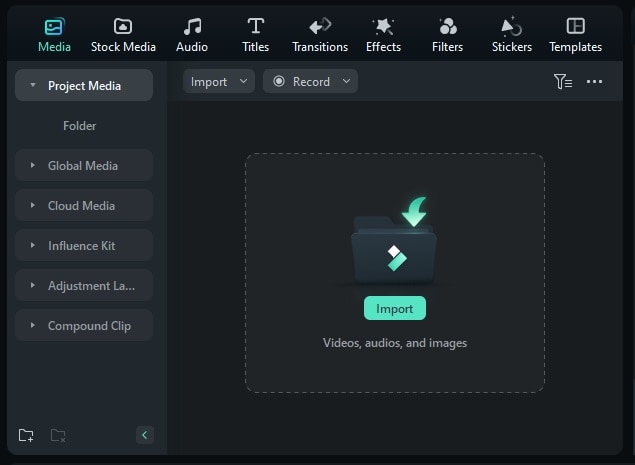
After opening Filmora, begin by selecting "New Project" from the startup screen. Then, to add your video file, click on the "Import" option.
- Step 3: Enable AI Lip Sync
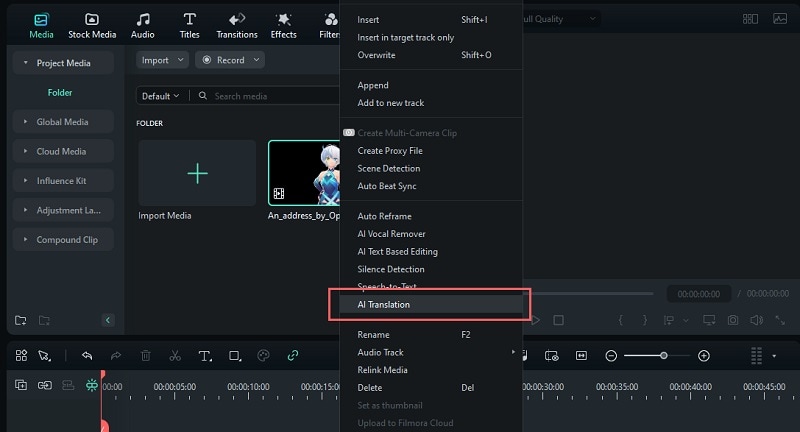
Right-click on your video and select "AI Translation" from the dropdown menu.
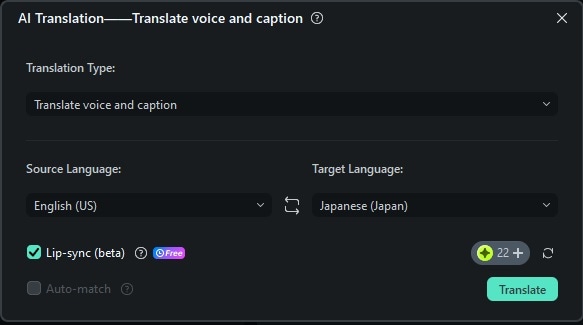
In the AI Translation settings, choose "Translate voice and caption" for translation type, pick your source and target languages, and enable the "AI Lip Sync" feature by checking the box. Click either "Generate" or "Try Free" to initiate the process.
- Step 4: Customize Subtitles and Edit
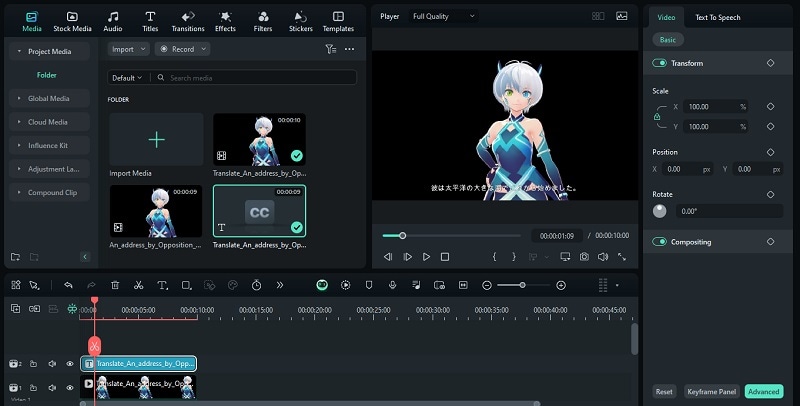
When the process is complete, the synced video will appear in the Project Media section. You can then drag it onto the timeline to continue editing.
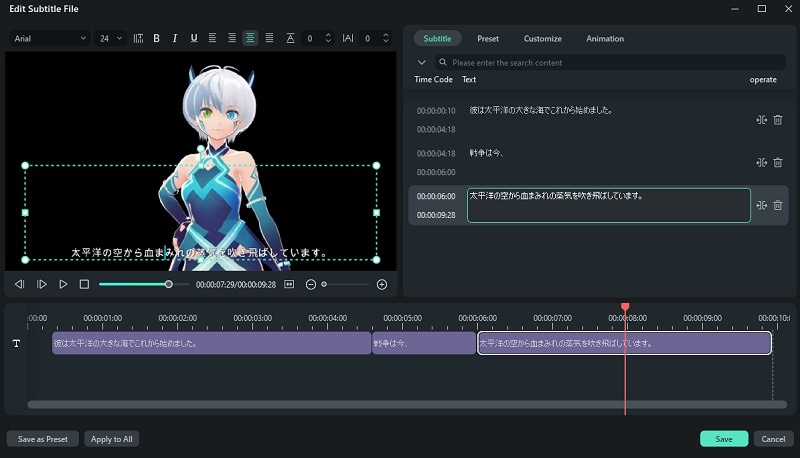
To modify subtitles, double-click on the subtitle track in the timeline and make any changes you need.
Compare Lip Sync Effect in Adobe After Effects and Filmora
Between lip syncing in After Effects and Filmora, have you considered the key differences that can impact your workflow? To help you get familiar with both software quickly, we have provided a quick comparison of the lip sync feature in After Effects and Filmora.
| After Effects | Filmora | |
| Target Users | Best for professional animators and complex projects | Ideal for creators who need quick localization |
| Control | Full control over animation details | Less control over mouth movements |
| Automation | Manual keyframing required | Automated by AI |
| Cost | Requires Adobe or stand-alone app subscription | Offers multiple pricing options at a more affordable rate |
In short, lip syncing in After Effects can be done by downloading the lip sync plug-in or manually keyframing the mouth shapes to match the sound. While it’s perfect for detailed and complex animations, AE demands more time and expertise.
On the other hand, Filmora’s AI-driven approach offers a faster and more accessible solution to localize your content. The choice between the two will depend on your specific needs and the complexity of your projects.
Bonus: Do Voice-Over for Animated Figures in Filmora
If you want to add voice overs or dub audio for your animated video, Filmora also lets you easily replace the original sound and record new voice overs as the video plays. To access this feature, simply click on the "Record Voice Over" button at the top of the editing timeline. For a detailed walkthrough, you can also check out the full guide in the video below.
Conclusion
By now, you should have a solid understanding of how to create lip sync animations in After Effects, whether manually or with the help of plugins. Mastering this technique can significantly elevate your animation projects. You can add realism and depth to the character you've made.
While After Effects offers powerful tools for animating and adding lip sync effects to your characters, options like Filmora can help you with localizing your content without the need for extensive manual adjustments. Filmora’s AI-driven lip sync feature streamlines the process. You can quickly translate and synchronize dialogue across multiple languages.


