Artificial Intelligence has brought up multiple applications for industrial adoption. Where the concepts of AI were believed to target the higher levels of research and development, very few observed the adoption of AI on fundamental levels. Such is the case with Midjourney, a platform designed to provide high-quality images made through AI.
While the tool hit the market with a storm, it has grown into an excellent opportunity to understand AI. The following article will demarcate some critical notes about Midjourney. Look through this comprehensive Midjourney guide to learn more about this exceptional AI image creator.
In this article
Turn Your Words into Art with Filmora AI Image! Experience the magic of Text to Image with Filmora AI Image Generator, where your words come to life in beautiful visuals.

Part 1: What is Midjourney?
Midjourney has introduced itself as an independent platform developed with the inheritance of artificial intelligence. The platform has been solely designed to provide a system of creating AI art through text-based prompts. This exceptional AI art generator has grown into a professional tool that is commended by the greats of this industry.
Where many people have not understood the true shape of Midjourney, the tool is still in the development phase. Many things are to be introduced across Midjourney, and many are to be improved. Seeing this, the considerate development of a proper Midjourney user guide is still underway. This article intends to act as a proper guide for those who are not yet aware of this exceptional AI art generator.
With an entry of a few words, the tool returns an original, high-quality, high-resolution image. Through the concepts of AI and machine learning, it utilizes the provided prompt and creates exceptional art under the mentioned keywords. The platform is open for public utility and is processed through the Discord channel. The entire team of Midjourney covers their operations through this social service, providing bot services for generating art.
We will continue our discussion in understanding more about Midjourney through this intuitive Midjourney guide. The following sections will focus on the utility and execution of this AI art generator. Where there are many operating in the market, it is crucial to realize the qualities that set Midjourney apart from others.
Part 2: How to Create an Image with Midjourney?
This section will discuss proper guidelines on how to create images through Midjourney. Look through all the prevalent details to know more about image generation with this professional AI art tool.
Step 1Join Discord and Open Newbies Channel
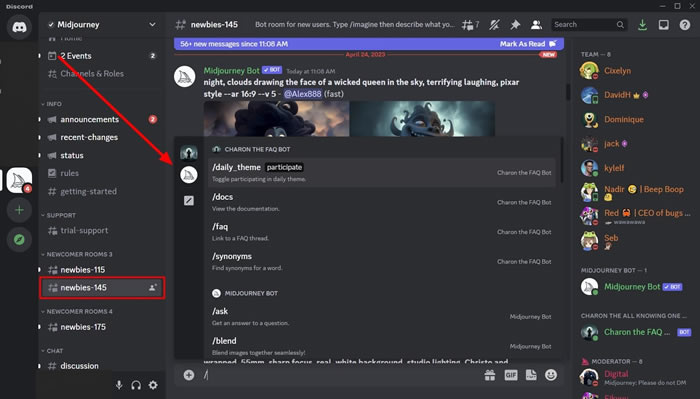
You have to start by joining the official Discord channel of Midjourney. Continue into the newbies’ section from the left and type “/” on the provided message space to open a list of commands.
Step 2Select Command To Create AI Image
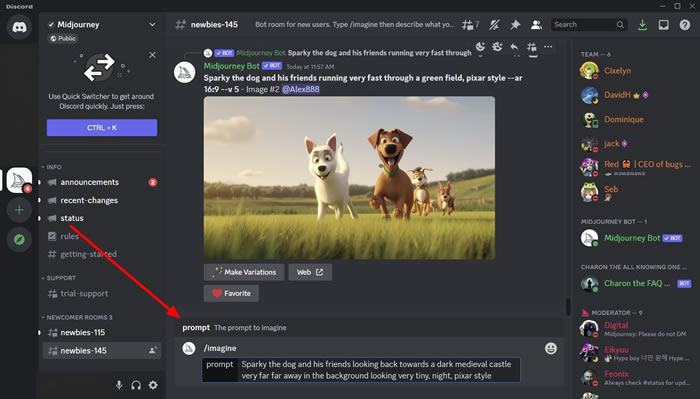
Continue to select the “/imagine” command from the list and type the text prompt that you want to create an image from. On writing the text prompt, continue to enter and send the details to the bot.
Step 3Upscale Or Change Image Model Version
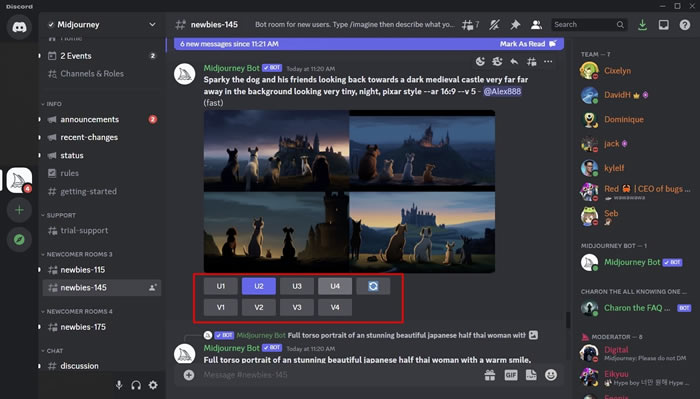
The AI bot returns the created image in the channel. Observe the image and upscale or change the model version with the available buttons below the image.
Step 4Open the Image on the Browser
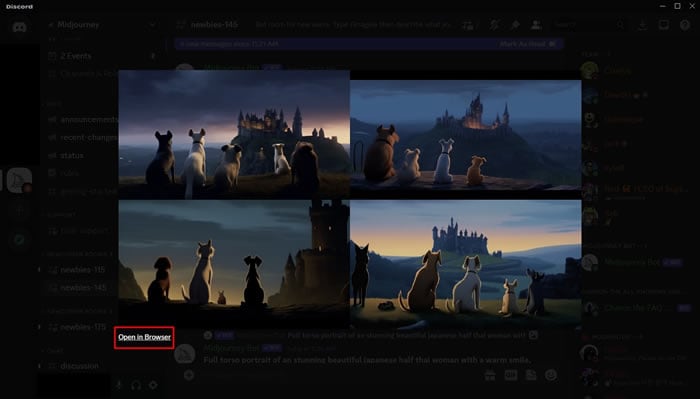
To save the image, click on it to open it on a new screen. Select the “Open in Browser” button to lead to a new window.
Step 5Save the Image to the Device
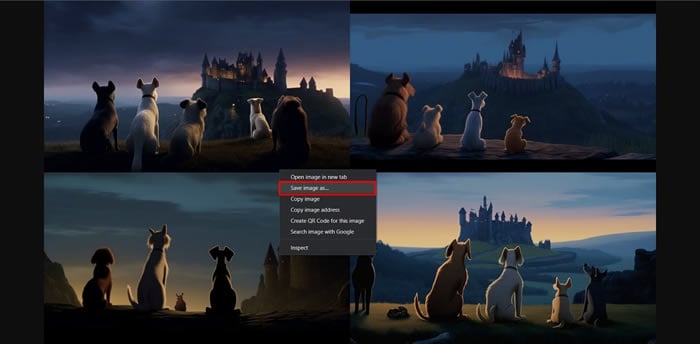
As the image opens on a browser, right-click to select the option of “Save image as…” to continue downloading the image on your computer.
Filmora offers a ChatGPT plug-in and AI tools to enhance your creative vision.

Part 3: What are the Basic Parameters and Commands of Midjourney?
As stated above, there are certain text prompts provided by the user within Discord that provides them with a considerate result. To know how to utilize Midjourney properly, it is essential to have proper knowledge of these parameters and commands. Provided below is the list of parameters and commands that you should be aware of before using Midjourney:
List of Parameters
This Midjourney user guide comes along with some of the most critical parameters that will help you put up a perfect image from the AI image generator:
- Aspect Ratio: Change the aspect ratio of a generated image with the “--aspect" or “--ar" addition.
- Chaos: Use “-- chaos
<number 0-100> to change the unexpectedness within a result. The higher the number, the more unusual the result. - No: Using the “-- no" prompt presents a narrative that you do not want a particular element within the image.
- Quality: You can set the rendering quality time for every image, which varies according to the price of every image. Use the prompt "-- quality
<0.25, 0.5, 1 or 2> according to your quality requirements. - Repeat: If you want multiple results from a single prompt, use “-- repeat
<1-40> for this. - Seed: A seed number issues the initiation point for the image grids. Using the "-- seed
<integer between 0 - 4294967295> " parameter, specify it for the image to be created. - Stop: If you wish to stop the current job that is underway, use the “-- stop
<integer between 10-100> to halt the process. - Style: The use of this parameter defines the strong influence of the aesthetic style of Midjourney on the images created. Use the “-- stylize
<number> ” or “-- s<number> ” for this purpose. - Uplight: This provides a light upscale, with the image closer to the original grid image. The parameter “-- uplight" helps in this process.
- Upbeta: This is an alternative to the beta upscaler, with the results closer to the original image. Use "-- upbeta" for this purpose.
- Niji: This model parameter is used to obtain anime-style images, with the code used as "-- niji."
- High Definition: While creating abstract or landscape images, you can utilize the “-- hd" parameter for creating exceptional resolutions.
- Test: To use the special test model of Midjourney, use the “-- test" parameter.
- Testp: For use the photography test model, use the “-- testp" parameter.
- Version: Although the currently running version of Midjourney by default is 4, you can have it changed with "-- version
<1, 2, 3, 4, or 5> ." - Creative: For modifying the test results, you can use the “-- creative" parameter for better results.
- Image Weight: You can define a proper image prompt weight to the text weight with the “-- iw" parameter.
- Sameseed: To create images with the same noise and similar results, use the “-- sameseed" parameter.
- Video: If you wish to create a video of the image generated on Midjourney, use the "-- video" parameter.
List of Commands
There are multiple commands that can be conveniently used alongside the parameters. A knowledge of these commands will help you understand much about the process in detail:
- /ask: You will get an answer to a question.
- /blend: Use this to blend two images.
- /daily_theme: You will be pinged the #daily_theme channel updates on Discord.
- /docs: Get hold of the official Midjourney user guide.
- /describe: You will receive four example prompts against the uploaded image.
- /faq: This can be used in the official Discord server for creating a prompt for the FAQs channel.
- /fast: You will switch to the Fast Mode.
- /help: View helpful information involving the Midjourney Bot.
- /imagine: The basic prompt used for generating an image.
- /info: This helps you view information related to the account or running prompts.
- /stealth: If you are a Pro Plan subscriber, you can shift to Stealth Mode.
- /public: Being a Pro Plan subscriber, you can shift to Public Mode with this.
- /subscribe: This creates a personal link for the user’s account page.
- /settings: Get into Midjourney’s settings for adjustments.
- /prefer option: You can manage a custom option or create one.
- /prefer option list: To view the current custom options, use this command.
- /prefer suffix: You can specify a suffix to be added at the end of every prompt.
- /show: To regenerate an image, use this command to get hold of the image Jobs ID.
- /relax: Set your account to Relax Mode.
- /remix: Start the Remix Mode on the account.
Part 4: What are the Pricing Plans of Midjourney?
If you are willing to continue using Midjourney to create the perfect AI images, you will also need an overview of the pricing plans of this platform. Get an overview of the complete pricing plans and their details in the table below:
| Properties | Free Trial | Basic Plan | Standard Plan | Pro Plan |
| Monthly Pricing | None | $10/month | $30/month | $60/month |
| Annual Pricing | None | $8/month ($96) | $24/month ($288) | $48/month ($576) |
| Relax GPU Time | None | None | Unlimited | Unlimited |
| Fast GPU Time | 0.4hr/lifetime | 3.3hr/month | 15hr/month | 30hr/month |
| Extra GPU Time Cost | None | $4/hour | $4/hour | $4/hour |
| Stealth Mode | No | No | No | Yes |
| Rating Images | No | Yes | Yes | Yes |
| Queue Length | 3 concurrent; 10 in waiting | 3 concurrent; 10 in waiting | 3 concurrent; 10 in waiting | 12 concurrent Fast Jobs; 3 concurrent Relaxed Jobs; 10 in waiting |
| Work Solo in Your Direct Messages | No | Yes | Yes | Yes |
Conclusion
This article has presented a useful Midjourney guide to help users start their journey with this AI tool. With the mentioned details, it will be much easier for you to operate it without facing any issues. Follow all the commands and parameters to create high-quality, professional AI images for yourselves.


 100% Security Verified | No Subscription Required | No Malware

