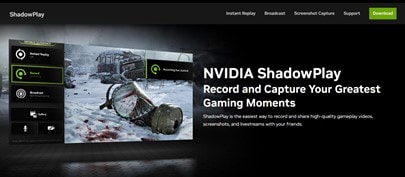
With the revolution in the gaming industry, live streaming and promoting gaming content online is the current trend among gamers. Gamers want to share their gaming experience with friends and fellow gamers on social platforms while playing. This trend has made so many gamers be on the lookout for ways they can live stream their gaming experience in the most effective way possible. Fortunately, Nvidia Shadowplay has to a large extent, bridged this gap.
With its incredible features like instant replay, customizable HUD (Heads-up Display), and live broadcasting, Nvidia Shadowplay has taken gameplay recording and live streaming to another level. Your gaming experience can be as easy as ordering a plate of pizza. Once you have an Nvidia graphics card, you are already more than halfway to successfully streaming your gameplay with your friends. It is pretty convenient to live stream with Nvidia Shadowplay if you have an Nvidia graphics card.
In this article
Part 1. What is Nvidia Shadowplay?
Nvidia Shadowplay (rebranded as Nvidia Share) is a gameplay recording, enhancing, and live streaming tool for gamers who want to capture important game actions and share their gaming experience. It is a hardware screen recording and lives streaming tool available on your Nvidia graphics card.
It allows you to record gameplay action, save the instant replay from capturing predetermined minutes of game action, and immediately share your gaming experience through live streaming them to as many people as possible. You can quickly get your live gaming moments to the gaming community on Facebook, YouTube, Twitch, etc. Pretty cool, right? Nvidia Shadowplay might just be that missing piece to checkmate your gameplay live streaming experience.
Part 2. How To Live Stream With Nvidia Shadowplay
The feeling is fantastic when you share your gaming feats with friends and fellow gamers. And especially when you have attained new levels in the game. So, if you haven't been able to because of the live-streaming technology, get ready because I'm about to show you how to live to stream your gameplays utilizing Nvidia Shadowplay effectively. Without further ado, let's dive right into it!
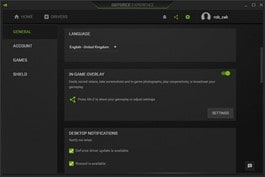
Step1 Enable In-game Overlay.
Enter your GeForce Experience to enable the Nvidia in-game overlay is like the key to the treasure house. When you switch on the in-game overlay, you can record, do instant replay and live stream. To enable it, click on the setting button in your GeForce Experience, scroll down in the new window that will pop up, and click on the slider next to the "in-game overlay" inscription. You can also use the Alt + Z shortcut key to bring up the in-game overlay.
Step2 Record Gameplays.
To record that impeccable gaming moment or do instant replays, head on to the in-game overlay and click on 'Settings' a new tab will open, then click on "Video capture". A new window will appear where you can adjust how you want your gameplay to be recorded.
You can change the resolution and FPS rate you want your video to be recorded in this window. After making your changes, you can start recording using your keyboard's Alt + F9 shortcut key. To do instant replays, enable it from your in-game overlay and then use the Alt + F10 shortcut key to do an instant replay.
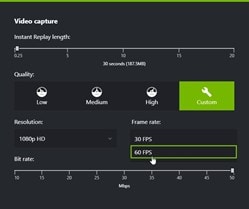
You can customize the duration for your instant replays in the "Video capture" tab. However, before you do so, you must turn off the in-game overlay to successfully customize the duration. You can pause your recording using the Alt + F7 and Alt + F8 to stop recording.
| Shortcut Review | |
| Alt + F7 | Pause recording |
| Alt + F8 | Stop recording |
| Alt + F9 | Start recording |
| Alt + F10 | Instant replay |
Step3 Use Nvidia Shadowplay to live stream.
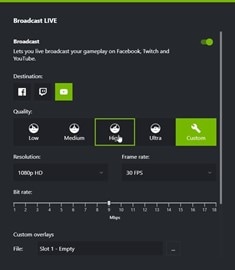
To live stream your gameplay using Nvidia Shadowplay, you must go to your in-game overlay, click on settings, and then on the "Broadcast Live" button.
A new window will come up, where you will choose the social platform you want to live stream to. The options are YouTube, Facebook, and Twitch. You can also choose your live stream quality, resolution, and FPS rate and add a custom overlay to this window.
After you have made your settings, run the game you want to live stream and press Alt + F8. A broadcast window will open where you select the site you want to live stream to and then log in to your account on the site. It will appear in the "post as" box after successfully logging in to your account. Other adjustments are easy and pretty straightforward. If it's YouTube, you want to live to stream your gameplay too. You must turn on the live streaming function in your YouTube Studio account.
Part 3. Tips To Consider When Live Streaming With Nvidia Shadowplay
1. Hardware: The type of hardware component you use plays a huge role in how successful your gameplay live streaming will be. Having the right quality of hardware will give you good quality live streams. The first step is to have an Nvidia graphics card. GPU GTX 650 will support Nvidia shadowplay on desktops, while GTX 700M or higher is needed for laptops and notebooks.
Computers with windows 7 - 10 are required; however, having windows 10 or higher will be ideal for enjoying quality live streams. Your computer should have 8GB RAM or higher. And its CPU should be Inter core i5 8600, AMD Ryzen r5 2600 or higher for better streaming output.
2. Software: Some of the software you will need are GeForce Experience, Twitch, Facebook, and YouTube. You must have the GeForce Experience software installed on your computer with an Nvidia graphics card. The GeForce Experience is what helps record and live stream your gameplay smoothly. And remember to install the social platform you want to go live.
3. Equipment: The right equipment is needed to successfully share your gaming experience with your friends through live streams. You will need a nice chair to sit in correctly while gaming. You might also need a good microphone and an excellent webcam (a 1080p60 will do great work. However, you may get a 4k webcam for maximum resolution streams). You will also need to lighten up your gaming space and a green screen if you want to remove or customize your background.

4. Stream Settings: Before you start live streaming, there are some settings you will have to make to ensure smooth live streaming. You will have to create a lovely title that can draw attention. You can choose the NVENC encoder for higher performance and streaming quality. Overlays can also be used to personalize your channel and provide a personal touch consistent with your brand or technique.
5. Resolution: Don't use more than 75% of your upload bandwidth because if you do, it may result in lousy streaming quality. Your bandwidth determines your stream resolution quality. So, the output may be poor if you don't have enough bitrate to support the resolution quality you set up. If you have below 8mbs, you should not go for 1080p resolution quality but a lesser one. That way, your streams will turn out well. But if you have 8mbs or higher bandwidth, you can stream at 1080 resolution.
6. Keep learning: Finally, you can't get the hang of everything at first, so you start, and as you progress, you will gain more experience and better your live streaming skill.
Bonus Tip: How To Record and Save Your Stream Videos Easily
Suppose you want to record your live stream or audience interaction fully. In that case, you can do so with the powerful Filmora recording tool.
Filmora is a fantastic screen recording and editing tool that you can use to record your screen in high video and audio quality. GIF support, Audio Equalizer, Video Stabilizer, audio mixer, noise removal, and other editing functions are available.
Step-by-step Guide to a Successful Recording with Filmora
Recording on Filmora is pretty easy. We will be showing you a simple step-by-step guide to follow:
Step1 After installing the software, open it and click on create a new project. Afterward, go to your screen top menu and click on the file. A drop-down menu will come up. Scroll down and click on record media.
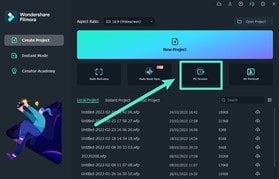
Step2 Click on "PC screen". A new window will pop up where you can customize how you want your recording to be. You can choose where you want to record your audio and change the quality level.
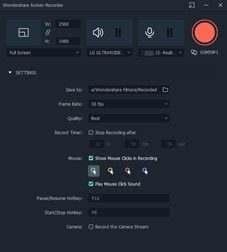
If you want your face to show while recording, click on the " record from camera" option on the customization page. Your webcam will record simultaneously with your screen.
Step3 Once you are done with your settings, you can start recording by hitting the red button on the page. To stop, pause, or restart your recording go to your desktop top menu. You will find all the buttons there.
Conclusion
Live streaming with Nvidia shadowplay can improve your live stream's quality to a professional standard. With its unique features, Nvidia shadowplay might be the missing piece to checkmate a professional and quality live stream. However, if Nvidia shadowplay doesn't match your desire, you can try its best alternative, Filmora.