
Blender is an open-source 3D creation suite known for its extensive range of features. One of its standout capabilities is motion tracking. Blender's motion track feature allows you to integrate 3D elements seamlessly into live-action footage, adding realism and depth to your projects.
Imagine enhancing your videos to life by tracking objects and adding dynamic 3D elements that follow their path. Blender 4.2 makes this process accessible, even for beginners. This article will explore Blender's 3D motion tracking feature and guide you to master it easily. Let's jump right into the topic!
In this article

Part 1. Motion Tracking in Blender 4.2
Motion tracking in Blender 4.2 lets you track the movement of objects or cameras in your footage. So, you can add 3D elements that blend naturally with your video. This includes object tracking for individual items, camera tracking to match the camera's movement, and plane tracking for surfaces.
In the next sections, we'll guide you through the straightforward steps to use motion tracking in Blender. The process is easy to follow, ensuring you can efficiently apply these techniques to enhance your projects.
Part 2. How to Track an Object in Blender 4.2?
Tracking an object in Blender involves analyzing and following the movement of a specific object or feature within a video clip. This process usually starts with preparing the footage by ensuring the object has clearly visible markers to help in accurate tracking. You then import the video into Blender, set up the motion-tracking workspace, and place tracking markers on the object.
To do object tracking in Blender 4.2, follow the steps below.
Step 1. Prepare Your Video Footage
Film an object with at least 8 visible markers applied to its surface. Ensure they are well-placed and visible throughout the footage. Move the object slowly to keep the markers visible and easy to track.
Step 2. Set Up Blender
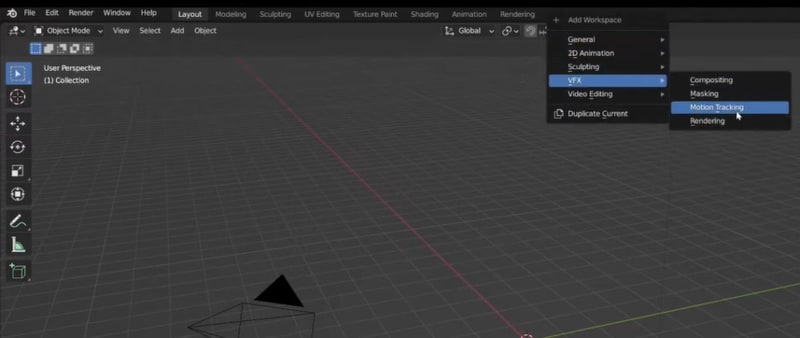
Open Blender and set the frame rate to match your video. Switch to the Motion Tracking workspace by going to the top menu, and clicking the Plus button > VFX > Motion Tracking.
Step 3. Import Your Footage
In the Movie Clip Editor (within the Motion Tracking workspace), click Open to import your video. Load your footage into the editor, and make sure it appears correctly in the preview window.
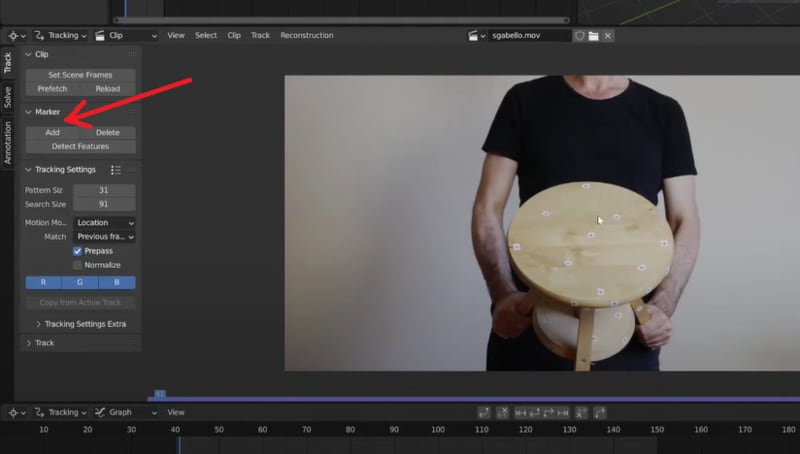
Step 4. Add and Track Markers
Go to Solve > Marker and click Add in the Movie Clip Editor to place markers on your video. If markers are blurry, enable the Blurry Footage option for better tracking accuracy.
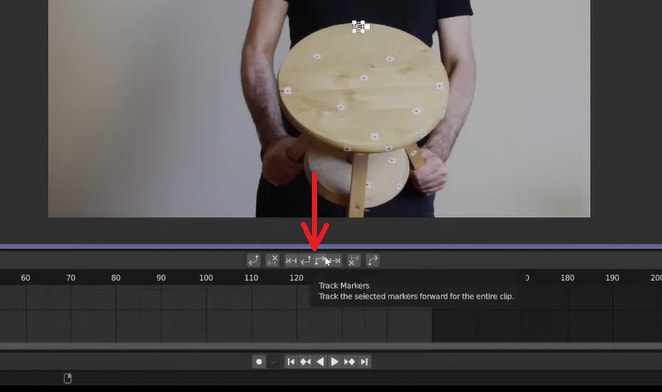
Track markers by clicking Track Forward or Track Backward. Adjust and re-track markers as necessary.
Use at least 8 markers and click Solve Object Motion.
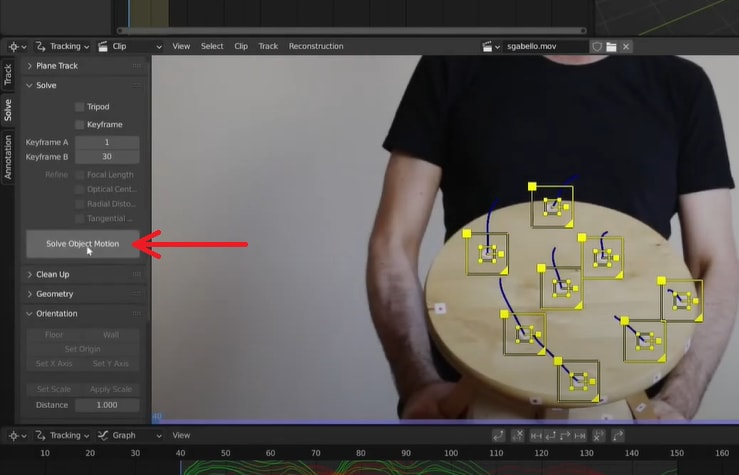
Step 5. Verify Tracking Accuracy
Play back the footage and ensure the tracked markers align correctly with the object's movement. If the solve error is less than one, the tracking is successful. Click Set as Background to use the video as the camera's background for better visual alignment.
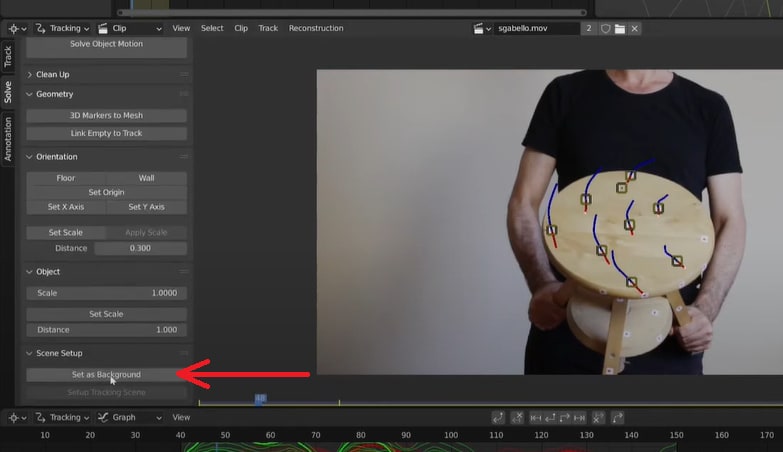
Step 6. Align Markers with Camera
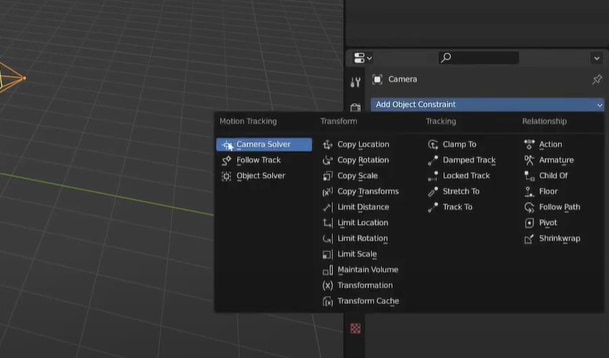
Switch to the Layout workspace. On the right side of the screen, select the Camera and add a constraint called Camera Solver. Ensure markers align in the camera view (press 0 on the numeric pad). Adjust the background and camera if needed.
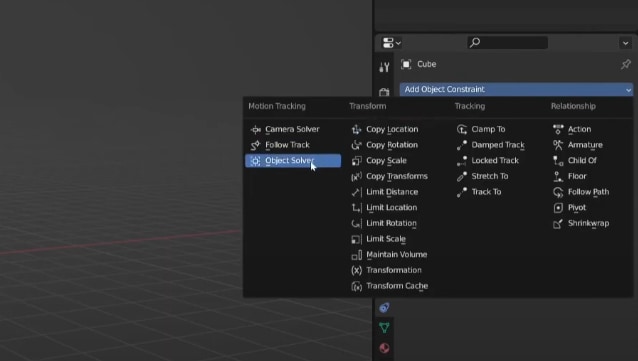
Step 7. Add and Position Your 3D Object
Add a 3D object (e.g., cube) and apply an Object Solver constraint. Use the tracked markers as a guide to position and model the object accurately in 3D space, ensuring it aligns correctly with the footage.
Following these steps, you can effectively do object tracking in Blender 4.2 and integrate it seamlessly with your video footage.
Part 3. How to Execute Camera Tracking in Blender?
Camera Tracking is another tracking technique that you can use in Blender for post-production and video effects. It involves recreating the path of the real-life camera used to capture the footage.
For instance, if you record a video with your phone and want to add a 3D model, just placing it on top of the footage won't look realistic because the ground may move. To solve this issue, you can use Blender's camera tracking feature to track the camera's movement, so you can integrate the 3D model seamlessly into the scene.
Follow the steps below to do 3D camera tracking in Blender 4.2:
Step 1. Set Up Blender
Open Blender and go to the Motion Tracking workspace by clicking the Plus button > VFX > Motion Tracking. Import your video clip to the Movie Clip Editor, then adjust the frame rate and video resolution in the Output Properties to match your video.
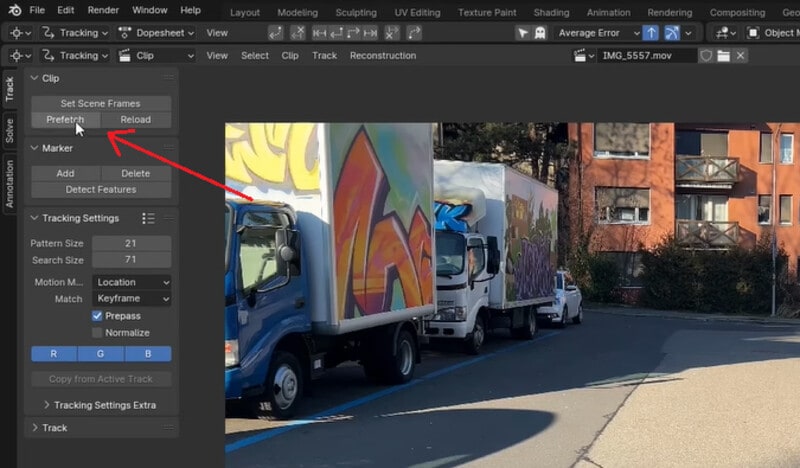
Step 2. Load the Footage
Before we start tracking, load the footage into memory to make tracking smoother. On the left panel, go to Track > Clip > Prefetch. You'll see a purple bar indicating the progress. Once loading is complete, you're ready to start tracking.
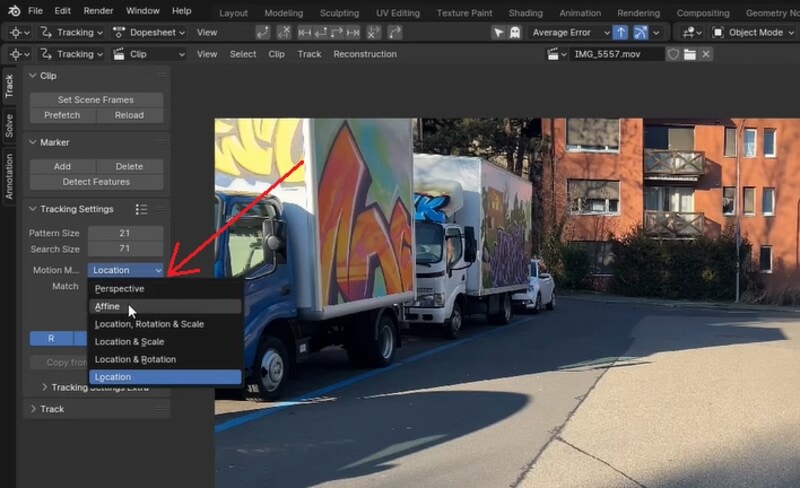
Step 3. Adjust Tracking Settings
Go to the first frame of your clip. Change the motion model by going to Track > Tracking Settings > Motion Model, and choose Affine from the dropdown menu. Enable Normalize for more stable results.
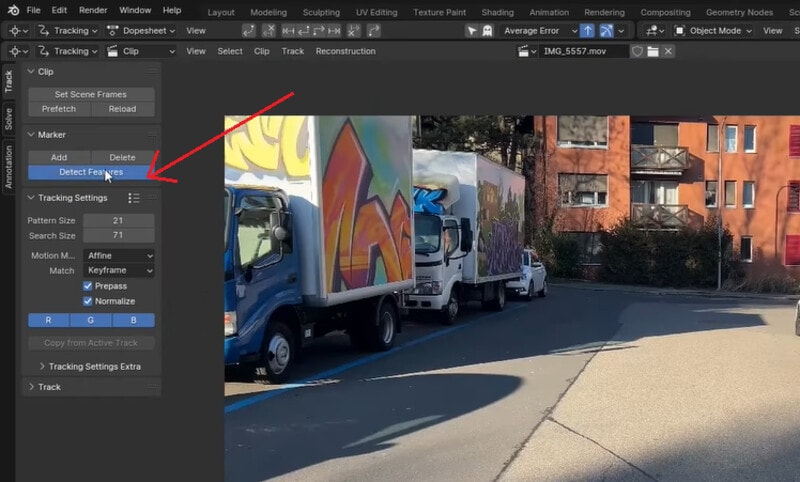
Step 4. Place Tracking Markers
To place tracking markers, position the Playhead at the start of the video. Go to Track > Marker > Detect Features. Blender will automatically add marker points to the clip.
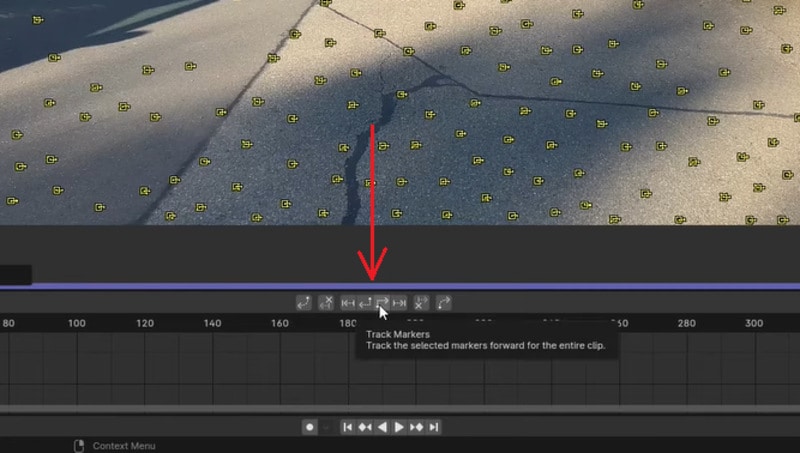
Step 5. Track the Camera Movement
Select all markers and click the Track Forward or Track Backward button. Blender will automatically track the points throughout the clip.
Step 6. Refine Tracking
Review the tracked markers by adjusting or deleting markers if they drift or become inaccurate. Re-track as needed to improve accuracy.
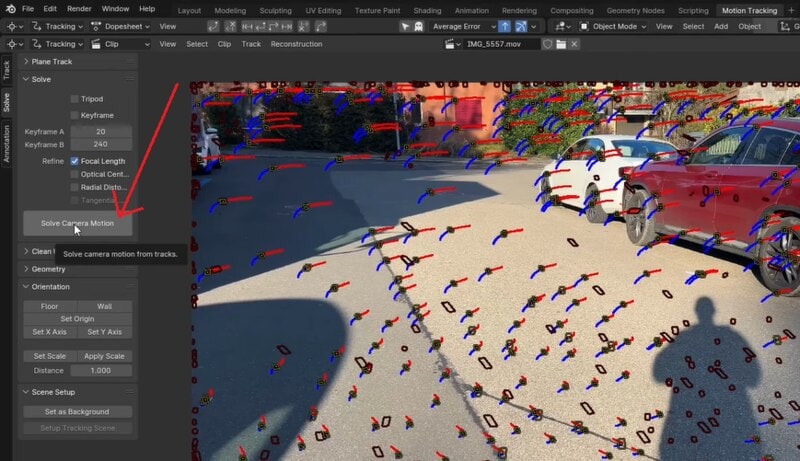
Step 7. Solve the Camera Motion
Once tracking is complete, go to Solve and click Solve Camera Motion. Blender will calculate the camera's motion and create a camera path based on the tracked data. This process might take some time. Once it is done, check the average solve error; if it's below 1, the result is good.
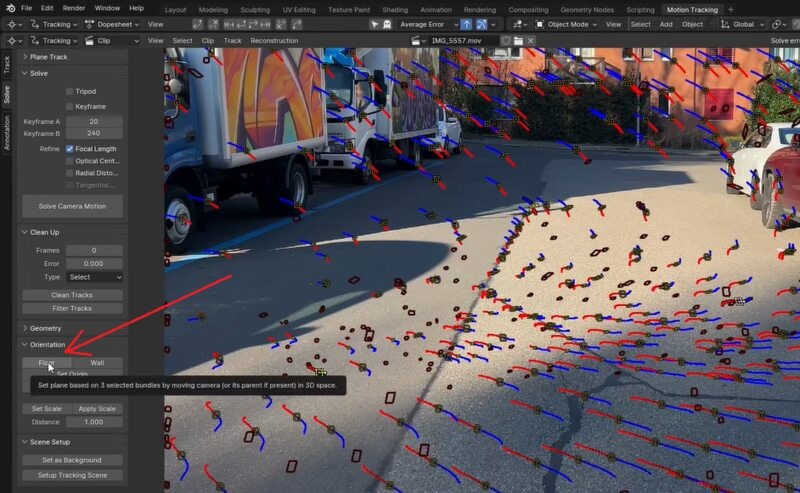
Step 8. Align the Ground
Next, we need to align the ground of the video clip with the ground of the Blender 3D space. To do this, go to the Tracking workspace, and select three points that are fixed on the ground of the video. Then, go to the Solve panel > Orientation > click Floor to align these points with the ground in the 3D space.
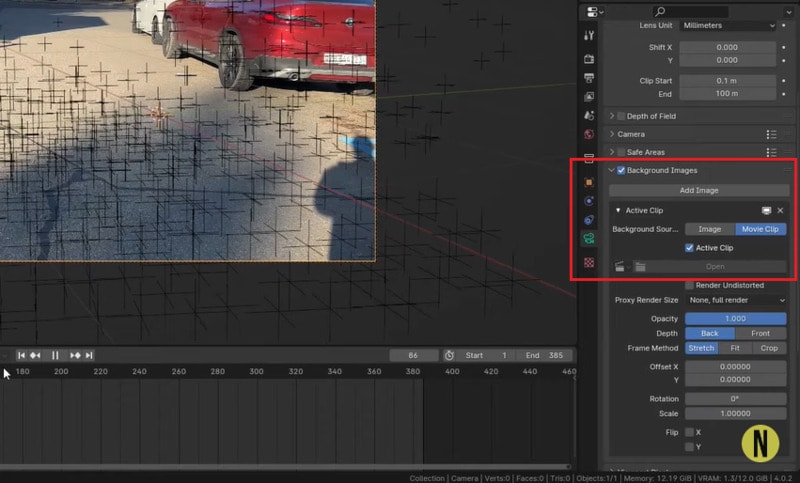
Step 9. Set the Background
Press Numpad 0 to enter the camera perspective. Go to Camera Properties > enable Background Images > Add Image > Movie Clip > enable the Active Clip. Your footage will appear in the background.
Step 10. Add and Position 3D Elements
Press Shift + A to add a 3D object (e.g., a cube). Adjust the position, scale, and orientation of your 3D objects to fit naturally within the scene. Make final tweaks to match the 3D elements with the background footage.
By following these steps, you can effectively use 3D camera tracking in Blender 4.2 to integrate 3D elements with your video footage.
Part 4. How to Use Plane Tracking in Blender?
After learning about motion and camera tracking in Blender, you might also notice Plane Tracking and wonder what it's used for. In Blender, you can use plane tracking to track the movement of flat surfaces within your footage, such as walls, floors, or any other flat area. It's particularly useful for adding details or integrating 3D elements into scenes where the surface changes perspective or moves.
Follow the steps below to do plane tracking in Blender 4.2:
Step 1. Set Up Blender
Open Blender and go to the Motion Tracking workspace by clicking the Plus button > VFX > Motion Tracking. Then, import your video clip into the Movie Clip Editor.
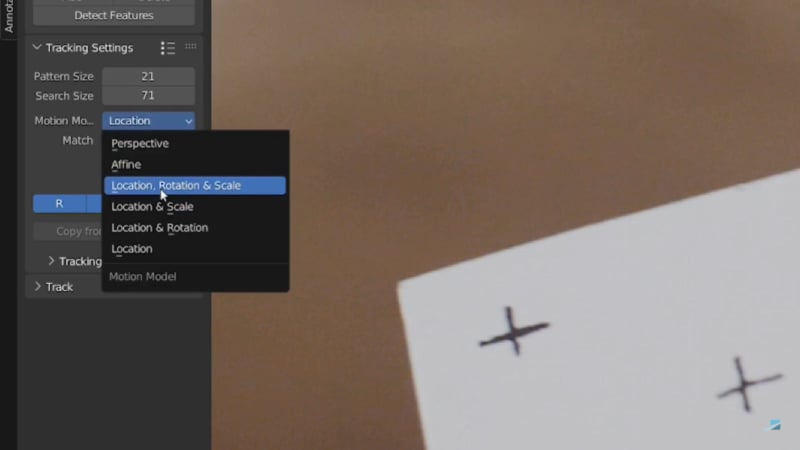
Step 2. Set the Tracking Settings
Navigate to the first frame of your clip. On the left panel, go to the Track section and enable Normalize to improve tracking stability. Change the Motion Model to Location, Rotation & Scale from the dropdown menu.
Step 3. Add Tracking Markers
Add tracking markers to the object in your clip by clicking on the relevant areas. Adjust their placement to ensure they are on distinct features.
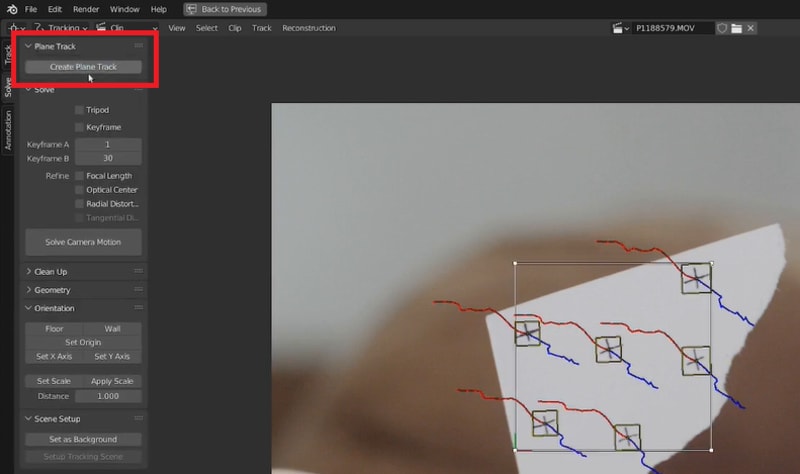
Step 4. Set the Plane Track
Select all the trackers you've placed. In the left panel, go to Solve > Plane Track > Create Plane Track. Use the G (grab), R (rotate), and S (scale) hotkeys to adjust the plane track box so that it aligns correctly with the tracked object in your footage.
Step 5. Apply the Plane Track
Once you're satisfied with the plane track, you can use it to integrate 3D elements or other effects into your scene. Position and adjust your 3D objects or effects to match the plane track for seamless integration.
By using these steps, you can successfully apply Plane Tracking in Blender 4.2 to incorporate 3D elements seamlessly into your video footage.
Part 5. Wondershare Filmora: Apply Motion Tracking in Video Without Blender
While we have outlined various ways how to use Blender for video tracking, those who found difficulty in the process can use other easier alternative that provides similar features. One of the recommended options is Wondershare Filmora.
Filmora is a great alternative to Blender motion tracking as it provides video editing tools that are easy to use and perfect for those who want a simpler approach to tracking movement in videos. Unlike Blender, which can be complex and overwhelming, Filmora offers a more straightforward and user-friendly experience.
Why Choose Filmora for Motion Tracking?
- Easy to Use: Filmora's simple design makes it easy to learn and use, so you can quickly get your tracking done without a steep learning curve.
- Quick Setup: Unlike Blender, which requires a deeper understanding of 3D modeling and motion tracking, Filmora provides a more straightforward setup that gets you started quickly.
- Built-In Tools: You don't need extra plugins or extensive setup—Filmora has everything you need for motion tracking right inside the software.
Here is the step-by-step guide on how to use the motion tracking feature on Wondershare Filmora:
Step 1. Open Filmora and Import Your Video
Launch Filmora and start a New Project. Click the Import button to add your video files to the media library. Drag and drop it onto the timeline to begin editing.
Step 2. Add the Motion Tracking Effect
Select your video clip on the timeline and click the More icon above the timeline and choose Motion Tracking. Then, switch on the Motion Tracking tool.
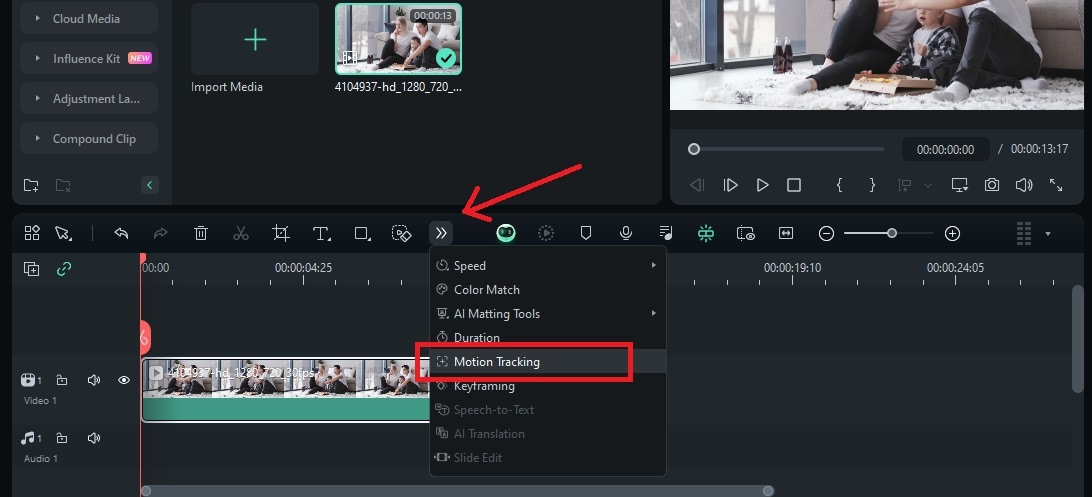
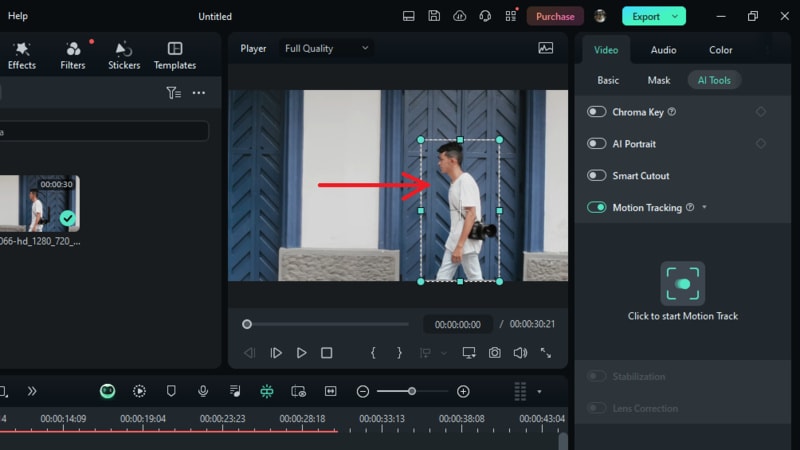
Alternatively, you can access Motion Tracking by going to the right panel, and click on Video > AI Tools > Motion Tracking.
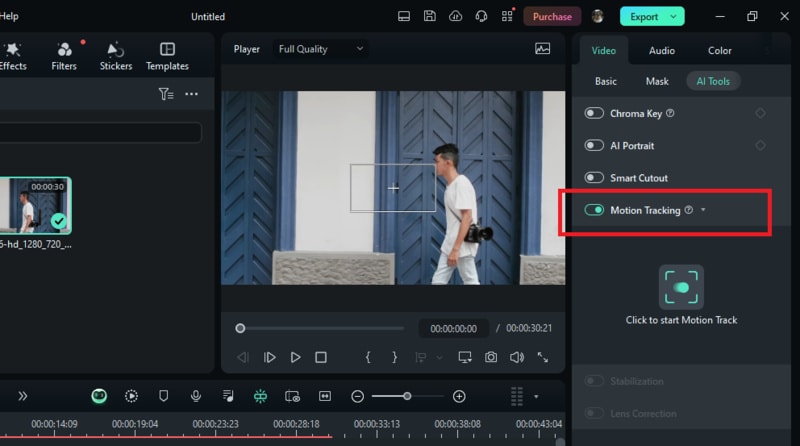
Step 3. Set Up the Tracking Box
Move the playhead to the starting point where you want tracking to begin. In the preview window, adjust the tracking box on the object you want to track. Ensure that the object remains inside the tracking box and is fully visible throughout the tracking process.
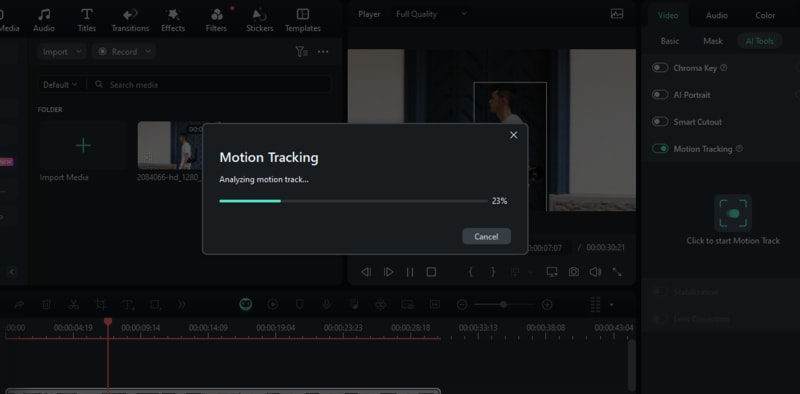
Step 4. Start and Review Tracking
Click Start Motion Tracking. Filmora will analyze the video and track the object's movement. Playback the video to check the accuracy of the tracking, and adjust the tracking box or settings if necessary.
Step 5. Apply and Link the Tracking Element
Drag and drop an element (like text or an image) onto a track above your video on the timeline. Click on the video clip, go to the Motion Tracking panel, and use the Link Element drop-down menu to select the element. Adjust the element's size and position as needed to fit with the tracked object.

By following these steps, you can easily apply motion tracking in Wondershare Filmora. This user-friendly tool simplifies the process, helping you enhance your videos with professional effects. Once you're done, you can export your video and share your project.
How To Use Motion Tracking With Filmora Mobile
As we all know, motion tracking is a complicated video editing skill requiring a desktop. However, these days, mobile apps are equipped with features to do it. This means that you can create advanced-level video editing procedures on the go. This is an excellent development because most videos are taken from a mobile phone. You might as well edit them using the device, right?
Filmora is one of those tools that offer this fantastic feature. To access it, follow the steps below:
Step 1: Download Filmora on your mobile phone (Android and iOS).
Step 2: Make a New Project, then import your video.
Tip: Using videos with a green screen is a more effective way to use motion tracking.
Step 3 (Optional): If you’re using a green screen video, use the Smart Cutout feature first to remove the background.
Step 4: Now, add an Effect to the video.
Step 5: Once the effect is applied, select the clip again. Then, go to Object and select the object you want to motion track. This will use the effect as the object moves.
Step 6: You can also do the same on stickers or text. Select the object (Sticker or text) you’ve added, then go to Tracking > Start Tracking.
With the methods provided above, you’ve now unlocked the skill of motion tracking without using Blender on your phone. These advanced functions are made possible by Filmora, so try it out today!
- Learn how to track moving objects with precision.
- Add text, images, or effects that follow the action seamlessly.
- Enhance storytelling by keeping elements in focus.


Part 6. What to Do When Blender Motion Tracking Isn't Working?
Blender's motion tracking feature can sometimes present challenges. Here are some common issues users may encounter and their solutions:
- Blurry or Low-Quality Footage: If your footage is blurry or has poor contrast, Blender may struggle to track markers accurately.
Solution: Ensure your video is high quality and well-lit. Consider sharpening the footage in a video editor before importing it into Blender.
- Insufficient Number of Markers: Tracking may be unreliable if there are too few markers.
Solution: Increase the number of markers to enhance tracking stability. Aim to place at least 8 markers on distinct features.
- Drifting Markers: Trackers may shift away from their intended targets, leading to inaccuracies.
Solution: Frequently check and adjust the markers' positions. Remove or correct any markers that do not stay on their targets and re-track those areas.
- High Solve Error: A high solve error suggests that tracking results are not accurate.
Solution: Reevaluate and adjust the tracking markers and settings. Verify that the camera movement is properly captured by the markers.
- Noisy Tracking Data: Noisy or unstable tracking data can disrupt the integration of 3D elements.
Solution: Apply filtering options in Blender to smooth out the data and improve the tracking results.
By addressing these issues, you can improve the performance of Blender's motion tracking and achieve better results in your projects.
Part 7. How to Use Plugins in Blender [Advanced version]?
Blender's motion tracking capabilities can be greatly enhanced with the use of advanced plugins. These plugins offer specialized tools that can streamline the tracking process and extend Blender's functionality. In this section, we'll explore three plugins and discuss their features along with the steps on how to use them effectively.
1. CamTrackAR
CamTrackAR is a plugin designed to facilitate the addition of augmented reality (AR) elements into your scenes. It offers advanced tracking features that make it easier to combine 3D objects with live-action footage.
Here is how to use CamTrackAR in Blender:
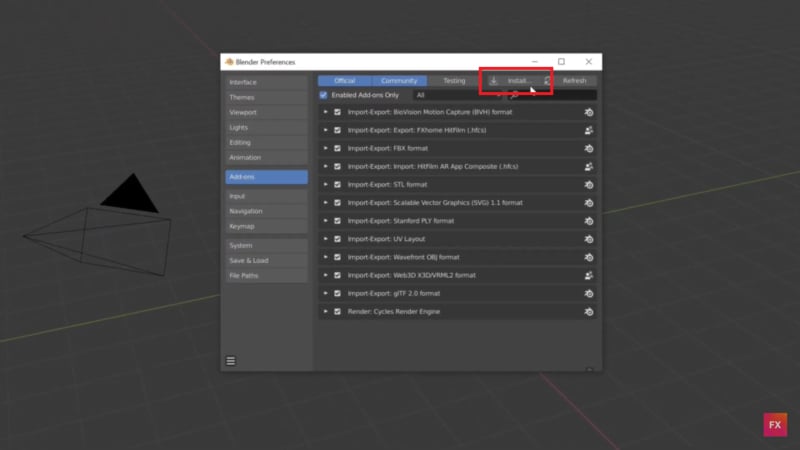
Step 1. Install the CamTrackAR
After downloading the CamTrackAR plugin, open Blender and go to Edit > Preferences > Add-ons.

Click Install and select the CamTrackAR plugin file. Once you install the addon file, Blender will update the add-ons list. Locate the installed plugin and check the box next to it to activate it.
Step 2. Set Up the Scene
Import your video footage into Blender's Motion Tracking workspace. Then, add new tracking markers for the AR elements you wish to integrate.
Step 3. Apply CamTrackAR
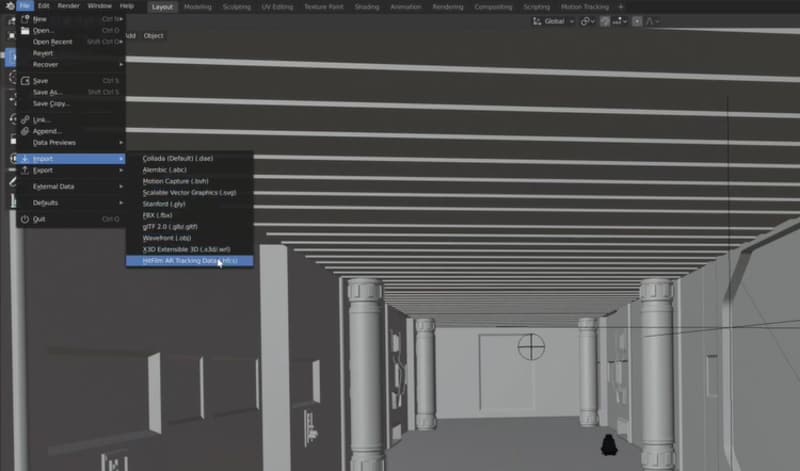
To import the CamTrackAR data, go to File > Import > Hitfilm AR Tracking Data. Find the take you want and select the .hfcs file. After importing, select the appropriate layer and press 0 on the number pad to switch to the camera view. This will synchronize your virtual camera with the real one's movement on set.
Step 4. Preview and Adjust
Use the real-time preview to ensure AR elements are properly aligned with your footage. Make necessary adjustments for a more seamless integration.
Step 5. Render the Final Scene:
Once satisfied with the AR elements, render the scene to produce the final video with integrated AR elements.
2. MoCap
MoCap (Motion Capture) is a plugin that enhances Blender's capability to work with motion capture data. It's ideal for creating realistic animations based on actual movements. In this guide, we will use Rokoko's motion capture tool.
How to use the Rokoko Retargeting Plugin for Blender:
Step 1. Download and Install the Rokoko retargeting plugin
First, you need to download the plugin. Then open Blender to install the plugin by going to Edit > Preferences > Add-ons. Click Install and select the plugin file you downloaded. Once it is installed, activate the plugin from the list of add-ons.
Step 2. Set Up Your Character Rig
Prepare your character using your preferred rigging method or tool, for example, you can use Maximo. With them, you just need to place the circles in the major joint areas.
Step 3. Import Your Rigged Character
Start a new project in Blender and import your rigged character mesh. Check the tick boxes for Automatic Bone Orientation and Animation. Set the scale to 100 to make sure the Mixamo mesh doesn't import at a super tiny size.

Step 4. Import MoCap Data
Import your BVH or FBX motion capture file into the Blender scene. Make sure the MoCap data is positioned correctly within the same scene as your rigged character.
Step 5. Configure Plugin Settings
Find the MoCap plugin within Blender's options panel. Select your MoCap animation as the source and choose your rigged character as the target. Click on Build Bone List to create a mapping of bones between the source and target.
Step 6. Apply the Motion Capture Data
Click Retarget Animation to transfer the motion capture data onto your character. Examine the animation and make any necessary tweaks to ensure it matches your character's rig.
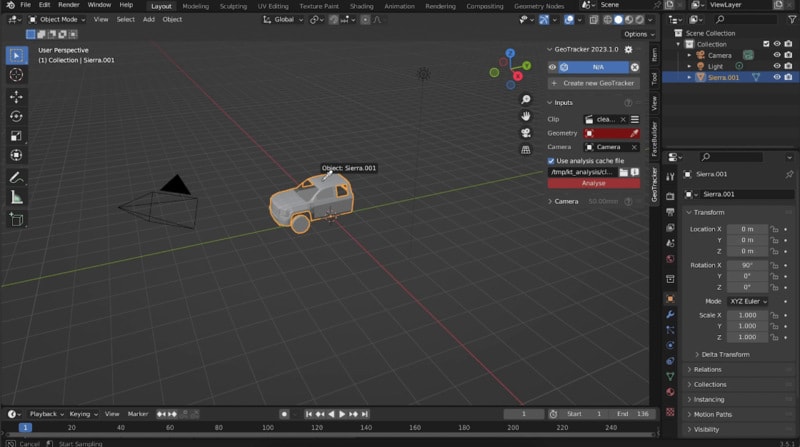
3. KeenTools GeoTracker
KeenTools GeoTracker is a plugin designed for geolocated 3D tracking. It's ideal for projects that require precise geometry-based tracking and integration of 3D elements into specific geographic contexts.
How to Use KeenTools GeoTracker:
Step 1. Install and Setup
Download and install the GeoTracker plugin from the KeenTools website. Begin by launching the Blender and open your project.
Step 2. Add and Configure GeoTracker
Go to the 3D Viewport and switch to the KeenTools tab in the sidebar (N-panel). Here, you will find the GeoTracker panel. Click on Add GeoTracker to create a new GeoTracker object in your scene.
Step 3. Configure Tracking Settings
Click Load Video in the GeoTracker panel and select your video file. Place the tracking points by clicking Add Point to place points on noticeable features in your video. You can add multiple points to improve tracking accuracy.
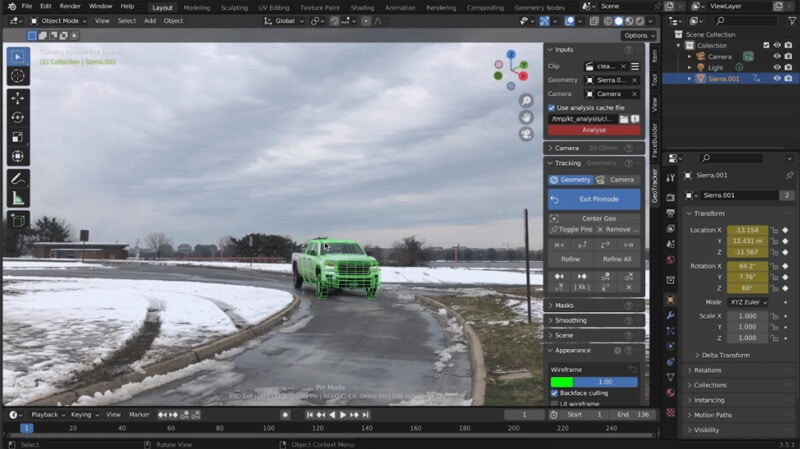
Step 4. Track the Footage
Once your points are set, click Track Forward or Track Backward to begin the tracking process. GeoTracker will analyze the video and track the selected points across frames.
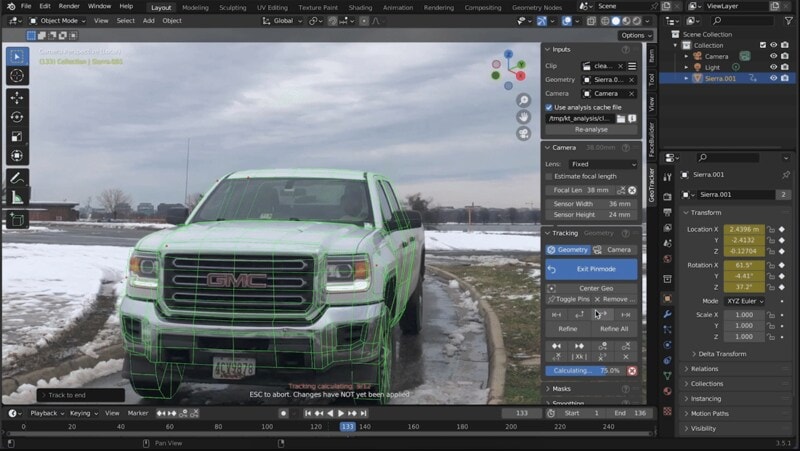
Step 5. Apply Tracking Data
With your tracking data ready, you can now create 3D objects that align with the tracked footage. Use the Match Camera tool to align your 3D camera with the footage.
Step 6. Final Adjustments
Make any final adjustments to your 3D objects, camera angles, and render settings to ensure the best integration with your video footage. Don't forget to save your Blender project file and any exported data.
Conclusion
Blender's motion tracking features offer powerful tools for integrating 3D elements into your footage. You can do so much with Blender, from object tracking, camera tracking, to plane tracking. However, they come with a steep learning curve and their complexity might be overwhelming for beginners.
If you prefer a more accessible and creative alternative, you can use Wondershare Filmora. It offers an easy-to-use interface and straightforward motion tracking setup, making it a great choice for those who want effective results without the complexity. If you're looking for a quick and effective solution for motion tracking, Filmora is a solid choice.
