
 100% Security Verified | No Subscription Required | No Malware


 ChatGPT
 Perplexity
 Gemini
 Claude
 Grok
Grok

Streamlabs is a popular choice among Twitch and YouTube streamers. This platform is entirely dedicated to streaming and offers users the option to customize their streams quickly and reliably. The software also offers a video editing solution to help streamers, which will be the main focus of this text.
We will mainly focus on adding transitions in the Streamlabs video editor. If you stick around until the end, we will also show a different video editing tool that might be a better alternative for newcomers.
But first, let’s go over the guide to add transitions in Streamlabs.
In this article
A Step-by-Step Guide to Streamlabs Scene Transitions
Transition effects in Streamlabs are called Scene Transitions. Here are the steps you need to follow to complete the task.
Step 1: Open Streamlabs on your device and log into your account.
Step 2: Check the screenshot below to see where to find the Edit Scene Transitions feature. Your interface might be a bit different, but try to resize it to match what you see in the screenshot so you can navigate around the tool and follow our guide better.
Step 3: When the Scene Transitions window pops up, you need to click on Add Transition. To add a new transition, you need to click on the +. To align with our tutorial, select the Stinger transition.
Step 4: You can assign a title to the transition. After that, click on Browse and select a video file where you want to add the transition effect.
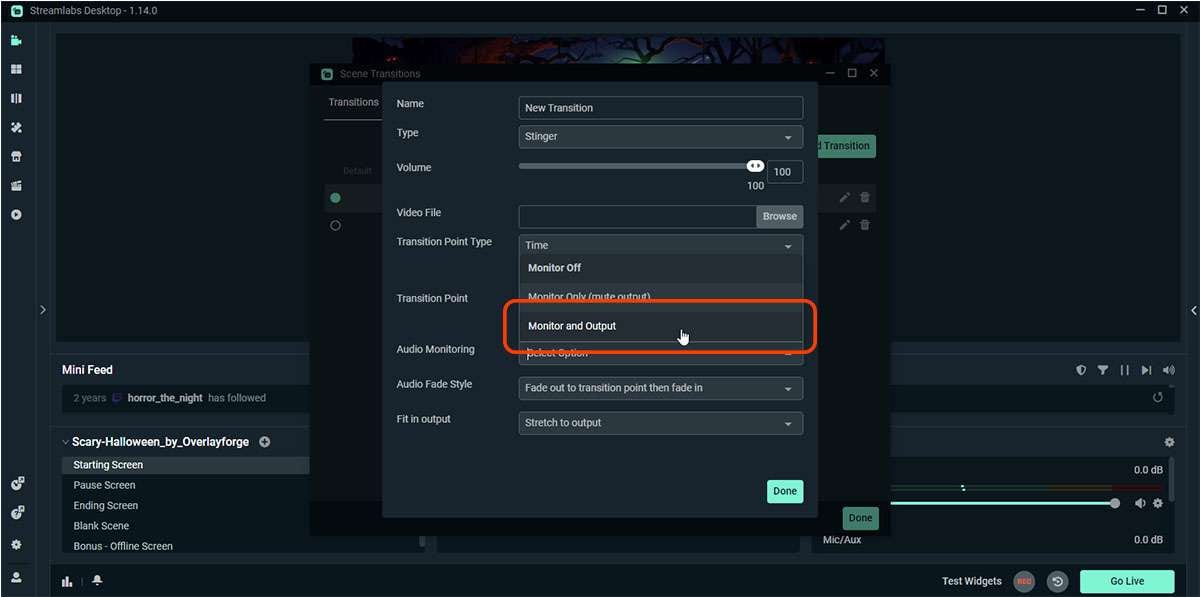
Step 5: If the video you chose to apply the transition effect in Streamlabs has audio, you might want to mute it. This is done by selecting Monitor Off. If you want the audio to be heard by both you and your audience, you can select the Monitor and Output option (as shown in the screenshot). There is a third option, Monitor Only, which allows you to hear the audio, but your viewers won’t. This final option is not used that often.
When you are done with everything, click the green Done button. You can set the newly created transition as the default transition effect. The only thing left to do now is to test your stream, try switching between two scenes, and see what it looks like. If you are not satisfied, you can repeat the process but try different options.
And that’s how you do it. If you are a streamer, Streamlabs (as the name suggests) is for you. However, if you are a video editor and you need a fast way to add transitions to your video footage, you can use Filmora. This easy-to-use alternative will help you achieve the desired results in mere minutes.
You can download and install Filmora on Windows and Mac, but there is also a version for Android and Filmora iOS devices.
Add Transitions on the Go with Filmora Mobile
The mobile version of Filmora offers all the important functionalities you can find in the desktop version. It might not have all the AI features that are available on desktop, but when it comes to adding transitions, you can rest assured that Filmora Mobile packs the same power as the desktop version. Let’s see how to add transitions.
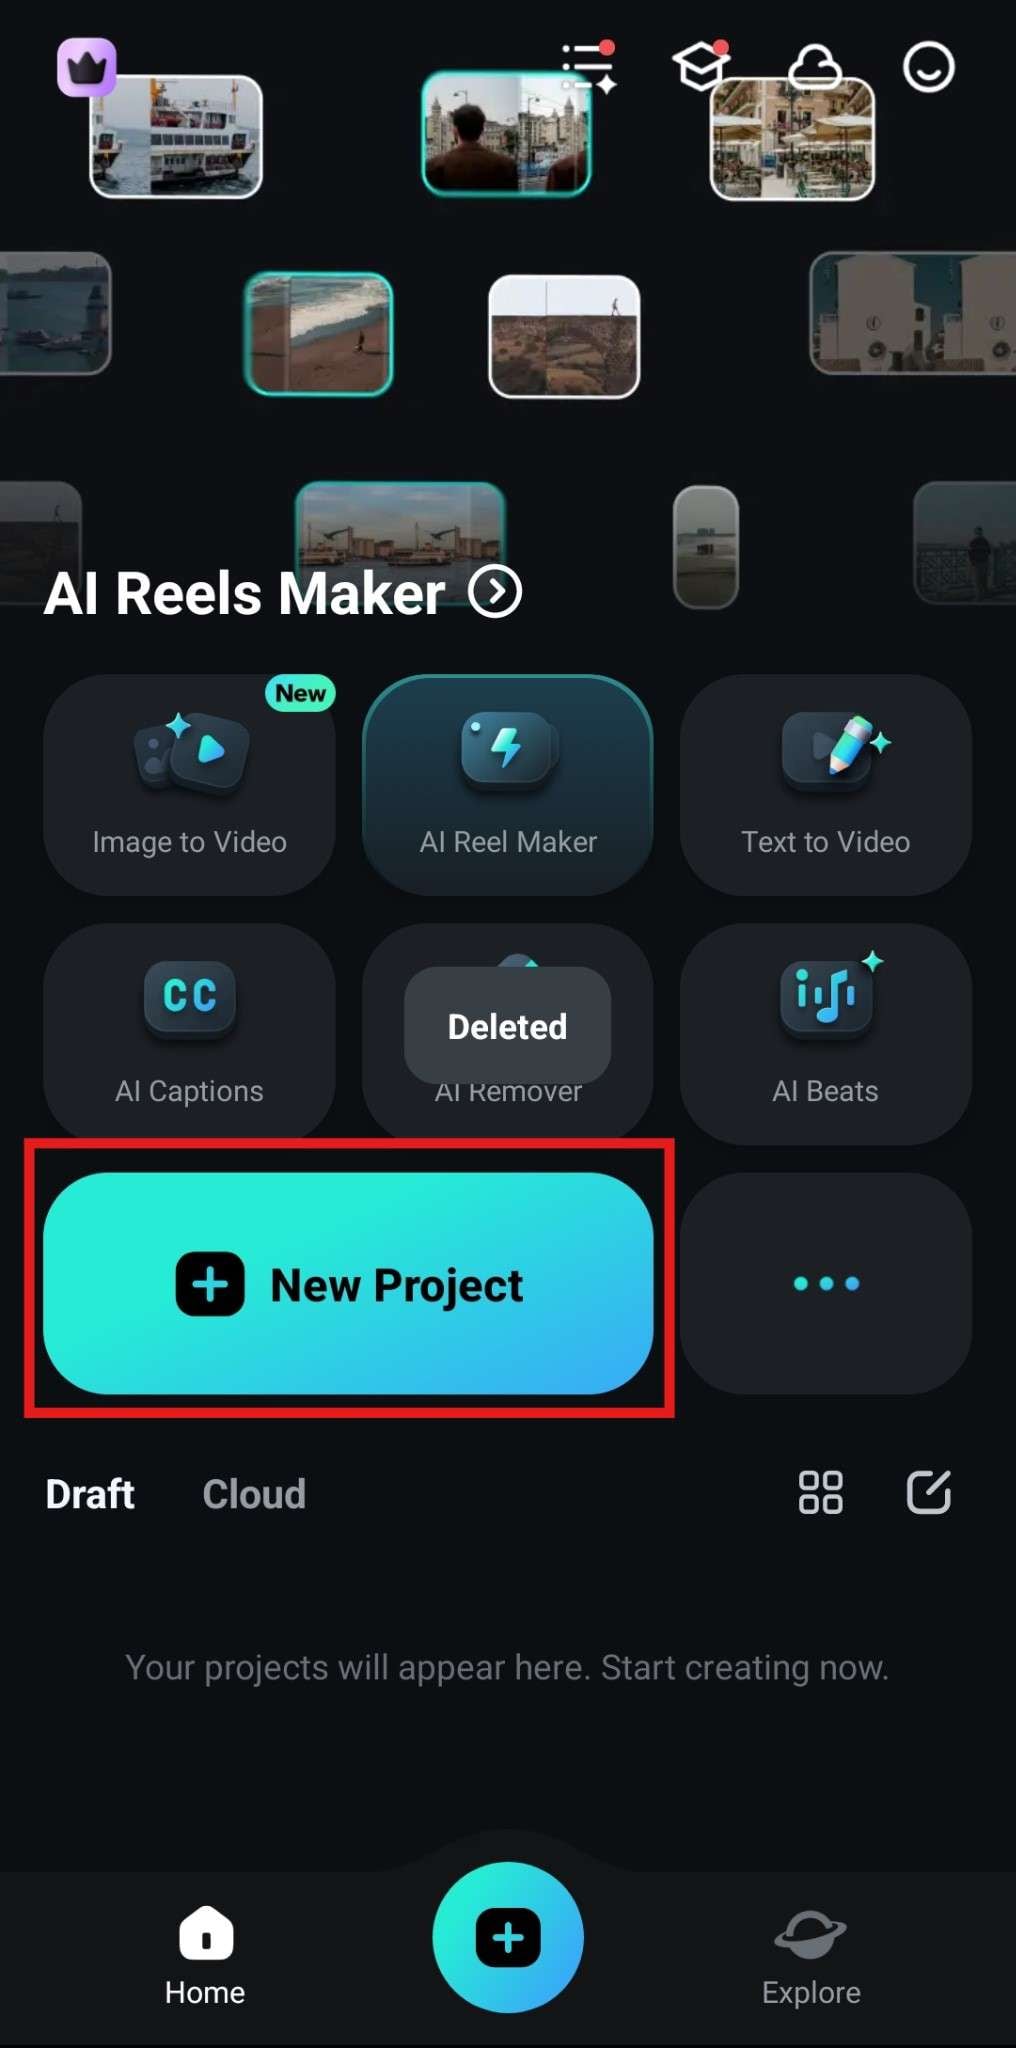
Step 1: Install and open the app on your mobile, and then, just like with the desktop version, tap on New Project. This will prompt you to pick photos or videos from your device. Simply select two videos where you want to add a transition between them.
 secure download

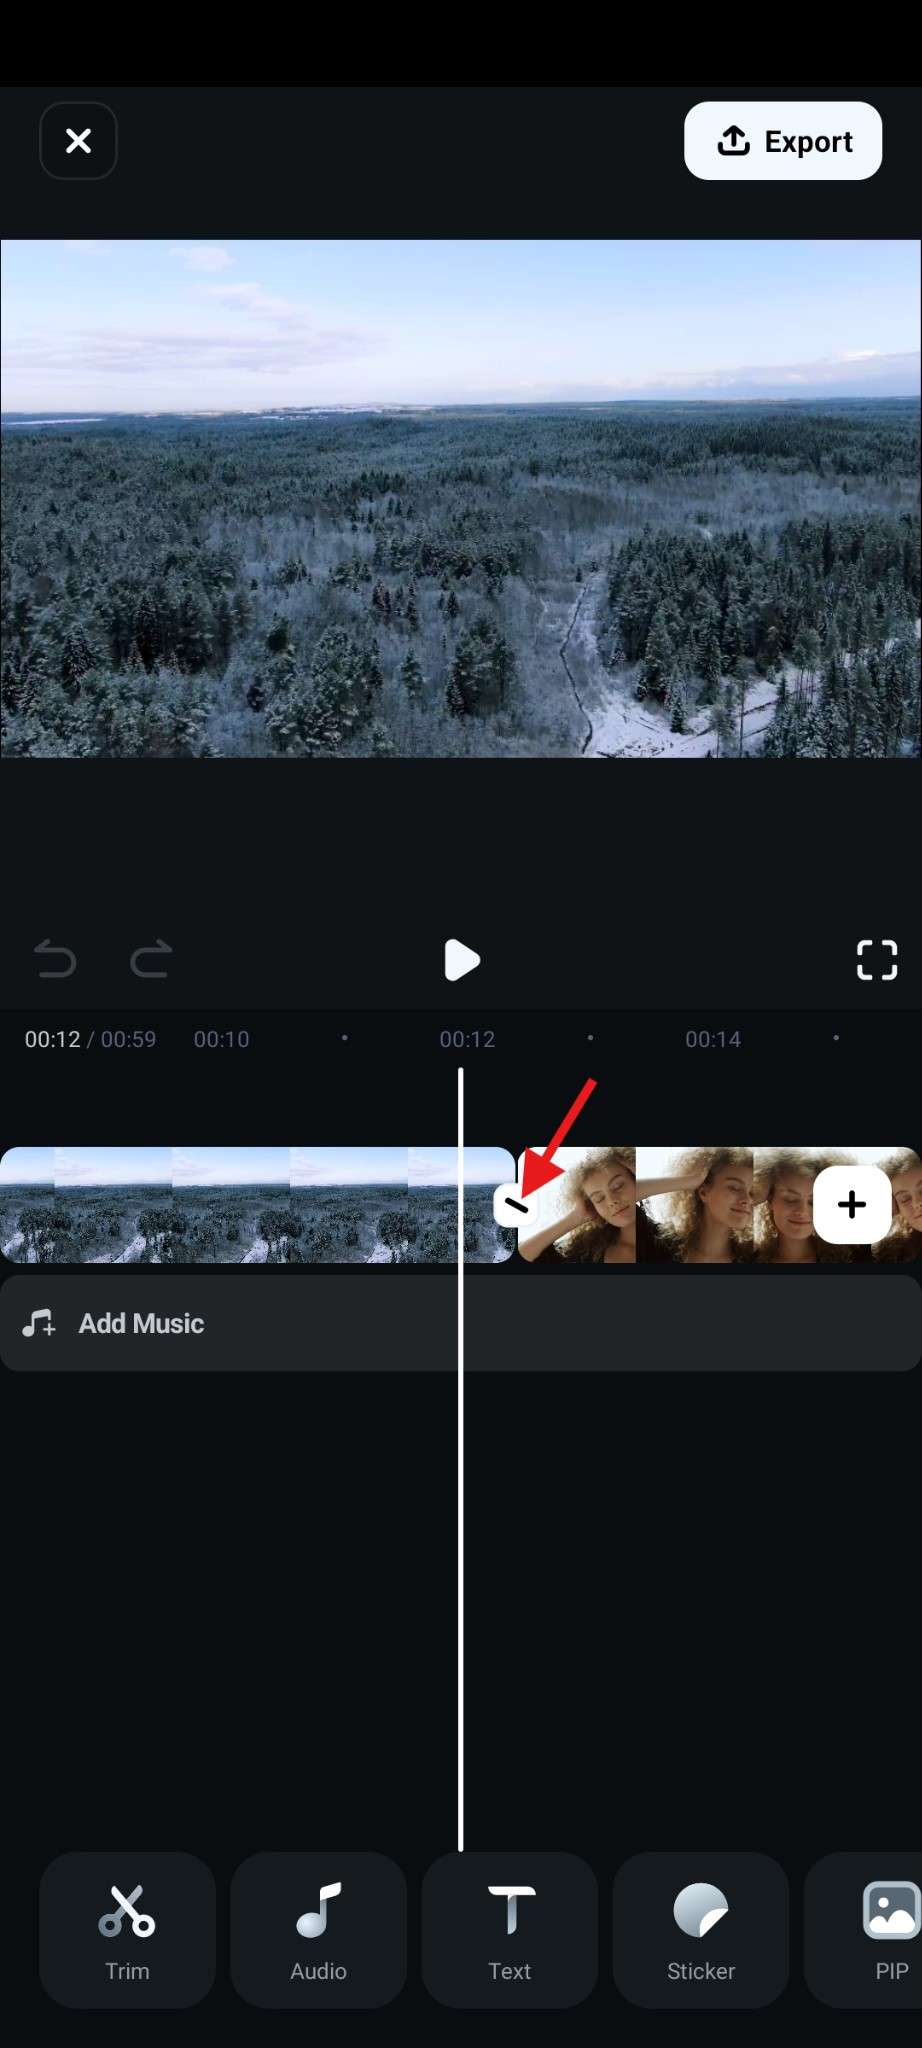
Step 2: Now that the videos are uploaded, find a place in the timeline where the first one ends and the second one begins. Between them, you will notice a line icon that actually opens up different transitions. Tap on that line.
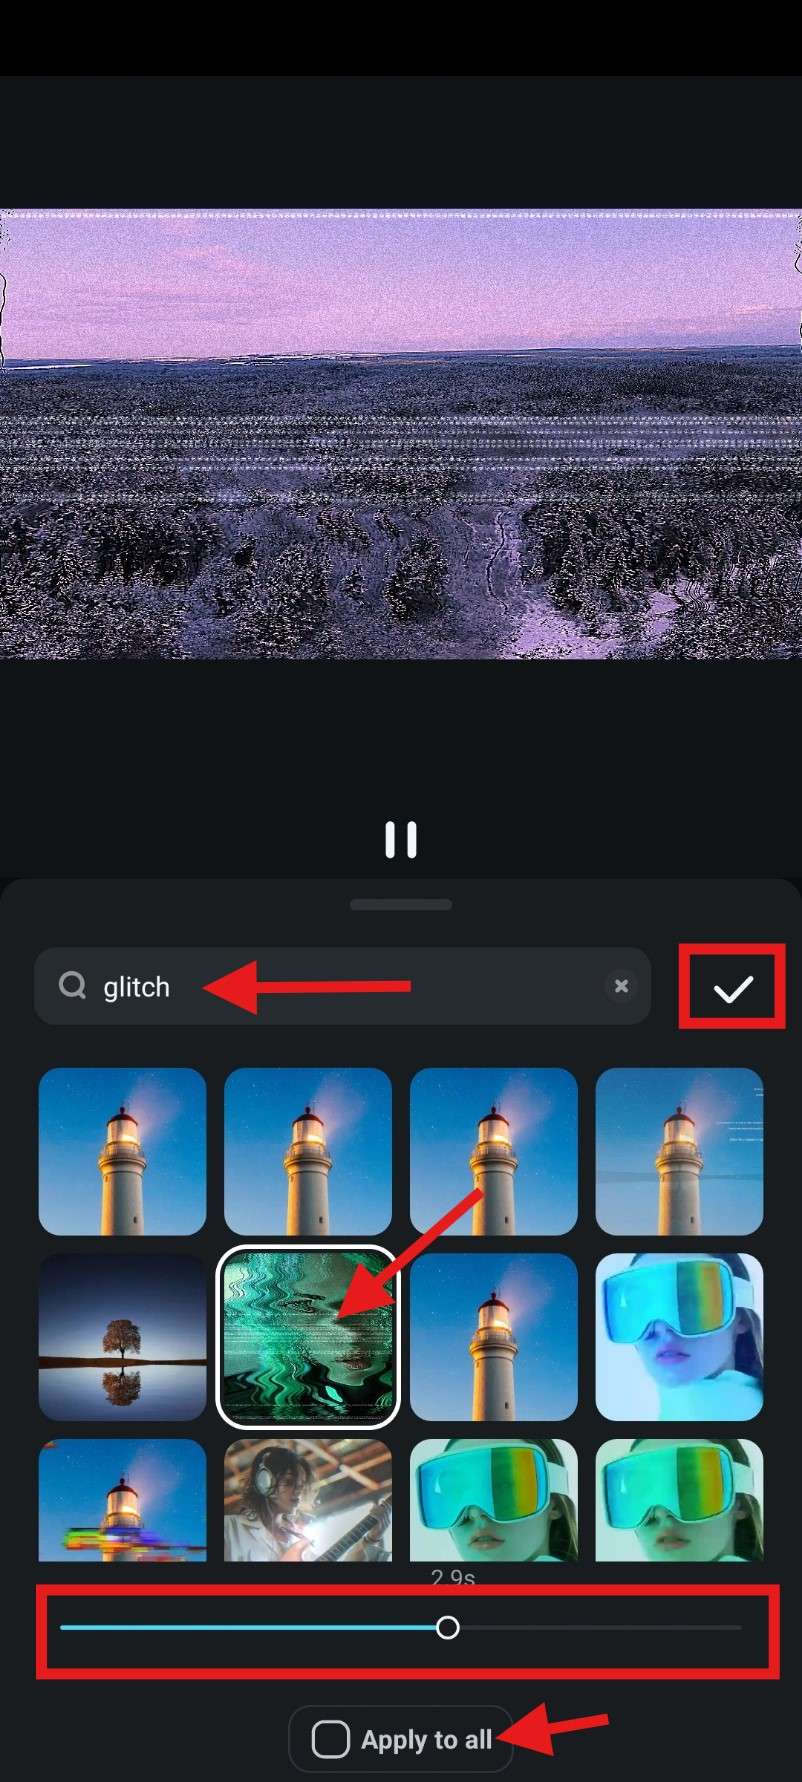
Step 3: Since there are so many options, use the search bar to narrow your search. Tap on an effect that you like, adjust the duration of the effect at the bottom, and tap the Tick to confirm the changes. If you added multiple clips and want to add the same transition effect to all of them, click on Apply to all.
How to Add Transitions on Filmora’s Desktop Version
The desktop version of Filmora packs a familiar interface akin to all other popular video editing tools, but the team at Wondershare (Filmora developers) tried to make everything more accessible to newcomers. They did a pretty good job, and that’s why Filmora is very popular among novice video editors who are looking to learn. On the other hand, more and more video editing pros are trying Filmora to explore useful AI features.
Let’s jump into the steps and see how you can add transitions using the desktop version of Filmora.
secure download
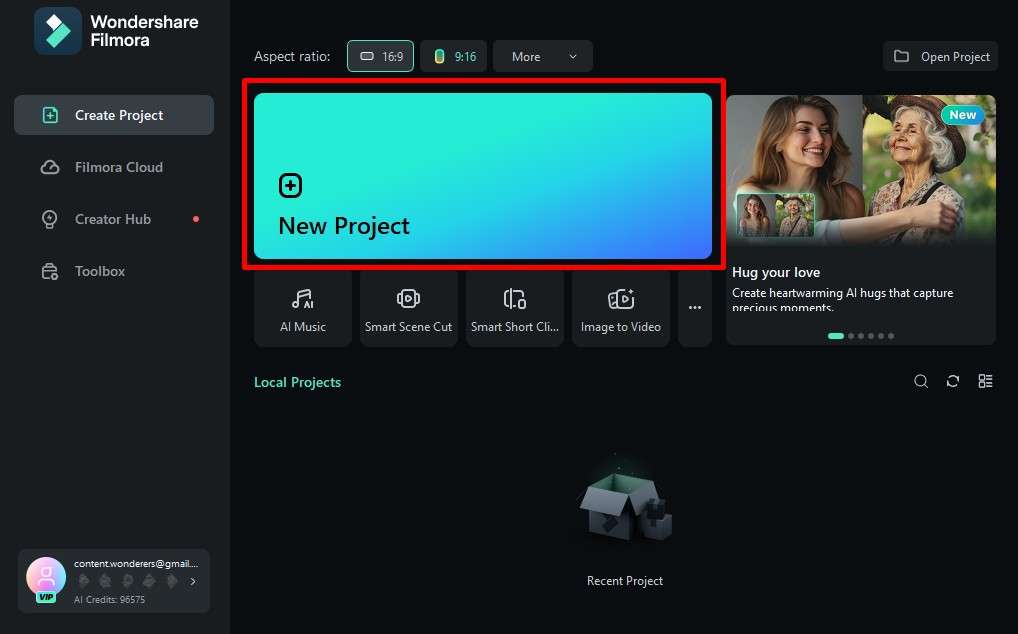
Step 1: Launch Filmora on your desktop or laptop device and click on the big blue/green New Project button.
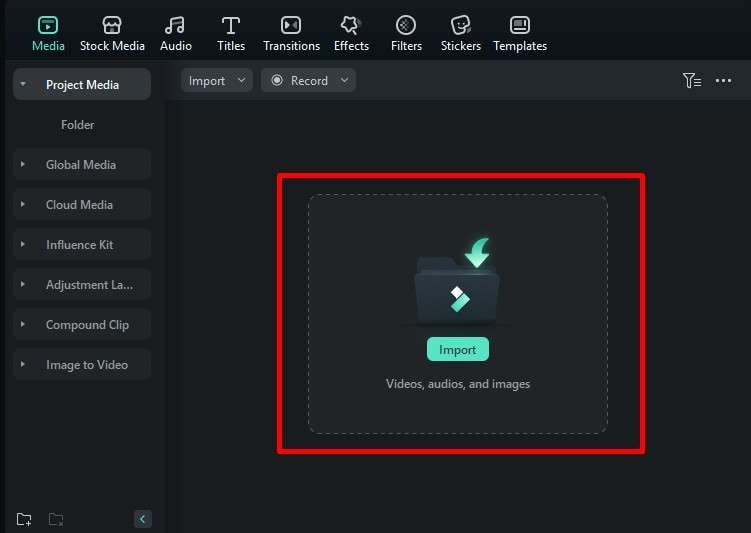
Step 2: When the new project opens up, click anywhere in the area highlighted in the screenshot below to Import videos to the project.
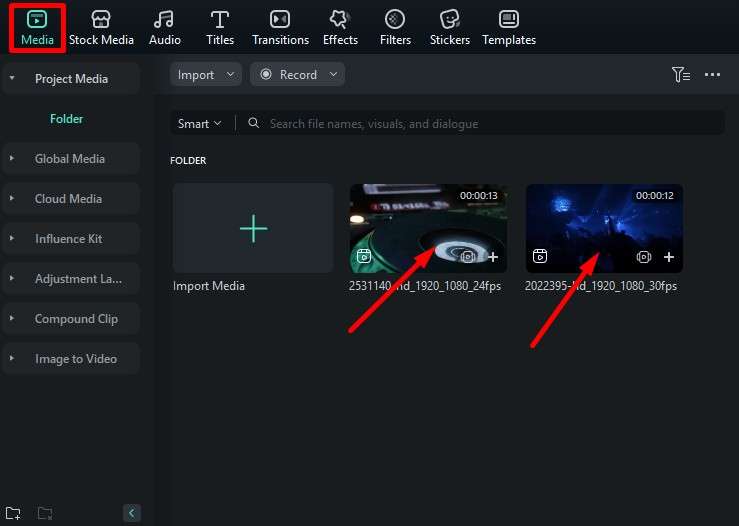
Step 3: You will notice that the two files are now in the Media tab.
Step 4: To add these videos to the project, you need to drag them to the timeline. Do this like in the screenshot below, and make sure that one video is placed after the other video in the same video channel.
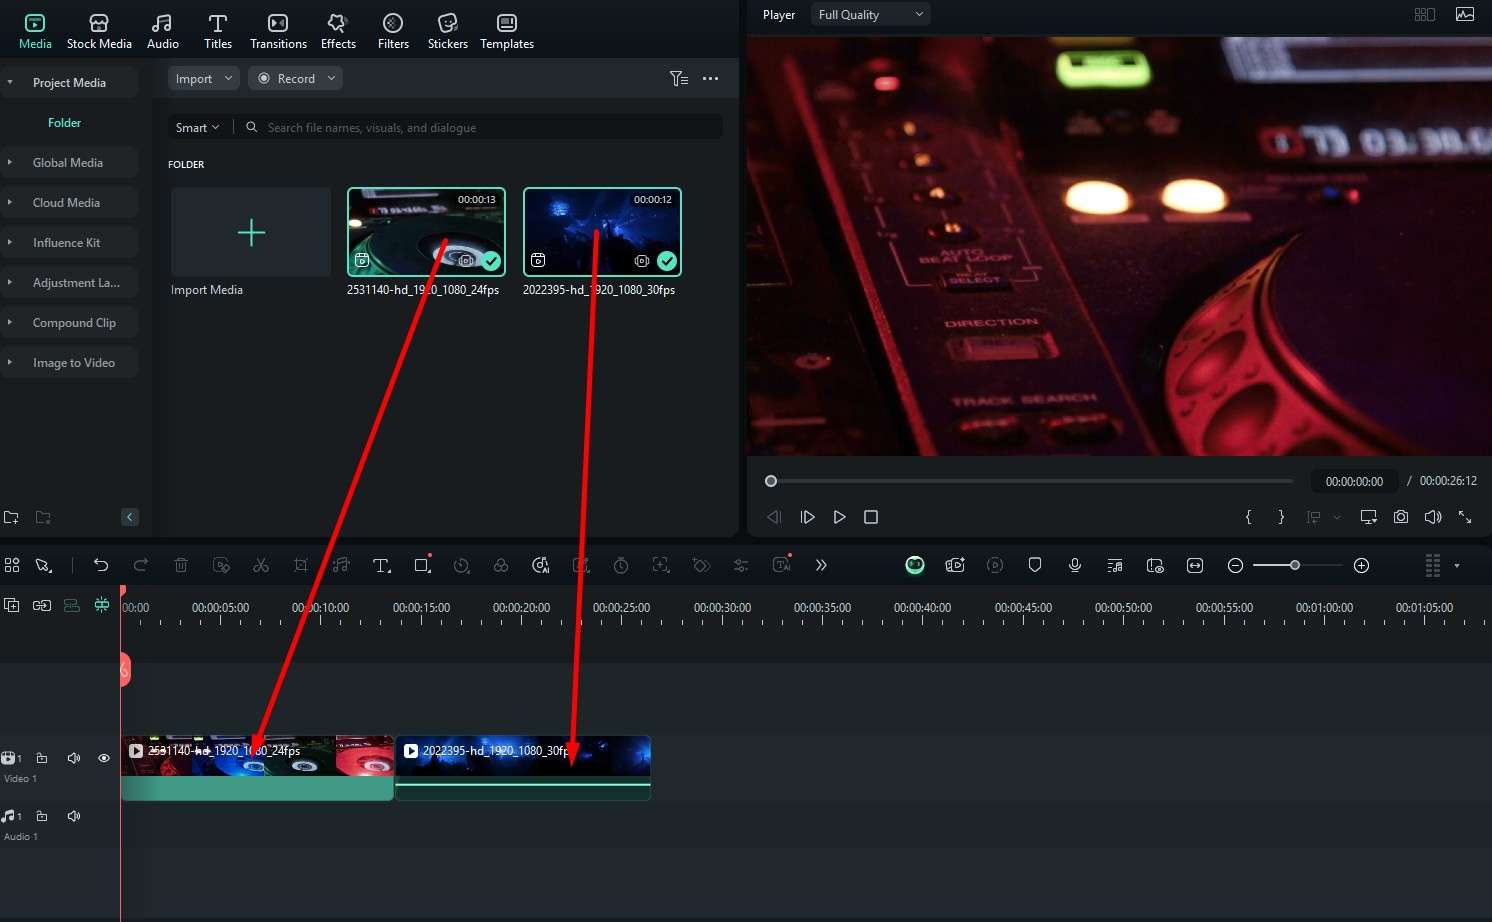
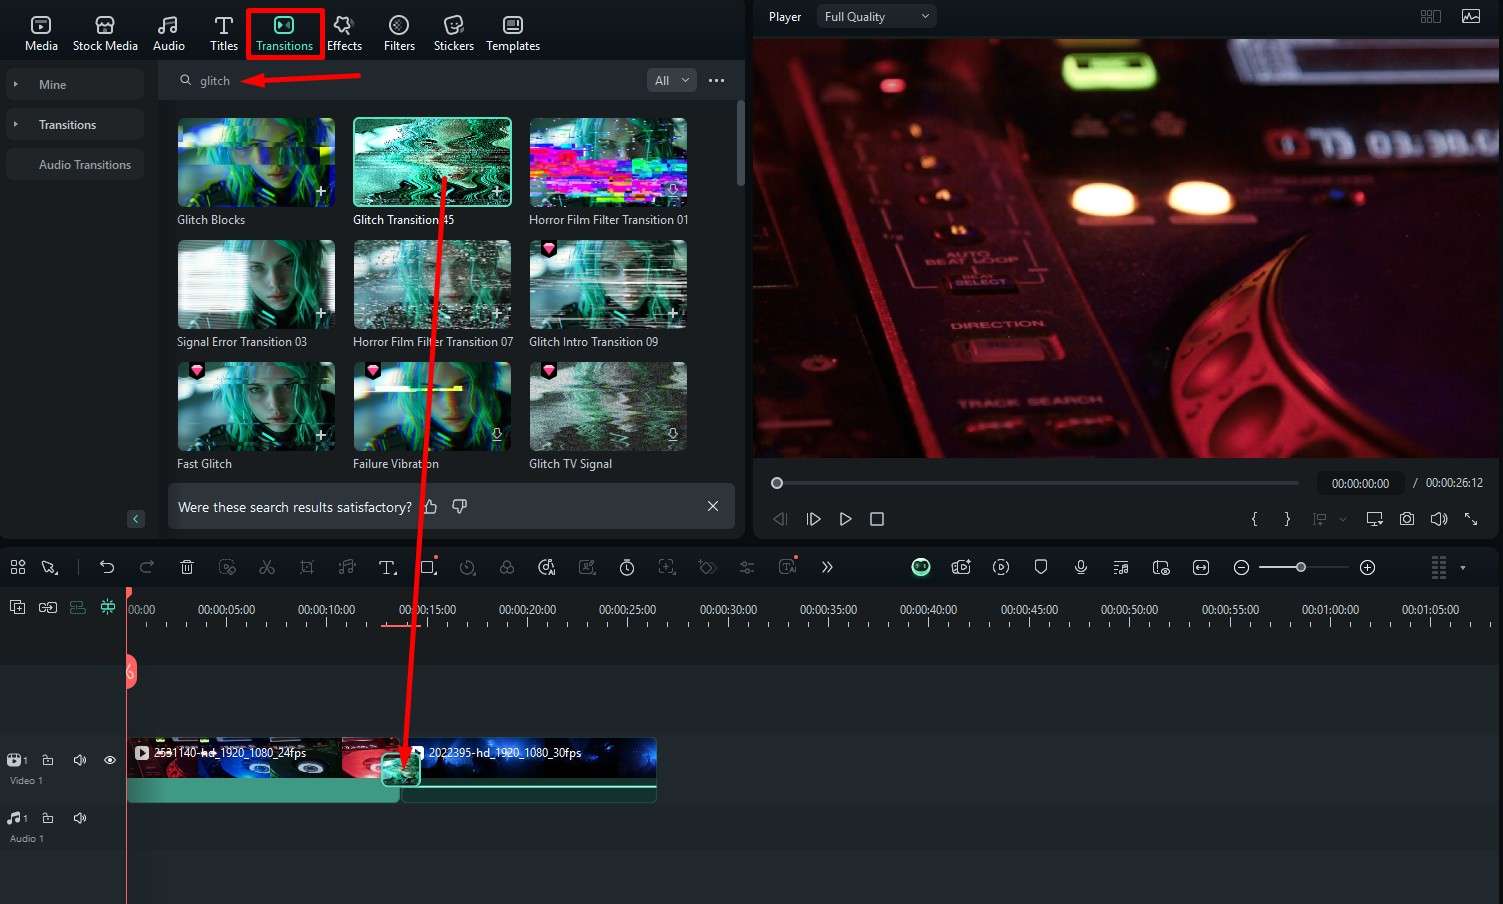
Step 5: Now that the two videos are in the timeline, if you want to add a transition effect, simply navigate to the Transitions tab and pick a transition effect that you like. There are hundreds of options, so be sure to use the search function to specify the type of transition you are looking for. For the purpose of this tutorial, we will search for a Glitch transition effect. When you find something that you like, drag it to the timeline between the two media clips.
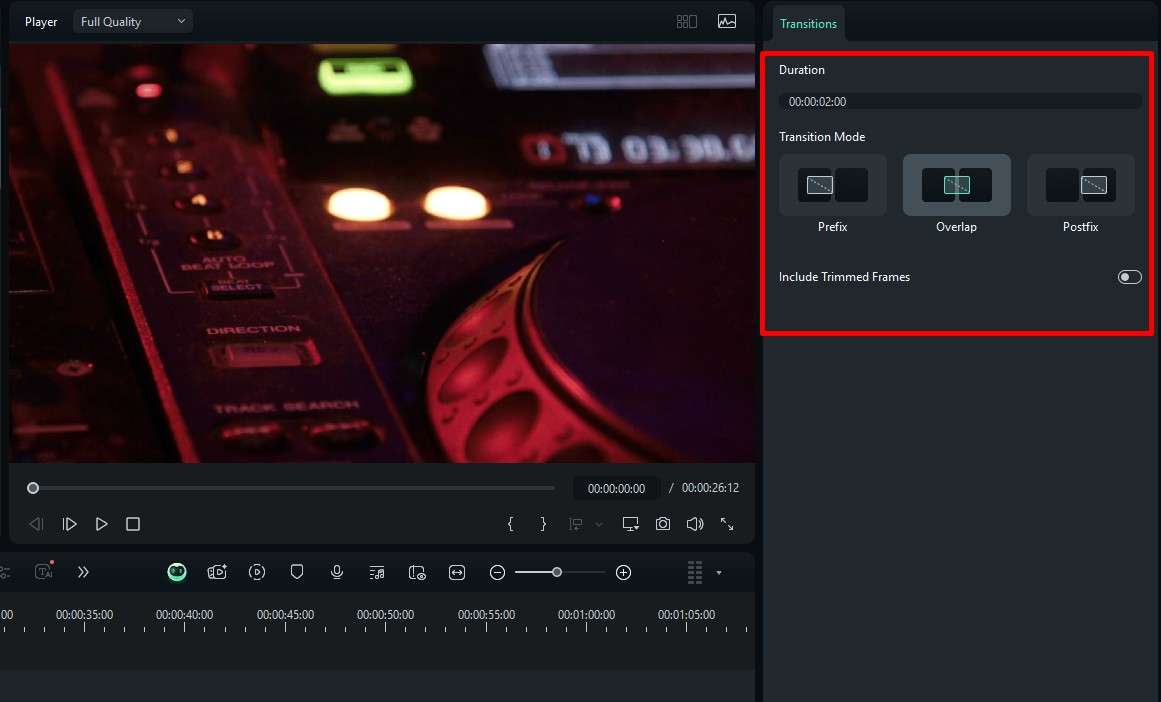
Step 6: Adjust the transition effect on the right.
At this point, you are done. As you can see from the tutorial above, adding transitions in Filmora is much more straightforward than Streamlabs, but they do serve different purposes. With Streamlabs, you need transitions that will work while you stream, whereas you can use Filmora to create promotional videos to support your stream.
If you are constantly traveling, you can try the mobile version to edit videos and add transitions on the go.
There are a lot more editing features to explore on both desktop and mobile devices, but you can do that on your own time as you continue to use Filmora to make magic. While on the subject of magic, let’s explore some AI features offered by Wondershare that make video editing a breeze.
More Tips: Use Filmora’s AI Features to Enhance Streaming Videos
Filmora has about 30 unique AI features. Some of them are only available on desktops, while some are only available on mobile. Let’s go over some of them.
AI Camera
This feature is specifically designed for mobile devices. With it, you open your camera, and you get several filters and effects that you can apply to your face before you start recording a video. Record several of those, add them to the project, and add cool transitions between them to make an exciting video.
AI Text to Video
This feature is available on all devices. It does what it promises to do. You input a script, and Filmora will generate a video by combining several stock footage videos. You can also pick an AI voice to read the script you created. Of course, all this will be opened in an editable project, and you can tweak the results to your liking.
AI Video Enhancer
This feature is very attractive even to professional video editors. You can use the AI Video Enhancer if you are working with a sub-par video file. You click one button, wait for a few minutes while the AI analyzes the video, and then you will get a video with a better resolution, better coolers, and improved frame rates.
There are many more AI features, such as AI Image to Video, AI Face Mosaic, Smart BGM Generation, and many more. Explore them as you uncover new features in Filmora.
Conclusion
If you are a streamer, you need to use an OBS tool like Streamlabs. If you want to add transitions in Streamlabs that will appear while you are switching scenes during your stream, you know how to do it. However, if you want to use a video editing tool to prepare promotional videos for different social media channels, Filmora is an excellent choice. Use it to make cool videos for YouTube or excellent reels for Instagram.
