

 TL;DR:
Starting with Premiere Pro v25.0, Adobe officially removed the Essential Graphics panel and replaced it with a split workflow using the contextual Properties panel for editing and the Graphics Templates panel for browsing assets.
● Navigating the new setup requires importing MOGRTs through the Graphics Templates panel and customizing them in the Properties panel, which supports simultaneous multi-clip adjustments but forces users to switch between two separate windows.
● Restoring the legacy unified workspace requires using the Creative Cloud app to roll back to a pre-v25.0 version of Premiere Pro, which inherently restricts access to any newer software updates and features.
● Filmora 2026 serves as an all-in-one alternative suited for creators prioritizing workflow efficiency, lower costs, and built-in AI templates, whereas the Premiere Pro workflow is recommended exclusively for users requiring precise control and highly complex professional outputs.
Ask AI for a summary
 ChatGPT
 Perplexity
 Gemini
 Claude
 Grok
Grok
The Essential Graphics panel in Premiere Pro is the core workspace for creating professional motion graphics and titles. If you are using the 2026 update, you might find that essential graphics for Premiere Pro have moved to new locations like the Properties panel.
This is because starting with version 25.0, Adobe officially removed the Essential Graphics panel in Premiere Pro. And in its place, you'll now find the Properties and Graphics Templates panels instead, which are designed to handle the same functions.
Now, the next question is, how do you work with these new panels? We have prepared a comprehensive guide on the update, which will help you manage your graphics moving forward.
As of 2026, Adobe has replaced the Essential Graphics panel in Premiere Pro with a more contextual workflow using the Properties and Graphics Templates panels to streamline motion graphics creation.
Key Takeaways:
- Adobe removed the Essential Graphics panel starting with Premiere Pro v25.0.
- The new workflow uses the Properties panel for editing and the Graphics Templates panel for assets.
- Users can still access the old workflow by rolling back to earlier versions via Creative Cloud.
- Filmora 2026 offers a simpler all-in-one alternative for graphics and AI-powered templates.
Part 1. What is the Essential Graphics Panel in Premiere Pro Used for?
What is the Essential Graphics Panel? The Essential Graphics panel in Premiere Pro was the dedicated workspace for creating, editing, and managing titles and motion graphics templates (MOGRTs). In the latest 2026 updates, its functions are now split between the Properties panel (for editing) and the Graphics Templates panel (for browsing).
Premiere Pro is a professional video editing software made up of multiple panels, each designed for a specific purpose. Adobe Premiere Essential Graphics panel was built specifically for designing and editing motion graphics directly inside Premiere Pro, so you don't always have to switch to After Effects for these kinds of tasks.
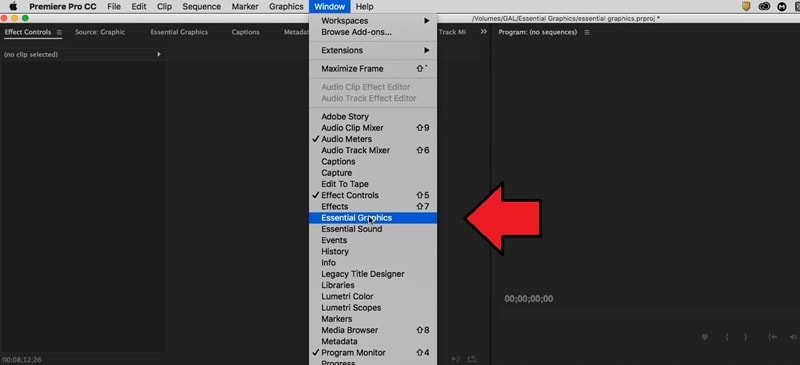
You could access it by going to Window > Essential Graphics. Once opened, the panel offered two main tabs: Browse and Edit. Under the Browse tab, you can find ready-made options such as:
- Captions and Subtitles
- Credits
- Custom Templates
- Graphic Overlays
- Lower Thirds
- Slates
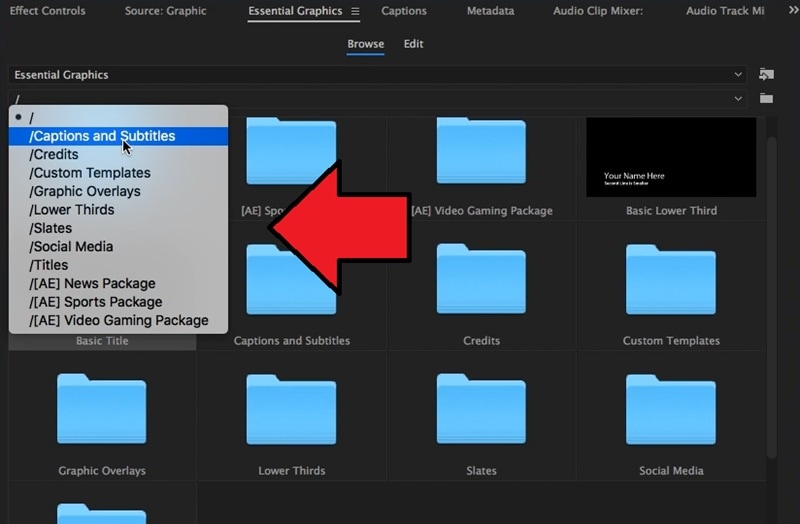
These presets were what you could add directly to your timeline. Once placed, you could then switch to the Edit tab to refine the details.
Part 2. What Changed in the Latest Version of Premiere Pro (V25.0)
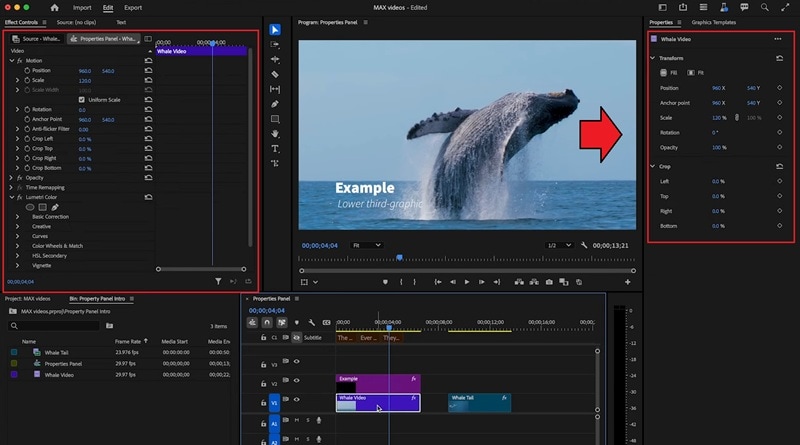
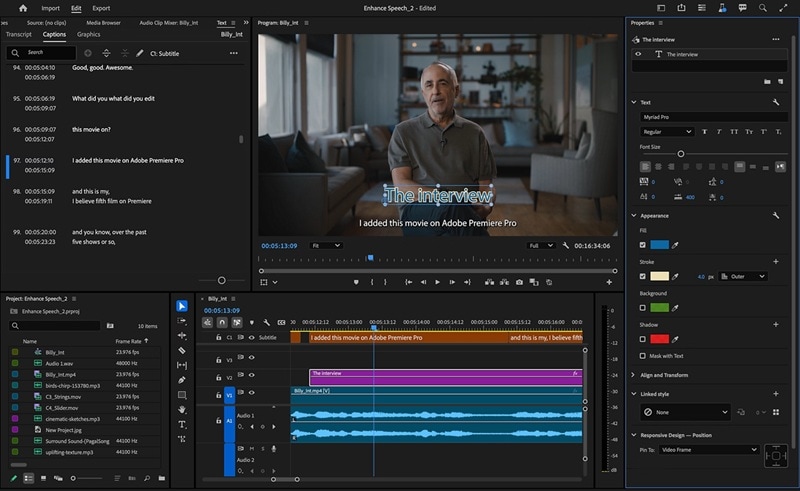
A significant change in Premiere Pro version 25.0 is the removal of the Essential Graphics panel and the introduction of two new panels: the Properties panel and the Graphics Templates panel. The aim of this change is to make the workflow more focused.
The Properties panel adapts to the selected clip, showing relevant tools and parameters, while the Graphics Templates panel serves as your library for motion graphics templates (MOGRTs), titles, overlays, and Adobe Stock assets.
Premiere Pro Old vs New Graphics Workflow: What's the Difference?
Here's a concise comparison of the old Essential Graphics panel versus the new setup:
| Aspect | Old Essential Graphics Panel | New Panels (V25.0) | Key Difference |
| Access | Window > Essential Graphics | Properties Panel & Graphics Templates Panel | Tasks are split: browsing/importing (Graphics Templates) vs editing/customizing (Properties) |
| Tabs / Layout | Browse & Edit tabs | Two separate panels | Each panel focuses on one function, reducing menu hunting |
| Editing Graphics | Edit text, motion graphics, lower thirds, templates directly in panel | Properties Panel handles adjustments: position, scale, rotation, opacity, keyframes, text/audio tweaks | Context-aware editing; adapts based on selected clip(s), supports multi-clip adjustments |
| Browsing Templates | Browse tab: captions, credits, overlays, lower thirds, custom templates | Graphics Templates Panel: search, preview, import MOGRTs or Adobe Stock | Easier to find templates; drag-and-drop directly to timeline |
| Workflow | All tasks in one panel | Split between two panels | More organized, focused workflow; requires short adaptation period |
Tip: Selecting multiple clips in the timeline lets you adjust them simultaneously in the Properties panel, speeding up your editing process.
"The shift toward context-aware panels in video editing software mimics modern UI trends, prioritizing tool accessibility over traditional tabbed layouts." - Industry Insights 2026
Pros & Cons of the New Setup
- Making changes to several clips at once in the Property panel is possible by selecting them.
- The Property panel adapts to whatever you select, so you can quickly adjust it without hunting through different menus.
- It gives you direct access to other essential tools, which make the editing process faster and more organized.
- Not everyone is comfortable with the new layout yet; it takes some time to adjust.
- You now need to switch between the Properties and Graphics Templates panels instead of having everything in a single place.
Answer: How to find Essential Graphics tools in Premiere Pro 2026
- Go to the Window menu.
- Select Properties to open the context-aware editing panel.
- Select Graphics Templates to browse your MOGRTs and stock assets.
Part 3. Easy Alternative to Premiere Pro with Built-in Graphics & Templates
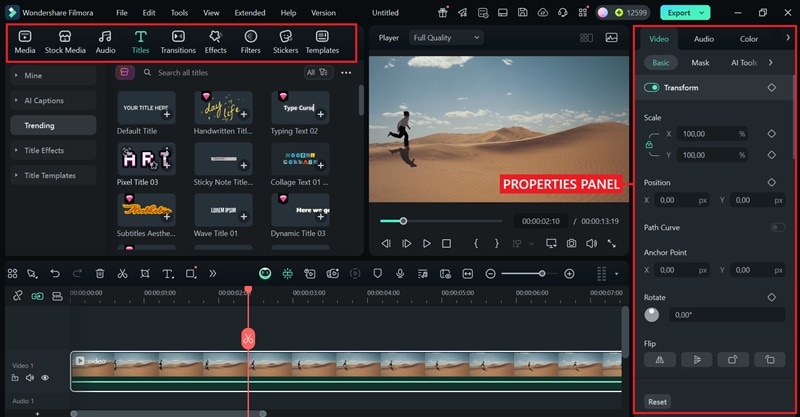
If switching between the Properties and Graphics Templates panels in Premiere Pro feels cumbersome, Wondershare Filmora offers a more streamlined alternative.
Instead of jumping back and forth between multiple panels, Filmora provides a single, intuitive workspace where everything—from text and graphics to animations and templates—is easily accessible. This makes it ideal for creators who want professional-looking videos without spending extra time navigating complex menus.
Filmora vs. Premiere Pro: Graphics & Template Workflow
| Feature | Filmora | Premiere Pro |
| Text Editing | One-click animated titles, 3D fonts, hundreds of stylish presets with instant preview | Professional-grade tools but require manual setup and more steps for customization |
| Captioning | Auto-Caption instantly generates and syncs subtitles with audio; supports multi-language transcription; manual fine-tuning available | Captions require manual setup; auto-captioning possible but involves extra steps or plugins |
| Graphics | Built-in animated shapes, emojis, stickers, lower thirds, overlays; drag-and-drop ready; no external installs | Relies on imported MOGRTs or Adobe Stock assets; setup takes longer |
| Templates & Stock Media | Access AI-powered templates for intros, slideshows, social posts; built-in stock library (videos, images, music, sound effects) included | Adobe Stock available, but requires separate subscription and integration |
| Animation & Keyframes | Beginner-friendly keyframing with intuitive controls; easily add smooth motion effects, transitions, or text animations | Advanced and precise keyframing, but with a steep learning curve |
| AI Features | Exclusive creative AI tools: AI Text-to-Video, AI Image-to-Video, AI Stickers, AI Sound Effects, plus AI Smart Cutout | No built-in AI video or image generation; relies on manual effects or third-party plugins |
| Ease of Use | All-in-one panel for text, graphics, and effects; drag-and-drop workflow; designed for beginners, educators, and casual creators | Split into Properties Panel (editing) + Graphics Templates Panel (browsing); higher learning curve |
| Pricing | Affordable with one-time purchase option or flexible subscription; free trial available | Only available via Creative Cloud subscription, higher long-term cost |
Explore Filmora's Ready-to-Use Templates & Assets
Beyond the streamlined workflow, Filmora also gives you instant access to a wide range of AI-powered templates, animated titles, stickers, and stock assets. These built-in resources make it easy to style your videos in seconds—no need for external downloads or complex setup like in Premiere Pro.


Our Recommendation
Being presented with two video editing options, you can decide which one suits you best, depending on the workflow you prefer when working with graphics in your videos.
- If you prioritize efficiency, AI intelligence, and low cost, Filmora is the best choice.
- If you seek precise control, high-complexity templates, and professional-grade output, Premiere Pro is more suitable.
Part 4. Optional: Bringing Back Essential Graphics / Workspace Tips
An Adobe Community user has requested Adobe to reinstate the Essential Graphics panel, but it looks like it won't be coming back anytime soon. If you wish to still use the Essential Graphics in Adobe Premiere Pro or if you want to get comfortable with the new setup quickly, there are a few workarounds you can try.
1. Use the Older Version of Premiere Pro
Since the Essential Graphics panel has been replaced starting from Premiere Pro V25.0, the simplest option to work with the old workflow is to roll back to an earlier version where the panel is still available.

You can do this directly from the Creative Cloud app:
- Open the Creative Cloud Desktop app and go to All Apps.
- Find Premiere Pro in your installed apps list.
- Click on the three dots next to the Open button.
- From the dropdown, select Other Versions.
In the pop-up window, choose the version you want to install. Once you've installed it, you can continue using the old workflow you're familiar with, though you won't have access to the latest features introduced in v25.0 and beyond.
Tip: You can also contact Adobe customer support to ask for the older version.
2. Customize the Workspaces
If rolling back to an older version isn't an option for you, the next best approach is to customize your workspace and make it your own.
Thankfully, Premiere Pro is quite flexible when it comes to workspaces. You can rearrange, dock, or undock panels to create a setup that at least helps you navigate through the tools more easily.
What you can do is open the panel you want. Then, drag and drop it into a spot where it's most convenient for you.
This guide was compiled by video editing experts who have tested Premiere Pro v25.0+ and Filmora 2026 workflows to ensure technical accuracy.
Summary: Adapting to Essential Graphics Premiere Pro Updates
In 2026, the Premiere Pro Essential Graphics panel remains accessible via legacy versions, but the future lies in the unified Properties panel. For creators seeking simplicity, Filmora remains the top alternative.
Frequently Asked Questions about Premiere Pro Essential Graphics
-
Why is the Essential Graphics panel not showing in Premiere Pro?
If you can't find the panel, go to the top menu and select Window > Essential Graphics. If it’s still missing, you might be using an older version of Premiere Pro; this panel was introduced in version 11.1 (2017). Ensure your workspace is set to "Graphics" to see the full suite of titling and design tools. -
How do I import and use MOGRT files in the Essential Graphics panel?
To import a Motion Graphics template (.mogrt), open the Essential Graphics panel, click the "+" icon at the bottom right, and select your file. Once imported, you can simply drag and drop the template from the Browse tab onto your timeline to start customizing text, colors, and animations. -
Why can't I edit some Motion Graphics templates in Premiere Pro?
Some advanced MOGRTs are created in After Effects and require it to be installed on your computer to function, even if you don't open it. If a template is "locked" or greyed out, it may be due to missing fonts or a version mismatch between Premiere Pro and the original After Effects project. -
Can I create my own custom titles within the Essential Graphics panel?
Yes, you can use the Type tool or Shape tools directly in the Program Monitor. These layers will automatically appear in the Essential Graphics panel under the "Edit" tab, where you can adjust responsive design, pin layers to one another, and save them as reusable templates for future projects. -
Is there an easier alternative to Premiere's Essential Graphics for beginners?
While Premiere Pro offers deep customization, Filmora provides a much more streamlined experience for titles and motion graphics. Filmora includes thousands of pre-made, drag-and-drop animated titles and lower thirds that don't require external software like After Effects to run smoothly.
