Music is one of the most viewed video categories on YouTube, as millions of people worldwide use this platform to find or discover music they like. Making music videos that really stand out in the sea of similar content is far from easy, but if you are not a professional filmmaker, and you would just like to make a video quickly you can try creating music videos you share on social networks with a music visualizer. Most of the music visualizers you can find online enable you to select an audio spectrum template, pick the style of the visualization or even add logos or links to your social media accounts.
So, in this article we are going to take you through the five best music visualizers you can use to create music videos that are going to get a lot of likes and shares on social media in 2025. You will learn:
In this article
What Is Music Visualization?
The conversion of sounds into imagery is often referred to as music visualization, and since the mid-1970 a number of different electronic and media player software visualizers have been used to generate animated images from a musical composition.
How Does Music Visualization Work?
Music visualization techniques range from very simple to highly complex. The simplest visualizations, such as oscilloscope-like displays, show the waveform of the audio signal in real time. More advanced visualizations analyze the song's frequency spectrum and loudness to generate dynamic, colorful effects that move with the music.
Many popular media players, like Winamp or VLC, include built-in visualization features that rely on this real-time analysis of sound data. This real-time responsiveness is exactly why music visualization software is widely used by VJ (video jockey) artists to create live, reactive visuals for performances.
In recent years, music visualization has become increasingly accessible. By 2019, it was already possible to visualize your favorite songs directly online without needing to install additional software, making this creative experience available to a much wider audience.
Best Music Visualizers in 2025
If you already have the music you would like to visualize, then it is time for you to start browsing through some of the best music visualizers that are currently available on the markets. Nearly all of the music visualizers we featured in this article offer free trial versions that have a limited scope of visualization and exporting options, but enable you to see if the music visualizer meets all of your demands. Let's have a look at the five best music visualizers of 2025.
| Best 5 Music Visualizers | Pricing | Compatiblity | Features |
|---|---|---|---|
| Renderforest Music Visualizer | $9.99 per month | Online | Visualization templates |
| Videobolt Music Visualizer | $7.99 per month | Online | Template customization |
| Magic Music Visuals | $44,95 for a full version license | Windows/macOS | Generate 2D and 3D graphics |
| VSDC Free Video Editor | Free | Windows | Audio Spectrum Visualizer |
| After Effects | $20,99 per month | Windows/macOS | Audio Spectrum Effect |
| Media | Free | Online | Audio Spectrum Visualizer |
1. Renderforest Music Visualizer
Renderforest is a platform that helps its users create visual content online, or even design an entire website. However, in order to start visualizing your music with Renderforest, you must first register and create your own account. Afterward, you just have to choose between visualization templates with text or photo holders, add the artist's name and the title of the song and add the background photo or video. You can then proceed to pick the style of the visualization that matches the music perfectly, select its color and finally upload a song you would like to use in your video. When done, you should simply click on the Preview icon and the Renderforest will send you the email that contains the music visualization video. Keep in mind that all videos created with the free version of the platform are going to be watermarked and that their duration can't exceed a one-minute limit.
Price: Free version available, subscription plans start at $9.99
Compatibility: Online
2. Videobolt Music Visualizer
The collection of music visualization templates this website offers is truly impressive, as you can choose from a wide variety of templates during the process of creating a video. However, you must purchase one of the available subscription plans in order to be able to customize the template you've selected and export a watermark-free video. After you've selected a music visualization template you just have to click on the Edit button below it to start working on your project. You can either upload a song from your computer or use SoundCloud to import a song you would like to visualize into the project. Adding cover art or using a variation of the template you originally selected can improve the quality of your video. The only downside is that you won't be able to customize videos produced by Videobolt Music Visualizer during the free trial period.
Price: Free trial available, Subscription plans start from $7.99 per month
Compatibility: Online
3. Magic Music Visuals
VJs and all other artists who like to mix sound and images during live sessions can use the Performer edition of this cross-platform music visualization software. The Studio edition offers all features that are necessary for the creation of real-time music visualizations or music videos. You can use both editions of Magic to generate 2D and 3D graphics that react to the music or mix together photos, 3D files or videos. Moreover, you can easily enter the full-screen mode and project your videos using LED displays or projectors. The Magic Music Visuals also enables its users to combine an unlimited number of audio inputs simultaneously, which means that you can mix two or more songs effortlessly. This music visualization software lets you export videos in mp4 and mov files, but the length of the rendering process depends on how long the video is and on the processing power of the computer you're using.
Price: Free demo available, $44,95 for a full version license
Compatibility: macOS, Windows
4. VSDC Video Editor Free - Audio Spectrum Visualizer
Visualizing music is just one out of countless video editing options VDSC Video Editor Free offers. Besides the creation of videos based on music, you can also use this video editing software product to stabilize videos recorded with action cameras, enhance the colors in the footage captured with a wide array of cameras and drones, create 3D charts or export videos in high resolution to your accounts on social media directly from the software. The editor's audio visualizer contains five hundred presets you can use to create a captivating music video for your latest song. Besides the Spectrum feature that displays the sounds within a set color range, the VDSC Video Editor also offers the Audio Abstraction option that generates colorful abstract shapes based on the music you select. Even though visualizing sound with VDSC's audio visualizer is a fun and simple process, video creators with no previous video editing experience may need a little time to get used to the software's interface.
Price: Free
Compatibility: Windows
5. After Effects - The Audio Spectrum Effect
There isn't virtually anything related to digital visual effects, motion graphics or compositing you can't do in Adobe After Effects. That is why it is hardly surprising that you can also use the After Effects to visualize the music, but you must have at least basic knowledge of the software in order to be able to that. Before you can apply the Audio Spectrum effect you must first create a new composition, add the sound file to that composition and set its duration. If these tasks sound too complicated, you should take your time and slowly learn how to use the basic functionalities of Adobe After Effects. More experienced video editors can use The Audio Spectrum effect's settings to try out different styles of music visualization and explore creative ways of making their videos more dynamic.
Price: $20,99 per month as a single app or $52,99 as a part of the All Apps subscription model
Compatibility: macOS, Windows
The All-in-One Solution: Finding Your Sound and Visualizing It in Filmora
While the tools above are excellent for specific visualization tasks, they all assume you already have the perfect audio track ready to go. What if your creative process could be more integrated? What if you could find inspiration, select a track, and create a stunning video all in one place?
This is where Wondershare Filmora stands out as a complete creation suite. It not only offers powerful and intuitive ways to create music videos but also solves the first big challenge: finding the right sound. Filmora includes a massive, built-in library of royalty-free music, allowing you to discover the perfect track without ever leaving the editor.
To get your creative juices flowing, here’s a small sample of the diverse genres and moods you can find inside Filmora:


Once you've found the perfect track (or imported your own), Filmora offers two powerful ways to create stunning music videos, whether you want to build a narrative or a classic audio-reactive visual.
Method 1: Create a Complete Narrative Video with AI Text to VideoAI Text-to-Video
For creators who want to go beyond reactive visuals and build a story around their music, Filmora's latest AI feature is a game-changer. It can generate an entire video from a simple text description, idea, or even your song's lyrics.
- Smart Script & Storyboarding: AI crafts a rich, immersive narrative from your keywords, complete with structured storytelling and engaging plotlines. You can edit every detail before generation.
- True AI-Generated Footage: It generates original video clips from the script, ensuring your music video is truly unique and not just a collection of stock media.
- Production Control: Set aspect ratios, video styles (realistic, anime, cyberpunk, etc.), and generate auto-captions to match your vision.
- AI Voiceover & Lip Sync: While not always needed for music videos, you can add narrative voiceovers with natural-sounding AI voices.
This is the perfect tool for creating a lyric video with dynamic scenes, visualizing the story your song tells, or producing a promotional video in minutes.
Method 2: Create a Classic Audio Spectrum Visualizer Video [Step by Step]
For a more traditional audio-reactive look, you can easily create and customize an audio spectrum video using online tools and then perfect it in Filmora. One of the best software we recommend for the final edit is Filmora video editor because you can keyframe audio, use the built-in equalizer, and easily composite visual elements with one click.
This section will give a guide on how to use an online visualizer and then bring it into Filmora. First, we need to generate a music spectrum video. A great online tool for this is Musicvid.org.
Step1Import audio to Musicvid.org to Get Visualizer Video
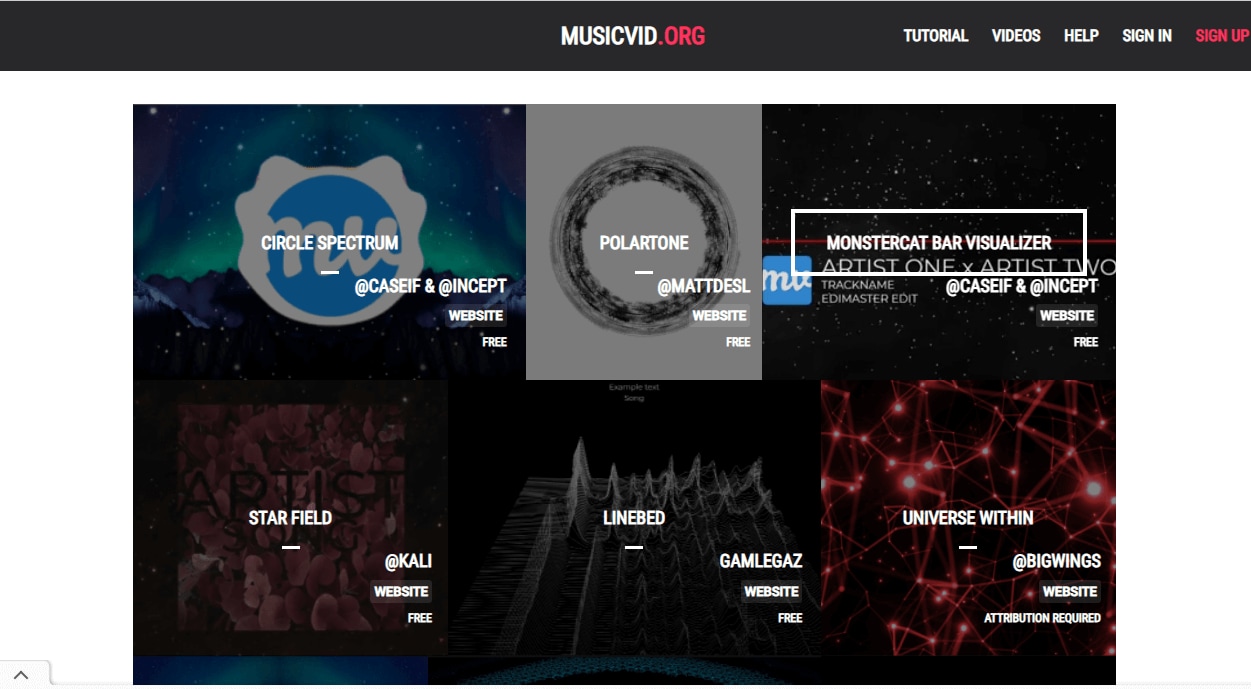
Go to the website musicvid.org, and then you will find there are 3 popular music visualizer templates, circle spectrum, Polartone, and Monstercat Bar Visualizer. Here let's take the last one for example, and then import audio from your computer.
Step2Editing the spectrum and exporting
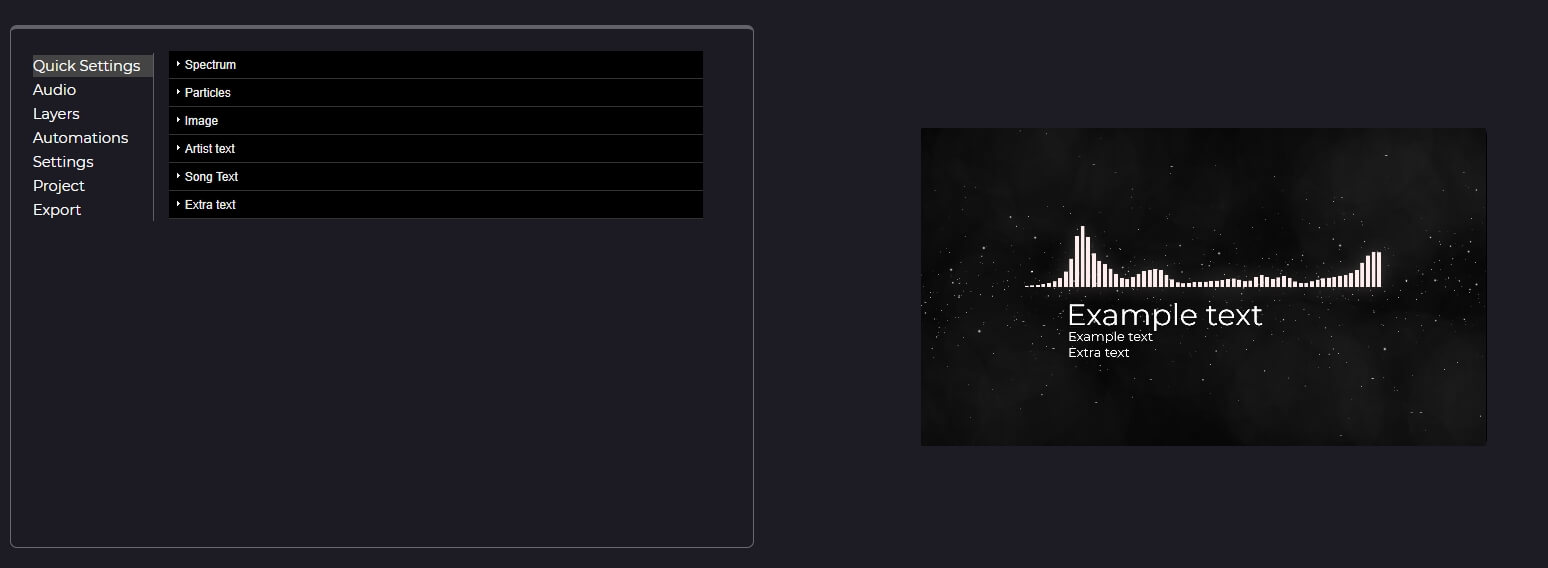
Musicvid provides several options to customize the spectrum effect. You can edit the spectrum, particle, image, song text, artist text, and extra text to your desire and make it look cool.
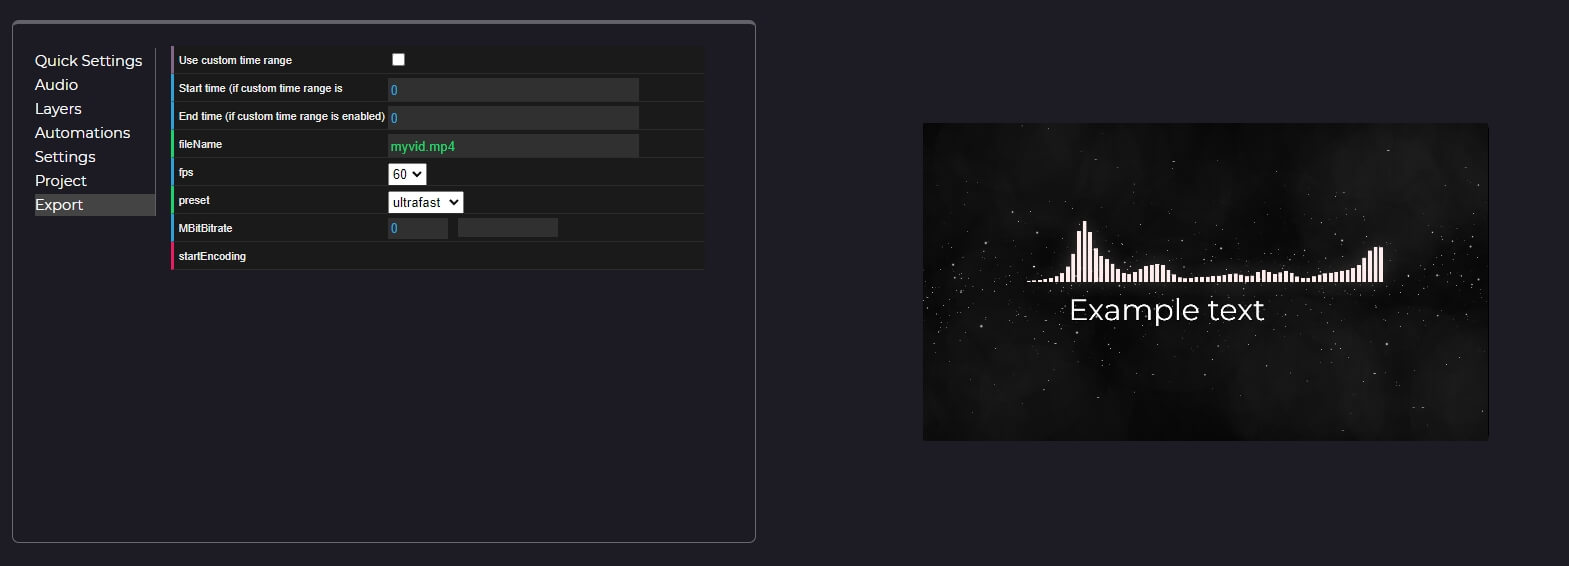
After editing, go to Export and click on startEncoding option to export the audio to your media library. From the library, you can import to Filmora video editor.
Step3Import Video to Filmora video editor
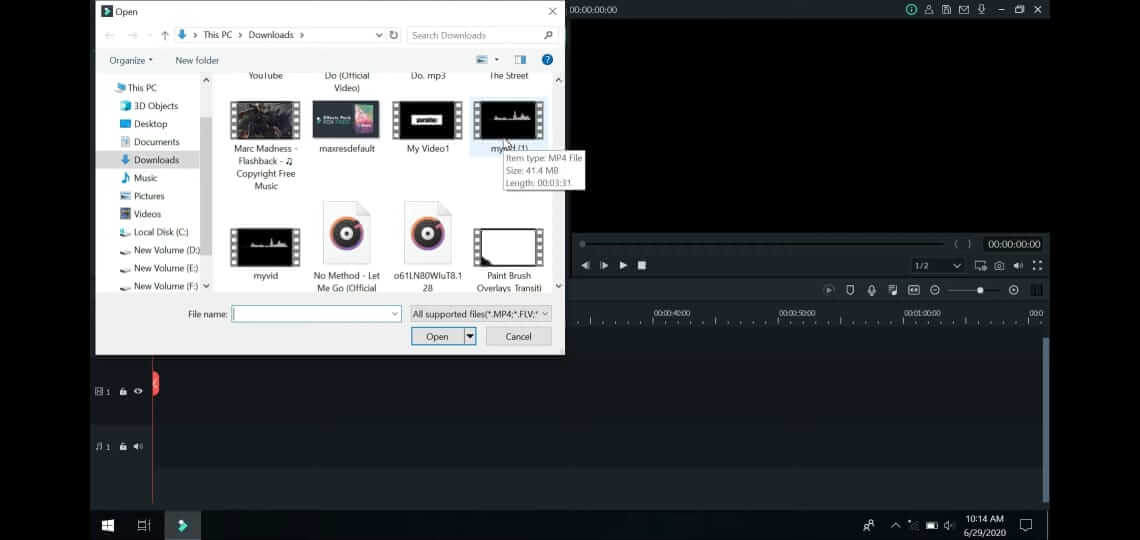
Launch Filmora video editor and then go to a new project. Import the spectrum visualizer video made with musicvid.org to the Filmora timeline.
Step4Adding Images to music visualizer file
You can add a new picture or video as the music background cover to Filmora, and then composite the pictures and the visualizer video. Double-click on the picture, go to Compositing and click on the Screen. You can click the Render Preview button to improve playback speed.
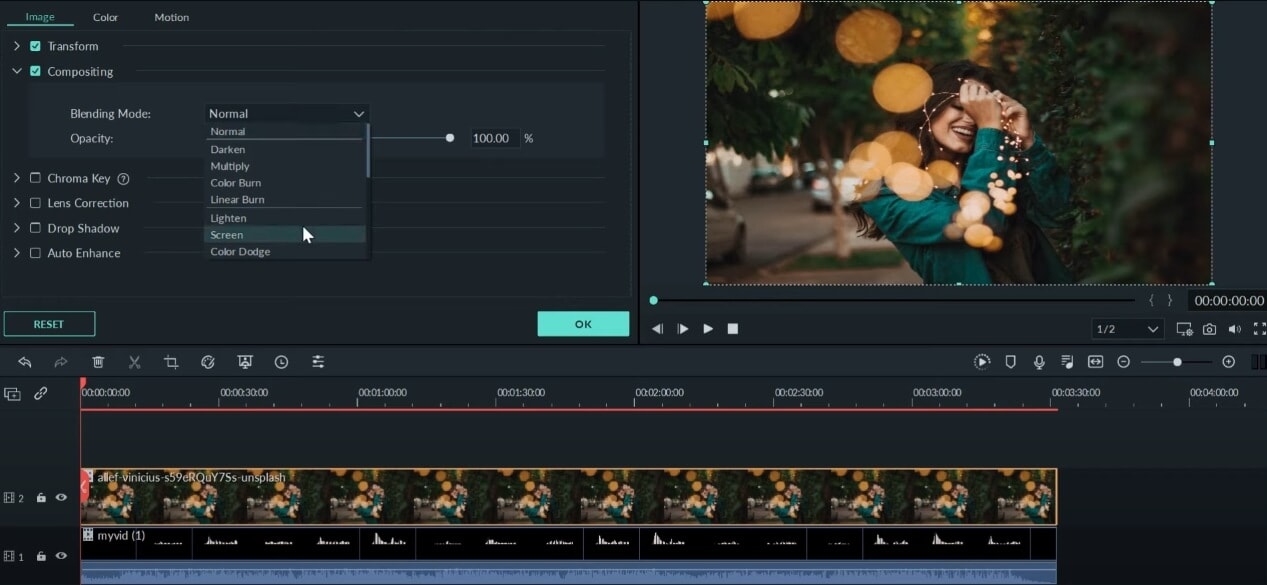
Filmora also provides other editing features, you can do all necessary edits like text effects transitions, etc., to have a nice look and feel.
Step5Preview and Export
Click the Playback button in the Preview window, and when you feel good about the results, click on Export to download the video and your library, and successfully share it on different social media platforms.
We hope you found the above information is helpful in learning how to create an Audio Spectrum visualizer with Filmora video editor. An audio spectrum visualizer allows you to add cool effects to your music and help you create and animate the beat of your sound. Making an audio spectrum might not seem time-consuming, but the results may take your breath away. Filmora video editor also provides some elements for music visualizer, you can search music visualizer on the Elements tab and have a try.

Conclusion
From simple online tools to advanced software like After Effects, there has never been a better time to create stunning music videos. Social media content creators, musicians, and VJs can all produce professional visuals using the music visualizers we've featured. For those looking for an all-in-one solution that combines ease of use with professional power, Wondershare Filmora stands out. Whether you want to customize a classic audio visualizer or automatically generate a complete narrative video with itsAI Text to Video AI Text-to-Video feature, Filmora provides all the tools you need.


 100% Security Verified | No Subscription Required | No Malware

