- Windows Movie Maker Editing Tips
- 3.1 How to add voice over to video with WMM
- 3.2 How to add/edit music with WMM
- 3.3 How to add transitions in WMM
- 3.4 How to add text in WMM
- 3.5 How to add subtitle to video in WMM
- 3.6 How to make PIP video with WMM
- 3.7 How to make green screen video with WMM
- 3.8 How to do color correction in WMM
- 3.9 How to make time-lapse and slow-mo video in WMM
- 3.10 How to add watermark to video with WMM
- 3.11 How to zoom in/out videos with WMM
- 3.12 How to blur faces/objects with WMM
How to Zoom In/Out Videos in Windows Movie Maker

Jul 14, 2025• Proven solutions
Whether you are a pro in video editing or just a newbie, you need to zoom in or out the videos to fit your needs. As a free yet powerful video editor, Windows Movie Maker is capable of helping you get what you want. Despite not offering you the capabilities of cropping the video or photo during editing, Windows Movie Maker allows users to pan and zoom with some effects, which makes the video with more dramatic visual effects.
In this article, we are going to look at how you can zoom in/out a video in Windows Movie Maker to create a professional-like video. Since Windows Movie Maker is officially discontinued on January 10, 2017, so you can now not able to download it from Microsoft. Therefore, we provide you another way to zoom in or zoom out on a specific object in your video.
In case that you are looking for a way of creating zoom in effect video by cropping, check our article about How to Zoom in on Videos by Cropping on Windows
- Part 1: Zoom in/Zoom out Videos in Wondershare Filmora
- Part 2: How to Zoom In/Out Videos in Windows Movie Maker
Zoom in/Zoom out Videos on Windows 7/8/10:Wondershare Filmora


While zoom in/out in Windows Movie Maker is possible, this software does not allow you to zoom specifically into a specific object. For instance, if you have a video with a person in it, when you want to zoom out/in on the individuals' faces, it is impossible to do so. Why? Windows Movie Maker only allows you to zoom in/out on the whole frame. In addition to that limitation, Windows Movie Maker 6.0 version only allows you to save a video in the .wmv and mp4 formats.
Luckily, Wondershare Filmora is here to save you from all these Windows Movie Maker hassles. Here’s why;
- Allows you to zoom in/out on a specific object and not the whole frame.
- Supports to zoom in on videos by cropping
- Customize the Zoom effect by adjusting the Starting and Ending Frame
- Supports common video formats such as .avi, .mp4, .mkv, .mpeg etc.
- Comes with advanced features such as color grading, green screen, audio mixer, split screen, etc.
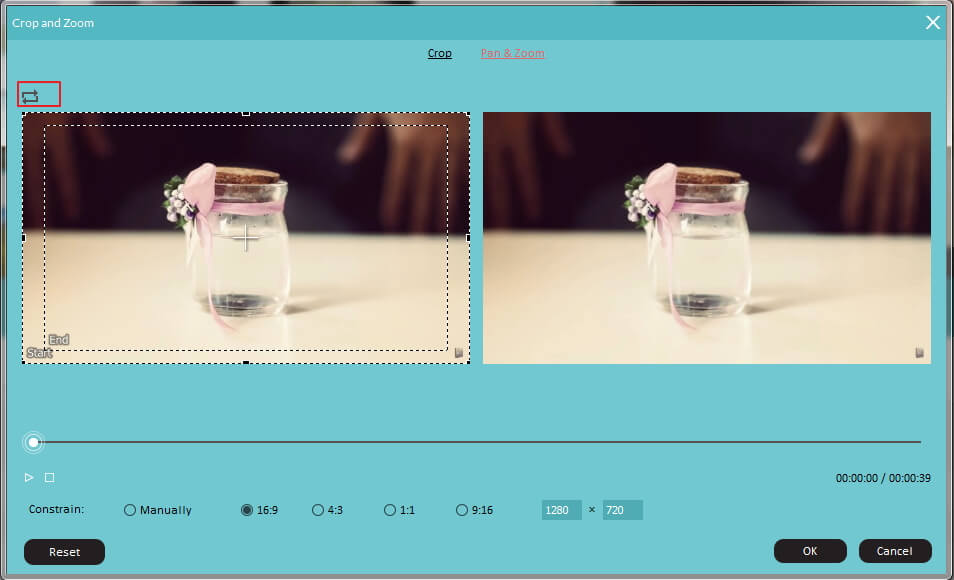
The steps of zoom in and zoom out videos in Filmora is easy. Just import your video clips into the timeline and then click the Crop icon to enter the Crop and Zoom interface. You can then crop the unwanted frames to zoom in or use the Pan&Zoom effect to customize the starting or ending frames of the Zoom in or zoom out effect.
For the detailed information of How to Pan & Zoom to create Ken Burns Effect, check How to get Ken Burns Effect in your video.
How to Zoom In/Out Videos in Windows Movie Maker
In order for us to effectively learn how to zoom in/out videos in Windows Movie Make, we shall approach the editing in steps. Before we begin, it is important to note that you might require a previous version of the Windows Movie Maker - Windows Movie Maker 6.0 version or Windows Movie Maker 2012. To check the version of the Windows Movie Maker, just go to About Movie Maker option in the main menu in Movie Maker. The latest version is Version 2012 (Build 16.4.3528.0331).
In this article below, I will show you all the information that you need to Zoom in or zoom out on video in Windows Movie Maker.
Related article: How to create Ken Burns Effect to your photo and video>>
1. Zoom in and Zoom out Videos with Movie Maker 2012
Step 1 Import Videos or Photos to Movie Maker
Click Add videos and photos button in the toolbar to select and load the media file to Movie Maker.

Step 2 Select Target Pan/Zoom in/Zoom out Effect
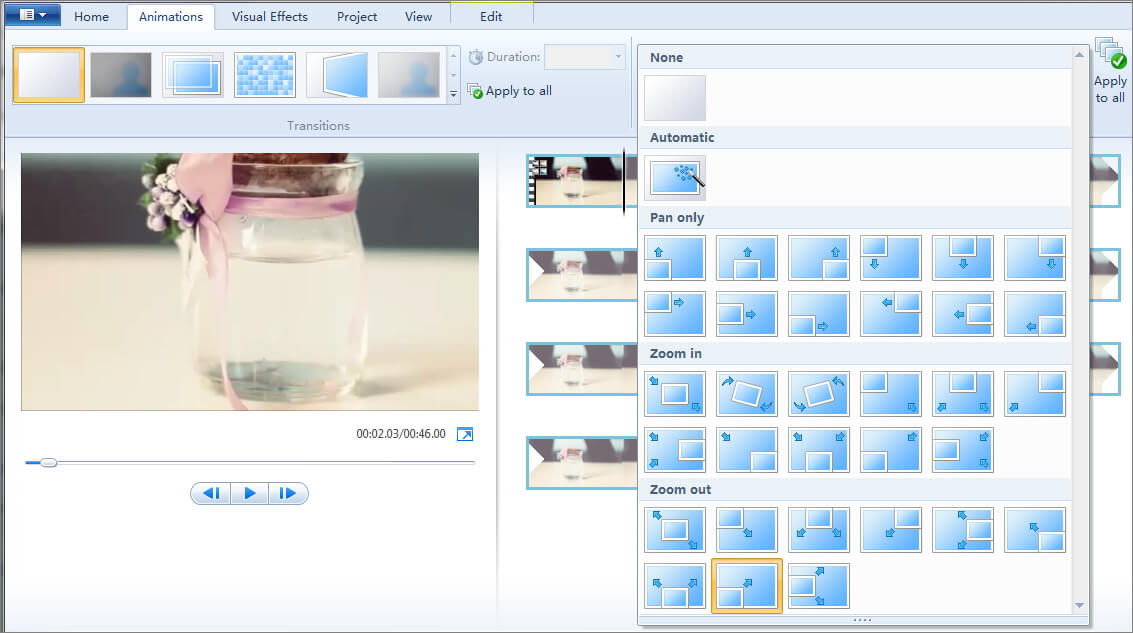
Go to the Animations tab and then switch to Pan and Zoom section. Preview the preset pan and zoom effects and then select a target one.
If you just want to pan the video, you use Pan only feature. There is 10 preset pan effect, you can pan up or pan down, or pan left and pan right. Besides, you can also pan up along the left or pan right along the bottom.
In the Zoom in Effect, you can choose to zoom in and rotate video left or right, as well as zoom in the top, zoom in the bottom, or zoom in the center. While with the Zoom out feature, you can zoom out top/bottom or zoom out top-right or top left.
The selected Pan or zoom in or zoom out effect will be applied to all the frames in the video, which also makes the pan and zoom effect not so visible. In this case, to get a more visible pan and zoom effect, we recommend you split the frames first and then apply the Pan & Zoom effect to certain frames.
Note: To zoom in and zoom out the timeline in Movie Maker, you can right-click the clips in the timeline and then select Zoom in or Zoom out option from the submenu, but this will not zoom in or zoom out the video.
Step 3 Preview and Save video
Now, you can preview the zoomed video and save it to MP4 or MWV. By the way, in Windows Movie Maker 2012, you can also upload the video to YouTube or Vimeo directly or burn to DVD as well.
2. Zoom in/out on Videos with Windows Movie Maker 6.0 Version
Step 1
Launch the Windows Movie Maker 6.0. If you have not yet installed the movie maker, you can go ahead and download this updated version from the link here.
Note: It is possible to have both versions (2012 and 6.0) of the moviemaker at the same time.
Step 2
Import the video file from your computer’s directory (where you have saved the video.) On version 6.0, click the ‘Import media’ option to import your video.
Step 3
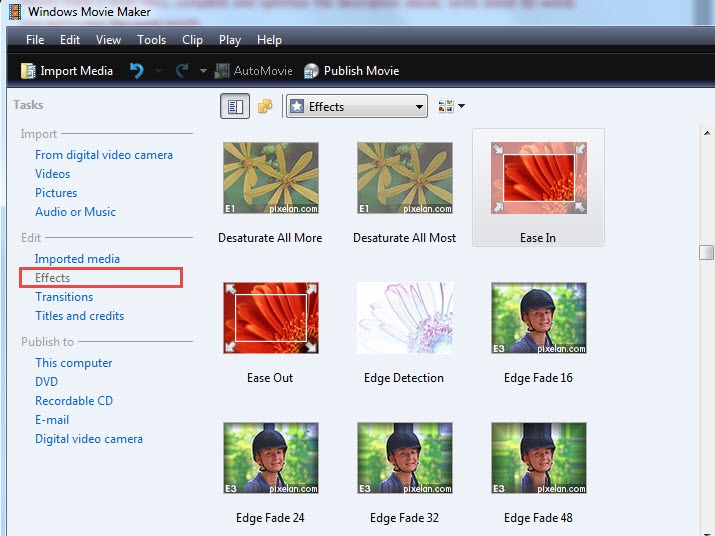
Drag the video onto the timeline and then find the edit option on the left panel. There are 4 options there – "Imported Media", "Effects", "Transitions" and "Titles and Credits". You want to select the ‘Effects’ option.
Step 4
A new effects window will open, and there you will see several options such as the "ease in", "ease-out" features which are essentially used for zooming. Select if you either want to zoom in/out in Windows Movie Maker using either these two options.
Step 5
Let’s say you have chosen the "ease-out" option, a new window will open where you can choose from different easing out options such as "zoom out from the lower right", "zoom out from upper left", "zoom out from the upper right" etc. In order to preview the effect, double click the option you want to use.

Step 6
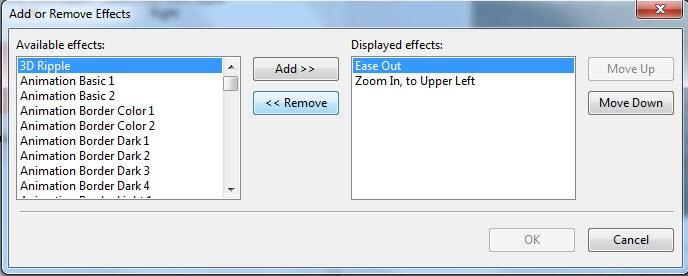
To use a specific zoom in/out the video in Windows Movie Maker effect, drag the effect onto the video. If you are not pleased with the effect, simply right click on the video, choose the "effect" option, and remove it.
Conclusion
Adding zooming and panning effects into video clips with Windows Movie Maker is easy, but you can also create a more customized pan&zoom effect by setting up the starting and ending point with Wondershare Filmora. Besides the pan&zoom effect, you can do more in Filmora. Check our picks of best alternatives to Windows Movie Maker and choose the best video editing software based on your needs.
Can't seem to apply the Ken Burns effect in iMovie in the right way? Here is a stepwise guide to get the perfect Ken Burns effect on iMovie via iPhone or Mac.
by Liza Brown Jul 15, 2025 14:26 PM
In this particular article, we will show you how to correct the colors in Windows Movie Maker 6.0 with plugins and add-ons.
by Liza Brown Jul 14, 2025 14:51 PM
Learn the easy way to add subtitles to video in Windows Movie Maker 6.0 using Title Overlay. Detailed steps for WMM subtitle, timing, and font adjustments.
by Liza Brown Oct 28, 2025 10:29 AM
Liza Brown
chief Editor
