Back when everyone was just starting out with video editing, Windows Movie Maker was the go-to tool. It made adding text, captions, and titles easy and fun. But after Microsoft shut it down, people searching for things like how to add text in Windows Movie Maker soon realized it doesn't work on modern systems anymore.
Still, that doesn't mean you're out of luck. We'll walk you through how Movie Maker used to handle text and then show a newer, much better way to add text to video on Windows 10 using tools built for today's creators. It's the same simplicity you loved, just upgraded for 2025.
Part 1. What Happened to Windows Movie Maker: Text & Default Font Limits
Back in the day, Movie Maker was pre-installed on most Windows PCs. It had simple buttons, drag-and-drop editing, and quick text overlays that anyone could use. But time moved on, and Microsoft eventually stopped supporting it, leaving many users nostalgic for its easy workflow.
However, if you happen to still have the old version tucked away on your computer, you can technically keep using it. So, let's take a look at how to add text in Movie Maker back then and why it became such a classic feature among early creators.


The Windows Movie Maker text generator was simple but limited:
- Fonts depended on what was installed on your computer, so creativity was limited.
- You couldn’t layer multiple text styles, combine effects, or create smooth motion like in modern editors.
Now that Movie Maker is gone, it’s better to use modern editors that offer more freedom and style for adding text to videos.
Part 2. The Filmora Advantage: Better Text Animation & Text-to-Speech
Thankfully, the story doesn't stop with Movie Maker fading away. If you miss how simple it used to be but want something that actually keeps up with today's editing needs, Wondershare Filmora steps in perfectly.
This all-in-one editor brings back that easy, drag-and-drop feel while giving you way more control over how your videos look. Here's how Filmora brings back the spirit of Movie Maker in adding text, only better in every possible way:
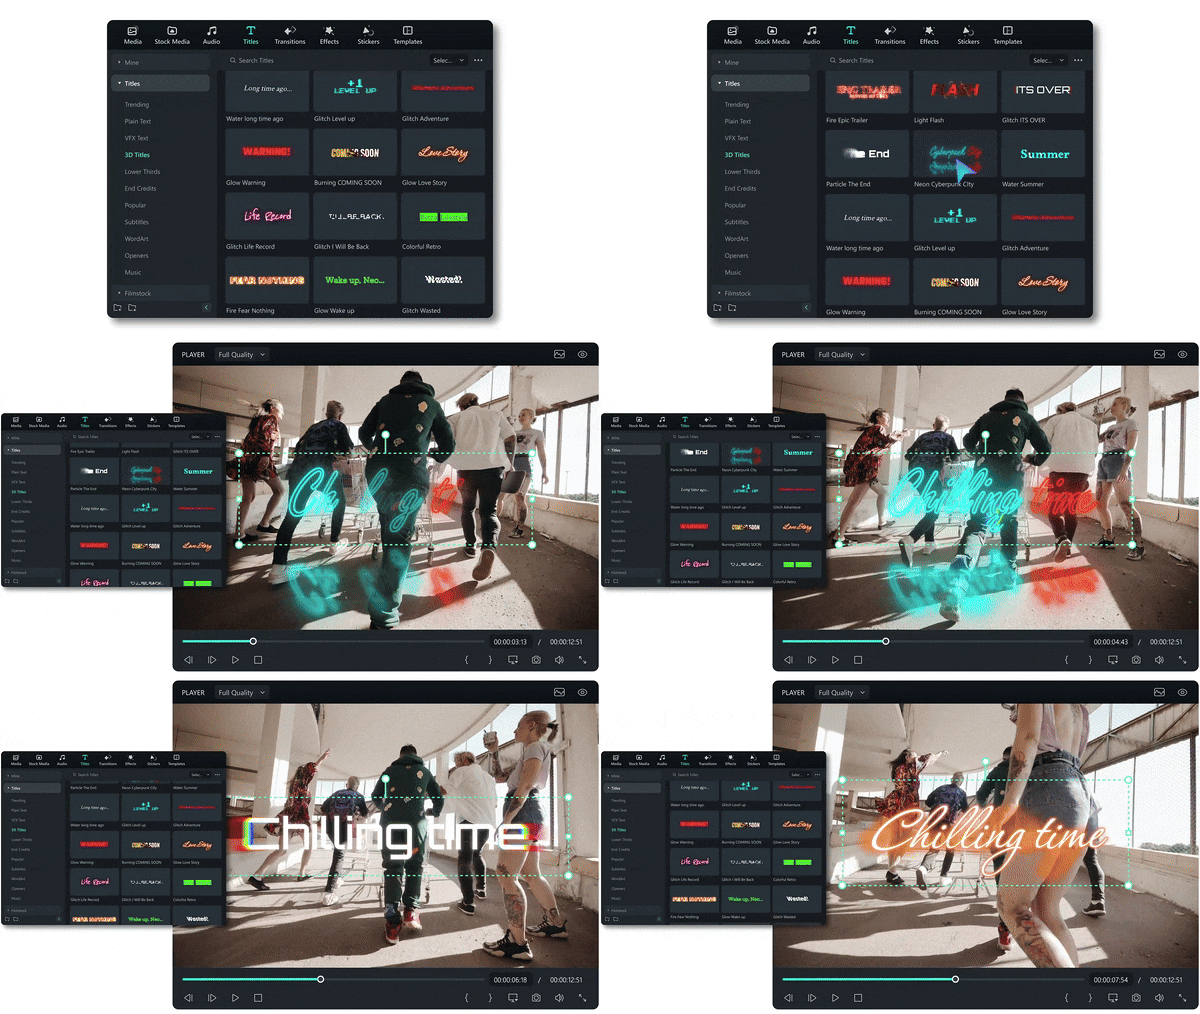
- Add Text in Seconds: Filmora makes adding text as easy as it was in Windows Movie Maker. Drop in titles, captions, or animated text in just a few clicks and see instant results.
- Pick Fonts That Fit Your Style: Choose from a big library of fonts and text animations that make your videos stand out. Everything is easy to tweak, from bold headlines to subtle lower thirds, so your words always fit the tone of your story.
- Advanced Text Animation and Motion: Filmora gives you complete control over text animation, allowing your titles and captions to move perfectly with the rhythm of your video.
- Customize Everything Easily: Change the font, color, and animation however you like. You can mix styles, add shadows, or give your text soft movements that feel natural.
- Keep Creating Without Limits: Filmora gets better with every update, so you're never stuck with the same old templates. From trending fonts to new text effects, it keeps your videos looking fresh and modern all year long.
Wondershare Filmora makes text editing feel smoother than ever. It's faster, more organized, and gives you the kind of creative control that makes every title look intentional. Here's what you can expect from Filmora's newest text update:
- Smarter organization with "In / Out / Loop" text animation structure.
- 12 brand-new animation styles (and more rolling out through 2025).
- Faster browsing with new Level 3 and Level 4 text animation categories.
- Favorites & Recently Used categories for quick access.
- And more.
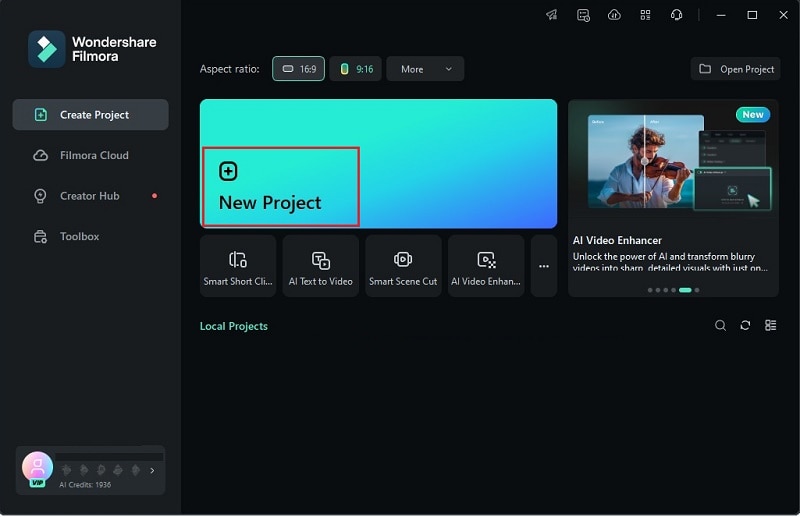
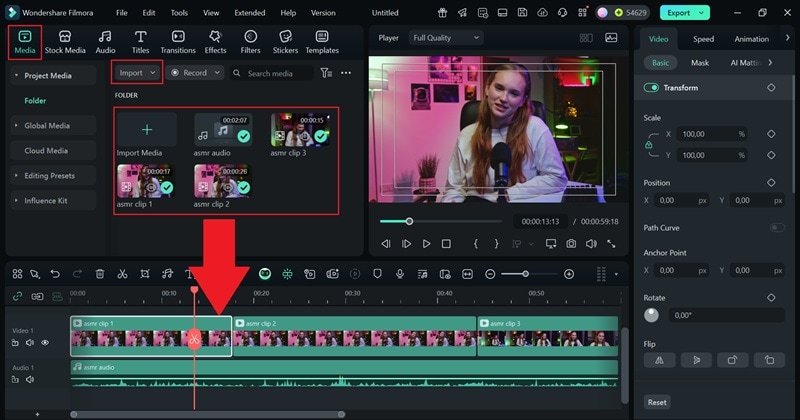
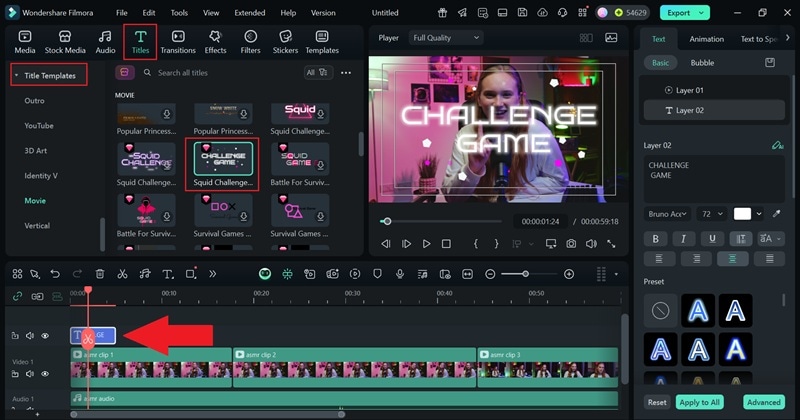
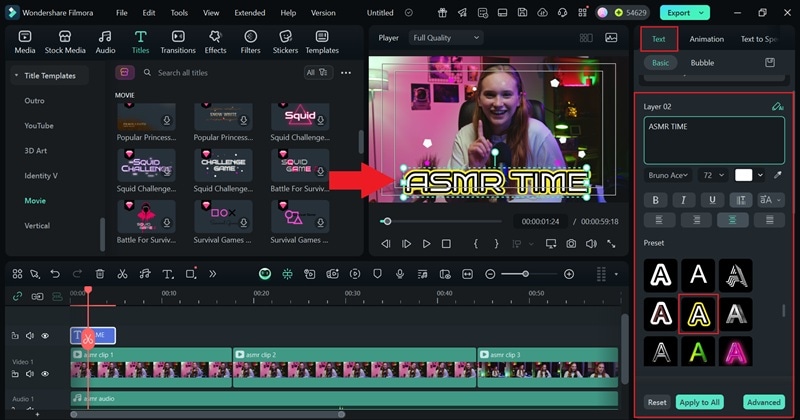
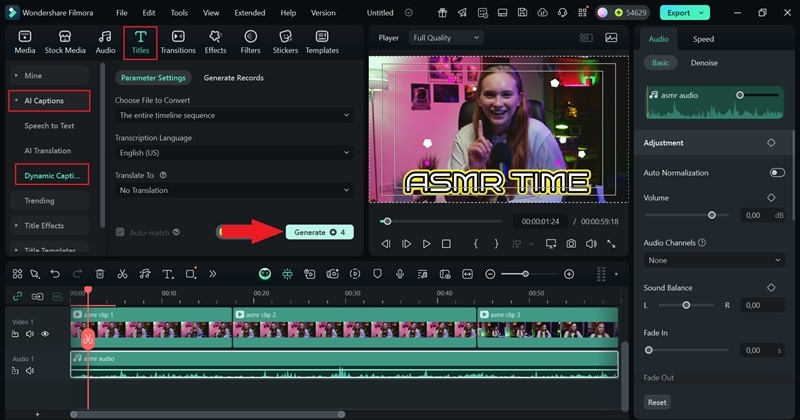
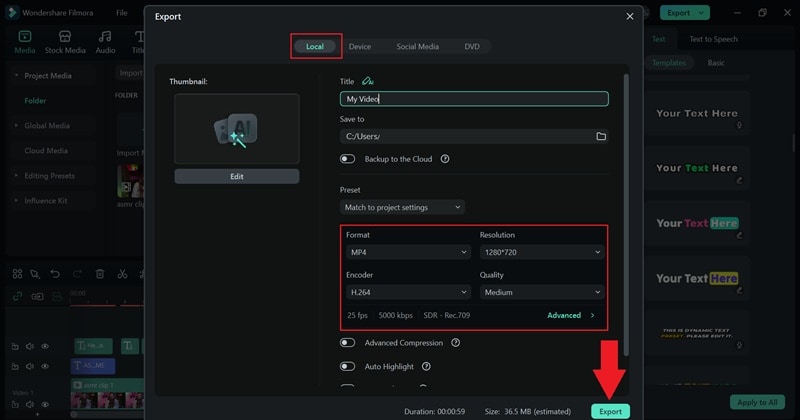
With all these new features, Filmora easily outshines the old Windows Movie Maker title generator and takes video editing to another level. It gives you more freedom to design, animate, and style your text exactly how you want it. Now, take a look at this quick guide on how to add text to your video using Filmora:
Part 3. Why You'll Never Miss Movie Maker Again
By now, you can probably feel the difference. Adding text in Filmora feels natural, quick, and surprisingly fun. Compared to the old Windows Movie Maker text feature, Filmora gives you more than just basic fonts and static effects, it gives you complete creative control. You can shape every title, animation, and caption to match your story perfectly.
Apart from what was already said, here's why Filmora isn't just a replacement, but a major step forward:
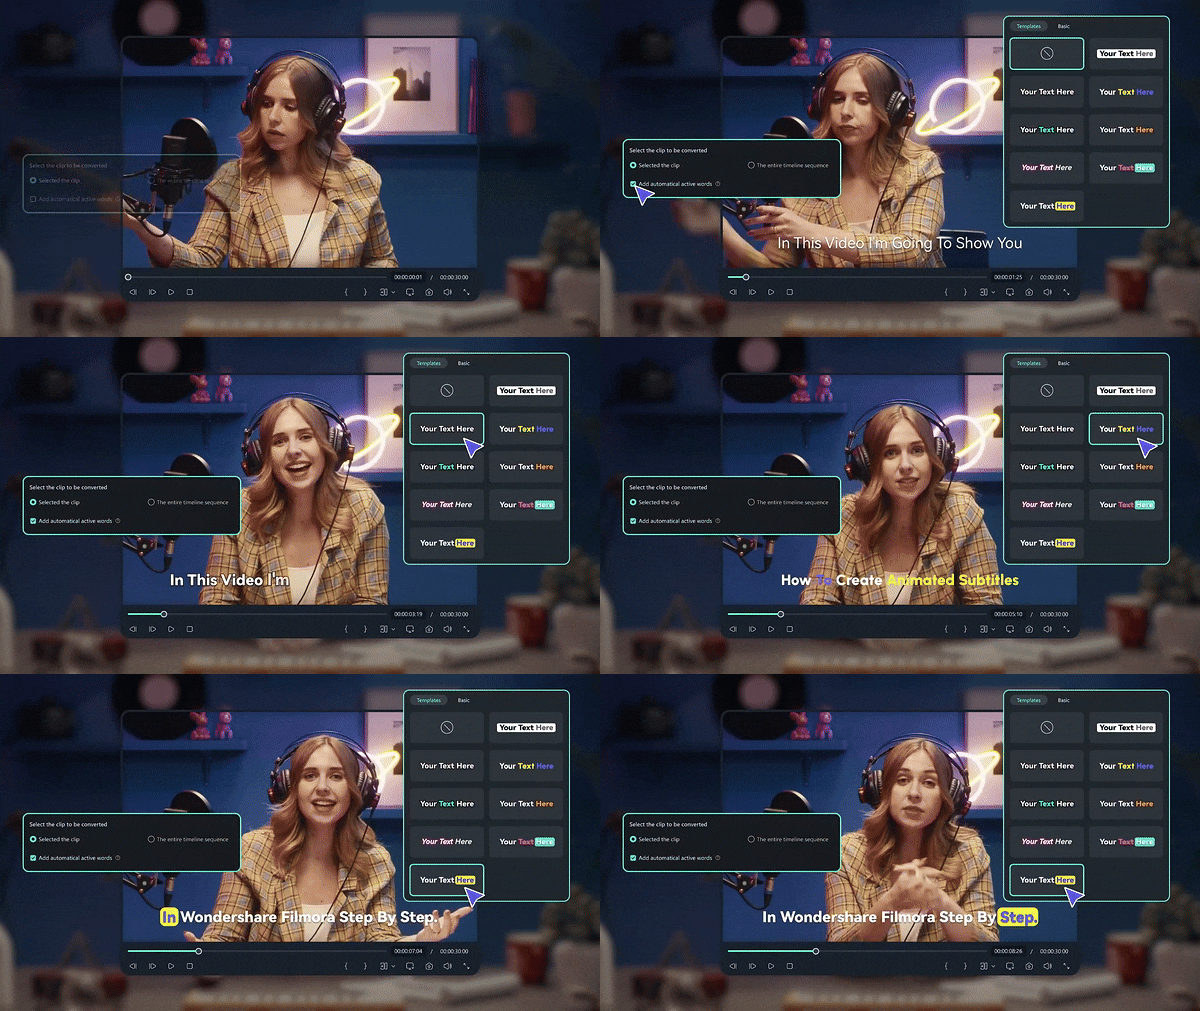
- Smarter Layout: Filmora makes everything easy to find with a clean and organized workspace. Unlike Windows Movie Maker's old drop-down lists, every text style and animation is neatly categorized so you can get what you need without wasting time.
- A Library That Sparks Creativity: Filmora gives you a wide selection of fonts, motion presets, and text templates that instantly make your videos feel more polished. You can mix, match, and experiment freely, turning every title or caption into something that fits your story.
- AI Text-to-Speech & Captioning: The Auto Captions feature automatically generates subtitles that sync perfectly with your video. This advanced tool goes far beyond what any Windows Movie Maker text to speech feature could have offered.
- Favorites Saved In The Cloud: Your preferred fonts and text styles are stored automatically, ready for the next project. No more redoing the same settings every time you start a new edit.
- Loop Animations That Add Energy: Filmora's looping text animations make intros, end screens, and highlight captions come alive. They keep your visuals flowing naturally and give every project a dynamic rhythm.
- Made For Every Kind Of Creator: Whether you're editing YouTube videos, tutorials, or short clips, Filmora's tools adapt to your pace. It combines the simplicity of Movie Maker with the flexibility that creators today actually need.
Conclusion
Back when it was still around, the Windows Movie Maker text feature stood out for how simple it felt to use. But since it's no longer part of the editing scene, it's time to turn to tools that carry that same ease into something more modern.
The smartest option today is Wondershare Filmora, a video editor that keeps the familiar flow of Movie Maker while opening up a whole new level of creativity. You can experiment with fonts, motion, and captions in a way that feels natural and enjoyable.
As a true Windows Movie Maker text generator alternative, Filmora doesn't just take its place, it reimagines what easy editing can be for today's creators.
Frequently Asked Questions
-
Can I still download Windows Movie Maker?
Unfortunately, no. Microsoft has completely discontinued Windows Movie Maker, and it's no longer available for download. Some third-party sites may claim to offer it, but they're often unsafe or outdated versions that don't run properly on modern systems. -
What's the best Movie Maker alternative for adding text to videos?
The best option today is Wondershare Filmora. It keeps the same easy feel as Windows Movie Maker text generator but adds far more creative tools. You can add animated text, use AI captions, and explore hundreds of templates without feeling overwhelmed. -
Can I import old Movie Maker projects into new software?
Movie Maker files can't be opened directly in newer editors. The best way is to export your old videos as standard files, then import those into Filmora or another modern editor to continue editing smoothly. -
Why doesn't my video show text correctly after exporting?
This usually happens if the font you used isn't installed on your computer or if the file was rendered incorrectly. In editors like Filmora, this problem is rare because all text effects and fonts are built into the software, keeping everything consistent when you export your video.


