
 100% Security Verified | No Subscription Required | No Malware

Nowadays, people love sharing their tales, tips, and adventures on YouTube. Having the right tools is crucial for both novice producers and seasoned ones seeking to improve their skills. A beautiful video with clear sound can keep people watching and help you get more followers.
What is the key to creating exceptional videos? It all starts with choosing the best camera for vlogging that matches your needs. If you're looking for portability, image stabilization, or high-resolution capabilities, this guide has got you covered. So, let's dive in to discover the perfect YouTube beginner equipment for your journey.

In this article
What Makes a Good Vlogging Camera?
When you're shopping around for the best camera equipment to create YouTube videos, there are a few key things you'll want to keep in mind to make sure you're getting the right gear for your needs:
- Portability and Weight: Vlogging often involves movement, so a lightweight camera is essential. A compact design makes it easier to carry during travel or outdoor shoots.
- Image Stabilization: No one likes videos that are shaky. Videos are always smooth, even when you're filming on the go, due to the built-in stability.
- High Video Resolution: A camera with at least 4K resolution will give you clear videos that look like professionals made them. This ensures every detail shines, enhancing your equipment to make YouTube videos stand out.
- Good Audio Input Options: High-quality audio is crucial. Look for a camera with a microphone input to boost sound clarity.
- Autofocus and Low-Light Performance: The fast autofocus keeps your subject clear, and the great low-light performance means you can get great pictures at night or inside.
If you choose a camera with these characteristics, you'll have the equipment needed to start a YouTube channel that posts visually appealing, high-quality videos.
Top 5 Cameras for Vlogging
Vlogging cameras can be confusingly many, and therefore, the selection process can become too complicated. Below are five of the best cameras for vlogging that cater to the range of needs and budgets that guarantee high-quality content immediately.
1. High-End Option: Sony ZV-1
For vloggers, the Sony ZV-1 ranks as one of the best small cameras to get. It's small, light, and full of high-tech capabilities make vlogging easy and professional.

Features:
- Integrated microphone for crystal-clear sound.
- External microphone input for versatile sound options.
- Flip-up screen for effortless framing and monitoring.
- Dedicated “Bokeh” button for background blur.
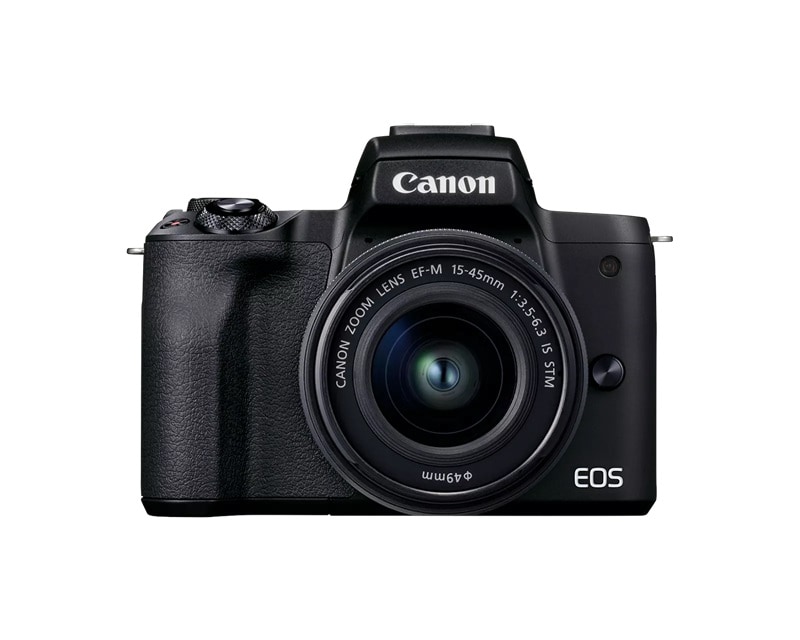
2. Budget-Friendly Option: Canon EOS M50 Mark II
Affordable and packed with essential features, the Canon EOS M50 Mark II is a great camera to consider. Its wonderful image quality and user-friendly design make it an excellent option for YouTube newbies.
Features:
- 24.1MP APS-C CMOS sensor for detailed visuals.
- Dual Pixel CMOS AF for fast and accurate focusing.
- Vari-angle touch screen for flexible shooting angles.
- Built-in Bluetooth and Wi-Fi make it easy to share files.
3. Action Camera: GoPro HERO11
If you're an ambitious filmmaker or competitor, you need an action camera with a powerful recorder like the GoPro HERO11. For outdoor vloggers, it is an essential tool for filming thrilling situations.

Features:
- For rock solid footage, try HyperSmooth stabilization.
- Ideal for underwater adventures, waterproof up to 33 feet.
- Multiple shooting modes for creativity.
4. Mirrorless Option: Fujifilm X-T200
A lightweight and fashionable compact camera, the Fujifilm X-T200 is perfect for those on the go. Vloggers that value both aesthetics and functionality will love this because of its high-quality photos and user-friendly layout.

Features:
- Articulating touchscreen for easy vlogging.
- Advanced Scene Recognition mode for optimized settings.
- Electronic image stabilization for smooth videos.
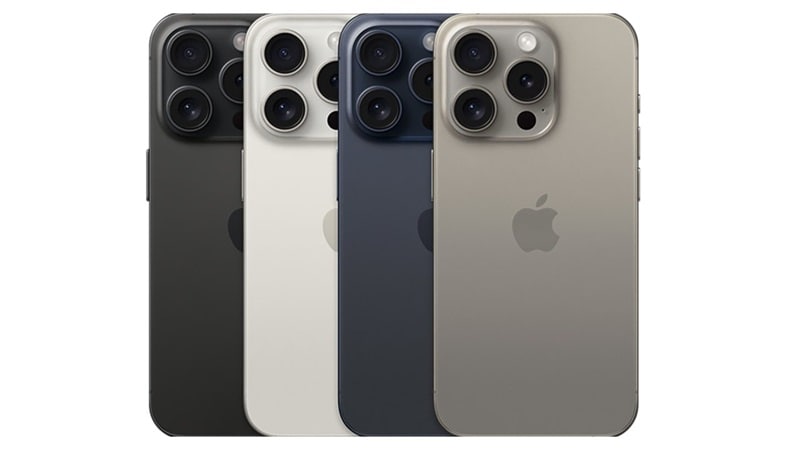
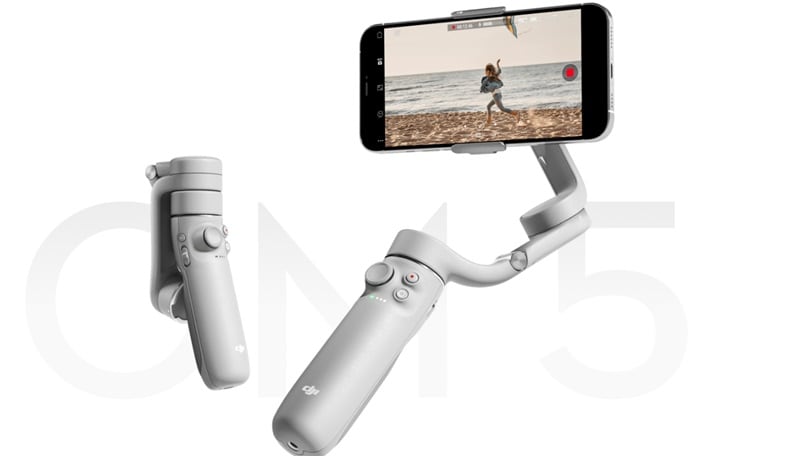
5. Smartphone with Accessories: iPhone 15 Pro + Gimbal
Smartphones have evolved to become efficient vlogging tools with the right attachments. The iPhone 15 Pro is a good option to use for vlogging as it allows you to shoot professional-grade footage. Three rear cameras support 4K60 recording and allow you various viewing angles. This will be ideal, especially when you are one who has more practice using a gimbal.
Features:
- 4K60 video recording for stunning visuals.
- Smart HDR for vivid colors and precise contrast.
- Triple-lens system (wide, ultra-wide, telephoto) for diverse perspectives.
- Compatibility with Filmic Pro app for manual settings and pro-level control.
Must-Have Accessories for YouTube Videos
Choosing the best camera for vlogging is just one piece of the puzzle when it comes to creating high-quality videos. To really step up your content game, make sure you grab these other essential tools for yourself:
- Microphones: Many popular YouTubers use an external microphone to get better sound quality. If you're filming outside, omnidirectional microphones are great because they reduce wind noise. For studio setups, shotgun or unidirectional microphones are perfect for focusing on the speaker's voice.
- Tripods and stabilizers: If you're planning to vlog while holding your camera, it's important to keep your footage steady. Tripods and stabilizers are super helpful, and you can find affordable options like gimbals or professional frames to avoid shaky videos.
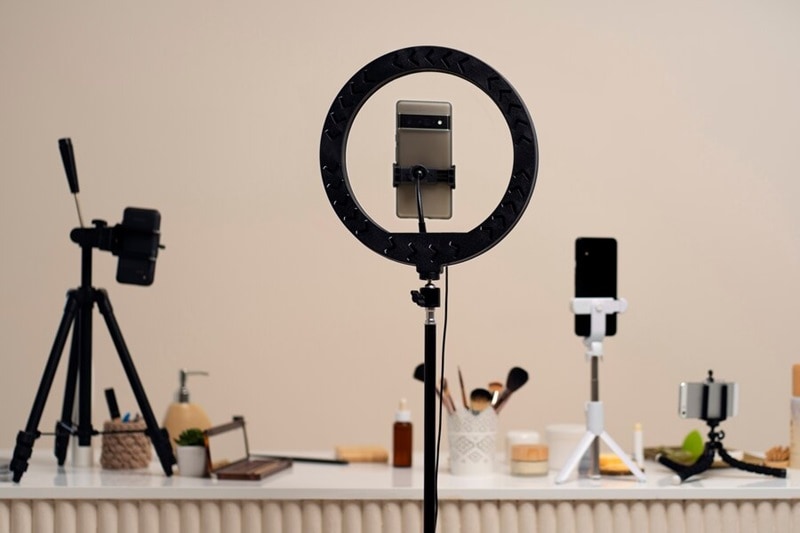
- Lighting: Good lighting makes a huge difference in your videos. You can choose from options like on-camera LEDs, ring lights, or softbox lights. These work best in controlled spaces like a studio.
- Other Accessories: Don't forget the little things! Extra memory cards, batteries, and lens covers can save you from interruptions during your shoot.
Edit Your Vlog Videos with the Best Video Editor
Editing is the last step to making your video shine after you've filmed it. This is where Wondershare Filmora is useful. Filmora is one of the best tools for vloggers, and YouTubers to edit videos because it has a lot of powerful features that can turn your footage into fine-tuned videos.
Key Features:
- Non-destructive editing: for multi-track editing without modifying the original video, apply an adjustment layer and save it as a preset.
- Vlog templates: alter the songs and components, swap out the stock videos, and utilize a pre-made design.
- Video Stabilizer: Smooth out shaky footage for a professional finish.
- AI Video Enhancement: With just one click, you can make the clip clearer. Get rid of blur, add accurate details, and boost video to 4K.
- Lens Correction: Fix optical distortions caused by wide-angle or fisheye lenses.
- Video Denoise: Remove noise from the video or change the lighting and contrast to make it brighter and clearer.
Step-by-Step Guide for Editing with Filmora:
- Superb video stabilization with low distortion.
- Vast video/audio effects and creative assets.
- Powerful AI for effortless content creation.
- Intuitive, professional yet beginner-friendly.
- Works on Mac, Windows, iOS, and Android.


Editing vlogs with Filmora is intuitive and highly effective. Here is a detailed guide to make your vlogs shine using Filmora's tools and features:
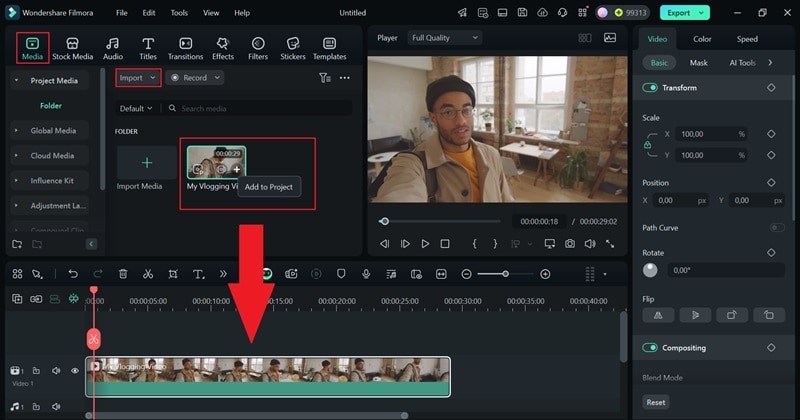
01of 07Import Footage
Open Filmora and click on Import. Drag and drop your video files into the Media Library. Arrange your clips on the Timeline by dragging them from the library.
02of 07Stabilize Shaky Videos
In the property box on the right side of the screen, select the video in the timeline and then navigate to Video, choose AI Tools, and click on Stabilization. To turn on Stabilization, click the button next to it. After that, Filmora will automatically evaluate the video.
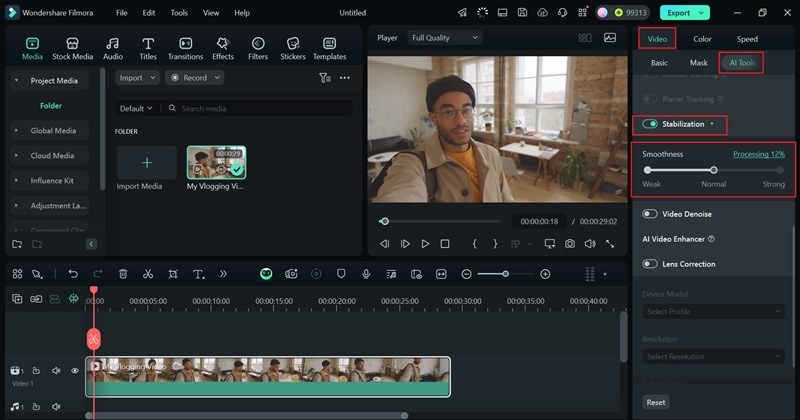
You may alter the smooth level by dragging the Smoothness after the evaluation is done. As long as you're happy with the sample in the Player, you can keep going.
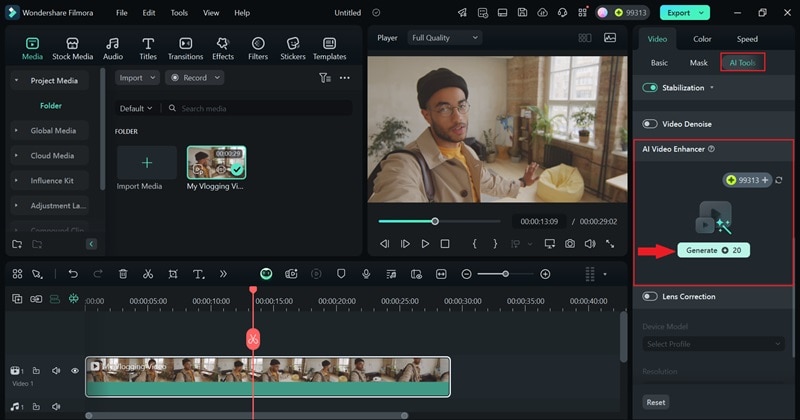
03of 07Enhance Video Quality Using AI
In the same properties panel under AI Tools, if you scroll down, you'll come across the AI Video Enhancer option. Click Generate to begin the feature and let Filmora automatically improve brightness, contrast, and sharpness.
04of 07Remove Fisheye
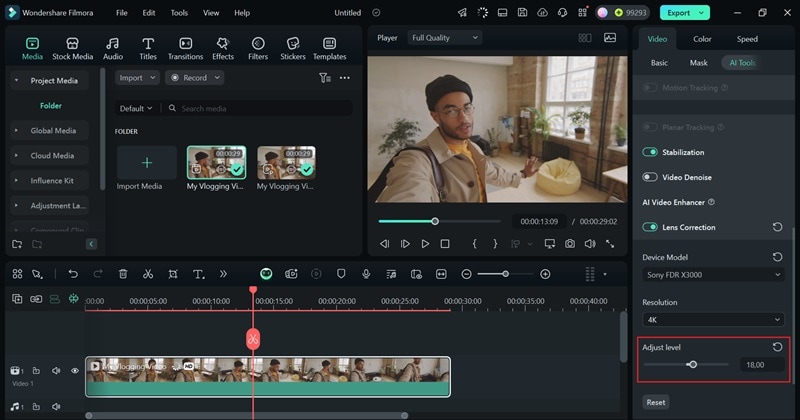
Navigate to the Video tab, select AI Tools, and click on Lens Correction.
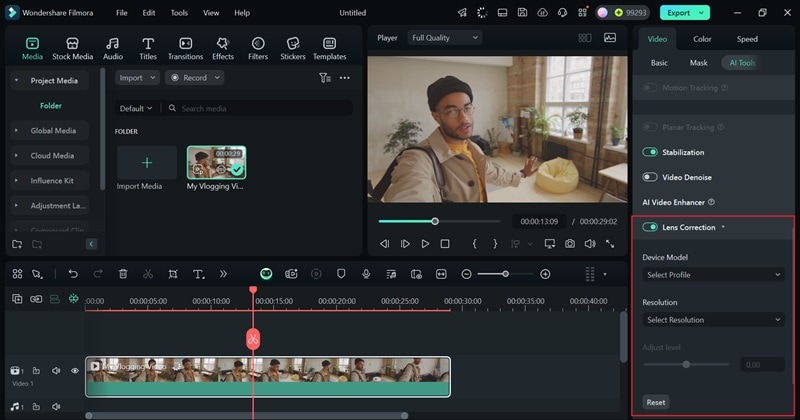
Choose a preset that matches your camera model.
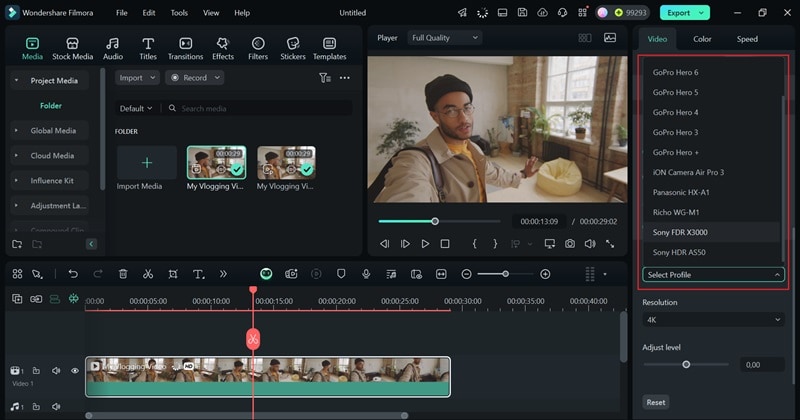
Drag the Adjust slide bar to change the level of correction. The video will get farther away if you raise the level. Preview your adjustments in the Preview Window.
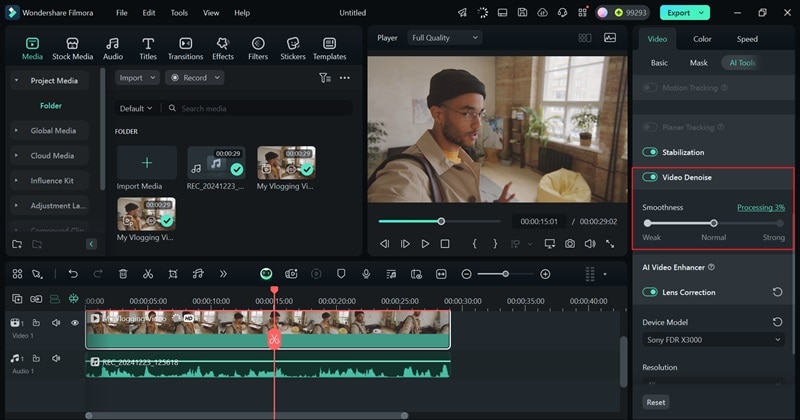
05of 07Remove Background Noise
Select your video clip on the Timeline. Click on the video tab, select AI Tools, and switch on the Denoise option. You can also move the slider to change the smooth level and improve the quality of the video. You can change it here from weak to normal to strong.
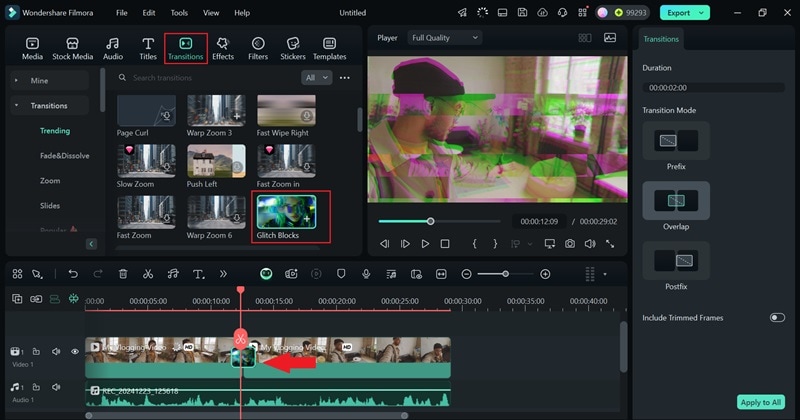
06of 07Add Transitions, Effects, and Titles
Go to the Transitions tab and drag your chosen transition between two clips on the timeline.
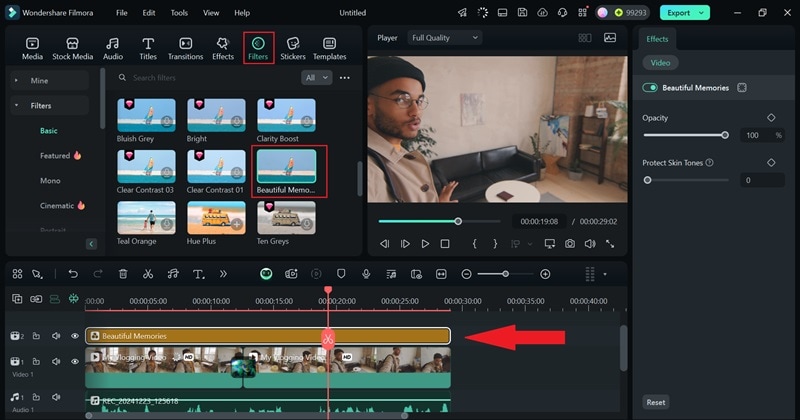
Click on Effects to add filters or overlays
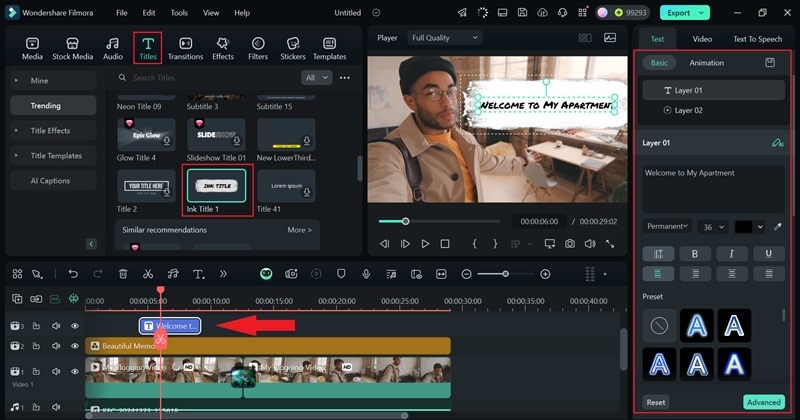
Use the Titles tab to create professional-looking intros, subtitles, or end screens. Drag and drop the title template onto the timeline and customize it in the Text Editor.
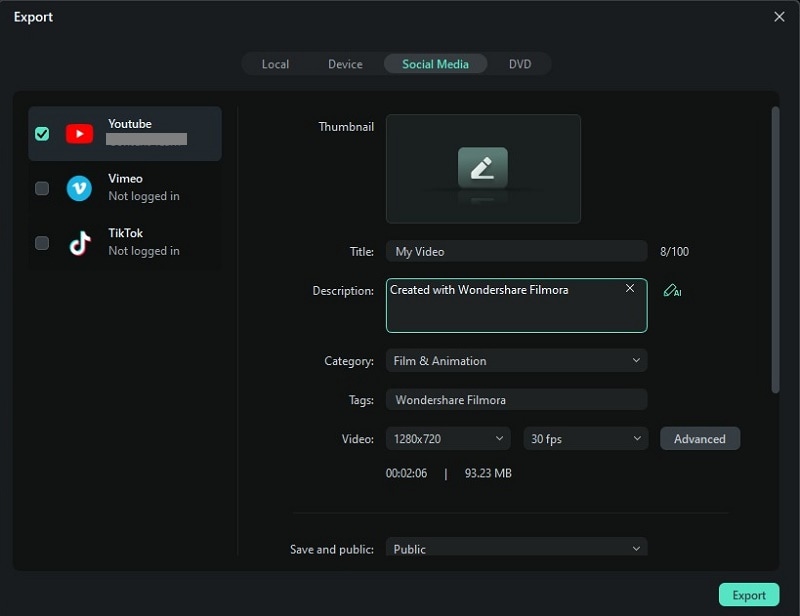
07of 07Export Your Video
Click on the Export button in the top-right corner. Select the YouTube preset for optimal settings. Name your file, choose a destination folder, and click Export to save your vlog.
Conclusion
Crafting compelling vlogs starts with the right tools and finishes with precise editing. Selecting the best camera for vlogging ensures high-quality footage, while thoughtful accessories elevate the final product. Yet, even the best tools need a touch of creativity in post-production. Filmora offers intuitive features like stabilization, AI video enhancements, and noise reduction to refine your work.
Whether you're a beginner or an experienced creator, editing is where your story comes alive. Explore innovative tools, experiment with effects, and create videos that captivate audiences. With the right blend of YouTube video equipment and skillful editing, your channel can thrive and make a lasting impression.
