
 100% Security Verified | No Subscription Required | No Malware

Are you tired of waiting endlessly to upload your videos to YouTube? If you're wondering how to upload on YouTube faster, you're in the right place. Slow upload speeds can be frustrating, but the good news is that with some smart strategies, you can drastically reduce the time it takes to get your content online.
In this article, we'll cover key tips to help you overcome common causes of slow uploads on YouTube, how to upload on YouTube faster, and how to divide long videos into multiple mini projects. Whether you're a content creator on a tight schedule or just looking to share your latest work, these techniques will ensure your uploads are faster and smoother than ever.
In this article
Basic Rules You Need to Know Before Uploading
YouTube imposes restrictions on the duration and size of videos that can be uploaded, which vary based on account verification status and content type.
📏YouTube Video Upload Limits
- Unverified Accounts: By default, users can upload videos up to 15 minutes in length.
- Verified Accounts: Once your account is verified, you can upload videos up to 12 hours long or 256 GB in size, whichever comes first.
To verify your account, visit YouTube's verification page and follow the instructions to receive a verification code via SMS or voice call.
🎬 YouTube Shorts Duration Update
As of October 15, 2024, YouTube Shorts allows creators to upload videos up to 3 minutes (180 seconds) in length, an increase from the previous 60-second limit. This change applies to videos with a square (1:1) or vertical (9:16) aspect ratio. Videos uploaded before this date remain unaffected.
📈 Optimal Video Length Recommendations
While YouTube permits longer uploads, it's essential to consider viewer engagement:
- Standard Videos: Videos between 7 to 15 minutes tend to perform well, balancing depth and viewer retention.
- In-Depth Content: For tutorials, interviews, or comprehensive guides, videos ranging from 10 to 20 minutes are effective.
- YouTube Shorts: With the new 3-minute limit, creators have more flexibility, but shorter content (around 60 seconds) often garners higher engagement due to its quick-consumption nature.
Remember, content quality and relevance are paramount. Ensure your videos are as long as necessary to convey your message effectively without unnecessary filler.
How To Upload Longer Videos To Youtube In A Step-by-step Process?
YouTube allows users to submit videos up to 15 minutes in length by default. You'll need to validate your account if you want to upload longer movies. Follow the procedures below to upload videos longer than 15 minutes and up to 12 hours on YouTube.
Step 1: Log in to your YouTube account first.
Step 2: Go to https://www.youtube.com/upload and post your video.
Step 3: At the bottom, click Increase your limit.

Step 4: You must validate your account. Select how you want to get a verification code. You have the option of having an automated voice message call me or having the verification code texted to me.

Step 5: Click Submit after entering your phone number. Select a language for the service to use when delivering you the verification code by clicking change language.
If you choose the Call me with an automated voice message option, make sure you have your phone nearby. The automated voice call will be made only once and practically immediately after you click Submit.

Step 6: The code will be delivered to your phone number, either an automated voice call or a text message, depending on your preference.
Step 7: Click Submit after entering the verification code. You can now post videos that are longer than 15 minutes (up to 12 hours in duration). YouTube allows you to upload files up to 128GB or 12 hours in length.
Common Causes of Slow Uploads on YouTube
Uploading a video to YouTube can sometimes feel like watching paint dry, but understanding what slows down your upload is the first step in figuring out how to make your video upload faster on YouTube. Here are some typical bottlenecks that could be dragging your uploads:
- Internet Connection Issues: Slow or inconsistent internet speeds can delay your upload significantly, especially if your upload speed is much lower than the download speed.
- High Traffic Times: Uploading during peak usage hours, when most people are online, can cause network congestion and reduce available bandwidth.
- Server Issues: Occasional server downs or heavy traffic on the YouTube side can also slow down the upload process, even if your connection is strong.
Recognizing these common causes, you'll better understand what might slow your progress. Next, we'll discuss actionable tips to overcome these issues and ensure your videos get uploaded to YouTube faster and more efficiently.
How to Upload on YouTube Faster
If you're searching for the fastest way to upload video to YouTube, the good news is that there are simple steps you can take to speed up the process. By optimizing your video files, internet connection, and upload settings, you can save valuable time and can drastically cut down upload times. Here's how to upload on YouTube for a faster and more seamless upload experience.
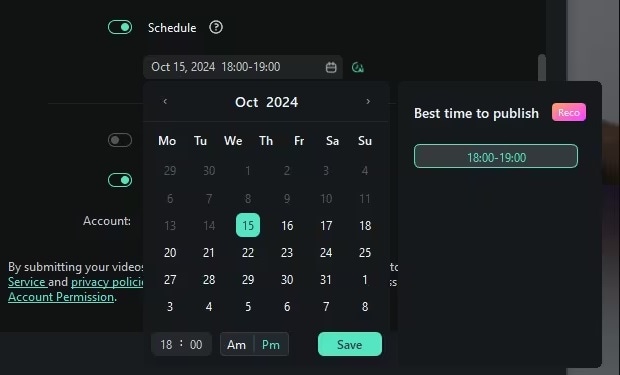
Schedule Your Video Upload: If you are using Wondershare Filmora to edit your video, there's a schedule posting feature to plan your uploads at times of lower internet traffic. This can significantly improve upload speeds and ensure your videos are processed efficiently.
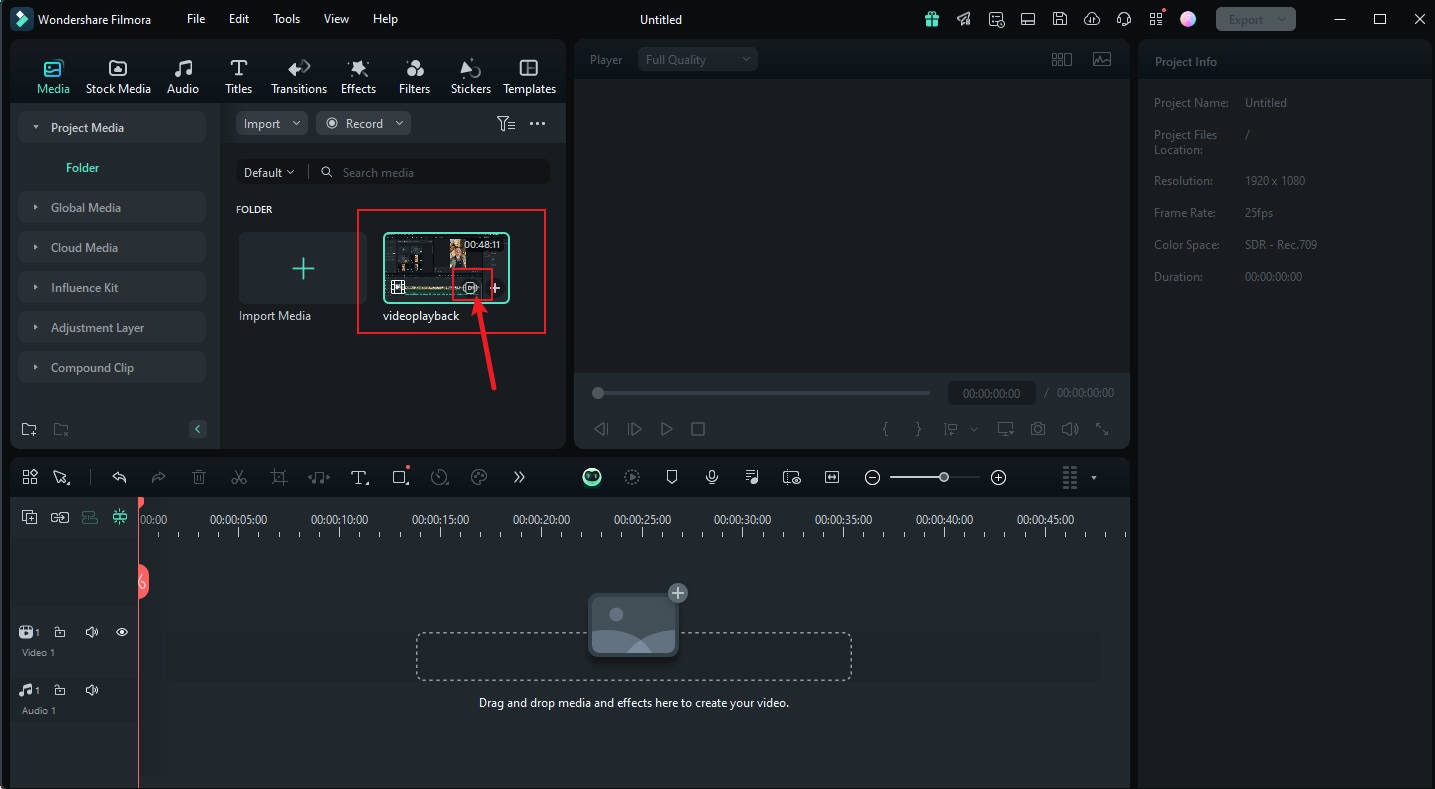
Reduce the File Size: Use a compressor like the Advanced Compression feature in Filmora to reduce the file size of your videos without compromising their quality. Smaller files upload faster, saving you time and bandwidth.
Render Videos at Their Original Frame Rate: Ensure the video is exported in the same frame rate it was recorded in. This avoids creating unnecessarily large files, which can slow down the upload process.

Switch to a Wired (Ethernet) Connection: Switch from Wi-Fi to a wired Ethernet connection on your computer or laptop for a more stable and faster internet connection. This minimizes disruptions and speeds up uploads.

Minimize Internet Usage During Uploads: Pause or limit other internet activities, such as streaming, downloading, or gaming, while uploading your video. This ensures maximum bandwidth is dedicated to the upload process.
With the tips below, you can experience the fastest way to upload your videos to YouTube, making the whole process more efficient.
Part 3. Divide Long Videos into Multiple Mini Projects
Uploading long videos can significantly slow down the process, but there's a simple solution: break them into smaller, more manageable parts. Shorter videos not only upload faster but also provide more content for your channel, so your audience can stay engaged. This is the fastest way to upload video to YouTube and will help make YouTube upload faster, allowing you to save time while increasing your content output.
Filmora offers two powerful features: Smart Scene Cut and Smart Short Clip to make this process easier. These tools help you quickly split and optimize your videos to upload your content to YouTube. Let's take a closer look at how these features work.
Method 1: Smart Scene Cut
Filmora's Smart Scene Cut feature automatically detects scene changes. This makes it easy to split long videos into multiple sections. Here's how you can use it:
01of 03Initiate the Smart Scene Cut Tool
After uploading your video to Filmora, right-click on it and choose "Smart Scene Cut". Then, proceed by clicking Start or Create.
02of 03Choose Clips for Highlighting
In the results interface of the smart scene cut, you will see options such as "Highlight Scene," "Character Scene," and "Custom Object." Select your desired clips by clicking Add and then choose Edit in the Main Timeline to further refine them.
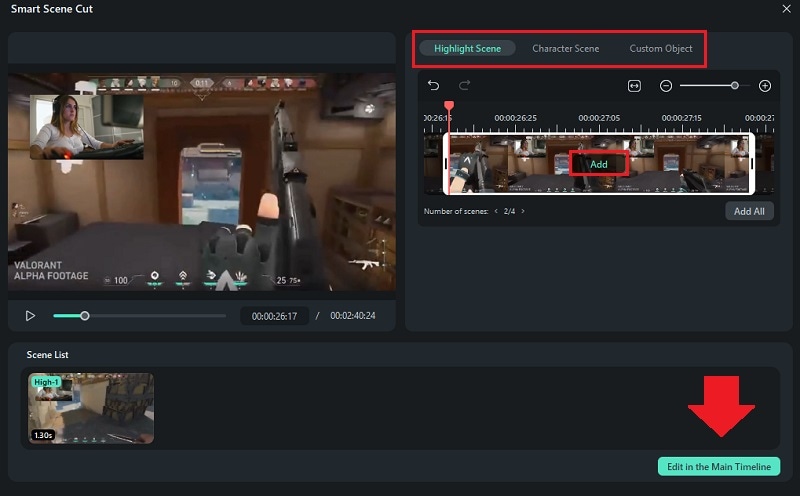
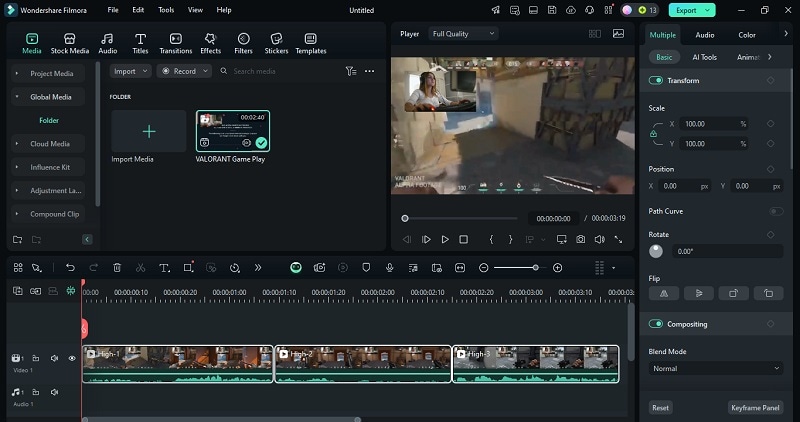
03of 03Customize Your Video Clips
With your selected clips in the main timeline, you now have the opportunity to personalize them. Adjust elements like aspect ratio, insert text, and add sound effects to tailor your clips to your preferences.
Method 2: Smart Short Clip
Filmora's Smart Short Clips feature helps to automatically extract the most interesting parts of your video, ideal for creating bite-sized uploads. Here's how to use it:
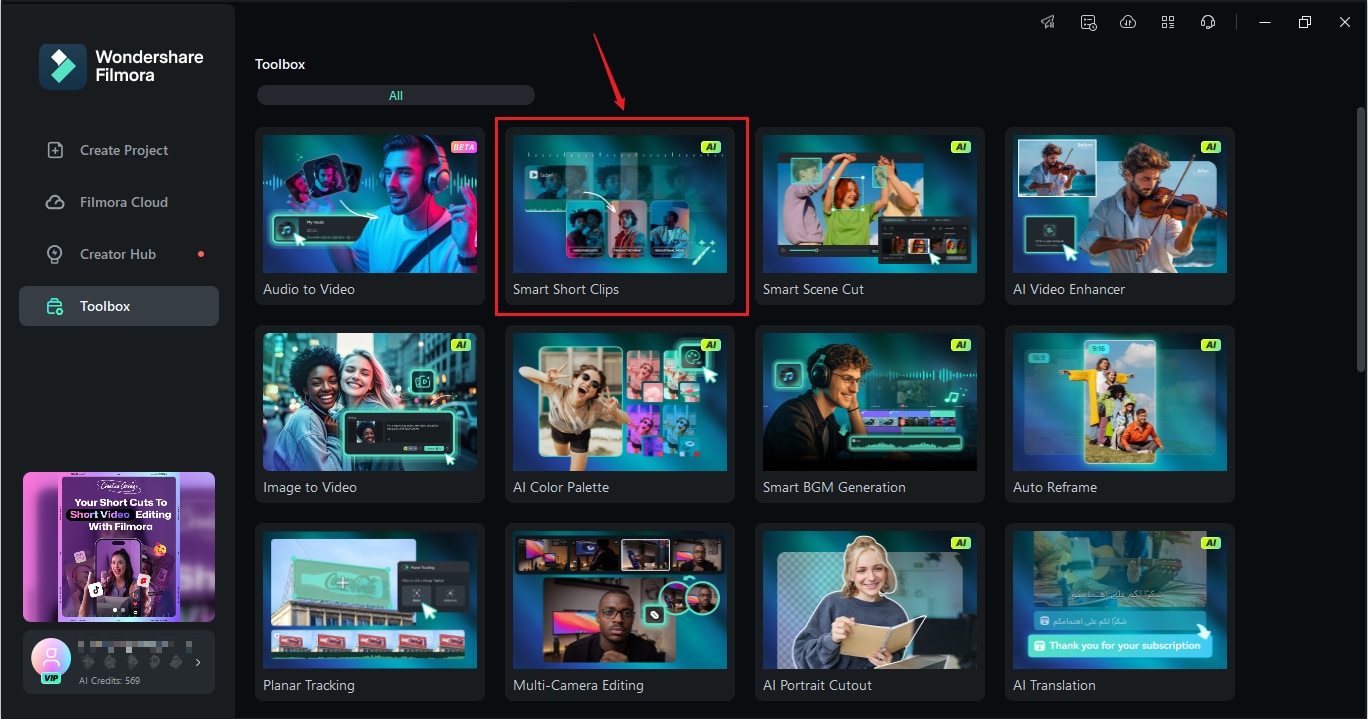
01of 05Launch the Smart Short Clips Tool
When you launch Filmora, head to the "Toolbox" section. Here, you will find the option for Smart Short Clips.
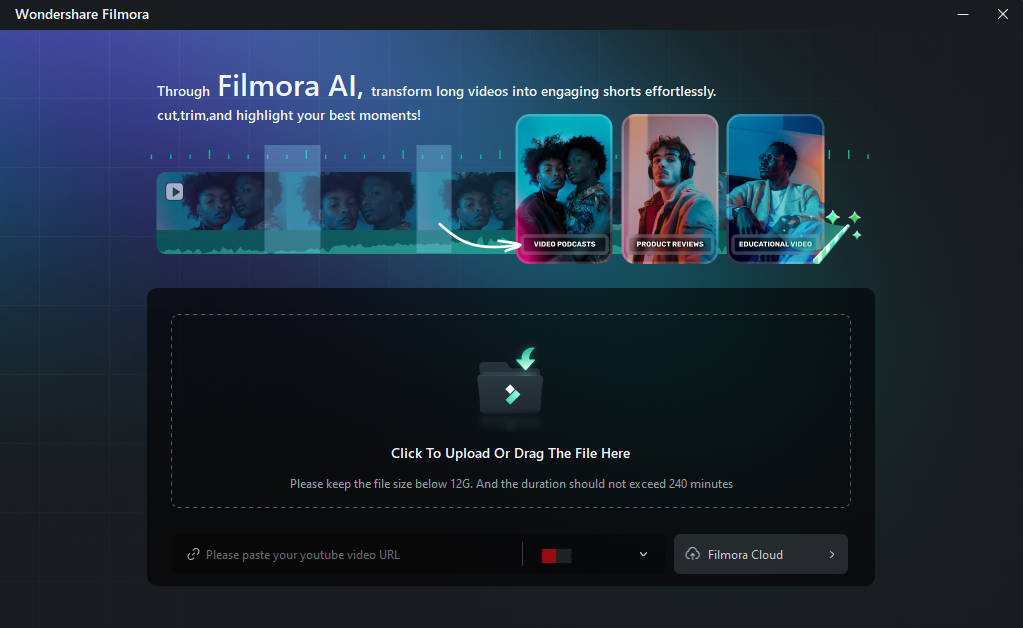
02of 05Add Your Video
To upload the video you wish to work on, either click the upload area or drag and drop your file into the interface.
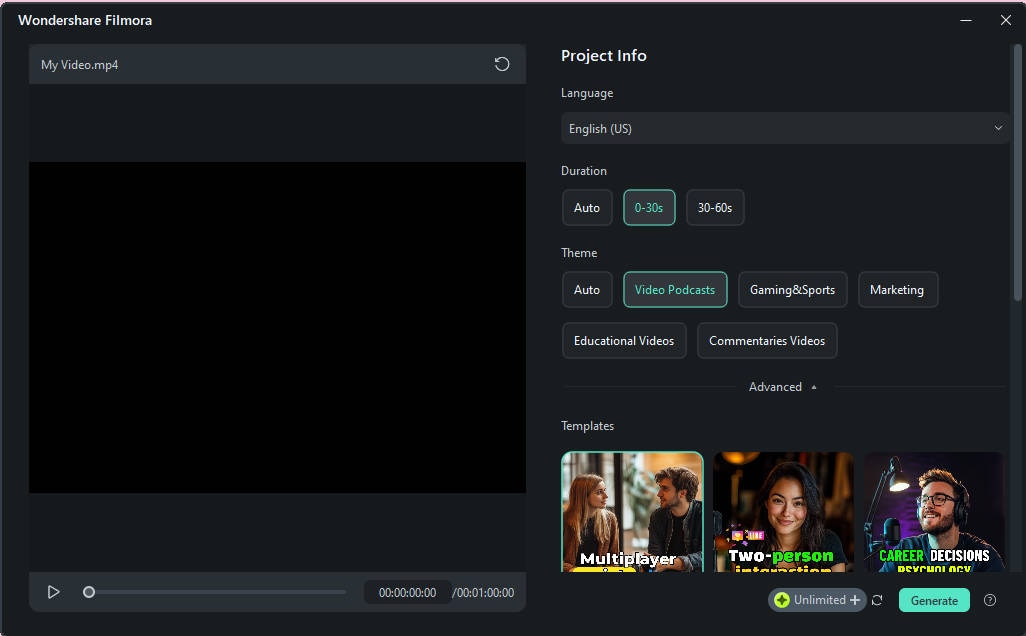
03of 05Configure Video Settings
Once your video is uploaded, select the video language. Modify the length and themes to suit your needs or opt for the default configurations.
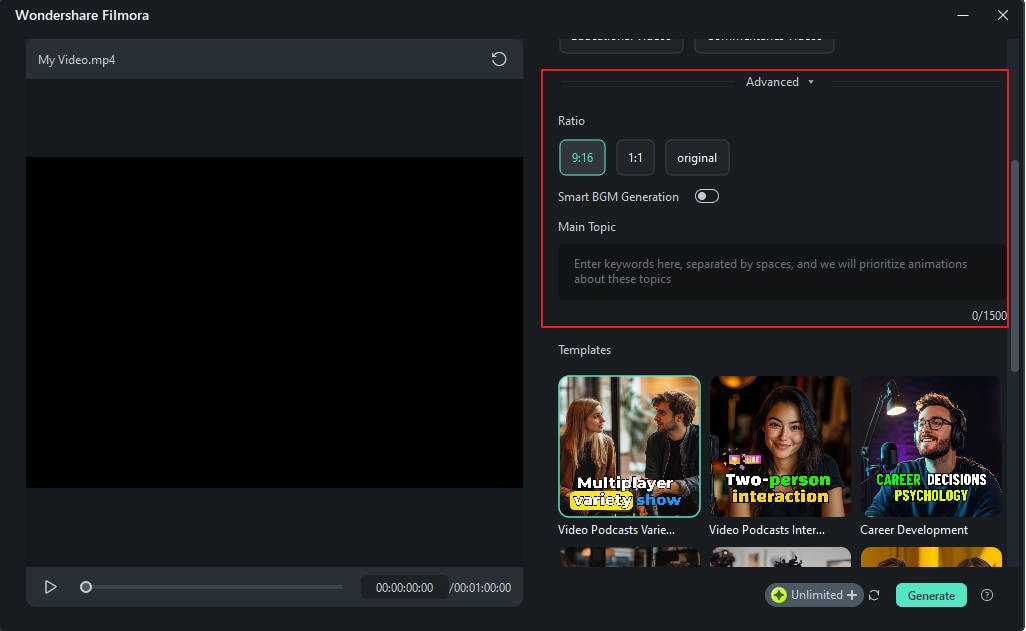
Proceed to the advanced settings where you can set the aspect ratio and turn on Smart BGM Generation for automatic music matching. Include some keywords in the Main Topic field to guide the AI in creating animations.
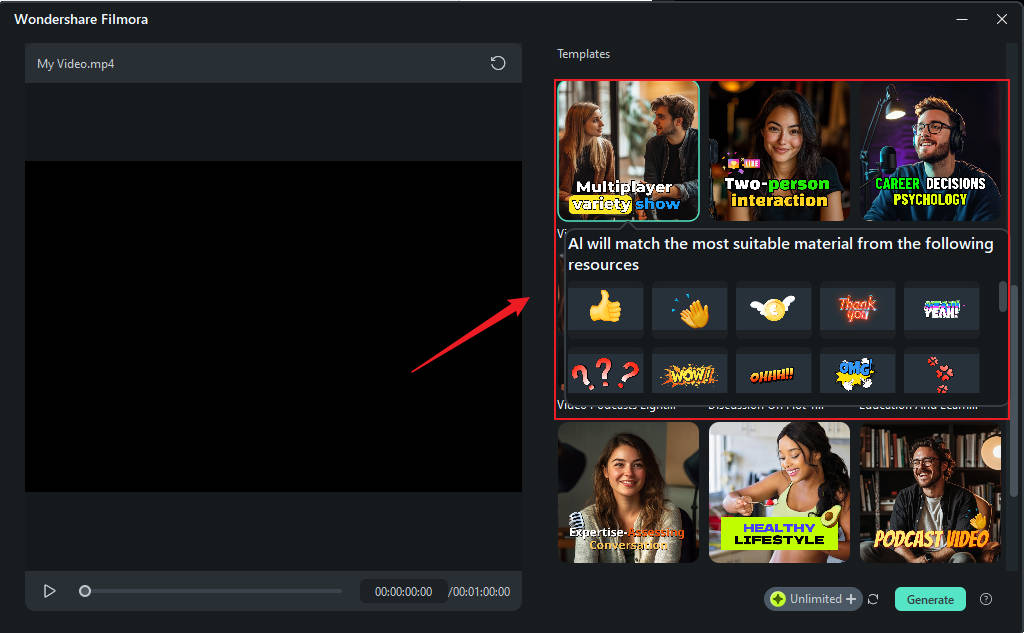
Explore the available templates under various themes, choose one that fits your project, and click Generate to continue.
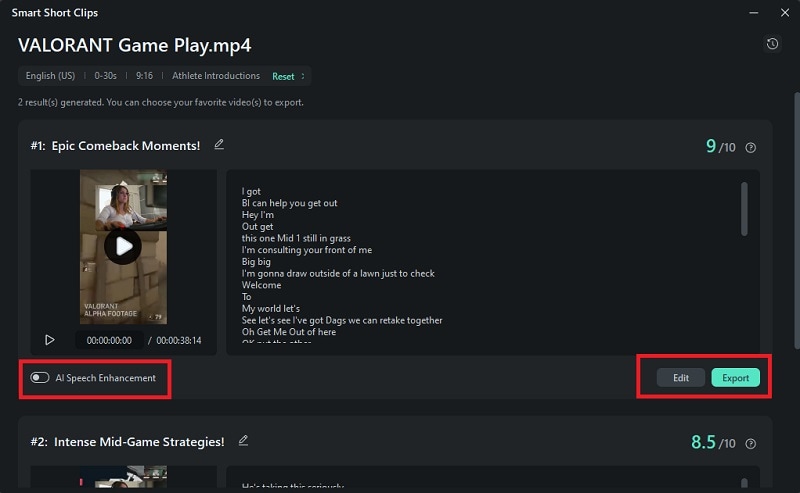
04of 05Select the Edited Version
Filmora will then present you with several edited versions of your video, each tailored to different platform standards. Select the version you prefer, apply "AI Speech Enhancement" for clearer audio, and click Edit to refine further.
05of 05Complete Your Video
In the editing panel of Smart Short Clips, you can alter captions, swap background music, introduce new voiceovers, create thumbnails, and more.

By following the steps above, you can get the fastest way to upload videos to YouTube.
Conclusion
Slow upload speeds can be a waste of time and you might wonder how to make your video upload faster on YouTube. By discovering the common causes of slow uploads such as internet connection issues, you can better understand what causes your slow progress. So, how do you upload to YouTube faster? You can try the tricks above to make the uploading process faster.
In addition to applying tricks to make YouTube upload faster, you can also utilize features from FIlmora, like Smart Scene Cut to split long videos into multiple sections easily, and Smart Short Clip feature to automatically the best part of your video.


